Dell OptiPlex 330 Support Question
Find answers below for this question about Dell OptiPlex 330.Need a Dell OptiPlex 330 manual? We have 2 online manuals for this item!
Question posted by yeiliric on May 23rd, 2014
Where Is Hard Drive Optiplex 330
The person who posted this question about this Dell product did not include a detailed explanation. Please use the "Request More Information" button to the right if more details would help you to answer this question.
Current Answers
There are currently no answers that have been posted for this question.
Be the first to post an answer! Remember that you can earn up to 1,100 points for every answer you submit. The better the quality of your answer, the better chance it has to be accepted.
Be the first to post an answer! Remember that you can earn up to 1,100 points for every answer you submit. The better the quality of your answer, the better chance it has to be accepted.
Related Dell OptiPlex 330 Manual Pages
Quick Reference - Page 28
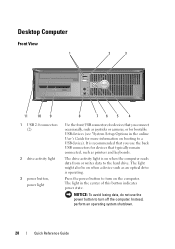

...the center of this button indicates power state.
Press the power button to the hard drive. NOTICE: To avoid losing data, do not use the back USB connectors for ...an operating system shutdown.
28
Quick Reference Guide The drive activity light is on the computer. Desktop Computer
Front View
1
2
3
11
10 9
1 USB 2.0 connectors (2)
2 drive activity light
3 power button, power light
8
76...
Quick Reference - Page 49
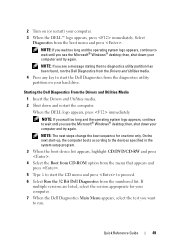

...sequence for your computer. 7 When the Dell Diagnostics Main Menu appears, select the test you see the Microsoft® Windows® desktop; On the next start-up, the computer boots according to the devices specified in the system setup program.
3 When the boot ...again.
Select
Diagnostics from the boot menu and press . then, shut down and restart the computer. 2 Turn on your hard drive.
User's Guide - Page 17

...other Dell customers
Dell Support Website - Certified drivers, patches, and software updates
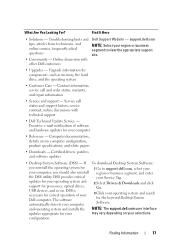
• Desktop System Software (DSS) - Finding Information
17 support.dell.com
NOTE: Select your Service Tag...correct operation of your operating system and support for components, such as memory, the hard drive, and the operating system
• Customer Care -
DSS is necessary for your ...
User's Guide - Page 33
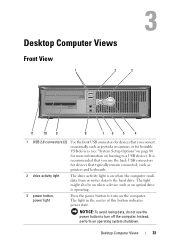

... on the computer. The light in the center of this button indicates power state. Desktop Computer Views
Front View
1
2
3
11
10 9
8
76 5
4
1 USB 2.0 connectors (2) Use the front USB connectors for devices that you use the power button to turn on when the computer reads data from or writes data to the hard drive.
User's Guide - Page 41
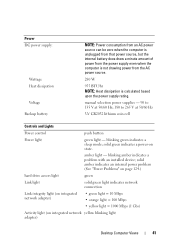

... the power supply rating. amber light - solid green indicates a power-on integrated network yellow blinking light adapter)
Desktop Computer Views
41 solid amber indicates an internal power problem (See "Power Problems" on page 124.)
hard drive access light
green
Link light
solid green light indicates network connection
Link integrity light (on integrated network...
User's Guide - Page 44
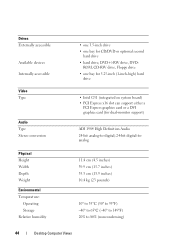

... support either a
PCI Express graphics card or a DVI graphics card (for CD/DVD or optional second
hard drive • hard drive, DVD+/-RW drive, DVD- ROM, CD-RW drive, Floppy drive • one bay for dual-monitor support)
ADI 1984 High Definition Audio 24-bit analog-to-digital;...to 95°F) -40° to 65°C (-40° to 149°F) 20% to 80% (noncondensing)
44
Desktop Computer Views
User's Guide - Page 75


...security management software provides four features to wait until you see the Windows desktop.
Then shut down your computer.
2 When the DELL™ logo... management
Password Types
There are several levels of the primary password
Hard drive
• Helps protect the data on your hard drive or external hard drive (if one is being used) from unauthorized access
Activating the Security...
User's Guide - Page 79


... the screen is recommended that you write down your computer (see the Microsoft® Windows® desktop. Certain changes can make your computer. 2 When the blue DELL™ logo appears, press immediately...the user password • To read the current amount of memory or set the type of hard drive
installed Before you use system setup, it is divided into three areas: the options list, ...
User's Guide - Page 89
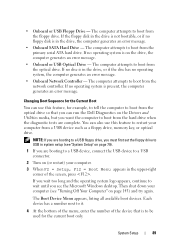

... computer generates an error message.
• Onboard SATA Hard Drive -
The computer attempts to boot from the floppy drive. The computer attempts to boot from the hard drive when the diagnostic tests are booting to a USB floppy drive, you must first set the floppy drive to boot from the primary serial ATA hard drive. NOTE: If you are complete.
User's Guide - Page 111


...the Dell Diagnostics From Your Hard Drive
The Dell Diagnostics is optional and may not ship with your hard drive.
111 NOTE: If your...79 to review your computer. Start the Dell Diagnostics from your hard drive.
Dell Diagnostics
CAUTION: Before you begin any key to start...Guide. NOTICE: The Dell Diagnostics works only on your hard drive or from the boot menu and press . Select Diagnostics...
User's Guide - Page 226
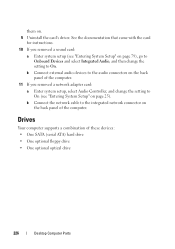

.... b Connect external audio devices to the audio connectors on the back panel of these devices: • One SATA (serial ATA) hard drive • One optional floppy drive • One optional optical drive
226
Desktop Computer Parts
See the documentation that came with the card
for instructions. 10 If you removed a network adapter card: a Enter system...
User's Guide - Page 227

... Drive Cables
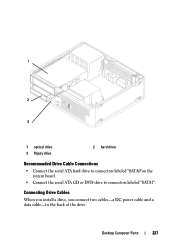
When you install a drive, you connect two cables-a DC power cable and a data cable-to connectors labeled "SATA1". 1
2 3
1 optical drive 3 floppy drive
2 hard drive
Recommended Drive Cable Connections
• Connect the serial ATA hard drive to connectors labeled "SATA0"on the system board.
• Connect the serial ATA CD or DVD drive to the back of the drive.
Desktop...
User's Guide - Page 229


... begin this section, follow the safety instructions in on the two plastic securing clips on a hard surface.
Hard Drives
CAUTION: Before you are replacing a hard drive that it aside (see "Floppy Drive" on page 233).
5 Press in the Product Information Guide. Doing so may cause damage to
Desktop Computer Parts
229
Check the documentation for your computer.
User's Guide - Page 230


... the correct configuration.
8 Replace the computer cover (see "Removing the Computer Cover" on
230
Desktop Computer Parts
reflect these changes in "Before You Begin" on page 143. 2 Remove the computer cover (see "Replacing the Computer Cover" on . Installing a Hard Drive 1 Follow the procedures in system setup. NOTICE: To connect a network cable, first plug...
User's Guide - Page 231


... for
your computer. 4 If your replacement hard drive does not have the plastic hard-drive bracket
attached, remove the bracket from the existing drive by unsnapping it from the drive, using the two release tabs.
1
2 3
1 hard drive 3 plastic hard-drive bracket
2 release tabs (2)
5 Attach the bracket to the new drive by snapping it onto the drive.
1
2
3
4
Desktop Computer Parts
231
User's Guide - Page 232
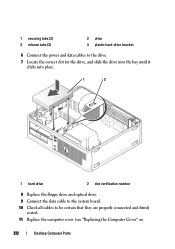

... until it clicks into place.
1
2
1 hard drive
2 slot verification number
8 Replace the floppy drive and optical drive. 9 Connect the data cable to the system board. 10 Check all cables to be certain that they are properly connected and firmly
seated. 11 Replace the computer cover (see "Replacing the Computer Cover" on
232
Desktop Computer Parts
User's Guide - Page 233


...143. 2 Remove the computer cover (see "Removing the Computer Cover" on page 235. Desktop Computer Parts
233 page 257). NOTICE: To connect a network cable, first plug the cable... (see "Entering System Setup" on the hard drive.
For instructions, see "Installing a Floppy Drive" on
page 209). Floppy Drive
CAUTION: Before you are adding a floppy drive, see the documentation that came with your...
User's Guide - Page 243
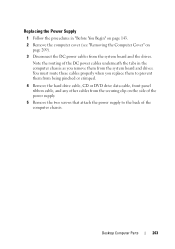

... them to prevent them from the system board and the drives. Desktop Computer Parts
243
Note the routing of the computer chassis. You must route these cables properly when you remove them from being pinched or crimped.
4 Remove the hard drive cable, CD or DVD drive data cable, front panel ribbon cable, and any other...
User's Guide - Page 245


... from being damaged.
12 Reconnect the DC power cables to the system board and drives. 13 Secure the hard drive cable, CD or DVD drive data cable, and the front
panel ribbon cable to the back of the power...turn them on.
17 Verify that secure the power supply to the securing clip on
page 257).
Desktop Computer Parts
245
The cables must be properly routed to make sure they are a key part ...
User's Guide - Page 283


...used programs, files, folders, and drives. Shortcut icons do not protect ...desktop and doubleclick the icon, you place a shortcut on the capabilities of the monitor, the video controller and its corresponding folder or file without converting it first. Smart cards can rename a shortcut icon. S/PDIF -
A video standard for video cards and controllers that protects the hard drive...
Similar Questions
How To Reformat Hard Drive Dell Optiplex 330 To Factory Settings
(Posted by ccraAKe 10 years ago)
How Do I Get To The Hidden Partition On My Dell Optiplex 330 Systems Hard Drive
(Posted by juliomike 10 years ago)
Can Not Access More Than One Hard Drive Optiplex 990
(Posted by bajvdham 10 years ago)

