Dell Latitude E6420 Support Question
Dell Latitude E6420 Support Question
Find answers below for this question about Dell Latitude E6420.Need a Dell Latitude E6420 manual? We have 3 online manuals for this item!
Question posted by gbelbhol on February 12th, 2014
No Display On Boot Up, Will Display On External Monitor, E6420
The person who posted this question about this Dell product did not include a detailed explanation. Please use the "Request More Information" button to the right if more details would help you to answer this question.
Current Answers
Related Dell Latitude E6420 Manual Pages
User Manual - Page 1
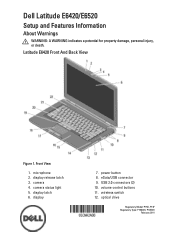
...Front And Back View
Figure 1. eSata/USB connector 9. Front View
1. optical drive
Regulatory Model: P15G, P14F Regulatory Type: P15G001, P14F001
February 2011 Dell Latitude E6420/E6520
Setup and Features Information
About Warnings
WARNING: A WARNING indicates a potential for property damage, personal injury, or death. microphone 2. volume control buttons 11.
camera status ...
User Manual - Page 3
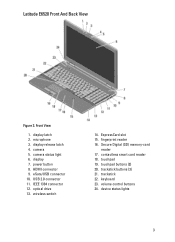
...touchpad 19. trackstick buttons (3) 21. keyboard 23. Latitude E6520 Front And Back View
Figure 3. display latch 2. display 7. eSata/USB connector 10. wireless switch
14. fingerprint reader 16. trackstick 22. USB 2.0 connector 11. power button 8. volume control buttons 24. microphone 3. display release latch 4. camera status light 6. HDMI connector 9. ExpressCard...
User Manual - Page 6
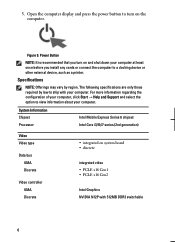
Open the computer display and press the power button to view information about your computer at least once before you turn on system board • discrete
integrated video • ... any cards or connect the computer to ship with 512MB DDR3 switchable
6
Figure 9. Specifications
NOTE: Offerings may vary by law to a docking device or other external device, such as a printer.
Owners Manual - Page 6

... (I/O) Board 97
29 DC-In Port 99
Removing DC-in Port...99 Installing DC-In Port...102
30 Display Assembly 103
Removing the Display Assembly 103 Installing the Display Assembly 106
31 Display Hinges 107
Removing the Display Hinge Covers 107 Installing the Display Hinge Covers 110
32 Display Bezel 111
Removing the Display Bezel 111 Installing the...
Owners Manual - Page 7

... 113
Removing the Display Panel 113 Installing the Display Panel 115
34 Display Bracket 117
Removing the Display Bracket 117 Installing the Display Bracket 117
35 Camera 119
Removing the Camera 119 Installing the Camera...120
36 Specifications 121
Technical Specifications 121
37 System Setup 129
Setup Overview......
Owners Manual - Page 103
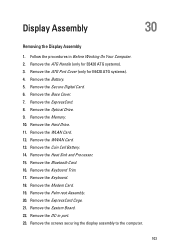
.... Remove the Secure Digital Card. 6. Remove the Heat Sink and Processor. 15. Remove the System Board. 22. Display Assembly
30
Removing the Display Assembly
1. Remove the Bluetooth Card. 16. Remove the ATG Handle (only for E6420 ATG systems). 4. Remove the Hard Drive. 11. Remove the Memory. 10. Remove the WWAN Card. 13. Remove...
Owners Manual - Page 106
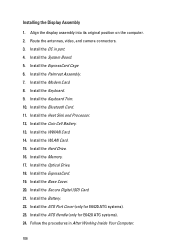
... Install the Palmrest Assembly. 7. Install the Heat Sink and Processor. 12. Align the display assembly into its original position on the computer. 2. Install the WWAN Card. 14. ... the ATG Handle (only for E6420 ATG systems). 23. Install the Optical Drive. 18. Install the Modem Card. 8. Install the Battery. 22. Installing the Display Assembly
1. Install the Bluetooth Card...
Owners Manual - Page 107
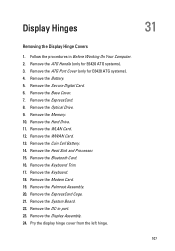
...Board. 22. Remove the WLAN Card. 12. Remove the Keyboard. 18. Display Hinges
31
Removing the Display Hinge Covers
1. Remove the Coin Cell Battery. 14. Remove the Palmrest Assembly....the Modem Card. 19. Remove the ATG Port Cover (only for E6420 ATG systems). 3. Remove the ATG Handle (only for E6420 ATG systems). 4. Remove the Secure Digital Card. 6. Follow the procedures...
Owners Manual - Page 108

Pry the display hinge cover from the right hinge. 108 Remove the display hinge cover from the right hinge. 27. Remove the display hinge cover from the left hinge. 26. 25.
Owners Manual - Page 110

... Handle (only for E6420 ATG systems). 24. Install the Coin Cell Battery. 14. Install the SD Card. 22. Replace the display hinge cover to the computer. 3. Install the Display Assembly. 4. Install .... Install the Keyboard Trim. 11. Install the Hard Drive. 17. Installing the Display Hinge Covers
1. Place the display hinges in port. 5. Install the Memory. 18. Install the Base Cover. 21...
Owners Manual - Page 111
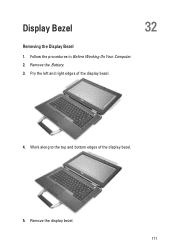
Remove the Battery. 3. Remove the display bezel. 111 Display Bezel
32
Removing the Display Bezel
1. Pry the left and right edges of the display bezel.
5. Work along to the top and bottom edges of the display bezel.
4. Follow the procedures in Before Working On Your Computer. 2.
Owners Manual - Page 121

... EPROM PCIe Gen1 bus
Intel Mobile Express Series 6 chipset 64-bit SPI 32 Mbits 100 MHz
Processor Types
L2 cache External bus frequency
• Intel Core i3 series (available only with Latitude E6420 only)
• Intel Core i5 series with Turbo Boost technology 2.0
• Intel Core i7 series with your computer. Specifications
36...
Owners Manual - Page 122
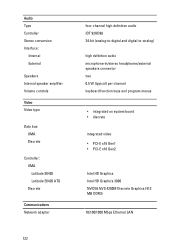
... Volume controls
Video Video type
Data bus: UMA Discrete
Controller: UMA Latitude E6420 Latitude E6420 ATG Discrete
Communications Network adapter
four-channel high definition audio IDT 92HD90 24-bit (analog-to-digital and digital-to-analog)
high definition audio microphone-in/stereo headphones/external speakers connector two 0.5 W (typical) per channel keyboard function keys and program...
Owners Manual - Page 123
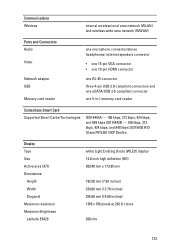
...Audio Video
Network adapter USB Memory card reader
one microphone connector/stereo headphones/ external speakers connector
• one 15-pin VGA connector • one 19-pin...HID iClass FIPS201 NXP Desfire
Display Type Size Active area (X/Y) Dimensions:
Height Width Diagonal Maximum resolution Maximum Brightness Latitude E6420
white Light Emitting Diode (WLED) display 14.0 inch high definition (...
Owners Manual - Page 124

Display Latitude E6420 ATG
Operating angle Refresh rate Minimum Viewing angles:
Latitude E6420 Horizontal Vertical
Latitude E6420 ATG Horizontal Vertical
Pixel pitch
Keyboard Number of keys
Layout
Touchpad Active Area:
X-axis Y-axis
...
80.00 mm 40.70 mm
• 4-cell "smart" lithium ion (available only with Latitude E6420 only)
• 6-cell "smart" lithium ion • 9-cell "smart" lithium ion
Owners Manual - Page 130
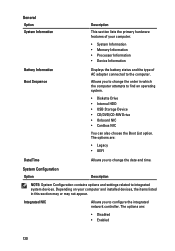
...• Memory Information • Processor Information • Device Information
Battery Information Boot Sequence
Displays the battery status and the type of your computer and installed devices, the ...RW Drive • Onboard NIC • Cardbus NIC
You can also choose the Boot List option.
General Option System Information
Description
This section lists the primary hardware features...
Owners Manual - Page 138
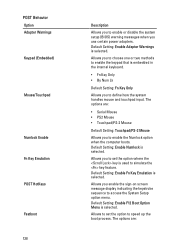
... system setup (BIOS) warning messages when you to set the option to speed up the boot process. Allows you use certain power adapters. Allows to set the option where the key ...8226; By Num Lk
Default Setting: Fn Key Only Allows you enable the sign-on screen message display indicating the keystroke sequence to define how the system handles mouse and touchpad input. Default Setting: Enable ...
Owners Manual - Page 142
...laptop.
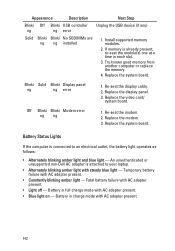
• Alternately blinking amber light with AC adapter present.
• Constantly blinking amber light - Try known good memory from another computer or replace the memory.
4. Blinki Solid Blinki Display...
1. Re-seat the modem. 2. Replace the video card/
system board. Re-seat the display cable. 2.
Fatal battery failure with AC adapter present.
• Light off - Replace the...
Administration Guide - Page 15
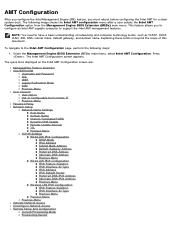
.... This feature allows you must reboot before configuring the Intel AMT for a clean system boot. Under the Management Engine BIOS Extension (MEBx) main menu, select Intel AMT Configuration.
....
The Intel AMT Configuration screen appears. The following steps:
1. The quick links displayed on the Intel AMT Configuration screen are:
Manageability Feature Selection SOL/IDER/KVM
Username ...
Administration Guide - Page 107
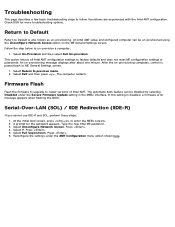
...Follow the step below to ME General Settings screen.
1. An un-provisioning message displays after about one minute. After the un-provisioning completes, control is passed back... MEBx interface.
Firmware Flash
Flash the firmware to upgrade to enter the MEBx screens. 2.
At the initial boot screen, press to newer versions of Intel AMT. Press . 5. Select Exit and then press . Select Full...
Similar Questions

How To Change To External Monitor On Laptop N5030
(Posted by guitrborra 9 years ago)

Latitude E6520 Screen Goes Black When External Monitor
(Posted by theacas 10 years ago)

How To Disable Mouse Pad On Dell Laptop Latitude E6420
(Posted by yatr 10 years ago)

How To Connect External Monitor To Dell Latitude E6430
(Posted by genedwils 10 years ago)

Cannot Use The External Microphone Of My Latitude E6420
(Posted by RoaAutoma 10 years ago)