Dell Latitude E6230 Support Question
Find answers below for this question about Dell Latitude E6230.Need a Dell Latitude E6230 manual? We have 3 online manuals for this item!
Question posted by luckyba on November 13th, 2013
How To Know If Smart Card Reader Is Working With E6230
The person who posted this question about this Dell product did not include a detailed explanation. Please use the "Request More Information" button to the right if more details would help you to answer this question.
Current Answers
There are currently no answers that have been posted for this question.
Be the first to post an answer! Remember that you can earn up to 1,100 points for every answer you submit. The better the quality of your answer, the better chance it has to be accepted.
Be the first to post an answer! Remember that you can earn up to 1,100 points for every answer you submit. The better the quality of your answer, the better chance it has to be accepted.
Related Dell Latitude E6230 Manual Pages
User Manual - Page 2
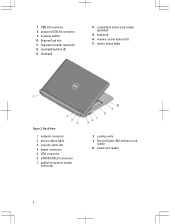

USB 3.0 connector 8. touchpad
14. security cable slot 4. eSATA/USB 2.0 connector 7. ExpressCard slot 11. fingerprint reader (optional) 12. contactless smart-card reader (optional)
15. Back View
1. device status lights
Figure 2. network connector 2. power connector 5. VGA connector 6. cooling vents 9. device status lights 3. audio/microphone combo
connector
8. volume control ...
User Manual - Page 3
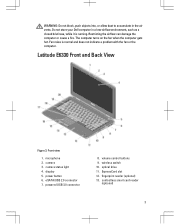

...Do not store your Dell computer in the air vents.
powered USB 3.0 connector
8. Latitude E6330 Front and Back View
Figure 3. power button 6. wireless switch 10. WARNING: Do... computer. camera 3. fingerprint reader (optional) 13. Fan noise is running. eSATA/USB 2.0 connector 7. microphone 2. contactless smart card reader
(optional)
3 Front view
1. ExpressCard slot 12. camera...
User Manual - Page 4
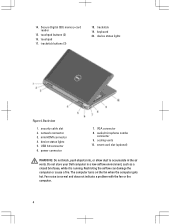

...the air vents. Fan noise is running. trackstick buttons (3)
18. device status lights
Figure 4. smart card slot (optional)
WARNING: Do not block, push objects into, or allow dust to accumulate in...connector 3. USB 3.0 connector 6. Secure Digital (SD) memory-card reader
15. device status lights 5. trackstick 19. 14. touchpad buttons (2) 16. touchpad 17. security cable slot ...
Owner's Manual - Page 3


Contents
Notes, Cautions, and Warnings 2
1 Working on Your Computer...7
Before Working Inside Your Computer...7 Turning Off Your Computer...8 After Working Inside Your Computer...8
2 Removing and Installing Components 11
Recommended Tools...11 Removing the Secure Digital (SD) Card...11 Installing the Secure Digital (SD) Card...11 Removing The ExpressCard...12 Installing the ExpressCard...12 ...
Owner's Manual - Page 4


... the ExpressCard Cage...36 Installing the ExpressCard Cage...37 Removing the WiFi-Switch Board ...37 Installing the WiFi-Switch Board...38 Removing the Smart Card Cage...39 Installing the Smart Card Cage...40 Removing the Display Bezel...40 Installing the Display Bezel...41 Removing the Display Panel...41 Installing the Display Panel...42 Removing...
Owner's Manual - Page 7

..., ground yourself by using a wrist grounding strap or by Dell is flat and clean to a docking device (docked) such as a connector on a card. Ensure that shipped with your work surface is not covered by its metal mounting bracket. Disconnect all attached devices from the network device. 4. If the computer is connected to...
Owner's Manual - Page 8
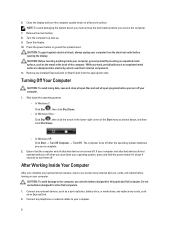

... Your Computer
After you complete any replacement procedure, ensure you service the computer.
7. Connect any installed ExpressCards or Smart Cards from the electrical outlet before turning on a flat work , periodically touch an unpainted metal surface to ground the system board. Remove the main battery. 8. In Windows XP: Click Start → Turn Off Computer...
Owner's Manual - Page 11
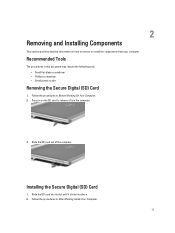

...; Small flat-blade screwdriver • Phillips screwdriver • Small plastic scribe
Removing the Secure Digital (SD) Card
1. Slide the SD card out of the computer. Installing the Secure Digital (SD) Card
1. Recommended Tools
The procedures in After Working Inside Your Computer.
11 2
Removing and Installing Components
This section provides detailed information on the SD...
Owner's Manual - Page 13
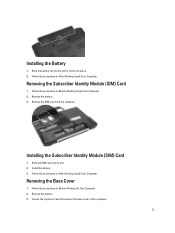

... computer.
13 Slide the battery into place. 2. Installing the Subscriber Identity Module (SIM) Card
1. Install the battery. 3. Follow the procedures in Before Working Inside Your Computer. 2. Follow the procedures in Before Working On Your Computer. 2. Installing the Battery
1. Slide the SIM card into its slot until it clicks into its slot. 2.
Remove the battery. 3.
Owner's Manual - Page 14
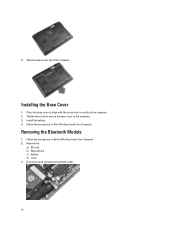

... Your Computer. 2. 4. Slide the base cover out of the computer. Follow the procedures in After Working Inside Your Computer. Removing the Bluetooth Module
1. Installing the Base Cover
1.
Place the base cover to the ...the base cover to align with the screw hole correctly on the computer. 2. Remove the:
a) SD card b) ExpressCard c) battery d) cover 3. Install the battery. 4.
Owner's Manual - Page 15


Install the:
a) base cover b) battery c) ExpressCard d) SD card 4. Remove the bluetooth module. Removing the Hard Drive
1. Remove the screws that secures the bluetooth module to the...Tighten the screw to secure the bluetooth module to its connector. 2. Follow the procedures in Before Working Inside Your Computer. 2. Installing the Bluetooth Module
1. Follow the procedures in After...
Owner's Manual - Page 18


...
1. Insert the memory module into the socket. 2. 4. Remove the:
a) battery b) base cover 3. Follow the procedures in Before Working Inside Your Computer. 2. Follow the procedures in After Working Inside Your Computer. Disconnect the SD memory card reader cable.
18
Repeat steps 2 and 3 to the system board. 3. Lift and remove the memory module from its connector.
5.
Owner's Manual - Page 19
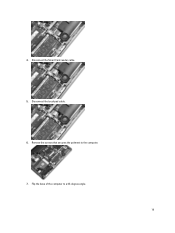

Disconnect the Smart Card reader cable. 5. Remove the screws that secures the palmrest to a 45-degree angle.
19 Flip the base of the computer to the computer. 7. 4. Disconnect the touchpad cable. 6.
Owner's Manual - Page 20
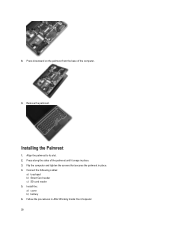

... tighten the screws that secures the palmrest in After Working Inside Your Computer. 20 Align the palmrest to its slot. 2. Install the: a) cover b) battery 6. Follow the procedures in place. 4.
Press along the sides of the computer.
9. Connect the following cables:
a) touchpad b) Smart Card reader c) SD card reader 5. Remove the palmrest. Press downward on the palmrest from...
Owner's Manual - Page 23


...the procedures in After Working Inside Your Computer. Slide the keyboard into place. 5. Install the:
a) palmrest b) cover c) battery 8. Slide and remove the WLAN card out from the WLAN card by pulling it ....
5.
Disconnect the antenna cables from its compartment and ensure that secures the WLAN card to secure the keyboard. 6. Flip the computer and tighten the screws at the bottom...
Owner's Manual - Page 36


... Your Computer. 2. Follow the procedures in After Working Inside Your Computer. Insert the power-connector port in its slot. 2. Install the:
a) base chassis b) speakers c) heat-sink module d) heat-sink fan e) bluetooth module f) keyboard g) palmrest h) base cover i) battery j) ExpressCard k) SD card 4. Remove the:
a) SD card b) ExpressCard c) battery d) base cover e) palmrest f) keyboard...
Owner's Manual - Page 37


... compartment. 2. Connect the ExpressCard reader cable. 4. Removing the WiFi-Switch Board
1. Follow the procedures in After Working Inside Your Computer. Tighten the screws to secure the ExpressCard cage to the computer 3. Install the:
a) base chassis b) speakers c) heatsink d) bluetooth module e) keyboard f) palmrest g) base cover h) battery i) ExpressCard j) SD card 5. Follow the procedures in...
Owner's Manual - Page 39
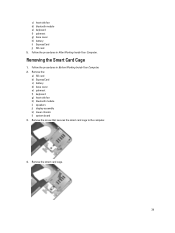

... i) speakers j) display assembly k) lower chassis l) system board 3. Remove the smart card cage.
39 Follow the procedures in Before Working Inside Your Computer. 2. Follow the procedures in After Working Inside Your Computer. Remove the screw that secures the smart card cage to the computer.
4. Removing the Smart Card Cage
1. c) heat-sink fan d) bluetooth module e) keyboard f) palmrest...
Owner's Manual - Page 40
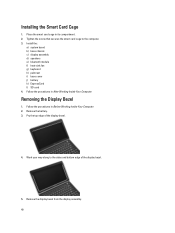

... way along to the computer. 3. Remove the display bezel from the display assembly.
40 Installing the Smart Card Cage
1. Follow the procedures in After Working Inside Your Computer. Tighten the screw that secures the smart card cage to the sides and bottom edge of the display bezel.
4. Pry the top edge of the display bezel...
Owner's Manual - Page 68
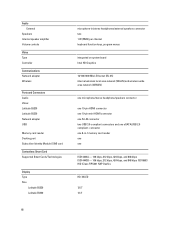

...
Communications Network adapter Wireless
Ports and Connectors Audio Video: Latitude E6230 Latitude E6330 Network adapter USB
Memory card reader Docking port Subscriber Identity Module (SIM) card
Contactless Smart Card Supported Smart Cards/Technologies
Display Type Size
Latitude E6230 Latitude E6330
microphone-in -1 memory card reader one one eSATA/USB 2.0 compliant- connector one 8-in /stereo...
Similar Questions
How To Install A Smart Card Reader In A Dell 6230
(Posted by rpgaHalAE 9 years ago)
How To Use The Contactless Smart Card Reader On An Dell Latitude E6500
(Posted by RAJSIwh 10 years ago)
Smart Card Readers Do Not Work With Windows Xp.
Installed and External Smart Card Readers do not work with Windows XP. Same laptop will work with Wi...
Installed and External Smart Card Readers do not work with Windows XP. Same laptop will work with Wi...
(Posted by nathankerley 12 years ago)

