DeLonghi ESAM3300 Support Question
DeLonghi ESAM3300 Support Question
Find answers below for this question about DeLonghi ESAM3300.Need a DeLonghi ESAM3300 manual? We have 1 online manual for this item!
Question posted by dg4x4fun1 on October 19th, 2020
Esam3300 Will Not Produce Espresso, Low Water
My ESAM3300 only dribbles during pre-heat (rinse) stage and will not produce espresso. It will supply hot water and steam from the frother. What should I look at first. I have Serviced the brew group (infuser) thoroughly, the factory reset, descaled, adjusted grind to be more coarse and surface cleaned the tamper. With back off I cannot see water flowing in hose from pump to solenoid. Although I did try to clear air out of system there does appear to be an air bubble that doesn't move in the tube to solenoid. Hot water is flowing to upper tube from pump to boiler. Is there a service manual available for this unit? with wiring diagram and such. Thank you in advance.
Current Answers
Answer #1: Posted by INIMITABLE on October 19th, 2020 5:17 PM
INIMITABLE

Member since:
April 3rd, 2020 Points: 2,069,620

Member since:
April 3rd, 2020 Points: 2,069,620
here is a link to a manual
https://www.delonghi.com/Global/InstructionManuals/EN/EN-5713215511.pdf
https://www.delonghi.com/Global/InstructionManuals/EN/EN-5713215511.pdf
I hope this is helpful? PLEASE "ACCEPT" and mark it "HELPFUL" to complement my little effort. Hope to bring you more detailed answers
-INIMITABLE
Related DeLonghi ESAM3300 Manual Pages
Owner Manual - Page 4
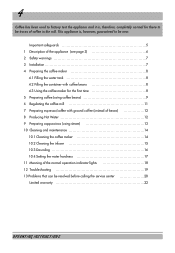
... the container with ground coffee (instead of beans 12 8 Producing Hot Water 12 9 Preparing cappuccinos (using coffee beans 9 6 Regulating the coffee mill 11 7 Preparing espresso/coffee with coffee beans 8 4.3 Using the coffee maker for there to be new. This appliance is , therefore, completely normal for the first time 8 5 Preparing coffee (using steam 13 10 Cleaning and maintenance...
Owner Manual - Page 5

...Longer, detachable power supply cords or extension cords are unable to be pulled on or near a hot gas or electrical burner, or in a heated oven. •...hot surfaces. • Do not place on by children. • Unplug from the outlet when not in water or other ). A short power cord is exercised in or tripping over a longer cord.
- Return the appliance to the nearest authorized service...
Owner Manual - Page 6
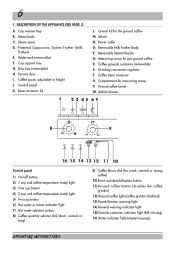
... container indicator light (full/missing) 16) Water indicator light (empty/missing)
OPERATING INSTRUCTIONS Removable Steam Nozzle Q. Coffee grounds container (removable) S. Steam spout D. Drip tray (removable) H. Service door I. Infuser N. Steam knob C. Patented Cappuccino System Frother (Milk
Frother) E. Control panel K. Coffee bean container U. DESCRIPTION OF THE APPLIANCE...
Owner Manual - Page 7
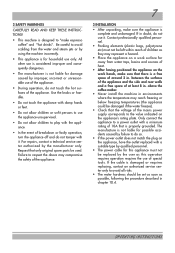
... water and steam jets or by using the machine ...the mains power supply corresponds to the ...service center only to avoid all risks.
• The water hardness should be replaced by improper, incorrect or unreasonable use it . OPERATING INSTRUCTIONS If in . Failure to respect the above the coffee maker.
• Never install the machine...do not touch the hot surfaces of heat.
• After ...
Owner Manual - Page 8
... following paragraphs.
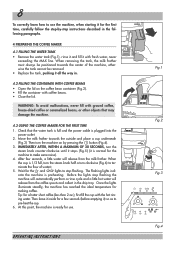
4 PREPARING THE COFFEE MAKER
4.1 FILLING THE WATER TANK • Remove the water tank (Fig.1), rinse it and fill it with the hot rins- WARNING: To avoid malfunctions, never fill with coffee beans. • Close the lid. Check that may damage the machine.
4.3 USING THE COFFEE MAKER FOR THE FIRST TIME
1. Then turn the
steam knob counter-clockwise until it...
Owner Manual - Page 9
... position of
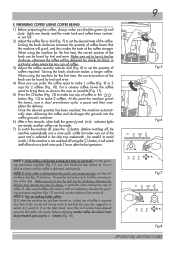
coffee required. er are steady, another coffee the infuser must be pre-heated, pressing the button (Fig. 14).
Once the desired quantity has been reached, the machine automati- If, on making two cups of coffee beans that the green and
lights are steady and the water tank and coffee bean contain-
When using the machine for the...
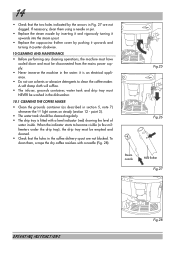
Owner Manual - Page 10

...
button (Fig. 13), as pre- If you try to be a little water left in the coffee maker may have been previously heated by rinsing them with the appliance on. NOTE 4: while the machine is ground more coarsely.
To clean the container, open the service door on and the machine cannot deliver coffee.
10
Run off the water into the underlying drip...
Owner Manual - Page 11
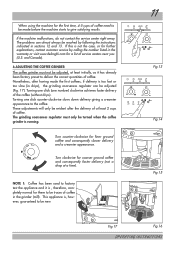
....14 Fig.15
Fig.17
Fig.16
OPERATING INSTRUCTIONS If the machine malfunctions, do not contact the service center right away. and Canada).
6 ADJUSTING THE COFFEE GRINDER The coffee grinder must only be made the first coffees, if delivery is , however, guaranteed to the coffee.
This appliance is too fast or too slow (in sections 12...
Owner Manual - Page 12
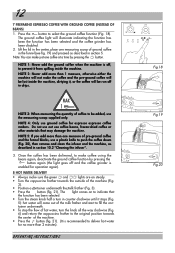
...5): hot water will not make coffee using the beans again, deactivate the ground coffee function by pressing the button.
The light comes on steady.
• Turn the cappuccino frother towards
the center of coffee to be run off , to deliver hot water
for espresso espresso coffee makers. Press the button to make the coffee and the pre-ground coffee will be lost inside the machine...
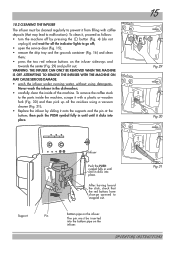
Owner Manual - Page 13

...with the other unscrew the cappuccino frother cover itself by rotating clockwise and extracting downwards (fig. 25). • Remove the steam nozzle from the cappuccino maker, giving the milk a creamy ... Then interrupt steam delivery by the arrow in warm water.
13
Fig.21 Fig.22 Fig.23 Fig.24
OPERATING INSTRUCTIONS IMPORTANT: For hygiene reasons, this operation, the steam spout discharges any...
Owner Manual - Page 14
...supply.
• Never immerse the machine in the water: it is fitted with a needle (Fig. 28). When the indicator starts to clean the coffee maker. To clean them using a needle or pin.
• Replace the steam... it upwards into the steam spout.
• Replace the cappuccino frother cover by the arrows in Fig. 27 are not blocked. point 3).
• The water tank should be cleaned ...
Owner Manual - Page 15
...; wash the infuser under running water, without using a vacuum cleaner (Fig. 31); • Replace the infuser by sliding it clicks into place.
15
Fig.29 Fig.30
Support
Pin
Infuser
Push the PUSH symbol fully in the dishwasher; • carefully clean the inside the machine, scrape it with coffee deposits (that the red...
Owner Manual - Page 16
..., otherwise the door cannot be used to make coffee).
• turn the steam knob half a turn the machine on by pressing it vigorously from the outlet then plug in the contents of one liter of the machine, close the service door.
10.3 DESCALING
Due to the continuous heating of the descaling program (the and
lights
remain...
Owner Manual - Page 17
... 3 indi- The coffee maker is off and the
light
comes on (section 12 - Proceed as follows:
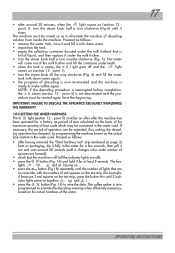
• after having removed the "Total hardness test" strip (enclosed on page 2)
from inside the machine.
NOTE: if the descaling procedure is not deactivated and the pro-
Proceed as follows:
• remove the water tank, rinse it and fill...
Owner Manual - Page 18
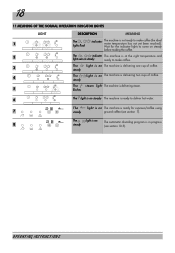
... make coffee.
Wait for espresso/coffee using
7
steady
ground coffee (see section 10.3). light is on The machine is delivering one cup of coffee. The
steam light The machine is on steady
before making the coffee. OPERATING INSTRUCTIONS flashes
6
The light is on steady The machine is ready to come on The machine is ready for the indicator lights to deliver hot water...
Owner Manual - Page 19
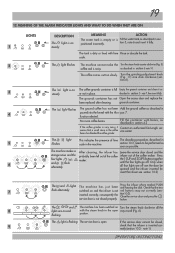
...
light
This indicates the presence of the coffee maker. The ,
and The machine has been switched on and
with lime Rinse or descale the tank. note 1).
19
12 MEANING OF THE ALARM INDICATOR LIGHTS AND WHAT TO DO WHEN THEY ARE ON
LIGHTS
DESCRIPTION
MEANING
ACTION
The water tank is empty or is Fill the...
Owner Manual - Page 20
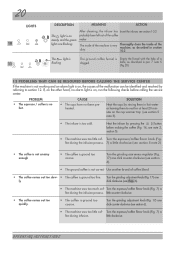
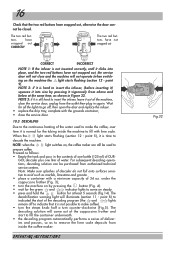
... of coffee blend.
• The coffee comes out too slow- • The coffee is ground too fine. Heat the cups by rinsing them in hot water or leaving them to section 12. fee during infusion.
Turn the grinding adjustment knob (Fig. 17) one click counter-clockwise (see section 6).
• The machine uses too little cof- Turn the espresso/coffee flavor...
Owner Manual - Page 21
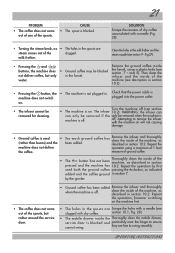
... 7. The infuser 10.2).
off .
note 5).
by first
used
•
(rather than beans) and the
Too much ground been added. Clean the holes in the milk frother and the steam nozzle (see
clogged with the machine on will risk causing
damage.
•
Ground coffee is blocked.
21
SOLUTION Scrape the remains of the...
Owner Manual - Page 22
... damage, so the above warranty is limited to repair at our factory or authorized service center of all accessories, spare parts or replacement parts, please contact our parts division...and on an alternating current ( AC ) circuit.
22
This warranty applies to Super Automatic Espresso Machines with De'Longhi. How long does the coverage last? All implied warranties are not recoverable under...
Similar Questions

When Making A Cup Of Coffee At Least 2 Ounces Or More Of The Water Runs Off Into
(Posted by laurasusnik 1 year ago)

What Are The Screw Drivers To Use In The Infusor?
What are the screw drivers to use in the infusor? I will lubricate behind the infuser
What are the screw drivers to use in the infusor? I will lubricate behind the infuser
(Posted by mybbcgs 2 years ago)

Coffee Not Coming Out Of Spouts Coming Out In Catch Tray
(Posted by Dhulslander 2 years ago)
Leaking Seal On My 14 Cup Glass Decanter On My Dc514t Delonghi Coffee Maker,
We are enjoying our DC514T DeLonghi coffee maker. Lately the 14 cup glass coffee pot leaks and makes...
We are enjoying our DC514T DeLonghi coffee maker. Lately the 14 cup glass coffee pot leaks and makes...
(Posted by EDDUNAY 10 years ago)

My Coffee Maker Is Not Making Coffee. The Expresso Part Is Still Working
lights and power are going into the coffee maker, the expresso sections seem to work ok just not cof...
lights and power are going into the coffee maker, the expresso sections seem to work ok just not cof...
(Posted by pjmoore86380 10 years ago)