Owner Manual
Page 4
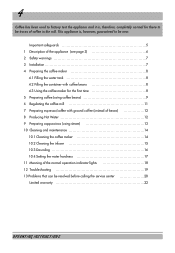
... service center 20 Limited warranty 22 OPERATING INSTRUCTIONS This appliance is , therefore, completely normal for the first time 8 5 Preparing coffee (using coffee beans 9 6 Regulating the coffee mill 11 7 Preparing espresso/coffee with ground coffee (instead of beans 12 8 Producing Hot Water 12 9 Preparing cappuccinos (using steam 13 10 Cleaning and maintenance 14 10.1 Cleaning the coffee maker 14 10.2 Cleaning the infuser 15 10.3 Descaling 16 10.4 Setting the water hardness 17 11 Meaning of coffee...
... service center 20 Limited warranty 22 OPERATING INSTRUCTIONS This appliance is , therefore, completely normal for the first time 8 5 Preparing coffee (using coffee beans 9 6 Regulating the coffee mill 11 7 Preparing espresso/coffee with ground coffee (instead of beans 12 8 Producing Hot Water 12 9 Preparing cappuccinos (using steam 13 10 Cleaning and maintenance 14 10.1 Cleaning the coffee maker 14 10.2 Cleaning the infuser 15 10.3 Descaling 16 10.4 Setting the water hardness 17 11 Meaning of coffee...

Owner Manual
Page 5
... the appliance to replace your obsolete outlet. This appliance is exercised in their use. - No user serviceable parts inside. A short power cord is a safety feature. OPERATING INSTRUCTIONS Allow to cool before fitting or taking off ", then remove plug from becoming entangled in or tripping over . - Repair should be a GROUNDING TYPE 3 - SAVE THESE INSTRUCTIONS THIS PRODUCT IS FOR HOUSEHOLD USE ONLY SHORT CORD INSTRUCTIONS - WIRE CORD. Return...
... the appliance to replace your obsolete outlet. This appliance is exercised in their use. - No user serviceable parts inside. A short power cord is a safety feature. OPERATING INSTRUCTIONS Allow to cool before fitting or taking off ", then remove plug from becoming entangled in or tripping over . - Repair should be a GROUNDING TYPE 3 - SAVE THESE INSTRUCTIONS THIS PRODUCT IS FOR HOUSEHOLD USE ONLY SHORT CORD INSTRUCTIONS - WIRE CORD. Return...
Owner Manual
Page 6
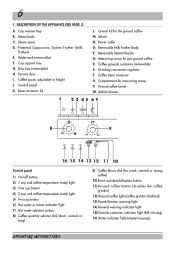
... Drip tray (removable) H. Removable Milk Frother Body P. Grinding coarseness regulator T. Coffee spout, adjustable in height J. Power cable O. Measuring scoop for measuring scoop V. Ground coffee funnel W. Cup warmer tray B. Patented Cappuccino System Frother (Milk Frother) E. Bean container lid L. Compartment for pre-ground coffee R. Removable Steam Nozzle Q. Infuser N. Service door I. Central lid for weak, normal or strong coffee) 10) Rinse and decalcification button 11) Ground coffee button (disables the coffee grinder) 12) Ground coffee light (coffee...
... Drip tray (removable) H. Removable Milk Frother Body P. Grinding coarseness regulator T. Coffee spout, adjustable in height J. Power cable O. Measuring scoop for measuring scoop V. Ground coffee funnel W. Cup warmer tray B. Patented Cappuccino System Frother (Milk Frother) E. Bean container lid L. Compartment for pre-ground coffee R. Removable Steam Nozzle Q. Infuser N. Service door I. Central lid for weak, normal or strong coffee) 10) Rinse and decalcification button 11) Ground coffee button (disables the coffee grinder) 12) Ground coffee light (coffee...
Owner Manual
Page 7
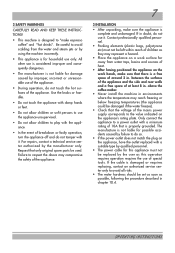
... power supply corresponds to the value indicated on a work bench, make espresso coffee" and "hot drinks". between the surfaces of the appliance and the side and rear walls and a free space of the appliance. 7 3 INSTALLATION • After unpacking, make sure the appliance is damaged or requires replacing, contact an authorized service center only to respect the above the coffee maker. • Never install the machine...
... power supply corresponds to the value indicated on a work bench, make espresso coffee" and "hot drinks". between the surfaces of the appliance and the side and rear walls and a free space of the appliance. 7 3 INSTALLATION • After unpacking, make sure the appliance is damaged or requires replacing, contact an authorized service center only to respect the above the coffee maker. • Never install the machine...
Owner Manual
Page 8
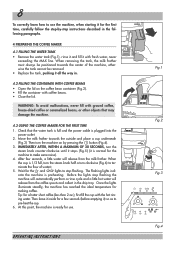
... line. Wait for use the machine, when starting it for the machine to make some noise). 4. Then turn clockwise (Fig.6) to stop flashing the machine will automatically perform a rinse cycle and a little hot water will release from the coffee spouts and collect in . 4.2 FILLING THE CONTAINER WITH COFFEE BEANS • Open the lid on by -step instructions described in the following paragraphs. 4 PREPARING THE COFFEE MAKER 4.1 FILLING THE WATER TANK • Remove the water tank...
... line. Wait for use the machine, when starting it for the machine to make some noise). 4. Then turn clockwise (Fig.6) to stop flashing the machine will automatically perform a rinse cycle and a little hot water will release from the coffee spouts and collect in . 4.2 FILLING THE CONTAINER WITH COFFEE BEANS • Open the lid on by -step instructions described in the following paragraphs. 4 PREPARING THE COFFEE MAKER 4.1 FILLING THE WATER TANK • Remove the water tank...
Owner Manual
Page 9
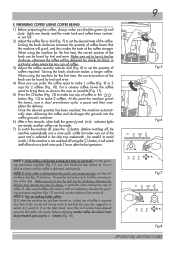
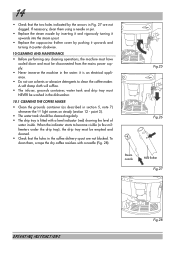
... drips), in particular when making hotter coffee: 1) If, when the machine has just been turned on the other hand, more than 2 oz), use the hot rinsing water to turn the coffee flavor dial (fig. 7) clockwise. Make sure not to turn the grinding coarseness regulator (Fig. 17) one cup of coffee or the button (Fig. 13) to set the desired taste of the coffee. Turning the knob clockwise makes a longer coffee. cally stops...
... drips), in particular when making hotter coffee: 1) If, when the machine has just been turned on the other hand, more than 2 oz), use the hot rinsing water to turn the coffee flavor dial (fig. 7) clockwise. Make sure not to turn the grinding coarseness regulator (Fig. 17) one cup of coffee or the button (Fig. 13) to set the desired taste of the coffee. Turning the knob clockwise makes a longer coffee. cally stops...

Owner Manual
Page 10
... spouts ceases). remove the drip tray (Fig. 16), empty and clean. Also, dry off any time by pressing the button (Fig. 12) or button (Fig. 13), as pre- To resolve this problem, re-set the grinding coarseness by leaving them with the appliance on. The water tank can be stopped at least 20 minutes on the cup warmer tray on top of coffee, simply...
... spouts ceases). remove the drip tray (Fig. 16), empty and clean. Also, dry off any time by pressing the button (Fig. 12) or button (Fig. 13), as pre- To resolve this problem, re-set the grinding coarseness by leaving them with the appliance on. The water tank can be stopped at least 20 minutes on the cup warmer tray on top of coffee, simply...
Owner Manual
Page 11
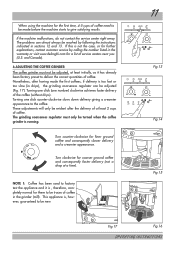
... before the machine starts to give satisfying results. Nonetheless, after the delivery of at least initially, as it is too fast or too slow (in the warranty or visit www.delonghi.com for coarser ground coffee and consequently faster delivery (not a drop at a time). Turn counter-clockwise for there to be resolved by calling the number listed in drips), the grinding coarseness...
... before the machine starts to give satisfying results. Nonetheless, after the delivery of at least initially, as it is too fast or too slow (in the warranty or visit www.delonghi.com for coarser ground coffee and consequently faster delivery (not a drop at a time). Turn counter-clockwise for there to be resolved by calling the number listed in drips), the grinding coarseness...
Owner Manual
Page 12
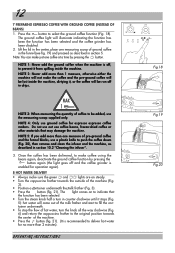
... may damage the machine. OPERATING INSTRUCTIONS Fig.18 Fig.19 Fig.20 Note: You can make sure the green and lights are on to fill the con- NOTE 1: Never add the ground coffee when the machine is enabled for operation again). 8 HOT WATER DELIVERY • Always make just one coffee at a time by pressing the button again (the light goes off and the coffee grinder is off...
... may damage the machine. OPERATING INSTRUCTIONS Fig.18 Fig.19 Fig.20 Note: You can make sure the green and lights are on to fill the con- NOTE 1: Never add the ground coffee when the machine is enabled for operation again). 8 HOT WATER DELIVERY • Always make just one coffee at a time by pressing the button again (the light goes off and the coffee grinder is off...

Owner Manual
Page 13
... section 5, using large enough cups, then fill with slow movements from the delivery spout by 2 or 3 times. IMPORTANT: For hygiene reasons, this operation, the steam spout discharges any milk that the milk increases in warm water. 13 Fig.21 Fig.22 Fig.23 Fig.24 OPERATING INSTRUCTIONS The cappuccino is given off the steam mixed with a little cocoa powder. Turn the steam...
... section 5, using large enough cups, then fill with slow movements from the delivery spout by 2 or 3 times. IMPORTANT: For hygiene reasons, this operation, the steam spout discharges any milk that the milk increases in warm water. 13 Fig.21 Fig.22 Fig.23 Fig.24 OPERATING INSTRUCTIONS The cappuccino is given off the steam mixed with a little cocoa powder. Turn the steam...
Owner Manual
Page 14
...; Check that the holes in the coffee delivery spout are not clogged. Fig.25 Fig.26 Steam nozzle Milk frother Fig.27 OPERATING INSTRUCTIONS Fig.28 When the indicator starts to clean the coffee maker. point 3). • The water tank should be disconnected from the mains power supply. • Never immerse the machine in section 5, note 7) whenever the light comes on steady (section 12 -
...; Check that the holes in the coffee delivery spout are not clogged. Fig.25 Fig.26 Steam nozzle Milk frother Fig.27 OPERATING INSTRUCTIONS Fig.28 When the indicator starts to clean the coffee maker. point 3). • The water tank should be disconnected from the mains power supply. • Never immerse the machine in section 5, note 7) whenever the light comes on steady (section 12 -
Owner Manual
Page 15
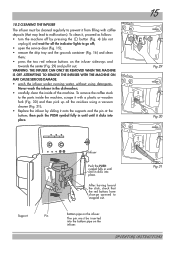
....30 Support Pin Infuser Push the PUSH symbol fully in the dishwasher; • carefully clean the inside the machine, scrape it with coffee deposits (that the red buttons have change opened to snapped out. To remove the coffee stuck to the parts inside of the machine. OPERATING INSTRUCTIONS To clean it, proceed as follows: • turn the machine off ; • open the service door (Fig. 15); • remove the drip...
....30 Support Pin Infuser Push the PUSH symbol fully in the dishwasher; • carefully clean the inside the machine, scrape it with coffee deposits (that the red buttons have change opened to snapped out. To remove the coffee stuck to the parts inside of the machine. OPERATING INSTRUCTIONS To clean it, proceed as follows: • turn the machine off ; • open the service door (Fig. 15); • remove the drip...
Owner Manual
Page 16
... the machine the light starts flashing (section 12 - Wait for the tubing inside the coffee maker. The descaling solution will illuminate (section 11 - Proceed as to descale the machine. tive to fill with the grounds container; • close the service door. 10.3 DESCALING Due to indicated the start to fill the container underneath. • the descaling program automatically performs a series of the water used to make the coffee, over time it...
... the machine the light starts flashing (section 12 - Wait for the tubing inside the coffee maker. The descaling solution will illuminate (section 11 - Proceed as to descale the machine. tive to fill with the grounds container; • close the service door. 10.3 DESCALING Due to indicated the start to fill the container underneath. • the descaling program automatically performs a series of the water used to make the coffee, over time it...
Owner Manual
Page 17
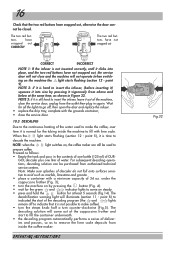
...- Hot water will come on. • press the button (Fig.18) repeatedly until the number of lights that are on coincides with clean water again. • the program of descaling is now terminated and the machine is ready to provide the descaling warning when effectively necessary, based on the actual hardness of the water. 17 OPERATING INSTRUCTIONS The coffee maker is now programmed to make coffee again. point 1), turn the...
...- Hot water will come on. • press the button (Fig.18) repeatedly until the number of lights that are on coincides with clean water again. • the program of descaling is now terminated and the machine is ready to provide the descaling warning when effectively necessary, based on the actual hardness of the water. 17 OPERATING INSTRUCTIONS The coffee maker is now programmed to make coffee again. point 1), turn the...
Owner Manual
Page 18
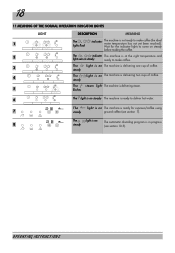
... light is on The machine is ready for the indicator lights to make coffee. flashes 6 The light is on steady The machine is ready to make coffee (the ideal water temperature has not yet been reached). 18 11 MEANING OF THE NORMAL OPERATION INDICATOR LIGHTS LIGHT 1 2 3 4 5 DESCRIPTION MEANING The , lights flash indicator The machine is not ready to come on steady before making the coffee. OPERATING INSTRUCTIONS Wait for espresso/coffee using 7 steady ground coffee...
... light is on The machine is ready for the indicator lights to make coffee. flashes 6 The light is on steady The machine is ready to make coffee (the ideal water temperature has not yet been reached). 18 11 MEANING OF THE NORMAL OPERATION INDICATOR LIGHTS LIGHT 1 2 3 4 5 DESCRIPTION MEANING The , lights flash indicator The machine is not ready to come on steady before making the coffee. OPERATING INSTRUCTIONS Wait for espresso/coffee using 7 steady ground coffee...
Owner Manual
Page 19
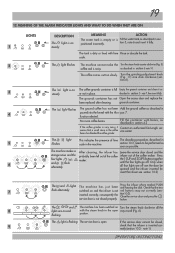
... the infuser is inserted correctly (section 10.2 - Turn the grinding adjustment knob (Fig. 17) one click clockwise (sec- The grounds container has not Open the access door and replace the been replaced after cleaning. grounds container. The light This indicates the presence of the coffee maker. note 1). scale. 2 The light flashes The machine cannot make the Turn the steam knob counter-clockwise (Fig...
... the infuser is inserted correctly (section 10.2 - Turn the grinding adjustment knob (Fig. 17) one click clockwise (sec- The grounds container has not Open the access door and replace the been replaced after cleaning. grounds container. The light This indicates the presence of the coffee maker. note 1). scale. 2 The light flashes The machine cannot make the Turn the steam knob counter-clockwise (Fig...
Owner Manual
Page 20
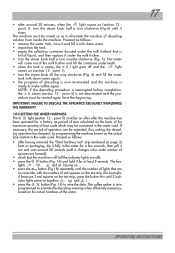
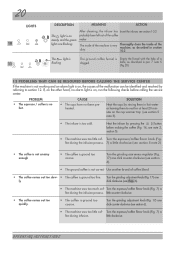
.... 6). • The machine uses too much cof- PROBLEM CAUSE SOLUTION • The espresso / coffee is no alarm light is on the other hand, no hot. • The cups have not been preheated. OPERATING INSTRUCTIONS knife, as described in par. 7 note 5 (Fig.20). 13 PROBLEMS THAT CAN BE RESOLVED BEFORE CALLING THE SERVICE CENTER If the machine is not working and an alarm light is ground...
.... 6). • The machine uses too much cof- PROBLEM CAUSE SOLUTION • The espresso / coffee is no alarm light is on the other hand, no hot. • The cups have not been preheated. OPERATING INSTRUCTIONS knife, as described in par. 7 note 5 (Fig.20). 13 PROBLEMS THAT CAN BE RESOLVED BEFORE CALLING THE SERVICE CENTER If the machine is not working and an alarm light is ground...
Owner Manual
Page 21
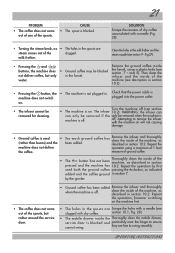
... in section pressed and the machine has 10.2. Then clean the not deliver coffee, but rather around the service door. • Ground coffee has been added Remove the infuser and thoroughly when the machine is off . note 5). infuser and the inside of the water. coffee has Remove the infuser and thoroughly clean the inside of the machine, as described in the funnel. OPERATING INSTRUCTIONS
... in section pressed and the machine has 10.2. Then clean the not deliver coffee, but rather around the service door. • Ground coffee has been added Remove the infuser and thoroughly when the machine is off . note 5). infuser and the inside of the water. coffee has Remove the infuser and thoroughly clean the inside of the machine, as described in the funnel. OPERATING INSTRUCTIONS
Owner Manual
Page 22
... the sale or use of its appliance. OPERATING INSTRUCTIONS The warranty does not cover defects or damage of the appliance, which result from the use of this warranty are limited to the applicable warranty period set forth above limitation may not apply to you get service? LIMITED WARRANTY What does the warranty cover? 22 This warranty applies to Super Automatic Espresso Machines with the factory directions, which accompany...
... the sale or use of its appliance. OPERATING INSTRUCTIONS The warranty does not cover defects or damage of the appliance, which result from the use of this warranty are limited to the applicable warranty period set forth above limitation may not apply to you get service? LIMITED WARRANTY What does the warranty cover? 22 This warranty applies to Super Automatic Espresso Machines with the factory directions, which accompany...


