
Canon PIXMA MP470 Support Question
Canon PIXMA MP470 Support Question
Find answers below for this question about Canon PIXMA MP470.Need a Canon PIXMA MP470 manual? We have 3 online manuals for this item!
Question posted by jjbraymond on June 2nd, 2015
How To Scan Multiple Pages Into One Document?
Current Answers
Answer #1: Posted by TechSupport101 on June 2nd, 2015 9:22 PM

Member since:
May 24th, 2013 Points: 12,171,305

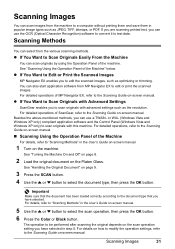
Although you will need to place each page on the platen glass separately, you can still scan each page individually, then save them as a multipage PDF file. To do this, please follow these steps:
1. Start MP Navigator EX.
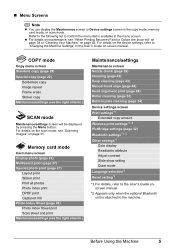
2. When MP Navigator opens, click on the SCAN/IMPORT option at the top left of the window, then click the PHOTOS/DOCUMENTS (PLATEN) option.
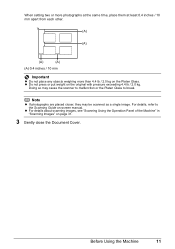
3. Place the document you want to scan on the platen glass, then select your Document Type (either Color or Black and White Document).
4. Click SPECIFY... to modify the document size and resolution as required, then click OK. By default, the document size selected is 'Auto Detect', and the Resolution selected is '300 dpi'. Both of these settings are usually satisfactory if you want to scan a document in as-is. If you need to specify a higher resolution scan or specific document size, please click on the 'SPECIFY' button.
5. Click the green SCAN button on the screen. Scanning starts. When scanning is completed, the Scan Complete dialog box opens.
6. Select SCAN or EXIT. You will select 'Scan' to scan the next document if there is one, or select 'Exit' to end scanning.
7. The scanned images appear in the Thumbnail window. Please put a checkmark under all of the images that you scanned in and want to save in a single file. If only one image is selected, then it will be a single-page document that is saved.
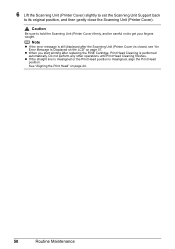
8. Save the scanned images by selecting the 'SAVE AS PDF' option on the bottom left-hand corner of the window.
9. A window will now appear giving you additional options for the file you are trying to save.
9-1. The 'SAVE IN' section will show you where the document is going to be saved. By default, the files are saved in the Pictures folder in a folder labeled 'MP Navigator EX'. If you would like to specify a different location to save the files to, please click on the 'BROWSE..' button and select the location where you want to save the file, the press the 'OK' button to return to the save window.
9-2. The 'FILE NAME' section will let you name the file you are saving. By default, the file name will be 'IMG'; you can delete that out and name the file whatever you like.
9-3. The 'SAVE AS TYPE' section will allow you to choose the file output type. If you selected an image file, you will have the option of JPEG/EXIF, BMP or TIFF; if you selected the 'Save as PDF' option, you will be able to save the file as a single or multi-page PDF file.
9-4. The 'SAVE TO A SUBFOLDER WITH THE CURRENT DATE' option will let you save the file in a subfolder with the current date inside of the folder location you selected in step 9-1 above. If do not want a subfolder created with the current date inside of the folder you selected in step 9-1 above, please uncheck the 'Save to a Subfolder with Current Date' option.
10. Click the SAVE button. The scanned images will be saved according to the settings you selected above.
11. Once the file is saved, you will be given the option to 'OPEN SAVE LOCATION' or 'CLOSE'. I would suggest selecting 'Close', and then going directly to the location where you specified the file be saved to. From there, you should be able to double-click on the file to open it.
Related Canon PIXMA MP470 Manual Pages

Similar Questions


Wherewill I find the property setting to allow me to set the settings I require above?


When I scan mulitiple page document it puts them on separate PDF's when I want them all on 1. It use...