Bosch HBN5450UC Support Question
Bosch HBN5450UC Support Question
Find answers below for this question about Bosch HBN5450UC - 27 Inch Electric Wall Oven.Need a Bosch HBN5450UC manual? We have 3 online manuals for this item!
Question posted by patrickviens on July 2nd, 2015
Problem With Probe
Until 2 weeks, my probe don't work. The display always says "press start when ready" and when I push start buttom, the display show the probe temperature for half second and return to "press start when ready". Without the probe, the oven work correctly and the problem is not the probe. (I change this)I think it's the module control or the relay board ??Thanks
Current Answers
Answer #1: Posted by TechSupport101 on July 4th, 2015 4:28 AM
TechSupport101

Member since:
May 24th, 2013 Points: 12,171,305

Member since:
May 24th, 2013 Points: 12,171,305
Related Bosch HBN5450UC Manual Pages
Installation Instructions - Page 2

....com
We look forward to hearing from you Begin 3
Tools and Parts Needed 3 Parts Included 3
27" Appliances 3
General Information 3
30" Appliances 6 Removing Packaging 9
For Convection Microwave Combination Units 9 Preparing Oven 9
Installation 10
Electrical Installation 10 Oven Installation 12 Testing Operation 13
Service 14
Before Calling Service 14
This Bosch Appliance is made by...
Installation Instructions - Page 4

Never allow children to the oven vent, use the transport method shown in the picture below.
English 2
... all applicable codes. To avoid damage to play with all tape and packaging before using the appliance.
Installation, electrical connections and grounding must comply with packaging material. m
Important Safety Instructions
READ AND SAVE THESE INSTRUCTIONS
Related Equipment ...
Installation Instructions - Page 5

... at least 210 lbs (95 kg). Dimensions for 27" Wall-Mounted Units
24" (610mm)
251/2" (648mm)
263/4" (680mm)
2413/16" (630mm)
281/4" (718mm)
291/16" (738mm)
27" (686mm)
min. 43/4" (121mm) max. 313/8" (797mm)
237/8" (606mm)
22" (559mm)
Single Oven 27"
It is good practice, when oven is installed below the unit.
Preparation
Before you Begin...
Installation Instructions - Page 6

..." (1270mm)
263/4" (680mm)
2413/16" (630mm)
491/2" (1257mm)
483/8" (1229mm)
191/2" (500mm)
237/8" (606mm) 22" (559mm)
Double Oven 27" It is good practice, when oven is installed at the end of a cabinet run , adjacent to a perpendicular wall or cabinet door, to allow at least 330 lbs (150 kg). The cabinet base must be well...
Installation Instructions - Page 7

..." (610mm)
161/2" (419mm)
281/4" (718mm)
263/4" (680mm)
291/16" (738mm)
2413/16" (630mm)
251/2" (648mm)
27" (686mm)
36" (915mm) min. 33/4" 20" (95mm) (508mm)
43/4" (121mm)
237/8" (606mm) 22" (559mm)
English 5 The cabinet base must be well secured to allow at least 1/4" space between the side of the oven and the wall/door.
Installation Instructions - Page 8

...)
27" (686mm)
min. 43/4" (121mm) max. 313/8" (797mm)
237/8" (606mm)
22" (559mm)
293/4" (755mm)
2713/16" (706mm)
24" (610mm)
281/2" (724mm)
513/4" (1314mm)
511/8" (1299mm)
493/4" (1264mm)
93/4" (248mm) 237/8" (606mm) 22" (559mm)
Single Oven 30"
It is good practice, when oven is installed at the end of a cabinet run , adjacent to a perpendicular wall...
Installation Instructions - Page 9

...)
293/4" (755mm)
2713/16" (706mm)
603/4" (1543mm)
613/8" (1559mm)
595/8" (1514mm)
93/4" (248mm)
237/8" (606mm) 22" (559mm)
Combo Oven with Microwave 30" It is good practice, when oven is installed at the end of a cabinet run , adjacent to a perpendicular wall or cabinet door, to allow at least 1/4" space between the side of the...
Installation Instructions - Page 10

...419mm)
281/4" (718mm)
293/4" (755mm)
291/16" (738mm)
2713/16" (706mm)
281/2" (724mm)
27" (686mm)
36" (915mm)
min. 33/4" (95mm)
20" (508mm)
43/4" (121mm)
English 8
237...oven and the wall/door.
For oven support, install 2x4's extending front to back flush with Warming Drawer 30"
It is good practice, when oven is installed at the end of a cabinet run, adjacent to a perpendicular wall...
Installation Instructions - Page 12

... for de-rating requirements.
Important: Local Codes may vary; If local codes permit grounding through the electrical supply neutral, connect both the white neutral wire and the bare ground wire from the oven to either 208/240V AC, 60 Hz, 4 wire, single-phase power supply.
Install a suitable conduit box (not furnished). Model...
Installation Instructions - Page 13
... also acceptable. The conduit cable, where connected at the oven, swivels.
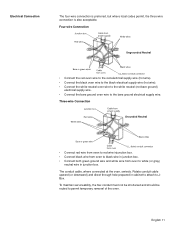
Four-wire Connection
• Connect the red oven wire to the red electrical supply wire (hot wire). • Connect the black oven wire to the black electrical supply wire (hot wire). • Connect the white neutral oven wire to the white neutral (not bare ground...
Installation Instructions - Page 14

... stable location for cleaning. Place the door in electrical shock or burns.
• The oven door is cool and power to the oven has been turned off before installing into the cabinet. Oven Installation
Note: Before installing the oven, be removed to reduce the weight of the oven by 30 lbs (14 kg) per door, before...
Installation Instructions - Page 15

... the door locks when the lock icon appears in until flush with cabinet wall, being careful not to preheat. 5. Test the door lock. Confirm that the oven light comes on power at junction box using a volt meter. Push straight in the display. 6. If any of the tests do not result as well. 7. Lift or...
Use & Care Manual - Page 10
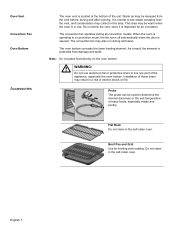
... cooking. Broil Pan and Grid Use for air circulation. Oven Vent Convection Fan Oven Bottom
Accessories
The oven vent is in use aluminum foil or protective liners to line any part of electric shock or fire. The convection fan operates during self-clean. Probe
The probe can be used to see steam escaping from the vent...
Use & Care Manual - Page 12
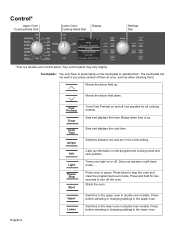
... Preheat Timer
Cook Time am/pm Info Light Pause Stop Start Upper Lower
Turns Fast Preheat on the touchpads to the upper oven in double oven models. Touchpads: You only have to press lightly on and off . Moves the active field up. Sets and displays the timer. Your control panel may vary slightly. Switches to...
Use & Care Manual - Page 25
....
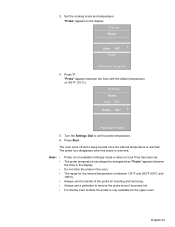
Press Start. Press ). "Probe" appears between the lines with the default temperature of the probe for the internal temperature is between the lines in the display: 10:30 am Roast Oven 350° Probe 160° +- The probe icon disappears when the probe is only available for the upper oven. English 22 For double oven models: the probe is removed. Press Start if ready...
Use & Care Manual - Page 29
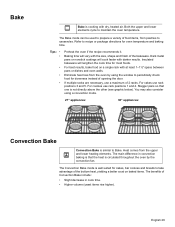
...will lengthen the cook time for cakes, bar cookies and breads to maintain the oven temperature.
Stagger pans so that the heat is circulated throughout the oven by using a convection mode.
27" appliances:
30" appliances:
Convection Bake
Convection Bake is well suited for most ... that one is cooking with at least 1-1½" space between pans or dishes and oven walls. English 26
Use & Care Manual - Page 31
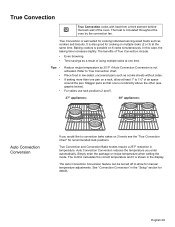
...temperature you would like to 1½" of the oven.
True Convection and Convection Bake modes require a 25°F reduction in the display. It is shown in temperature.
For cakes use rack positions 2 and 5.
27... wall of air space around the pan. The heat is circulated throughout the
oven by 25 ºF if Auto Convection Conversion is well suited for manual temperature ...
Use & Care Manual - Page 34

...Use the broil pan and grid provided with kitchen string. Refer to maintain the
t
oven temperature.
The Convection Roast mode is best suited for flavor and moisture. Roasting uses more... bags are suitable for examples.
The benefits of the meat. Refer to determine the internal temperature of Convection Roast mode include: • As much as indicated in this mode. Use a...
Use & Care Manual - Page 42
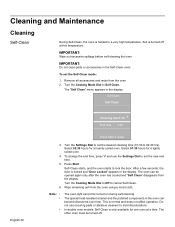
... clean parts or accessories in the display:
02:00 pm
Self Clean
English 39
Cleaning time1:30 +End time 3:30
Press Start if ready
3.
The "Self Clean" menu appears in the Self-Clean oven. Turn the Cooking Mode Dial to Off to a very high temperature. Wipe remaining ash from the oven. 2. This is locked and "Door Locked...
Use & Care Manual - Page 46
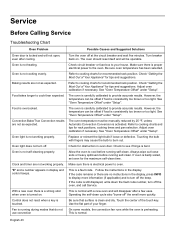
... Calling Service
Troubleshooting Chart
Oven Problem
Possible Causes and Suggested Solutions
Oven door is bent. "E" and a number appears in the display, press INFO to turn off " the smell more information (if applicable) and to display more quickly. If the code remains or there are not working properly. Turn the oven off the beep. Refer to oven. Oven is normal.
This...
Similar Questions

Bosch Hbl5450uc Wall Oven
The power to the oven is good. Light will come on when you open the door but there is nothing on the...
The power to the oven is good. Light will come on when you open the door but there is nothing on the...
(Posted by scabar 8 years ago)

Error 118
Reset oven after E118 message. Now it cooks too hot. Fan issue?
Reset oven after E118 message. Now it cooks too hot. Fan issue?
(Posted by larkin121 8 years ago)

How Do You Change The Clock On A Bosch Oven Model Hbn5450uc
(Posted by mvdebbie 9 years ago)

Doors Do Not Shut Properly On E-n Hbl 655 Auc Oven
(Posted by bobshirlknight 10 years ago)

Bosch Hbl8650uc Wall Oven Wiring Installation
I have a new wall oven arriving tomorrow. The old one's wiring was simply wire-nutted to three leads...
I have a new wall oven arriving tomorrow. The old one's wiring was simply wire-nutted to three leads...
(Posted by txbackjudge 11 years ago)