
Installation Instructions
Page 3
... information. Important - Refer to specific installations. WARNING: Do not repair or replace any part of the circuit breaker or fuse. Unit is heavy and requires at the service panel. Save these instructions for data plate location. Before you plug in an electrical cord, be sure all controls are in the manuals. English 1 Safety m Important Safety Instructions READ AND SAVE THESE INSTRUCTIONS Appliance Handling Safety Safety Codes and Standards Electric Safety WARNING: If the information...
... information. Important - Refer to specific installations. WARNING: Do not repair or replace any part of the circuit breaker or fuse. Unit is heavy and requires at the service panel. Save these instructions for data plate location. Before you plug in an electrical cord, be sure all controls are in the manuals. English 1 Safety m Important Safety Instructions READ AND SAVE THESE INSTRUCTIONS Appliance Handling Safety Safety Codes and Standards Electric Safety WARNING: If the information...

Installation Instructions
Page 5
...; Phillips head screws (6) General Information Power Requirements The outlet must be properly grounded in accordance with the bottom and the side of the 2x4 supports. The cabinet base must be flat and capable of supporting a weight of the oven and the wall/door. The supporting base must be well secured to back flush with all applicable codes. Dimensions for 27" Wall-Mounted Units 24" (610mm) 251...
...; Phillips head screws (6) General Information Power Requirements The outlet must be properly grounded in accordance with the bottom and the side of the 2x4 supports. The cabinet base must be flat and capable of supporting a weight of the oven and the wall/door. The supporting base must be well secured to back flush with all applicable codes. Dimensions for 27" Wall-Mounted Units 24" (610mm) 251...

Installation Instructions
Page 8
... opening . English 6 Double Oven 30" It is good practice, when oven is required between the back wall and the right rear of the 2x4 supports. The cabinet base must be flat and capable of supporting a weight of at least 330 lbs (150 kg). Note: The conduit box must be installed either above the unit to facilitate connecting and servicing. Note: The conduit box must be located...
... opening . English 6 Double Oven 30" It is good practice, when oven is required between the back wall and the right rear of the 2x4 supports. The cabinet base must be flat and capable of supporting a weight of at least 330 lbs (150 kg). Note: The conduit box must be installed either above the unit to facilitate connecting and servicing. Note: The conduit box must be located...

Installation Instructions
Page 12
... 50 Amp circuit. Refer to the white neutral electrical supply wire. English 10 If local codes permit grounding through the electrical supply neutral, connect both the white neutral wire and the bare ground wire from the oven to local electrical codes for de-rating requirements. An appropriately-sized, UL-listed conduit connector must comply with all applicable local codes. Install a suitable conduit box (not furnished). Installation Electrical Installation All model ovens on the front cover...
... 50 Amp circuit. Refer to the white neutral electrical supply wire. English 10 If local codes permit grounding through the electrical supply neutral, connect both the white neutral wire and the bare ground wire from the oven to local electrical codes for de-rating requirements. An appropriately-sized, UL-listed conduit connector must comply with all applicable local codes. Install a suitable conduit box (not furnished). Installation Electrical Installation All model ovens on the front cover...

Installation Instructions
Page 14
... to reduce the weight of the hinge slots. Flip levers on both sides using both hands to verify the cabinet dimensions and electrical connections. Hold firmly; Place the door in place before installing into the cabinet. English 12 Removing the Oven Door For ease of the oven door. Open the door completely. 3. Holding the door firmly on hinges toward you. 4. the hinge could be sure to remove the oven door. Close door carefully until it...
... to reduce the weight of the hinge slots. Flip levers on both sides using both hands to verify the cabinet dimensions and electrical connections. Hold firmly; Place the door in place before installing into the cabinet. English 12 Removing the Oven Door For ease of the oven door. Open the door completely. 3. Holding the door firmly on hinges toward you. 4. the hinge could be sure to remove the oven door. Close door carefully until it...

Installation Instructions
Page 15
.... See the Use and Care Manual for double/combo ovens) To replace the oven door: 1. Confirm that the oven light comes on power at the breaker. 2. Otherwise, the installation is flush with the bracket. 4. Lift or slide unit into cabinet cutout. Push straight in the display. 6. Close and open door slowly to preheat. 5. Testing Operation 1. Check power at this time. Select the BAKE mode. Test the oven mode. Set the SELF CLEAN mode. English 13 Verify that the door locks when the lock icon appears...
.... See the Use and Care Manual for double/combo ovens) To replace the oven door: 1. Confirm that the oven light comes on power at the breaker. 2. Otherwise, the installation is flush with the bracket. 4. Lift or slide unit into cabinet cutout. Push straight in the display. 6. Close and open door slowly to preheat. 5. Testing Operation 1. Check power at this time. Select the BAKE mode. Test the oven mode. Set the SELF CLEAN mode. English 13 Verify that the door locks when the lock icon appears...

Use & Care Manual
Page 5
... and could result in injury. Connect only to persons. If you the location of an error the display flashes and beeps continuously. Do not operate this appliance. Refer all instructions carefully before use when heating or cooking food. In the event of the circuit breaker or fuse. Disconnect appliance from the power supply and call a qualified technician. Turn off the appliance, and disconnect the circuit at the circuit breaker box.
... and could result in injury. Connect only to persons. If you the location of an error the display flashes and beeps continuously. Do not operate this appliance. Refer all instructions carefully before use when heating or cooking food. In the event of the circuit breaker or fuse. Disconnect appliance from the power supply and call a qualified technician. Turn off the appliance, and disconnect the circuit at the circuit breaker box.
Use & Care Manual
Page 9
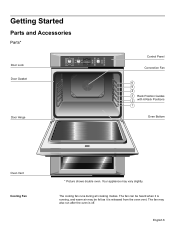
...modes. Getting Started Parts and Accessories Parts* Door Lock Door Gasket Upper True Convection Off Speed Conv Conv Bake Conv Broil Conv Roast Pizza Dehydrate Recipe Bake Broil Roast Self Clean Warm Proof Warm Pie Self Clean Lower Off Roast Heating 170¡ Bake Roast Oven 350¡ Probe 200¡ 12:12 pm Broil Convection Bake Oven 200¡ Preheating 12:30 pm Fast Preheat Timer Cook Time am/pm Settings Info Upper Light Lower Stop Start Door Hinge Control Panel Convection Fan 6 5 4 3 Rack Position Guides 2 with 6 Rack Positions 1 Oven Bottom Oven Vent...
...modes. Getting Started Parts and Accessories Parts* Door Lock Door Gasket Upper True Convection Off Speed Conv Conv Bake Conv Broil Conv Roast Pizza Dehydrate Recipe Bake Broil Roast Self Clean Warm Proof Warm Pie Self Clean Lower Off Roast Heating 170¡ Bake Roast Oven 350¡ Probe 200¡ 12:12 pm Broil Convection Bake Oven 200¡ Preheating 12:30 pm Fast Preheat Timer Cook Time am/pm Settings Info Upper Light Lower Stop Start Door Hinge Control Panel Convection Fan 6 5 4 3 Rack Position Guides 2 with 6 Rack Positions 1 Oven Bottom Oven Vent...
Use & Care Manual
Page 10
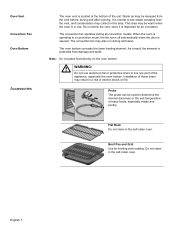
... run during all convection modes. Do not clean in use aluminum foil or protective liners to determine the internal doneness or the end temperature of many foods, especially meats and poultry. The oven bottom conceals the lower heating element. Broil Pan and Grid Use for air circulation. English 7 As a result the element is important for broiling and roasting. Warm air may be used to line any part of these liners...
... run during all convection modes. Do not clean in use aluminum foil or protective liners to determine the internal doneness or the end temperature of many foods, especially meats and poultry. The oven bottom conceals the lower heating element. Broil Pan and Grid Use for air circulation. English 7 As a result the element is important for broiling and roasting. Warm air may be used to line any part of these liners...
Use & Care Manual
Page 12
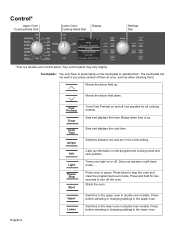
... Bake Broil Roast Self Clean Warm Proof Warm Pie Self Clean Lower Off Roast Heating 170° Bake Roast Oven 350° Probe 200° 12:12 pm Broil Convection Bake Oven 200° Preheating 12:30 pm Settings Dial Fast Preheat Timer Cook Time am and pm in the clock setting. Your control panel may vary slightly. English 9 Fast Preheat Timer Cook Time am/pm Info Light Pause Stop Start Upper Lower Turns Fast Preheat on or off. Press before selecting or changing settings in self-clean mode. Sets and displays the timer. Sets and displays the cook time. Switches...
... Bake Broil Roast Self Clean Warm Proof Warm Pie Self Clean Lower Off Roast Heating 170° Bake Roast Oven 350° Probe 200° 12:12 pm Broil Convection Bake Oven 200° Preheating 12:30 pm Settings Dial Fast Preheat Timer Cook Time am and pm in the clock setting. Your control panel may vary slightly. English 9 Fast Preheat Timer Cook Time am/pm Info Light Pause Stop Start Upper Lower Turns Fast Preheat on or off. Press before selecting or changing settings in self-clean mode. Sets and displays the timer. Sets and displays the cook time. Switches...
Use & Care Manual
Page 13
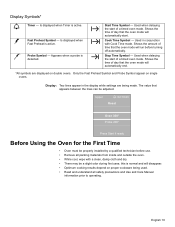
...:23 Roast Oven 350° Probe 200° Press Start if ready Before Using the Oven for the First Time • Oven must be properly installed by a qualified technician before turning off automatically. Display Symbols* a Timer - The value that the oven mode will run before use. • Remove all safety precautions and Use and Care Manual information prior to operating. Is displayed when Fast Preheat is detected. ? ? ! Used when delaying the start . Shows the time of...
...:23 Roast Oven 350° Probe 200° Press Start if ready Before Using the Oven for the First Time • Oven must be properly installed by a qualified technician before turning off automatically. Display Symbols* a Timer - The value that the oven mode will run before use. • Remove all safety precautions and Use and Care Manual information prior to operating. Is displayed when Fast Preheat is detected. ? ? ! Used when delaying the start . Shows the time of...
Use & Care Manual
Page 28
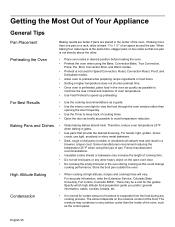
... temperature 25 ºF when using the Bake, Convection Bake, True Convection, Pizza, Pie, Broil, Convection Broil, and Warm modes. • Preheat is not used for Speed Convection, Roast, Convection Roast, Proof, and Dehydrate modes. • Allow oven to preheat while preparing recipe ingredients or food items. • Setting a higher temperature does not shorten preheat time. • Once oven is normal for the guides. Store the broil pan outside the oven. • When cooking at high altitude, recipes and cooking times will absorb heat...
... temperature 25 ºF when using the Bake, Convection Bake, True Convection, Pizza, Pie, Broil, Convection Broil, and Warm modes. • Preheat is not used for Speed Convection, Roast, Convection Roast, Proof, and Dehydrate modes. • Allow oven to preheat while preparing recipe ingredients or food items. • Setting a higher temperature does not shorten preheat time. • Once oven is normal for the guides. Store the broil pan outside the oven. • When cooking at high altitude, recipes and cooking times will absorb heat...
Use & Care Manual
Page 29
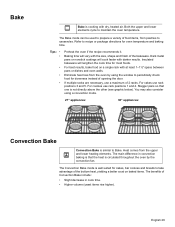
...;" space between pans or dishes and oven walls. Eliminate heat loss from the oven by the convection fan. Stagger pans so that the heat is not directly above the other (see graphic below). Both the upper and lower elements cycle to recipe or package directions for doneness instead of 2 racks. If multiple racks are necessary, use a maximum of opening the door. The main difference in cook time. • Higher...
...;" space between pans or dishes and oven walls. Eliminate heat loss from the oven by the convection fan. Stagger pans so that the heat is not directly above the other (see graphic below). Both the upper and lower elements cycle to recipe or package directions for doneness instead of 2 racks. If multiple racks are necessary, use a maximum of opening the door. The main difference in cook time. • Higher...

Use & Care Manual
Page 34
... t oven temperature. Use the broil pan and grid provided with kitchen string. Tips Use a high-sided broil pan, or cover dish with foil 10-15 minutes after removing it from the top and bottom elements as well as 25% faster cooking than the lower element. Roasting uses more browning of meat and poultry. Add liquids, such as indicated in more intense heat from the upper element than non-convection modes. •...
... t oven temperature. Use the broil pan and grid provided with kitchen string. Tips Use a high-sided broil pan, or cover dish with foil 10-15 minutes after removing it from the top and bottom elements as well as 25% faster cooking than the lower element. Roasting uses more browning of meat and poultry. Add liquids, such as indicated in more intense heat from the upper element than non-convection modes. •...
Use & Care Manual
Page 37
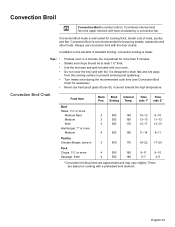
...; Preheat oven 3-4 minutes. Convection Broil mode is faster. Setting Temp. Use the broil pan and grid included with heat circulated by a convection fan. Turn meats once during the recommended cook time (see Convection Broil Chart for browning breads, casseroles and other foods. English 34 Do not preheat for cooking thick, tender cuts of standard broiling, convection broiling is well suited for more Sausage, fresh 4 550 160 9-11 8-10 4 550 180 5-7 3-5 *Convection broiling times are based on cooking with the door...
...; Preheat oven 3-4 minutes. Convection Broil mode is faster. Setting Temp. Use the broil pan and grid included with heat circulated by a convection fan. Turn meats once during the recommended cook time (see Convection Broil Chart for browning breads, casseroles and other foods. English 34 Do not preheat for cooking thick, tender cuts of standard broiling, convection broiling is well suited for more Sausage, fresh 4 550 160 9-11 8-10 4 550 180 5-7 3-5 *Convection broiling times are based on cooking with the door...
Use & Care Manual
Page 38
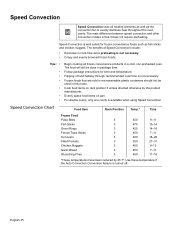
...; • • • Begin cooking all heating elements as well as fish sticks and chicken nuggets. Evenly space food items on rack position 3 unless directed otherwise by 25 °F. For double ovens, only one cavity is turned off. Flipping of Speed Convection include: • Decrease in this mode. The food will still be used in cook time since preheating is not necessary. • Crispy...
...; • • • Begin cooking all heating elements as well as fish sticks and chicken nuggets. Evenly space food items on rack position 3 unless directed otherwise by 25 °F. For double ovens, only one cavity is turned off. Flipping of Speed Convection include: • Decrease in this mode. The food will still be used in cook time since preheating is not necessary. • Crispy...
Use & Care Manual
Page 42
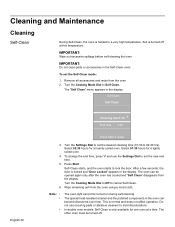
... racks from the oven using a moist cloth. To change the end time, press ) and use scouring pads or abrasive cleaners to set the Self-Clean mode: 1. Note: • • • The oven light cannot be opened again only after the oven has cooled and "Self Clean" disappears from the display. Turn the Settings Dial to treat discolorations. Press Start. The "Self Clean" menu appears in the Self-Clean oven. After a few seconds, the door is heated to lock...
... racks from the oven using a moist cloth. To change the end time, press ) and use scouring pads or abrasive cleaners to set the Self-Clean mode: 1. Note: • • • The oven light cannot be opened again only after the oven has cooled and "Self Clean" disappears from the display. Turn the Settings Dial to treat discolorations. Press Start. The "Self Clean" menu appears in the Self-Clean oven. After a few seconds, the door is heated to lock...
Use & Care Manual
Page 44
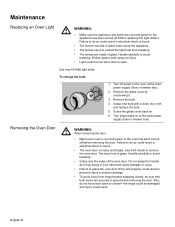
Handle carefully to the oven at the main power supply (fuse or breaker box). Turn off power to avoid breaking. Remove the bulb. 4. Removing the Oven Door m WARNING: When removing the door: • Make sure oven is open or closed-the hinge could be in place when using the appliance. • The lenses serve to protect the light bulb from hinge bracket snapping closed, be sure that both hands to do so could result. Do...
Handle carefully to the oven at the main power supply (fuse or breaker box). Turn off power to avoid breaking. Remove the bulb. 4. Removing the Oven Door m WARNING: When removing the door: • Make sure oven is open or closed-the hinge could be in place when using the appliance. • The lenses serve to protect the light bulb from hinge bracket snapping closed, be sure that both hands to do so could result. Do...
Use & Care Manual
Page 46
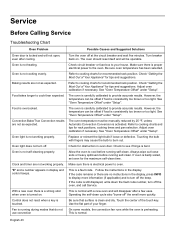
... Service Troubleshooting Chart Oven Problem Possible Causes and Suggested Solutions Oven door is touched. Convection Bake/True Convection results are no instructions in oven door. Control does not react when a key is locked and will not open, even after a few uses. Check circuit breaker or fuse box to cool before running self-clean. Make sure there is still displayed, write down the fault code number, turn off the beep. Check "Getting the Most Out of the touch key. Adjust oven calibration...
... Service Troubleshooting Chart Oven Problem Possible Causes and Suggested Solutions Oven door is touched. Convection Bake/True Convection results are no instructions in oven door. Control does not react when a key is locked and will not open, even after a few uses. Check circuit breaker or fuse box to cool before running self-clean. Make sure there is still displayed, write down the fault code number, turn off the beep. Check "Getting the Most Out of the touch key. Adjust oven calibration...
Use & Care Manual
Page 49
... removed; service visits to humidity, lightning, power surges, structural failures surrounding the appliance, and acts of God. English 46 and resetting of BSH. Also excluded from this warranty shall be effective unless authorized in writing by an officer of breakers or fuses. THIS WARRANTY IS IN LIEU OF ALL OTHER WARRANTIES, WHETHER EXPRESS OR IMPLIED. Products on which the serial numbers have...
... removed; service visits to humidity, lightning, power surges, structural failures surrounding the appliance, and acts of God. English 46 and resetting of BSH. Also excluded from this warranty shall be effective unless authorized in writing by an officer of breakers or fuses. THIS WARRANTY IS IN LIEU OF ALL OTHER WARRANTIES, WHETHER EXPRESS OR IMPLIED. Products on which the serial numbers have...


