
Acer Aspire V5-471 Support Question
Acer Aspire V5-471 Support Question
Find answers below for this question about Acer Aspire V5-471.Need a Acer Aspire V5-471 manual? We have 1 online manual for this item!
Question posted by lamdertta on November 23rd, 2015
The Battery Is 1/2 Charged, But When I Plug In The Charger The Screen Goes Blank
the battery is 1/2 charged but when I plug in the charger the screen goes blank, when I remove the changer the screen returns to normal
Current Answers
Answer #1: Posted by TommyKervz on November 25th, 2015 5:33 AM
TommyKervz

Member since:
January 10th, 2013 Points: 17,776,833

Member since:
January 10th, 2013 Points: 17,776,833
Please try the suggestions on the links below
Related Acer Aspire V5-471 Manual Pages
Acer V5-471 Notebook Service Guide - Page 3
Example:
the DRS5 User's Guide /usr/local/bin/fd the /TPH15spool_M program Computer output (text that represents information displayed on a computer screen, such as command names, option letters, and words) are shown in constant width bold. Example: [01] The server has been stopped User input (...
Acer V5-471 Notebook Service Guide - Page 5
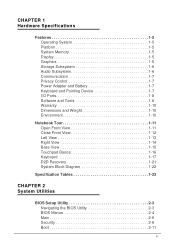
... Hardware Specifications
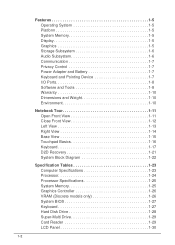
Features 1-5 Operating System 1-5 Platform 1-5 System Memory 1-5 Display 1-5 Graphics 1-5 Storage Subsystem 1-6 Audio Subsystem 1-6 Communication 1-7 Privacy Control 1-7 Power Adapter and Battery 1-7 Keyboard and Pointing Device 1-7 I/O Ports 1-8 Software and Tools 1-8 Warranty 1-10 Dimensions and Weight 1-10 Environment 1-10
Notebook Tour 1-11 Open Front...
Acer V5-471 Notebook Service Guide - Page 6
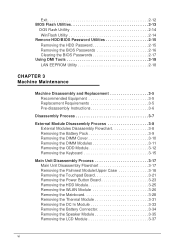
... Disassembly Flowchart 3-17 Removing the Palmrest Module/Upper Case 3-18 Removing the Touchpad Board 3-21 Removing the Power Button Board 3-23 Removing the HDD Module 3-25 Removing the WLAN Module 3-26 Removing the Mainboard 3-28 Removing the Thermal Module 3-31 Removing the DC In Module 3-33 Removing the Battery Connector 3-34 Removing the Speaker Module 3-35 Removing the LCD Module...
Acer V5-471 Notebook Service Guide - Page 7
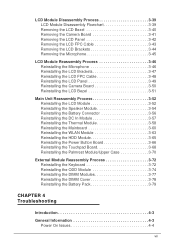
... Flowchart 3-39 Removing the LCD Bezel 3-40 Removing the Camera Board 3-41 Removing the LCD Panel 3-42 Removing the LCD FPC Cable 3-43 Removing the LCD Brackets 3-44 Removing the Microphone 3-45... 3-52 Reinstalling the LCD Module 3-52 Reinstalling the Speaker Module 3-54 Reinstalling the Battery Connector 3-56 Reinstalling the DC In Module 3-57 Reinstalling the Thermal Module 3-58...
Acer V5-471 Notebook Service Guide - Page 12
Features 1-5 Operating System 1-5 Platform 1-5 System Memory 1-5 Display 1-5 Graphics 1-5 Storage Subsystem 1-6 Audio Subsystem 1-6 Communication 1-7 Privacy Control 1-7 Power Adapter and Battery 1-7 Keyboard and Pointing Device 1-7 I/O Ports 1-8 Software and Tools 1-8 Warranty 1-10 Dimensions and Weight 1-10 Environment 1-10
Notebook Tour 1-11 Open Front View 1-11 Close Front ...
Acer V5-471 Notebook Service Guide - Page 17
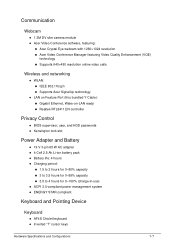
...;BIOS supervisor, user, and HDD passwords Kensington lock slot
Power Adapter and Battery 0
19 V 3-pin 65 W AC adapter 4-Cell 2.8 Ah Li-ion battery pack Battery life: 4 hours Charging period:
1.5 to 2 hours for 0-80% capacity 3 to 3.5 hours for 0-99% capacity...
Acer V5-471 Notebook Service Guide - Page 20
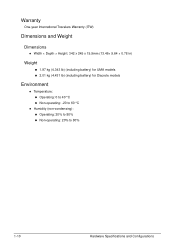
...; Height: 342 x 245 x 19.9mm (13.46× 9.64 × 0.78 in)
Weight
0
1.97 kg (4.343 lb) (including battery) for UMA models
2.01 kg (4.431 lb) (including battery) for Discrete models
Environment 0
Temperature: Operating: 0 to 40 °C Non-operating: -20 to 60...
Acer V5-471 Notebook Service Guide - Page 21

Open Front View
Table 1-1. Display screen
Also called liquid crystal display (LCD), displays computer output. Hardware Specifications and Configurations
1-11
Integrated microphone Internal microphone for video communication.
Open Front View 0
Figure 1-1. ...
Acer V5-471 Notebook Service Guide - Page 22
... amber: The computer is in AC mode. Blinking amber: The battery is in power-saving
mode. Note: Only one card can operate at any given time.
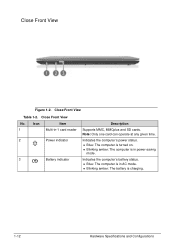
Close Front View
Table 1-2. Indicates the computer's battery status. Blue: The computer is charging.
1-12
Hardware Specifications and Configurations Close Front View
No.
Icon
Item...
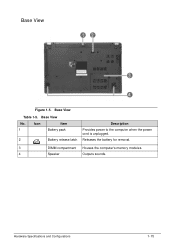
Acer V5-471 Notebook Service Guide - Page 25
Icon
Item
1
Battery pack
2
Battery release latch
Description
Provides power to the computer when the power cord is unplugged. Base View
No. Hardware Specifications and Configurations
1-15
Releases the battery for removal.
3
DIMM compartment Houses the computer's memory modules.
4
Speaker
Outputs sounds. Base View 0
Figure 1-5. Base View
Table 1-5.
Acer V5-471 Notebook Service Guide - Page 28

... the Num Lock is not applicable for computers (if you are on a network)
1-18
Hardware Specifications and Configurations Scroll Lock Fn+F12
When On, the screen moves one line up or down when pressing the up or down cursor keys. it launches the Start menu. Functions supported by the attachment...
Acer V5-471 Notebook Service Guide - Page 29
...
Fn+F3
Communication device toggle
Fn+F4
Sleep
Fn+F5 Fn+F6
Display off the LCD back light Switches the display output between the display screen, external monitor (if connected) or both.
Hardware Specifications and Configurations
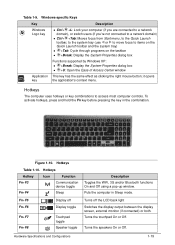
1-19 Puts the computer in the combination. Windows-specific Keys
Key
Description
Windows Logo key...
Acer V5-471 Notebook Service Guide - Page 30
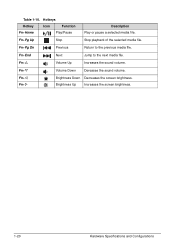
Fn+Pg Dn
Previous
Return to the next media file. Fn+End
Next
Jump to the previous media file. Brightness Up Increases the screen brightness.
0
1-20
Hardware Specifications and Configurations Fn+Pg ...10.
Fn+ Fn+
Brightness Down Decreases the screen brightness.
Hotkeys
Hotkey
Icon
Function
Fn+Home
Play/Pause
Description Play or pause a selected media file.
Acer V5-471 Notebook Service Guide - Page 31
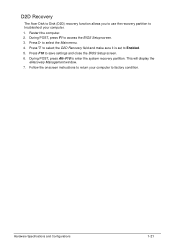
...computer. 2. Press F10 to Enabled. 5. During POST, press Alt+F10 to troubleshoot your computer to access the BIOS Setup screen. 3. This will display the
eRecovery Management window. 7. D2D Recovery 0
The Acer Disk to Disk (D2D) recovery function..., press F1 to factory condition. Follow the onscreen instructions to return your computer.
1. Press to select the Main menu. 4.
Acer V5-471 Notebook Service Guide - Page 43
...
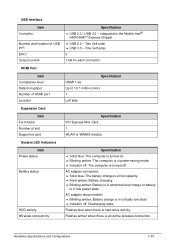
Specification USB 2.0 / USB 3.0 -
Integrated in low power state.
AC adapter connected: Solid blue: The battery charge is at full capacity. Solid amber: Battery charging. Blinking amber: Battery is in abnormal stop charge or battery
is turned off : Discharging state. One (left side) USB 3.0 - Flashes amber when there is hard drive...
Acer V5-471 Notebook Service Guide - Page 77
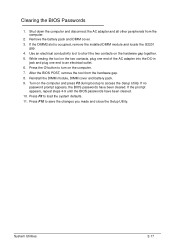
.... 11. If no
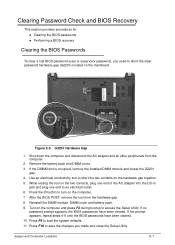
password prompt appears, the BIOS passwords have been cleared. 10. Remove the battery pack and DIMM cover. 3. Reinstall the DIMM module, DIMM cover and battery pack. 9. Press F9 to turn on the hardware gap together. 5. If the DIMM2...the hardware gap. 8. Clearing the BIOS Passwords 0
1. Turn on the two contacts, plug one end of the AC adapter into the DC-in
jack and...
Acer V5-471 Notebook Service Guide - Page 88
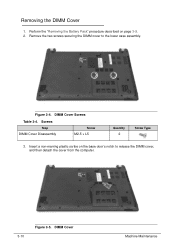
Perform the "Removing the Battery Pack" procedure described on the base door's notch to the lower case assembly. DIMM Cover Screws
Table 3-4. Insert a non-marring plastic scribe on page 3-9. 2. DIMM Cover
Machine Maintenance Figure 3-4. Remove the two screws securing the DIMM cover to release the DIMM cover, and then detach the cover from the...
Acer V5-471 Notebook Service Guide - Page 90
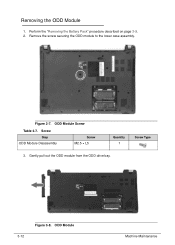
... Type
3. ODD Module Screw
Table 3-7. ODD Module
Machine Maintenance Figure 3-7. Gently pull out the ODD module from the ODD drive bay.
3-12
Figure 3-8. Perform the "Removing the Battery Pack" procedure described on page...
Acer V5-471 Notebook Service Guide - Page 164
...refer to the User Manual for instructions on the screen). If the computer boots correctly, add the ... the LCD panel is properly installed. The same goes for 10 seconds.
4. NOTE: NOTE:
Make ...perform the following one until the failure point is not normal, right-click on pages 3-37 and 3-41 respectively....and the external display by removing the power cable and the battery pack. There are no ...
Acer V5-471 Notebook Service Guide - Page 197
... mainboard. Turn on the computer. 7.
G2201 Hardware Gap
1. If the DIMM2 slot is occupied, remove the installed DIMM module and locate the G2201
gap. 4. Press the button to turn on the ...and plug one end to access the Setup Utility. Shut down the computer and disconnect the AC adapter and all other peripherals from the hardware gap. 8. Reinstall the DIMM module, DIMM cover and battery ...
Similar Questions

Power Plug Is In But No Indecater Light And Flashes 4r Or 5 Times And No Startup
(Posted by JKWEEBLEWOOBLE 8 years ago)

Will Not Start Up, Makes Strange Noises Then Screen Goes Blank
Will not start up, says to enter F2 for set-up. Hit F2 and reset defaults, when I save and close mak...
Will not start up, says to enter F2 for set-up. Hit F2 and reset defaults, when I save and close mak...
(Posted by coolkatz3 10 years ago)

Battery Query
is it necessary to remove the battery if it is plugged on AC power?
is it necessary to remove the battery if it is plugged on AC power?
(Posted by empresschloe 10 years ago)

Aspire V5 471 Monitor Flickering On Battery Power.
Last week I purchase Ace Aspire v5 471 laptop. But its display flickering sometimes on battery powe...
Last week I purchase Ace Aspire v5 471 laptop. But its display flickering sometimes on battery powe...
(Posted by jaipraveen529 11 years ago)