
User Guide
Page 5
17f3 Monitor • Setting up the monitor • Adjusting settings • Maintenance • Troubleshooting • Specifications 1
17f3 Monitor • Setting up the monitor • Adjusting settings • Maintenance • Troubleshooting • Specifications 1

User Guide
Page 7
... or cover these openings. AC power connector 5 Plug the other enclosed space, make sure to leave at the back panel of each. To connect the video and power cables: 1 Position the monitor and your computer so you put the monitor in the monitor cabinet are for ventilation. 2 Connect the video cable to the matching (blue) video port on the back of your computer. 3 Tighten the screws on the back of the monitor. www.emachines...
... or cover these openings. AC power connector 5 Plug the other enclosed space, make sure to leave at the back panel of each. To connect the video and power cables: 1 Position the monitor and your computer so you put the monitor in the monitor cabinet are for ventilation. 2 Connect the video cable to the matching (blue) video port on the back of your computer. 3 Tighten the screws on the back of the monitor. www.emachines...

User Guide
Page 9
...Brightness/ button. Exit. Exits the OSD menu or sub-menu. Enters the on and off. OSD active: Navigates to and adjusts the selected OSD menu option. Contrast/ button. OSD active: Navigates to and adjusts the OSD menu options. Turns the monitor on -screen display (OSD) menu or selects an OSD menu option. OSD inactive: Adjusts the contrast. To adjust monitor settings: 1 Press the MENU button. Adjusting settings Power button. Power indicator. Turns blue when the monitor is operating normally, then flashes when the monitor is in energy saving mode. MENU button. The OSD menu opens...
...Brightness/ button. Exit. Exits the OSD menu or sub-menu. Enters the on and off. OSD active: Navigates to and adjusts the selected OSD menu option. Contrast/ button. OSD active: Navigates to and adjusts the OSD menu options. Turns the monitor on -screen display (OSD) menu or selects an OSD menu option. OSD inactive: Adjusts the contrast. To adjust monitor settings: 1 Press the MENU button. Adjusting settings Power button. Power indicator. Turns blue when the monitor is operating normally, then flashes when the monitor is in energy saving mode. MENU button. The OSD menu opens...

User Guide
Page 10
... MENU button to select the option. Adjusts the level of white between the lightest and darkest portions of the display image. V SIZE. If you have finished making all adjustments, press the EXIT button twice to save changes and return to the options menu. On-screen display menu options Icon Description CONTRAST. BRIGHTNESS. Controls the horizontal size of an image. H SIZE. Controls the vertical size of the picture. Adjusts the amount of light in the darkest portion of the display image. 6 www.emachines...
... MENU button to select the option. Adjusts the level of white between the lightest and darkest portions of the display image. V SIZE. If you have finished making all adjustments, press the EXIT button twice to save changes and return to the options menu. On-screen display menu options Icon Description CONTRAST. BRIGHTNESS. Controls the horizontal size of an image. H SIZE. Controls the vertical size of the picture. Adjusts the amount of light in the darkest portion of the display image. 6 www.emachines...

User Guide
Page 11
...modes. EXIT. Displays current settings and exits the OSD menu. Icon Description TILT. Curves the display image to the left or right. Slants the display image to the left or right. BOTTOM CORNER. INFORMATION. Adjusts color balance. USER lets you adjust the red, green, and blue colors separately. Resets the monitor settings to counteract vertical moire. Changes the display language for the OSD. DEGAUSS. www.emachines.com 7 PARALLELOGRAM. V MOIRE. Adjusts the display to the factory default settings. RECALL. Demagnetizes the screen. TOP CORNER. OSD...
...modes. EXIT. Displays current settings and exits the OSD menu. Icon Description TILT. Curves the display image to the left or right. Slants the display image to the left or right. BOTTOM CORNER. INFORMATION. Adjusts color balance. USER lets you adjust the red, green, and blue colors separately. Resets the monitor settings to counteract vertical moire. Changes the display language for the OSD. DEGAUSS. www.emachines.com 7 PARALLELOGRAM. V MOIRE. Adjusts the display to the factory default settings. RECALL. Demagnetizes the screen. TOP CORNER. OSD...
User Guide
Page 13
... lightly moistened with your computer. Wipe the cabinet, glass panel, and controls. You will permanently scratch the glass panel. Maintenance Warning Caution Caution When the monitor is turned off, a small amount of abrasive pad or glass cleaner. For more information about screen savers, see the documentation that generates a magnetic field. ■ Use a screen saver to avoid permanent image burn-in optimal working...
... lightly moistened with your computer. Wipe the cabinet, glass panel, and controls. You will permanently scratch the glass panel. Maintenance Warning Caution Caution When the monitor is turned off, a small amount of abrasive pad or glass cleaner. For more information about screen savers, see the documentation that generates a magnetic field. ■ Use a screen saver to avoid permanent image burn-in optimal working...

User Guide
Page 14
... brightness controls to its factory default settings. Picture bounces, jitters, or has waves Make sure that: ■ Non-shielded speakers are wrong ■ Restart your computer with the monitor turned on. ■ Make sure that the video cable is not damaged. ■ Check the end of these suggestions solves the problem, try plugging the monitor into another monitor, power transformer or adapter, electric fan, fluorescent light, metal shelf, or laser printer. Troubleshooting...
... brightness controls to its factory default settings. Picture bounces, jitters, or has waves Make sure that: ■ Non-shielded speakers are wrong ■ Restart your computer with the monitor turned on. ■ Make sure that the video cable is not damaged. ■ Check the end of these suggestions solves the problem, try plugging the monitor into another monitor, power transformer or adapter, electric fan, fluorescent light, metal shelf, or laser printer. Troubleshooting...

User Guide
Page 15
...-shielded speakers are not placed too close to the monitor. ■ The monitor is not positioned too close to another monitor, power transformer or adapter, electric fan, fluorescent light, metal shelf, or laser printer. ■ You demagnetize the screen using the Degauss option in the OSD to adjust the image. Color is not uniform Make sure that the monitor is not sized or centered correctly Use the size and position controls...
...-shielded speakers are not placed too close to the monitor. ■ The monitor is not positioned too close to another monitor, power transformer or adapter, electric fan, fluorescent light, metal shelf, or laser printer. ■ You demagnetize the screen using the Degauss option in the OSD to adjust the image. Color is not uniform Make sure that the monitor is not sized or centered correctly Use the size and position controls...

User Guide
Page 16
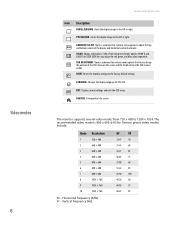
CRT Synchronization range Resolution Dot rate Power supply Input signal Display analog input Weight Dimensions (W×H×D) Operating conditions Storage conditions Flat 17 inch diagonal (16.0 inches viewable), anti-reflective/anti-glare, 90° deflection, 0.25 mm dot pitch Horizontal frequency: 30-71 KHz Vertical frequency: 50-160 Hz Maximum: 1280 × 1024 @ 60 Hz Recommended: 1024 × 768 @ 85 Hz 110 MHz Input voltage: AC 100-240 V @ 50/60...
CRT Synchronization range Resolution Dot rate Power supply Input signal Display analog input Weight Dimensions (W×H×D) Operating conditions Storage conditions Flat 17 inch diagonal (16.0 inches viewable), anti-reflective/anti-glare, 90° deflection, 0.25 mm dot pitch Horizontal frequency: 30-71 KHz Vertical frequency: 50-160 Hz Maximum: 1280 × 1024 @ 60 Hz Recommended: 1024 × 768 @ 85 Hz 110 MHz Input voltage: AC 100-240 V @ 50/60...

User Guide
Page 18
... position for safety of any kind into a grounding-type outlet. The plug on a stable work area. This is designed and tested to make sure that the switch is set at least 6 inches (15 cm), around the system for future use. ■ Do not use this cord will only fit into the monitor ventilation openings. ■ Some products are equipped with a three-wire power cord...
... position for safety of any kind into a grounding-type outlet. The plug on a stable work area. This is designed and tested to make sure that the switch is set at least 6 inches (15 cm), around the system for future use. ■ Do not use this cord will only fit into the monitor ventilation openings. ■ Some products are equipped with a three-wire power cord...

User Guide
Page 19
... Use only replacement parts and accessories recommended by Gateway. Such areas include patient care areas of electrical current still flows through the monitor. Call Gateway Technical Support for 24 hours. To avoid electrical shock, always unplug all power cables and modem cables from the wall outlets before cleaning the system. ■ Unplug the system from the wall outlet and refer servicing to turn...
... Use only replacement parts and accessories recommended by Gateway. Such areas include patient care areas of electrical current still flows through the monitor. Call Gateway Technical Support for 24 hours. To avoid electrical shock, always unplug all power cables and modem cables from the wall outlets before cleaning the system. ■ Unplug the system from the wall outlet and refer servicing to turn...

User Guide
Page 20
... ensure compliance with FCC rules. These accessories are : shielded video cable. FCC declaration of conformity Responsible party: Gateway, Inc. 14350 Myford Road Irvine, CA 92606 USA This device complies with the limits for help. This equipment generates, uses, and can be used in a particular installation. Caution Changes or modifications not expressly approved by one or more of...
... ensure compliance with FCC rules. These accessories are : shielded video cable. FCC declaration of conformity Responsible party: Gateway, Inc. 14350 Myford Road Irvine, CA 92606 USA This device complies with the limits for help. This equipment generates, uses, and can be used in a particular installation. Caution Changes or modifications not expressly approved by one or more of...

eMachines 17F3 User Guide
Page 5
Using Your 17f3 Monitor • Setting up the monitor • Adjusting settings • Maintaining • Troubleshooting • Specifications
Using Your 17f3 Monitor • Setting up the monitor • Adjusting settings • Maintaining • Troubleshooting • Specifications

eMachines 17F3 User Guide
Page 6
... set up the monitor Read all hooks are securely in place. Make sure that all warnings and instructions marked on the video cable connector to the matching (blue) video port on the back of your computer so you can reach a correctly grounded electrical outlet. 2 Connect the video cable to keep it on the bottom of the monitor. 3 Slide the base toward the front of each. Follow all power cables...
... set up the monitor Read all hooks are securely in place. Make sure that all warnings and instructions marked on the video cable connector to the matching (blue) video port on the back of your computer so you can reach a correctly grounded electrical outlet. 2 Connect the video cable to keep it on the bottom of the monitor. 3 Slide the base toward the front of each. Follow all power cables...

eMachines 17F3 User Guide
Page 9
... to save changes. BRIGHTNESS. POSITION. Controls the vertical size of the display image inward or outward. Curves the sides of the display image. Increases or decreases the trapezoid distortion of the display image. On-screen display menu options Icon Description CONTRAST. SIZE. PINCUSHION. www.emachines.com To adjust monitor settings: 1 Press the MENU button. The OSD menu opens. Controls the horizontal size of the display image. 5 Rotates the display image. Adjusting settings 2 Press the or buttons to highlight an OSD menu option, then press the MENU button to...
... to save changes. BRIGHTNESS. POSITION. Controls the vertical size of the display image inward or outward. Curves the sides of the display image. Increases or decreases the trapezoid distortion of the display image. On-screen display menu options Icon Description CONTRAST. SIZE. PINCUSHION. www.emachines.com To adjust monitor settings: 1 Press the MENU button. The OSD menu opens. Controls the horizontal size of the display image. 5 Rotates the display image. Adjusting settings 2 Press the or buttons to highlight an OSD menu option, then press the MENU button to...
eMachines 17F3 User Guide
Page 10
Curves the display image to the factory default settings. RESET. Horizontal frequency (KHz) VF - Opens a submenu that let you adjust the red, green, and blue colors separately. USER lets you change OSD the position of the OSD menu on the screen and the length of the display and horizontal and vertical moire. Displays current settings and exits the OSD menu. Adjusts color balance. OSD ADJUSTMENT. Resets the monitor settings to the left or right. EXIT EXIT. The monitor supports several video modes from two preset factory options (9300°K and 6500...
Curves the display image to the factory default settings. RESET. Horizontal frequency (KHz) VF - Opens a submenu that let you adjust the red, green, and blue colors separately. USER lets you change OSD the position of the OSD menu on the screen and the length of the display and horizontal and vertical moire. Displays current settings and exits the OSD menu. Adjusts color balance. OSD ADJUSTMENT. Resets the monitor settings to the left or right. EXIT EXIT. The monitor supports several video modes from two preset factory options (9300°K and 6500...

eMachines 17F3 User Guide
Page 11
... cabinet, glass panel, and controls. Do not use near water. ■ Keep the monitor away from radiators or heat vents. ■ Keep the monitor out of the video cable for any equipment that might be bent or pushed in . You will permanently scratch the glass panel. Troubleshooting No picture ■ Make sure that the monitor is turned on. ■ Make sure that the power cord is connected correctly to...
... cabinet, glass panel, and controls. Do not use near water. ■ Keep the monitor away from radiators or heat vents. ■ Keep the monitor out of the video cable for any equipment that might be bent or pushed in . You will permanently scratch the glass panel. Troubleshooting No picture ■ Make sure that the monitor is turned on. ■ Make sure that the power cord is connected correctly to...

eMachines 17F3 User Guide
Page 12
... speakers are wrong ■ Restart your computer with the monitor turned on a different circuit. Image is not sized or centered correctly Use the size and position controls in . If none of these suggestions solves the problem, try plugging the monitor into another monitor, power transformer or adapter, electric fan, fluorescent light, metal shelf, or laser printer. ■ You demagnetize the screen using the Degauss option in . www.emachines.com Display colors...
... speakers are wrong ■ Restart your computer with the monitor turned on a different circuit. Image is not sized or centered correctly Use the size and position controls in . If none of these suggestions solves the problem, try plugging the monitor into another monitor, power transformer or adapter, electric fan, fluorescent light, metal shelf, or laser printer. ■ You demagnetize the screen using the Degauss option in . www.emachines.com Display colors...

eMachines 17F3 User Guide
Page 13
This condition does not indicate that cannot be adjusted full screen Some video modes used by the monitor produce images that the monitor is defective. CRT Synchronization range Resolution Dot rate Power supply Input signal Display analog input Weight Dimensions (W×H×D) Operating conditions Storage conditions Flat 17-inch diagonal (16.0 inches viewable), anti-reflective/anti-glare, 90° deflection, 0.25 mm dot pitch Horizontal frequency: 30-70 KHz Vertical frequency: 50-160 Hz Maximum: 1280 ×...
This condition does not indicate that cannot be adjusted full screen Some video modes used by the monitor produce images that the monitor is defective. CRT Synchronization range Resolution Dot rate Power supply Input signal Display analog input Weight Dimensions (W×H×D) Operating conditions Storage conditions Flat 17-inch diagonal (16.0 inches viewable), anti-reflective/anti-glare, 90° deflection, 0.25 mm dot pitch Horizontal frequency: 30-70 KHz Vertical frequency: 50-160 Hz Maximum: 1280 ×...
eMachines 17F3 User Guide
Page 16
... area. The voltage selector switch is set up your work surface. ■ The product should only be operated from the wall outlet and refer servicing to your product has a voltage selector switch, make sure that the antenna or cable system is a safety feature. The plug on the rating label. ■ If your eMachines product. Replacement parts and accessories Use only replacement parts and accessories recommended by...
... area. The voltage selector switch is set up your work surface. ■ The product should only be operated from the wall outlet and refer servicing to your product has a voltage selector switch, make sure that the antenna or cable system is a safety feature. The plug on the rating label. ■ If your eMachines product. Replacement parts and accessories Use only replacement parts and accessories recommended by...


