
User Guide
Page 4
... the mouse 42 Cleaning CDs or DVDs 44 Restoring your system 44 Preventing static electricity discharge 45 Opening the case 46 Removing the side panel 46 Removing the front bezel 47 Closing the case 48 Replacing the side panel 48 Replacing the front bezel 49 Installing memory 50 Replacing the system battery... DVD drives 57 Computer 59 Diskette drive 59 DVD drives 60 File management 60 Hard drive 61 Internet 62 Keyboard 63 Memory 64 ii www.eMachines.com
... the mouse 42 Cleaning CDs or DVDs 44 Restoring your system 44 Preventing static electricity discharge 45 Opening the case 46 Removing the side panel 46 Removing the front bezel 47 Closing the case 48 Replacing the side panel 48 Replacing the front bezel 49 Installing memory 50 Replacing the system battery... DVD drives 57 Computer 59 Diskette drive 59 DVD drives 60 File management 60 Hard drive 61 Internet 62 Keyboard 63 Memory 64 ii www.eMachines.com
User Guide
Page 12
Chapter 1: Getting Help eMachines contact information To help you locate eMachines contact information, you can find the eMachines Web site, Online Support, and technical support contact information on the label located on the front of your computer case. 6 www.eMachines.com
Chapter 1: Getting Help eMachines contact information To help you locate eMachines contact information, you can find the eMachines Web site, Online Support, and technical support contact information on the label located on the front of your computer case. 6 www.eMachines.com
User Guide
Page 16
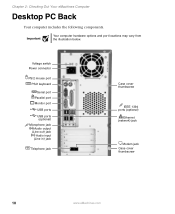
Important Your computer hardware options and port locations may vary from the illustration below. Voltage switch Power connector PS/2 mouse port PS/2 keyboard Serial port Parallel port Monitor port USB ports USB ports (optional) Microphone jack Audio output (Line out) jack Audio input (Line in) jack Telephone jack Case cover thumbscrew IEEE 1394 ports (optional) Ethernet (network) jack Modem jack Case cover thumbscrew 10 www.eMachines.com Chapter 2: Checking Out Your eMachines Computer Desktop PC Back Your computer includes the following components.
Important Your computer hardware options and port locations may vary from the illustration below. Voltage switch Power connector PS/2 mouse port PS/2 keyboard Serial port Parallel port Monitor port USB ports USB ports (optional) Microphone jack Audio output (Line out) jack Audio input (Line in) jack Telephone jack Case cover thumbscrew IEEE 1394 ports (optional) Ethernet (network) jack Modem jack Case cover thumbscrew 10 www.eMachines.com Chapter 2: Checking Out Your eMachines Computer Desktop PC Back Your computer includes the following components.
User Guide
Page 17
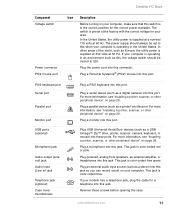
... printer, scanner, camera, keyboard, or mouse) into these screws before opening the case. Plug a monitor into this port. Plug powered, analog front speakers, an external amplifier, or headphones into this jack. www.eMachines.com 11 Plug the power cord into this port. For more information, see "...Monitor port USB ports (optional) Microphone jack Audio output (Line out) jack Audio input (Line in) jack Telephone jack (optional) Case cover thumbscrews Plug a PS/2 keyboard into this jack. This jack is color-coded lime green. If your computer is operating in an...
... printer, scanner, camera, keyboard, or mouse) into these screws before opening the case. Plug a monitor into this port. Plug powered, analog front speakers, an external amplifier, or headphones into this jack. www.eMachines.com 11 Plug the power cord into this port. For more information, see "...Monitor port USB ports (optional) Microphone jack Audio output (Line out) jack Audio input (Line in) jack Telephone jack (optional) Case cover thumbscrews Plug a PS/2 keyboard into this jack. This jack is color-coded lime green. If your computer is operating in an...
User Guide
Page 19
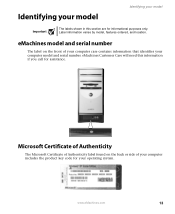
... front of your computer includes the product key code for assistance. www.eMachines.com 13 eMachines Customer Care will need this section are for informational purposes only. eMachines model and serial number The label on the back or side of your computer case contains information that identifies your computer model and serial number. Identifying...
... front of your computer includes the product key code for assistance. www.eMachines.com 13 eMachines Customer Care will need this section are for informational purposes only. eMachines model and serial number The label on the back or side of your computer case contains information that identifies your computer model and serial number. Identifying...
User Guide
Page 43
Chapter 5 Maintaining Your Computer • Caring for your computer • Updating Windows • Protecting your computer from viruses • Cleaning your computer • Restoring your system • Opening the computer case • Adding memory and replacing the battery 37
Chapter 5 Maintaining Your Computer • Caring for your computer • Updating Windows • Protecting your computer from viruses • Cleaning your computer • Restoring your system • Opening the computer case • Adding memory and replacing the battery 37
User Guide
Page 48
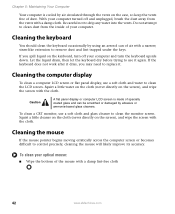
...), and wipe the screen with the cloth. Caution A flat panel display or computer LCD screen is cooled by air circulated through the vents on the case, so keep the vents free of air with a narrow, straw-like extension to remove dust and lint trapped under the keys. To clean a CRT monitor..., brush the dust away from the inside of your optical mouse: ■ Wipe the bottom of the mouse with a damp lint-free cloth 42 www.eMachines.com Chapter 5: Maintaining Your Computer Your computer is made of specially coated glass and can be scratched or damaged by using an aerosol can of...
...), and wipe the screen with the cloth. Caution A flat panel display or computer LCD screen is cooled by air circulated through the vents on the case, so keep the vents free of air with a narrow, straw-like extension to remove dust and lint trapped under the keys. To clean a CRT monitor..., brush the dust away from the inside of your optical mouse: ■ Wipe the bottom of the mouse with a damp lint-free cloth 42 www.eMachines.com Chapter 5: Maintaining Your Computer Your computer is made of specially coated glass and can be scratched or damaged by using an aerosol can of...
User Guide
Page 51
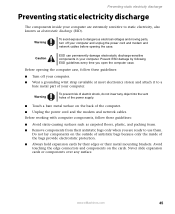
... Before working with computer components, follow these guidelines: ■ Avoid static-causing surfaces such as electrostatic discharge (ESD). www.eMachines.com 45 Avoid touching the edge connectors and components on the outside of antistatic bags because only the inside your computer are ... ■ Always hold expansion cards by following ESD guidelines every time you are extremely sensitive to use them. Before opening the computer case, follow these guidelines: ■ Turn off your computer. ■ Wear a grounding wrist strap (available at most electronics stores) and...
... Before working with computer components, follow these guidelines: ■ Avoid static-causing surfaces such as electrostatic discharge (ESD). www.eMachines.com 45 Avoid touching the edge connectors and components on the outside of antistatic bags because only the inside your computer are ... ■ Always hold expansion cards by following ESD guidelines every time you are extremely sensitive to use them. Before opening the computer case, follow these guidelines: ■ Turn off your computer. ■ Wear a grounding wrist strap (available at most electronics stores) and...
User Guide
Page 52
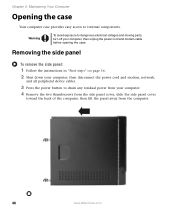
... toward the back of the computer, then lift the panel away from your computer, then unplug the power cord and modem cable before opening the case. Removing the side panel To remove the side panel: 1 Follow the instructions in "First steps" on page 56. 2 Shut down your computer, then disconnect the... power cord and modem, network, and all peripheral device cables. 3 Press the power button to internal components. Chapter 5: Maintaining Your Computer Opening the case Your computer case provides easy access to drain any residual power from the computer. 46 www...
... toward the back of the computer, then lift the panel away from your computer, then unplug the power cord and modem cable before opening the case. Removing the side panel To remove the side panel: 1 Follow the instructions in "First steps" on page 56. 2 Shut down your computer, then disconnect the... power cord and modem, network, and all peripheral device cables. 3 Press the power button to internal components. Chapter 5: Maintaining Your Computer Opening the case Your computer case provides easy access to drain any residual power from the computer. 46 www...
User Guide
Page 53
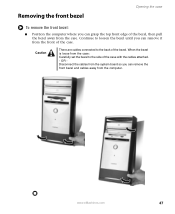
When the bezel is loose from the case. www.eMachines.com 47 Continue to loosen the bezel until you can remove the front bezel and cables away from the front of the case. OR Disconnect the cables from the system board so you can remove it from the computer. Caution There are cables connected... to the back of the bezel. Removing the front bezel Opening the case To remove the front bezel: ■ Position the computer where you can grasp the top front edge of the bezel, then pull the bezel away...
When the bezel is loose from the case. www.eMachines.com 47 Continue to loosen the bezel until you can remove the front bezel and cables away from the front of the case. OR Disconnect the cables from the system board so you can remove it from the computer. Caution There are cables connected... to the back of the bezel. Removing the front bezel Opening the case To remove the front bezel: ■ Position the computer where you can grasp the top front edge of the bezel, then pull the bezel away...
User Guide
Page 54
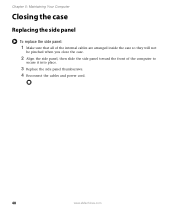
Chapter 5: Maintaining Your Computer Closing the case Replacing the side panel To replace the side panel: 1 Make sure that all of the internal cables are arranged inside the case so they will not be pinched when you close the case. 2 Align the side panel, then slide the side panel toward the front of the computer to secure it into place. 3 Replace the side panel thumbscrews. 4 Reconnect the cables and power cord. 48 www.eMachines.com
Chapter 5: Maintaining Your Computer Closing the case Replacing the side panel To replace the side panel: 1 Make sure that all of the internal cables are arranged inside the case so they will not be pinched when you close the case. 2 Align the side panel, then slide the side panel toward the front of the computer to secure it into place. 3 Replace the side panel thumbscrews. 4 Reconnect the cables and power cord. 48 www.eMachines.com

User Guide
Page 55
Closing the case 2 Press the bezel firmly into place. www.eMachines.com 49 Replacing the front bezel To replace the front bezel: 1 Align the latch pins with the computer latch holes.
Closing the case 2 Press the bezel firmly into place. www.eMachines.com 49 Replacing the front bezel To replace the front bezel: 1 Align the latch pins with the computer latch holes.
User Guide
Page 56
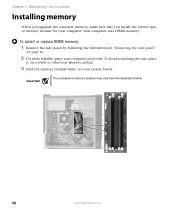
... type of memory module for your computer on its side. Important Your computer's memory location may vary from the illustration below. 50 www.eMachines.com To avoid scratching the case, place it on a towel or other non-abrasive surface. 3 Find the memory module banks on your system board. Your computer uses DIMM...
... type of memory module for your computer on its side. Important Your computer's memory location may vary from the illustration below. 50 www.eMachines.com To avoid scratching the case, place it on a towel or other non-abrasive surface. 3 Find the memory module banks on your system board. Your computer uses DIMM...
User Guide
Page 58
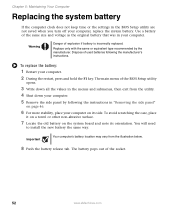
...location may vary from the utility. 4 Shut down your computer. 5 Remove the side panel by the manufacturer. Warning Danger of the socket. 52 www.eMachines.com Dispose of the same size and voltage as the original battery that was in your computer, replace the system battery. You will need to... install the new battery the same way. To avoid scratching the case, place it on a towel or other non-abrasive surface. 7 Locate the old battery on the system board and note its side. Chapter 5: ...
...location may vary from the utility. 4 Shut down your computer. 5 Remove the side panel by the manufacturer. Warning Danger of the socket. 52 www.eMachines.com Dispose of the same size and voltage as the original battery that was in your computer, replace the system battery. You will need to... install the new battery the same way. To avoid scratching the case, place it on a towel or other non-abrasive surface. 7 Locate the old battery on the system board and note its side. Chapter 5: ...
User Guide
Page 62
...if: ■ Power cords or plugs are damaged ■ Liquid has been spilled into your computer ■ Your computer was dropped ■ The case was damaged Instead, unplug your hard drive is turned on. ■ If a peripheral device (such as a keyboard or mouse) does not work,... electricity, see the program's printed documentation or the online help Customer Care in the Search box , then click the arrow. 56 www.eMachines.com Type the keyword troubleshooting in diagnosing and fixing the problem. ■ If you added or removed peripheral devices, review the installation procedures...
...if: ■ Power cords or plugs are damaged ■ Liquid has been spilled into your computer ■ Your computer was dropped ■ The case was damaged Instead, unplug your hard drive is turned on. ■ If a peripheral device (such as a keyboard or mouse) does not work,... electricity, see the program's printed documentation or the online help Customer Care in the Search box , then click the arrow. 56 www.eMachines.com Type the keyword troubleshooting in diagnosing and fixing the problem. ■ If you added or removed peripheral devices, review the installation procedures...
User Guide
Page 79
... make sure that all cables are damaged ■ Liquid has been spilled into your computer ■ Your computer was dropped ■ The case was damaged Instead, unplug your computer and contact a qualified computer technician. ■ Have your customer ID, serial number, and order number ...messages, and the steps you have taken. ■ Make sure that is supplying power. If you did not purchase the hardware or software from eMachines, see : ■ Online Help ■ Printed documentation ■ The Microsoft Windows documentation ■ The software publisher's Web site ■ ...
... make sure that all cables are damaged ■ Liquid has been spilled into your computer ■ Your computer was dropped ■ The case was damaged Instead, unplug your computer and contact a qualified computer technician. ■ Have your customer ID, serial number, and order number ...messages, and the steps you have taken. ■ Make sure that is supplying power. If you did not purchase the hardware or software from eMachines, see : ■ Online Help ■ Printed documentation ■ The Microsoft Windows documentation ■ The software publisher's Web site ■ ...

User Guide
Page 80
... printed or online documentation that came with your model" on page 13. In many cases, additional product information and online documentation for eMachines-supplied hardware can contact eMachines to get answers to your computer. For more how-to reach eMachines Customer Care telephone numbers vary by country or region. See the label on page...
... printed or online documentation that came with your model" on page 13. In many cases, additional product information and online documentation for eMachines-supplied hardware can contact eMachines to get answers to your computer. For more how-to reach eMachines Customer Care telephone numbers vary by country or region. See the label on page...
User Guide
Page 82
...incorrectly. Replacement parts and accessories Use only replacement parts and accessories recommended by the manufacturer. Appendix A: Important safety information Your eMachines system is designed and tested to provide some protection against personal injury and damage to avoid eating and drinking near water ...switch, make sure that the safety instructions marked on the product and in the computer case are equipped with the same or equivalent type recommended by eMachines. 76 www.eMachines.com Setting up the system on a stable work area. Never insert objects of ...
...incorrectly. Replacement parts and accessories Use only replacement parts and accessories recommended by the manufacturer. Appendix A: Important safety information Your eMachines system is designed and tested to provide some protection against personal injury and damage to avoid eating and drinking near water ...switch, make sure that the safety instructions marked on the product and in the computer case are equipped with the same or equivalent type recommended by eMachines. 76 www.eMachines.com Setting up the system on a stable work area. Never insert objects of ...

User Guide
Page 84
... result in the devices not ringing in advance that it is permissible to be connected to maintain uninterrupted service. In some situations. 78 www.eMachines.com If requested, this equipment, users should not exceed five (5.0). A telephone line cord with a modular plug is designed to a line,... Code of 1991 makes it unlawful for the call . The Department does not guarantee the equipment will provide advance notice in some cases, the inside wiring associated with a single-line individual service may make sure that temporary discontinuance of devices which is subject to the...
... result in the devices not ringing in advance that it is permissible to be connected to maintain uninterrupted service. In some situations. 78 www.eMachines.com If requested, this equipment, users should not exceed five (5.0). A telephone line cord with a modular plug is designed to a line,... Code of 1991 makes it unlawful for the call . The Department does not guarantee the equipment will provide advance notice in some cases, the inside wiring associated with a single-line individual service may make sure that temporary discontinuance of devices which is subject to the...
User Guide
Page 89
... slots 31 troubleshooting add-in card 57 troubleshooting memory card 64 types of memory cards supported 31 case closing 48 opening 46 CD cleaning 44 inserting 34 playing audio 35 recording 35 troubleshooting 57 CD ... drive 9 troubleshooting 57 using 33 cellular phone memory cards 31 Certificate of Authenticity 13 cleaning case 41 CD 44 computer exterior 41 computer screen 42 DVD 44 keyboard 42 LCD panel 42 mouse ...42 screen 42 clicking 25 closing computer case 48 front bezel 49 unresponsive program 21 connecting modem 26 PS/2 keyboard 11 PS/2 mouse 11...
... slots 31 troubleshooting add-in card 57 troubleshooting memory card 64 types of memory cards supported 31 case closing 48 opening 46 CD cleaning 44 inserting 34 playing audio 35 recording 35 troubleshooting 57 CD ... drive 9 troubleshooting 57 using 33 cellular phone memory cards 31 Certificate of Authenticity 13 cleaning case 41 CD 44 computer exterior 41 computer screen 42 DVD 44 keyboard 42 LCD panel 42 mouse ...42 screen 42 clicking 25 closing computer case 48 front bezel 49 unresponsive program 21 connecting modem 26 PS/2 keyboard 11 PS/2 mouse 11...


