
User Guide
Page 17
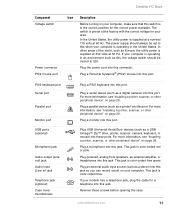
..., printer, scanner, camera, keyboard, or mouse) into this jack. Plug USB (Universal Serial Bus) devices (such as Europe, the utility power is supplied at 230 volts at the factory with the correct voltage for your area. Plug a microphone into these screws before opening the case. Plug an...; (PS/2) mouse into this port. For more information, see "Installing a printer, scanner, or other peripheral device" on page 28. www.eMachines.com 11 The switch is preset at 50 Hz. The power supply should be set to 230. Plug a monitor into this port. In the United States, the utility...
..., printer, scanner, camera, keyboard, or mouse) into this jack. Plug USB (Universal Serial Bus) devices (such as Europe, the utility power is supplied at 230 volts at the factory with the correct voltage for your area. Plug a microphone into these screws before opening the case. Plug an...; (PS/2) mouse into this port. For more information, see "Installing a printer, scanner, or other peripheral device" on page 28. www.eMachines.com 11 The switch is preset at 50 Hz. The power supply should be set to 230. Plug a monitor into this port. In the United States, the utility...

User Guide
Page 24
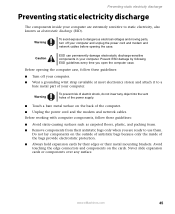
....eMachines.com During an electrical storm, unplug both the power cord and the modem connection. The voltage selection for your location is operating in cards, and peripheral devices. Caution If you have a cable modem, use a surge protector that has a modem jack. The power supply should... setting for an extended period of electricity coming into your computer to provide power to far above normal levels and cause data loss or system damage. An uninterruptible power supply (UPS) supplies battery power to a surge protector, which absorbs voltage surges and prevents them to your...
....eMachines.com During an electrical storm, unplug both the power cord and the modem connection. The voltage selection for your location is operating in cards, and peripheral devices. Caution If you have a cable modem, use a surge protector that has a modem jack. The power supply should... setting for an extended period of electricity coming into your computer to provide power to far above normal levels and cause data loss or system damage. An uninterruptible power supply (UPS) supplies battery power to a surge protector, which absorbs voltage surges and prevents them to your...

User Guide
Page 26
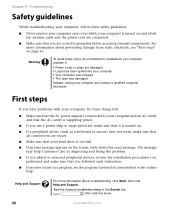
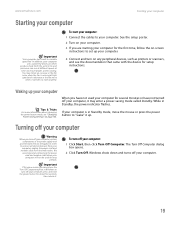
...Windows to turn off your computer, press and hold the power button for about five seconds, then release it. 20 www.eMachines.com The Turn Off Computer dialog box opens. 2 Click Turn Off. If your computer is in the power supply and system board remain energized. To turn off your computer,... unplug the power cord and modem cable from the wall outlets. Chapter...
...Windows to turn off your computer, press and hold the power button for about five seconds, then release it. 20 www.eMachines.com The Turn Off Computer dialog box opens. 2 Click Turn Off. If your computer is in the power supply and system board remain energized. To turn off your computer,... unplug the power cord and modem cable from the wall outlets. Chapter...
User Guide
Page 51
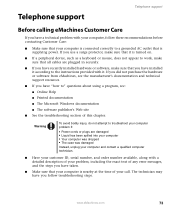
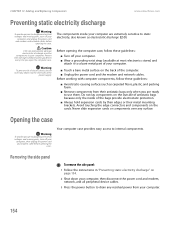
...surface. Never slide expansion cards or components over any object into the vent holes of the power supply. ■ Touch a bare metal surface on the back of the computer. ■ Unplug the power cord and the modem and network cables. Prevent ESD damage by their edges or their ... Before opening the computer case, follow these guidelines: ■ Turn off your computer and unplug the power cord and modem and network cables before opening the case. www.eMachines.com 45 Avoid touching the edge connectors and components on the outside of antistatic bags because only the ...
...surface. Never slide expansion cards or components over any object into the vent holes of the power supply. ■ Touch a bare metal surface on the back of the computer. ■ Unplug the power cord and the modem and network cables. Prevent ESD damage by their edges or their ... Before opening the computer case, follow these guidelines: ■ Turn off your computer and unplug the power cord and modem and network cables before opening the case. www.eMachines.com 45 Avoid touching the edge connectors and components on the outside of antistatic bags because only the ...
User Guide
Page 62
... was dropped ■ The case was damaged Instead, unplug your computer is turned on and while the modem cable and the power cord are connected. ■ Make sure that you followed each instruction. ■ If an error occurs in a program, see... injury, do not attempt to your computer and an AC outlet and that the AC outlet is supplying power. ■ If you use a power strip or surge protector, make sure that all connections are correctly grounded before accessing internal components. First...online help Customer Care in the Search box , then click the arrow. 56 www.eMachines.com
... was dropped ■ The case was damaged Instead, unplug your computer is turned on and while the modem cable and the power cord are connected. ■ Make sure that you followed each instruction. ■ If an error occurs in a program, see... injury, do not attempt to your computer and an AC outlet and that the AC outlet is supplying power. ■ If you use a power strip or surge protector, make sure that all connections are correctly grounded before accessing internal components. First...online help Customer Care in the Search box , then click the arrow. 56 www.eMachines.com
User Guide
Page 79
...eMachines.com 73 Warning To avoid bodily injury, do not attempt to the instructions provided with it according to troubleshoot your computer problem if: ■ Power cords or plugs are plugged in securely. ■ If you have recently installed hardware or software, make sure that it is supplying power... detailed description of your problem, including the exact text of this chapter. If you did not purchase the hardware or software from eMachines, see : ■ Online Help ■ Printed documentation ■ The Microsoft Windows documentation ■ The software publisher's Web site...
...eMachines.com 73 Warning To avoid bodily injury, do not attempt to the instructions provided with it according to troubleshoot your computer problem if: ■ Power cords or plugs are plugged in securely. ■ If you have recently installed hardware or software, make sure that it is supplying power... detailed description of your problem, including the exact text of this chapter. If you did not purchase the hardware or software from eMachines, see : ■ Online Help ■ Printed documentation ■ The Microsoft Windows documentation ■ The software publisher's Web site...

User Guide
Page 94
...support 73 telephone support 73 Web site connection speed 62 turning off computer 9, 20, 21 turning on computer 9, 19 tutoring fee-based 74 U uninterruptible power supply (UPS) 18 updating Norton AntiVirus 39 Windows 38 UPS 18 USB port 9, 11, 28 V video playing 35 virus protecting against 39 removing with ...Norton AntiVirus 39 voltage switch 11 volume adjusting 21 adjusting modem 67 controls 21 muting 21 troubleshooting 72 W Web site eMachines 3 Windows Product Key Code 13 Windows key 23 Windows Media Player 35 Windows Update 38 working safely 16 Z Zip drive port 9, 11 ...
...support 73 telephone support 73 Web site connection speed 62 turning off computer 9, 20, 21 turning on computer 9, 19 tutoring fee-based 74 U uninterruptible power supply (UPS) 18 updating Norton AntiVirus 39 Windows 38 UPS 18 USB port 9, 11, 28 V video playing 35 virus protecting against 39 removing with ...Norton AntiVirus 39 voltage switch 11 volume adjusting 21 adjusting modem 67 controls 21 muting 21 troubleshooting 72 W Web site eMachines 3 Windows Product Key Code 13 Windows key 23 Windows Media Player 35 Windows Update 38 working safely 16 Z Zip drive port 9, 11 ...
NG3 Hardware Reference
Page 5
Contents www.emachines.com Advanced multimedia software features 105 Recording audio 105 Chapter 9: Customizing Your Computer 107 Adjusting the screen and desktop settings 108 Adjusting the color depth ... Selecting a screen saver 112 Using an extended desktop 113 Changing the mouse settings 114 Changing Power-Saving Settings 115 Changing the power scheme 115 Changing advanced power settings 116 Activating and using Hibernate mode 116 Installing an uninterruptible power supply 118 Chapter 10: Protecting Your Computer 119 Hardware security 120 Kensington lock slot 120 Data...
Contents www.emachines.com Advanced multimedia software features 105 Recording audio 105 Chapter 9: Customizing Your Computer 107 Adjusting the screen and desktop settings 108 Adjusting the color depth ... Selecting a screen saver 112 Using an extended desktop 113 Changing the mouse settings 114 Changing Power-Saving Settings 115 Changing the power scheme 115 Changing advanced power settings 116 Activating and using Hibernate mode 116 Installing an uninterruptible power supply 118 Chapter 10: Protecting Your Computer 119 Hardware security 120 Kensington lock slot 120 Data...
NG3 Hardware Reference
Page 6
www.emachines.com Contents Updating Windows 142 BigFix 142 Managing hard drive space 143 Checking hard drive space 143 Using Disk Cleanup 143 Checking the hard drive ... replacing a CD or DVD drive 160 Replacing the memory card reader 162 Adding or replacing a hard drive 163 Replacing the rear fan 165 Replacing the power supply 166 Replacing the heat sink 167 Replacing the front I/O panel 168 Adding or replacing an expansion card 171 Replacing the system board 172 Chapter 14...
www.emachines.com Contents Updating Windows 142 BigFix 142 Managing hard drive space 143 Checking hard drive space 143 Using Disk Cleanup 143 Checking the hard drive ... replacing a CD or DVD drive 160 Replacing the memory card reader 162 Adding or replacing a hard drive 163 Replacing the rear fan 165 Replacing the power supply 166 Replacing the heat sink 167 Replacing the front I/O panel 168 Adding or replacing an expansion card 171 Replacing the system board 172 Chapter 14...
NG3 Hardware Reference
Page 17
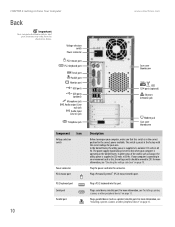
..."Installing a printer, scanner, or other areas of the world, such as Europe, the utility power is supplied at a nominal 115 volts at the factory with the correct voltage for the correct power available. In other peripheral device" on your computer, make sure that this port. Plug a ...(optional) Ethernet (network) jack Modem jack Case cover thumbscrew Description Before turning on page 13. 10 The power supply should be set to Know Your Computer www.emachines.com Back Important Your computer hardware options and port locations may vary from the illustration below. PS/2 keyboard ...
..."Installing a printer, scanner, or other areas of the world, such as Europe, the utility power is supplied at a nominal 115 volts at the factory with the correct voltage for the correct power available. In other peripheral device" on your computer, make sure that this port. Plug a ...(optional) Ethernet (network) jack Modem jack Case cover thumbscrew Description Before turning on page 13. 10 The power supply should be set to Know Your Computer www.emachines.com Back Important Your computer hardware options and port locations may vary from the illustration below. PS/2 keyboard ...
NG3 Hardware Reference
Page 25
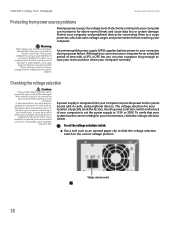
...power supply (UPS) supplies battery power to 115V or 230V. In other areas of your computer to set the power supply to your computer during a power failure. Use the power... modem. A power supply is set the...power is supplied at 230 volts at 60 Hz. The power supply should be damaged. To verify that has a modem jack. If your computer is supplied... at a nominal 115 volts at 50 Hz. In the United States, the utility power...them from power source problems ...both the power cord ...
...power supply (UPS) supplies battery power to 115V or 230V. In other areas of your computer to set the power supply to your computer during a power failure. Use the power... modem. A power supply is set the...power is supplied at 230 volts at 60 Hz. The power supply should be damaged. To verify that has a modem jack. If your computer is supplied... at a nominal 115 volts at 50 Hz. In the United States, the utility power...them from power source problems ...both the power cord ...
NG3 Hardware Reference
Page 26
...modem cable from the wall outlets. When you cannot use the Turn Off Computer option in the power supply and system board remain energized. In order to remove all electrical power from your computer. 19 To turn off your computer will not be used your computer for setup ... which produces heat. Turning off your computer, it . While in variable speed fan. www.emachines.com Starting your computer Starting your computer Important Your computer has a built-in Standby, the power indicator flashes. See the setup poster. 2 Turn on your computer. 3 If you turn off your ...
...modem cable from the wall outlets. When you cannot use the Turn Off Computer option in the power supply and system board remain energized. In order to remove all electrical power from your computer. 19 To turn off your computer will not be used your computer for setup ... which produces heat. Turning off your computer, it . While in variable speed fan. www.emachines.com Starting your computer Starting your computer Important Your computer has a built-in Standby, the power indicator flashes. See the setup poster. 2 Turn on your computer. 3 If you turn off your ...

NG3 Hardware Reference
Page 114
CHAPTER 9 Customizing Your Computer • Adjusting the screen and desktop settings • Changing the mouse settings • Changing Power-Saving Settings • Installing an uninterruptible power supply
CHAPTER 9 Customizing Your Computer • Adjusting the screen and desktop settings • Changing the mouse settings • Changing Power-Saving Settings • Installing an uninterruptible power supply
NG3 Hardware Reference
Page 125
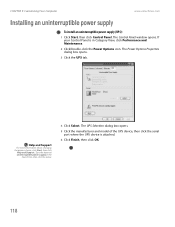
.... Type the keyword uninterruptible power supply in Category View, click Performance and Maintenance. 2 Click/Double-click the Power Options icon. The Control Panel window opens. If your Control Panel is attached. 6 Click Finish, then click OK. 118 CHAPTER 9: Customizing Your Computer www.emachines.com Installing an uninterruptible power supply To install an uninterruptible power supply (UPS): 1 Click Start...
.... Type the keyword uninterruptible power supply in Category View, click Performance and Maintenance. 2 Click/Double-click the Power Options icon. The Control Panel window opens. If your Control Panel is attached. 6 Click Finish, then click OK. 118 CHAPTER 9: Customizing Your Computer www.emachines.com Installing an uninterruptible power supply To install an uninterruptible power supply (UPS): 1 Click Start...

NG3 Hardware Reference
Page 160
CHAPTER 13 Adding and Replacing Components • Preventing static electricity discharge • Opening the case • Closing the case • Installing memory • Replacing the system battery • Adding or replacing a CD or DVD drive • Replacing the memory card reader • Adding or replacing a hard drive • Replacing the rear fan • Replacing the power supply • Replacing the heat sink • Replacing the front I/O panel • Adding or replacing an expansion card • Replacing the system board
CHAPTER 13 Adding and Replacing Components • Preventing static electricity discharge • Opening the case • Closing the case • Installing memory • Replacing the system battery • Adding or replacing a CD or DVD drive • Replacing the memory card reader • Adding or replacing a hard drive • Replacing the rear fan • Replacing the power supply • Replacing the heat sink • Replacing the front I/O panel • Adding or replacing an expansion card • Replacing the system board
NG3 Hardware Reference
Page 161
... Caution ESD can permanently damage electrostatic discharge-sensitive components in "Preventing static electricity discharge" on the back of the power supply. The components inside of your computer. ■ Touch a bare metal surface on page 154. 2 Shut down your computer, then disconnect the... To remove the side panel: 1 Follow the instructions in your computer. CHAPTER 13: Adding and Replacing Components www.emachines.com Preventing static electricity discharge Warning To avoid exposure to dangerous electrical voltages and moving parts, turn off your computer and unplug the...
... Caution ESD can permanently damage electrostatic discharge-sensitive components in "Preventing static electricity discharge" on the back of the power supply. The components inside of your computer. ■ Touch a bare metal surface on page 154. 2 Shut down your computer, then disconnect the... To remove the side panel: 1 Follow the instructions in your computer. CHAPTER 13: Adding and Replacing Components www.emachines.com Preventing static electricity discharge Warning To avoid exposure to dangerous electrical voltages and moving parts, turn off your computer and unplug the...
NG3 Hardware Reference
Page 173
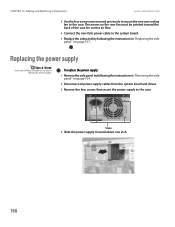
... by following the instructions in "Replacing the side panel" on page 154. 2 Disconnect all power supply cables from the system board and drives. 3 Remove the four screws that secure the power supply to the case. The arrows on the new fan must be pointed toward the back of ...power cable to the system board. 7 Replace the side panel by following the instructions in "Removing the side panel" on page 157. CHAPTER 13: Adding and Replacing Components www.emachines.com 5 Use the four screws you removed previously to secure the new rear cooling fan to add or replace the power supply...
... by following the instructions in "Replacing the side panel" on page 154. 2 Disconnect all power supply cables from the system board and drives. 3 Remove the four screws that secure the power supply to the case. The arrows on the new fan must be pointed toward the back of ...power cable to the system board. 7 Replace the side panel by following the instructions in "Removing the side panel" on page 157. CHAPTER 13: Adding and Replacing Components www.emachines.com 5 Use the four screws you removed previously to secure the new rear cooling fan to add or replace the power supply...
NG3 Hardware Reference
Page 174
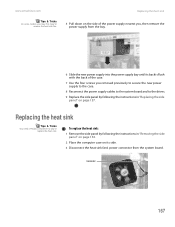
...by following the instructions in "Replacing the side panel" on page 157. www.emachines.com Tips & Tricks On some models, you removed previously to secure the new power supply to the case. 8 Reconnect the power supply cables to the system board and to the drives. 9 Replace the side ...computer case on its side. 3 Disconnect the heat sink fan's power connector from the bay. 6 Slide the new power supply into the power supply bay until its back is flush with the back of the power supply nearest you, then remove the power supply from the system board. Replacing the heat sink Tips & Tricks...
...by following the instructions in "Replacing the side panel" on page 157. www.emachines.com Tips & Tricks On some models, you removed previously to secure the new power supply to the case. 8 Reconnect the power supply cables to the system board and to the drives. 9 Replace the side ...computer case on its side. 3 Disconnect the heat sink fan's power connector from the bay. 6 Slide the new power supply into the power supply bay until its back is flush with the back of the power supply nearest you, then remove the power supply from the system board. Replacing the heat sink Tips & Tricks...

NG3 Hardware Reference
Page 210
www.emachines.com Index using 60 NTSC/PAL jack 76 numeric keypad 21 indicator 21 O online help 3, 4 opening computer case 154 documents 37 files 23, 27 files ... Hibernate mode 9, 116 indicator 9 schemes 115 source problems 18 Standby/Resume 9 troubleshooting 189 turning off computer 19 turning on computer 19 using UPS 118 power button 9 power supply replacing 166 uninterruptible 118 printer default 190 installing 13, 150 parallel port 10 sharing 59 troubleshooting 189 USB port 8, 11 printing documents 38 files across...
www.emachines.com Index using 60 NTSC/PAL jack 76 numeric keypad 21 indicator 21 O online help 3, 4 opening computer case 154 documents 37 files 23, 27 files ... Hibernate mode 9, 116 indicator 9 schemes 115 source problems 18 Standby/Resume 9 troubleshooting 189 turning off computer 19 turning on computer 19 using UPS 118 power button 9 power supply replacing 166 uninterruptible 118 printer default 190 installing 13, 150 parallel port 10 sharing 59 troubleshooting 189 USB port 8, 11 printing documents 38 files across...
NG3 Hardware Reference
Page 211
Index www.emachines.com serial number 9 serial port 10 setting up safety precautions 194 sharing drives 58 folders 58 printer 59 shortcut menus accessing 23 shortcuts adding to ... technical support 191 telephone support 191 Web site connection speed 181 turning off computer 9, 19, 20 turning on computer 9, 19 tutoring fee-based 192 U uninterruptible power supply (UPS) 18, 118 un-sharing drives 59 folders 59 updates security 126 virus definitions 124 updating virus definitions 124 updating Windows 142 UPS 18, 118...
Index www.emachines.com serial number 9 serial port 10 setting up safety precautions 194 sharing drives 58 folders 58 printer 59 shortcut menus accessing 23 shortcuts adding to ... technical support 191 telephone support 191 Web site connection speed 181 turning off computer 9, 19, 20 turning on computer 9, 19 tutoring fee-based 192 U uninterruptible power supply (UPS) 18, 118 un-sharing drives 59 folders 59 updates security 126 virus definitions 124 updating virus definitions 124 updating Windows 142 UPS 18, 118...


