
eMachines E644 and E644G Series Serivce Guide
Page 5
... 1 Hardware Specifications Features 1-5 Operating System 1-5 Platform 1-5 System Memory 1-5 Display 1-5 Audio Subsystem 1-5 Graphics 1-5 Storage Subsystem 1-6 Privacy Control 1-6 Optical Media Drive 1-6 Communication 1-7 Dimension and Weight 1-7 Power Adapter and Battery 1-7 Special Keys and Controls 1-7 I/O Ports 1-8 Optional Items 1-8 Warranty 1-8 Software 1-8 Environment 1-9 Notebook Tour 1-10 Top View 1-10 Closed Front View 1-12 Rear View 1-13 Left View 1-14 Right View 1-15 Base View 1-16 Touchpad Basics 1-17 Using the Keyboard 1-18 Windows Keys 1-19 Hotkeys...
... 1 Hardware Specifications Features 1-5 Operating System 1-5 Platform 1-5 System Memory 1-5 Display 1-5 Audio Subsystem 1-5 Graphics 1-5 Storage Subsystem 1-6 Privacy Control 1-6 Optical Media Drive 1-6 Communication 1-7 Dimension and Weight 1-7 Power Adapter and Battery 1-7 Special Keys and Controls 1-7 I/O Ports 1-8 Optional Items 1-8 Warranty 1-8 Software 1-8 Environment 1-9 Notebook Tour 1-10 Top View 1-10 Closed Front View 1-12 Rear View 1-13 Left View 1-14 Right View 1-15 Base View 1-16 Touchpad Basics 1-17 Using the Keyboard 1-18 Windows Keys 1-19 Hotkeys...

eMachines E644 and E644G Series Serivce Guide
Page 6
... 1-33 Display Supported Resolution (GPU Supported Resolution 1-33 Mini Card 1-35 3G Card (not available in this model 1-35 Audio Codec and Amplifier 1-35 Audio Interface 1-35 Battery 1-37 VRAM 1-37 USB Port 1-37 AC Adapter 1-38 System Power Management 1-38 Card Reader 1-38 System LED Indicator 1-39 System DMA Specification 1-39 CHAPTER 2 System Utilities BIOS Setup Utility 2-3 Navigating the BIOS Utility 2-3 BIOS 2-4 Information 2-4 Main 2-6 Security 2-8 Boot 2-12 Exit 2-13 BIOS Flash Utilities 2-14 DOS Flash Utility 2-15 WinFlash Utility 2-17 Remove HDD/BIOS Password...
... 1-33 Display Supported Resolution (GPU Supported Resolution 1-33 Mini Card 1-35 3G Card (not available in this model 1-35 Audio Codec and Amplifier 1-35 Audio Interface 1-35 Battery 1-37 VRAM 1-37 USB Port 1-37 AC Adapter 1-38 System Power Management 1-38 Card Reader 1-38 System LED Indicator 1-39 System DMA Specification 1-39 CHAPTER 2 System Utilities BIOS Setup Utility 2-3 Navigating the BIOS Utility 2-3 BIOS 2-4 Information 2-4 Main 2-6 Security 2-8 Boot 2-12 Exit 2-13 BIOS Flash Utilities 2-14 DOS Flash Utility 2-15 WinFlash Utility 2-17 Remove HDD/BIOS Password...
eMachines E644 and E644G Series Serivce Guide
Page 7
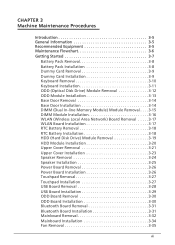
...Maintenance Flowchart 3-6 Getting Started 3-7 Battery Pack Removal 3-8 Battery Pack Installation 3-8 Dummy Card Removal 3-9 Dummy Card Installation 3-9 Keyboard Removal 3-10 Keyboard Installation 3-11 ODD (Optical Disk Drive) Module Removal 3-12 ODD Module Installation 3-13 Base Door Removal 3-14 Base Door Installation 3-14 DIMM (Dual In-line Memory Module) Module Removal . . . .3-15 DIMM Module Installation 3-16 WLAN (Wireless Local Area Network) Board Removal . . . . .3-17 WLAN Board Installation 3-17 RTC Battery Removal 3-18 RTC Battery Installation 3-18 HDD (Hard Disk Drive...
...Maintenance Flowchart 3-6 Getting Started 3-7 Battery Pack Removal 3-8 Battery Pack Installation 3-8 Dummy Card Removal 3-9 Dummy Card Installation 3-9 Keyboard Removal 3-10 Keyboard Installation 3-11 ODD (Optical Disk Drive) Module Removal 3-12 ODD Module Installation 3-13 Base Door Removal 3-14 Base Door Installation 3-14 DIMM (Dual In-line Memory Module) Module Removal . . . .3-15 DIMM Module Installation 3-16 WLAN (Wireless Local Area Network) Board Removal . . . . .3-17 WLAN Board Installation 3-17 RTC Battery Removal 3-18 RTC Battery Installation 3-18 HDD (Hard Disk Drive...

eMachines E644 and E644G Series Serivce Guide
Page 12
... 1-5 Operating System 1-5 Platform 1-5 System Memory 1-5 Display 1-5 Audio Subsystem 1-5 Graphics 1-5 Storage Subsystem 1-6 Privacy Control 1-6 Optical Media Drive 1-6 Communication 1-7 Dimension and Weight 1-7 Power Adapter and Battery 1-7 Special Keys and Controls 1-7 I/O Ports 1-8 Optional Items 1-8 Warranty 1-8 Software 1-8 Environment 1-9 Notebook Tour 1-10 Top View 1-10 Closed Front View 1-12 Rear View 1-13 Left View 1-14 Right View 1-15 Base View 1-16 Touchpad Basics 1-17 Using the Keyboard 1-18 Windows Keys 1-19 Hotkeys 1-20 System Block Diagram 1-22...
... 1-5 Operating System 1-5 Platform 1-5 System Memory 1-5 Display 1-5 Audio Subsystem 1-5 Graphics 1-5 Storage Subsystem 1-6 Privacy Control 1-6 Optical Media Drive 1-6 Communication 1-7 Dimension and Weight 1-7 Power Adapter and Battery 1-7 Special Keys and Controls 1-7 I/O Ports 1-8 Optional Items 1-8 Warranty 1-8 Software 1-8 Environment 1-9 Notebook Tour 1-10 Top View 1-10 Closed Front View 1-12 Rear View 1-13 Left View 1-14 Right View 1-15 Base View 1-16 Touchpad Basics 1-17 Using the Keyboard 1-18 Windows Keys 1-19 Hotkeys 1-20 System Block Diagram 1-22...
eMachines E644 and E644G Series Serivce Guide
Page 18
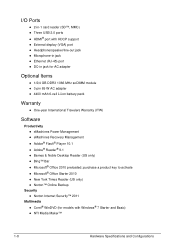
.../line-out jack Microphone-in jack Ethernet (RJ-45) port DC-in -1 card reader (SD™, MMC) Three USB 2.0 ports HDMI® port with Windows® 7 Starter and Basic) NTI Media Maker™ 1-8 Hardware Specifications and Configurations I/O Ports 0 2-in jack for AC adapter Optional Items 0 1/2/4 GB DDR3 1066 MHz soDIMM module 3-pin 65 W AC adapter 4400 mAh 6-cell Li-ion battery pack Warranty 0 One-year International Travelers Warranty (ITW) Software 0 Productivity eMachines Power Management eMachines Recovery Management Adobe® Flash®...
.../line-out jack Microphone-in jack Ethernet (RJ-45) port DC-in -1 card reader (SD™, MMC) Three USB 2.0 ports HDMI® port with Windows® 7 Starter and Basic) NTI Media Maker™ 1-8 Hardware Specifications and Configurations I/O Ports 0 2-in jack for AC adapter Optional Items 0 1/2/4 GB DDR3 1066 MHz soDIMM module 3-pin 65 W AC adapter 4400 mAh 6-cell Li-ion battery pack Warranty 0 One-year International Travelers Warranty (ITW) Software 0 Productivity eMachines Power Management eMachines Recovery Management Adobe® Flash®...

eMachines E644 and E644G Series Serivce Guide
Page 21
...Fully charged: The light shows blue when in AC mode. 7 Click buttons The left and right buttons function like (left and right) the left and right mouse buttons. 8 TouchPad Touch-sensitive pointing device which functions like a computer mouse. 9 Speakers Left and right speakers deliver stereo audio output. 10 Microphone Internal microphone for recording sound. Table 1-1. Top View (Continued) # Icon Item 3 HDD indicator Communication indicator 4 Power button Description Indicates when the hard disk drive is charging. 2. Battery Indicates the computer's battery status...
...Fully charged: The light shows blue when in AC mode. 7 Click buttons The left and right buttons function like (left and right) the left and right mouse buttons. 8 TouchPad Touch-sensitive pointing device which functions like a computer mouse. 9 Speakers Left and right speakers deliver stereo audio output. 10 Microphone Internal microphone for recording sound. Table 1-1. Top View (Continued) # Icon Item 3 HDD indicator Communication indicator 4 Power button Description Indicates when the hard disk drive is charging. 2. Battery Indicates the computer's battery status...
eMachines E644 and E644G Series Serivce Guide
Page 24
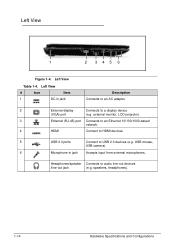
... View 0 1 2 345 6 Figure 1-4. USB mouse, USB camera). 6 Microphone-in jack Description Connects to an AC adapter 2 External display Connects to a display device (VGA) port (e.g. Headphones/speaker Connects to USB 2.0 devices (e.g. speakers, headphones). 1-14 Hardware Specifications and Configurations Left View Table 1-4. external monitor, LCD projector). 3 Ethernet (RJ-45) port Connects to an Ethernet 10/100/1000-based network. 4 HDMI Connect to HDMI devices 5 USB 2.0 ports Connect to audio line-out devices /line-out jack (e.g. Left View # Icon Item...
... View 0 1 2 345 6 Figure 1-4. USB mouse, USB camera). 6 Microphone-in jack Description Connects to an AC adapter 2 External display Connects to a display device (VGA) port (e.g. Headphones/speaker Connects to USB 2.0 devices (e.g. speakers, headphones). 1-14 Hardware Specifications and Configurations Left View Table 1-4. external monitor, LCD projector). 3 Ethernet (RJ-45) port Connects to an Ethernet 10/100/1000-based network. 4 HDMI Connect to HDMI devices 5 USB 2.0 ports Connect to audio line-out devices /line-out jack (e.g. Left View # Icon Item...
eMachines E644 and E644G Series Serivce Guide
Page 25
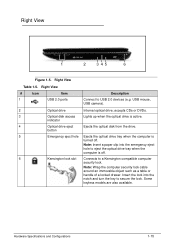
... CDs or DVDs. 3 Optical disk access Lights up when the optical drive is turned off . 6 Kensington lock slot Connects to USB 2.0 devices (e.g. Note: Wrap the computer security lock cable around an immovable object such as a table or handle of a locked drawer. button 5 Emergency eject hole Ejects the optical drive tray when the computer is active. Some keyless models are also available. USB mouse, USB camera). 2 Optical drive Internal optical drive; Hardware Specifications and Configurations 1-15 indicator 4 Optical drive eject Ejects...
... CDs or DVDs. 3 Optical disk access Lights up when the optical drive is turned off . 6 Kensington lock slot Connects to USB 2.0 devices (e.g. Note: Wrap the computer security lock cable around an immovable object such as a table or handle of a locked drawer. button 5 Emergency eject hole Ejects the optical drive tray when the computer is active. Some keyless models are also available. USB mouse, USB camera). 2 Optical drive Internal optical drive; Hardware Specifications and Configurations 1-15 indicator 4 Optical drive eject Ejects...

eMachines E644 and E644G Series Serivce Guide
Page 28
... access Num Lock on embedded keypad Type numbers in uppercase. manner. 1-18 Hardware Specifications and Configurations Table 1-8. To simplify the keyboard legend, cursor-control key symbols are in a normal manner. Using the Keyboard 0 The computer has a close-to connect an external keypad. The keys function as a calculator (complete with some applications. Cursor-control keys on the upper right corner of numeric data entry. Scroll Lock When Scroll Lock is indicated by small characters located...
... access Num Lock on embedded keypad Type numbers in uppercase. manner. 1-18 Hardware Specifications and Configurations Table 1-8. To simplify the keyboard legend, cursor-control key symbols are in a normal manner. Using the Keyboard 0 The computer has a close-to connect an external keypad. The keys function as a calculator (complete with some applications. Cursor-control keys on the upper right corner of numeric data entry. Scroll Lock When Scroll Lock is indicated by small characters located...
eMachines E644 and E644G Series Serivce Guide
Page 29
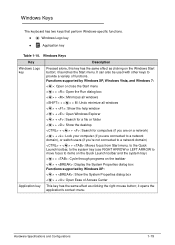
... Properties dialog box Functions supported by Windows XP: < > + : Show the System Properties dialog box < > + : Open Ease of functions. Hardware Specifications and Configurations 1-19 It can also be used with other keys to items on the Quick Launch toolbar and the system tray) < > + : Cycle through programs on the Windows Start button; Windows Keys 0 The keyboard has two keys that perform Windows-specific functions. Windows Logo key Application key Table 1-10. Windows Keys Key Description Windows Logo key Pressed alone, this...
... Properties dialog box Functions supported by Windows XP: < > + : Show the System Properties dialog box < > + : Open Ease of functions. Hardware Specifications and Configurations 1-19 It can also be used with other keys to items on the Quick Launch toolbar and the system tray) < > + : Cycle through programs on the Windows Start button; Windows Keys 0 The keyboard has two keys that perform Windows-specific functions. Windows Logo key Application key Table 1-10. Windows Keys Key Description Windows Logo key Pressed alone, this...

eMachines E644 and E644G Series Serivce Guide
Page 30
...Keyboard Hotkeys Hot key + + Icon Function Description Communication switch Enables/disables the computer's communication devices. (Communication devices may vary by configuration.) Sleep Puts the computer in the hockey combination. Figure 1-9. Table 1-11. Increases the screen brightness. Hotkeys 0 The computer employs hotkeys or key combinations to access most of the computer's controls like screen brightness and volume output. Keyboard Hotkeys To activate hotkeys, press and hold the key before pressing the other key in Sleep mode. + + + Display toggle Screen...
...Keyboard Hotkeys Hot key + + Icon Function Description Communication switch Enables/disables the computer's communication devices. (Communication devices may vary by configuration.) Sleep Puts the computer in the hockey combination. Figure 1-9. Table 1-11. Increases the screen brightness. Hotkeys 0 The computer employs hotkeys or key combinations to access most of the computer's controls like screen brightness and volume output. Keyboard Hotkeys To activate hotkeys, press and hold the key before pressing the other key in Sleep mode. + + + Display toggle Screen...
eMachines E644 and E644G Series Serivce Guide
Page 55
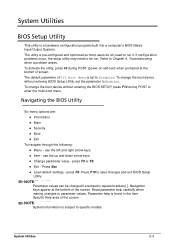
... change the boot device without entering BIOS Setup Utility, set to enter the multi-boot menu. Navigation keys appear at the bottom of the screen. Press Esc Load default settings - To activate the utility, press F2 during POST to Disabled. System Utilities BIOS Setup Utility 0 This utility is found in square brackets [ ]. The utility is pre-configured and optimized so most users do not need to parameter values. If configuration problems occur, the setup utility may need to Chapter 4, Troubleshooting when a problem...
... change the boot device without entering BIOS Setup Utility, set to enter the multi-boot menu. Navigation keys appear at the bottom of the screen. Press Esc Load default settings - To activate the utility, press F2 during POST to Disabled. System Utilities BIOS Setup Utility 0 This utility is found in square brackets [ ]. The utility is pre-configured and optimized so most users do not need to parameter values. If configuration problems occur, the setup utility may need to Chapter 4, Troubleshooting when a problem...
eMachines E644 and E644G Series Serivce Guide
Page 63
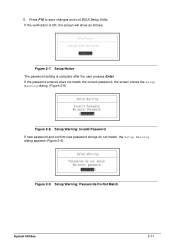
Figure 2-7. Setup Warning: Passwords Do Not Match System Utilities 2-11 5. If the password entered does not match the current password, the screen shows the Setup Warning dialog. (Figure 2-8) Figure 2-8. Setup Warning: Invalid Password If new password and confirm new password strings do not match, the Setup Warning dialog appears (Figure 2-9). Figure 2-9. If the verification is complete after the user presses Enter. Press F10 to save changes and exit BIOS Setup Utility. Setup Notice The password setting is OK, the screen will show as follows.
Figure 2-7. Setup Warning: Passwords Do Not Match System Utilities 2-11 5. If the password entered does not match the current password, the screen shows the Setup Warning dialog. (Figure 2-8) Figure 2-8. Setup Warning: Invalid Password If new password and confirm new password strings do not match, the Setup Warning dialog appears (Figure 2-9). Figure 2-9. If the verification is complete after the user presses Enter. Press F10 to save changes and exit BIOS Setup Utility. Setup Notice The password setting is OK, the screen will show as follows.
eMachines E644 and E644G Series Serivce Guide
Page 65
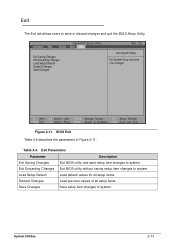
... Discarding Changes Exit BIOS utility without saving setup item changes to system. Table 2-4. Exit 0 The Exit tab allows users to save or discard changes and quit the BIOS Setup Utility. 3.5 Exit Saving Changes Exit Discarding Changes Load Setup Defaults Discard Changes Save Changes Item Specific Help Exit System Setup and save setup item changes to system. System Utilities 2-13 Exit Parameters Parameter Description Exit Saving Changes Exit BIOS utility and save your changes. Load Setup Default Load default...
... Discarding Changes Exit BIOS utility without saving setup item changes to system. Table 2-4. Exit 0 The Exit tab allows users to save or discard changes and quit the BIOS Setup Utility. 3.5 Exit Saving Changes Exit Discarding Changes Load Setup Defaults Discard Changes Save Changes Item Specific Help Exit System Setup and save setup item changes to system. System Utilities 2-13 Exit Parameters Parameter Description Exit Saving Changes Exit BIOS utility and save your changes. Load Setup Default Load default...
eMachines E644 and E644G Series Serivce Guide
Page 82
... 3-5 Maintenance Flowchart 3-6 Getting Started 3-7 Battery Pack Removal 3-8 Battery Pack Installation 3-8 Dummy Card Removal 3-9 Dummy Card Installation 3-9 Keyboard Removal 3-10 Keyboard Installation 3-11 ODD (Optical Disk Drive) Module Removal 3-12 ODD Module Installation 3-13 Base Door Removal 3-14 Base Door Installation 3-14 DIMM (Dual In-line Memory Module) Module Removal 3-15 DIMM Module Installation 3-16 WLAN (Wireless Local Area Network) Board Removal 3-17 WLAN Board Installation 3-17 RTC Battery Removal 3-18 RTC Battery Installation 3-18 HDD (Hard Disk Drive) Module...
... 3-5 Maintenance Flowchart 3-6 Getting Started 3-7 Battery Pack Removal 3-8 Battery Pack Installation 3-8 Dummy Card Removal 3-9 Dummy Card Installation 3-9 Keyboard Removal 3-10 Keyboard Installation 3-11 ODD (Optical Disk Drive) Module Removal 3-12 ODD Module Installation 3-13 Base Door Removal 3-14 Base Door Installation 3-14 DIMM (Dual In-line Memory Module) Module Removal 3-15 DIMM Module Installation 3-16 WLAN (Wireless Local Area Network) Board Removal 3-17 WLAN Board Installation 3-17 RTC Battery Removal 3-18 RTC Battery Installation 3-18 HDD (Hard Disk Drive) Module...
eMachines E644 and E644G Series Serivce Guide
Page 137
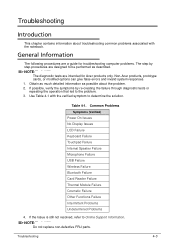
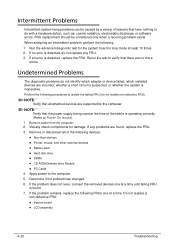
... for troubleshooting computer problems. The step by re-creating the failure through diagnostic tests or repeating the operation that led to the problem. 3. Table 4-1. Troubleshooting 4-3 Obtain as much detailed information as described. Common Problems Symptoms (Verified) Power On Issues No Display Issues LCD Failure Keyboard Failure Touchpad Failure Internal Speaker Failure Microphone Failure USB Failure Wireless Failure Bluetooth Failure Card Reader Failure Thermal Module Failure Cosmetic Failure Other Functions Failure Intermittent Problems Undetermined Problems...
... for troubleshooting computer problems. The step by re-creating the failure through diagnostic tests or repeating the operation that led to the problem. 3. Table 4-1. Troubleshooting 4-3 Obtain as much detailed information as described. Common Problems Symptoms (Verified) Power On Issues No Display Issues LCD Failure Keyboard Failure Touchpad Failure Internal Speaker Failure Microphone Failure USB Failure Wireless Failure Bluetooth Failure Card Reader Failure Thermal Module Failure Cosmetic Failure Other Functions Failure Intermittent Problems Undetermined Problems...
eMachines E644 and E644G Series Serivce Guide
Page 139
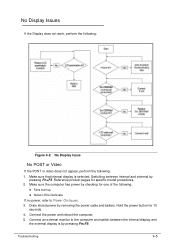
... pressing Fn+F5. Troubleshooting 4-5 Hold the power button for one of the following: Fans start up Status LEDs illuminate If no power, refer to the computer and switch between internal and external by removing the power cable and battery. Reference product pages for specific model procedures. 2. Connect an external monitor to Power On Issues. 3. Connect the power and reboot the computer. 5. No Display Issue No POST or Video 0 If the POST...
... pressing Fn+F5. Troubleshooting 4-5 Hold the power button for one of the following: Fans start up Status LEDs illuminate If no power, refer to the computer and switch between internal and external by removing the power cable and battery. Reference product pages for specific model procedures. 2. Connect an external monitor to Power On Issues. 3. Connect the power and reboot the computer. 5. No Display Issue No POST or Video 0 If the POST...

eMachines E644 and E644G Series Serivce Guide
Page 140
.... Adjust the brightness to Maintenance Flowchart. Refer to Online Support Information. If the Issue is still not resolved, refer to the User Manual for instructions on -screen prompts. 9. 6. Start the computer. Remove and reinstall the video driver. 6. If the issue is discovered. 9. Reseat the memory modules. 10. Readjust if necessary. 4. Run the Windows Memory Diagnostic from the operating system DVD and follow the on adjusting the settings. Refer to LCD Failure...
.... Adjust the brightness to Maintenance Flowchart. Refer to Online Support Information. If the Issue is still not resolved, refer to the User Manual for instructions on -screen prompts. 9. 6. Start the computer. Remove and reinstall the video driver. 6. If the issue is discovered. 9. Reseat the memory modules. 10. Readjust if necessary. 4. Run the Windows Memory Diagnostic from the operating system DVD and follow the on adjusting the settings. Refer to LCD Failure...
eMachines E644 and E644G Series Serivce Guide
Page 154
... found , replace the FRU. 3. Remove power from the computer. 2. Remove or disconnect all attached devices are no error is detected, replace the FRU. When analyzing an intermittent problem, perform the following devices: Non-Acer devices Printer, mouse, and other external devices Battery pack Hard disk drive DIMM CD-ROM/Diskette drive Module PC Cards 4. If an error is...
... found , replace the FRU. 3. Remove power from the computer. 2. Remove or disconnect all attached devices are no error is detected, replace the FRU. When analyzing an intermittent problem, perform the following devices: Non-Acer devices Printer, mouse, and other external devices Battery pack Hard disk drive DIMM CD-ROM/Diskette drive Module PC Cards 4. If an error is...
eMachines E644 and E644G Series Serivce Guide
Page 158
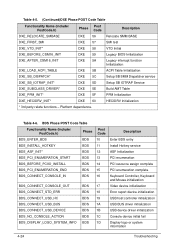
... Controller, Keyboard and Mouse initialization BDS_CONNECT_CONSOLE_OUT BDS 17 Video device initialization BDS_CONNECT_STD_ERR BDS 18 Error report device initialization BDS_CONNECT_USB_HC BDS 19 USB host controller initialization BDS_CONNECT_USB_BUS BDS 1A USB BUS driver initialization BDS_CONNECT_USB_DEVICE BDS 1B USB device driver initialization BDS_NO_CONSOLE_ACTION BDS 1C Console device initial fail BDS_DISPLAY_LOGO_SYSTEM_INFO BDS 1D Display logo or system information 4-24 Troubleshooting Table 4-6. Table 4-5. (Continued)DXE Phase POST Code Table Functionality...
... Controller, Keyboard and Mouse initialization BDS_CONNECT_CONSOLE_OUT BDS 17 Video device initialization BDS_CONNECT_STD_ERR BDS 18 Error report device initialization BDS_CONNECT_USB_HC BDS 19 USB host controller initialization BDS_CONNECT_USB_BUS BDS 1A USB BUS driver initialization BDS_CONNECT_USB_DEVICE BDS 1B USB device driver initialization BDS_NO_CONSOLE_ACTION BDS 1C Console device initial fail BDS_DISPLAY_LOGO_SYSTEM_INFO BDS 1D Display logo or system information 4-24 Troubleshooting Table 4-6. Table 4-5. (Continued)DXE Phase POST Code Table Functionality...


