

User Manual
Page 3
Contents Using Your eMachines Flat-Panel Monitor 1 Unpacking the monitor 2 Setting up the monitor 2 Attaching the base 2 Connecting cables 3 Connecting a security cable 4 Turning on the monitor 4 Adjusting monitor settings 5 Monitor buttons 5 On-screen display options 6 Changing Windows screen settings 8 Power management 9 ENERGY STAR 9 Energy ...Picture has shadows or "ghosts 11 Color is not uniform 11 Image is not sized or centered correctly 11 The monitor has pixels that are always dark or too bright 12 Connecting a game console 12 Video modes 13 Safety, Regulatory...
Contents Using Your eMachines Flat-Panel Monitor 1 Unpacking the monitor 2 Setting up the monitor 2 Attaching the base 2 Connecting cables 3 Connecting a security cable 4 Turning on the monitor 4 Adjusting monitor settings 5 Monitor buttons 5 On-screen display options 6 Changing Windows screen settings 8 Power management 9 ENERGY STAR 9 Energy ...Picture has shadows or "ghosts 11 Color is not uniform 11 Image is not sized or centered correctly 11 The monitor has pixels that are always dark or too bright 12 Connecting a game console 12 Video modes 13 Safety, Regulatory...

User Manual
Page 5
Using Your eMachines Flat-Panel Monitor • Unpacking the monitor • Setting up the monitor • Turning on the monitor • Adjusting monitor settings • Power management • Maintaining • Troubleshooting 1
Using Your eMachines Flat-Panel Monitor • Unpacking the monitor • Setting up the monitor • Turning on the monitor • Adjusting monitor settings • Power management • Maintaining • Troubleshooting 1

User Manual
Page 6
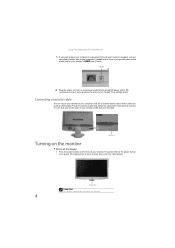
...eMachines Flat-Panel Monitor Unpacking the monitor Your monitor box should contain the following items: • Monitor (with neck attached) • Base (to connect to the neck) • This User Guide • VGA cable • Audio cable (Option)€ • Power cord If you slide the monitor neck down onto the base. 2 Setting up the monitor... To set up the monitor, first attach the base, then connect cables. Attaching the base To attach the base: ...
...eMachines Flat-Panel Monitor Unpacking the monitor Your monitor box should contain the following items: • Monitor (with neck attached) • Base (to connect to the neck) • This User Guide • VGA cable • Audio cable (Option)€ • Power cord If you slide the monitor neck down onto the base. 2 Setting up the monitor... To set up the monitor, first attach the base, then connect cables. Attaching the base To attach the base: ...

User Manual
Page 7
www.emachines.com Connecting cables To connect video and power cables: 1 Position your computer and the monitor so you can reach the back of each, then connect the blue VGA video cable to the blue VGA video connector under the back of the monitor. 2 * Option for Dual Model Position your computer and the monitor so... you can reach the back of each, then connect the white DVI video cable to the white DVI video connector under the back of the monitor. 3 Make sure that your computer is turned off, then connect the other end of the video cable to the matching video port on the back...
www.emachines.com Connecting cables To connect video and power cables: 1 Position your computer and the monitor so you can reach the back of each, then connect the blue VGA video cable to the blue VGA video connector under the back of the monitor. 2 * Option for Dual Model Position your computer and the monitor so... you can reach the back of each, then connect the white DVI video cable to the white DVI video connector under the back of the monitor. 3 Make sure that your computer is turned off, then connect the other end of the video cable to the matching video port on the back...
User Manual
Page 8
... recommend using a surge protector to another heavy object) with a cable lock (such as a Kensington™ lock). Using Your eMachines Flat-Panel Monitor 5 If you want to have your computer's audio played through your monitor's speakers, connect the included audio cable to your computer's headphones or line out jack (usually color-coded green) and...
... recommend using a surge protector to another heavy object) with a cable lock (such as a Kensington™ lock). Using Your eMachines Flat-Panel Monitor 5 If you want to have your computer's audio played through your monitor's speakers, connect the included audio cable to your computer's headphones or line out jack (usually color-coded green) and...
User Manual
Page 9
...angle. While the Scenario Mode menu is amber, or you see the Windows desktop, press the Auto button on the bottom of the monitor for the monitor. If the power LED is not on or is open or close the OSD and select the highlighted menu or setting. 5 This...of your computer. Important When adjusting the monitor settings, always press Auto before entering the on the monitor itself) and computer controls (accessible through Windows) to have the monitor self-adjust its image position, clock, and focus settings. www.emachines.com 2 Turn on the monitor's power button should be blue. After your...
...angle. While the Scenario Mode menu is amber, or you see the Windows desktop, press the Auto button on the bottom of the monitor for the monitor. If the power LED is not on or is open or close the OSD and select the highlighted menu or setting. 5 This...of your computer. Important When adjusting the monitor settings, always press Auto before entering the on the monitor itself) and computer controls (accessible through Windows) to have the monitor self-adjust its image position, clock, and focus settings. www.emachines.com 2 Turn on the monitor's power button should be blue. After your...

User Manual
Page 10
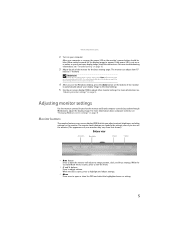
...to open the selected menu or setting. Color Temperature Selects a warm, cool, or user-defined color temperature. Mode Information Displays the monitor's current resolution, timing, input type, and serial number. Position Adjusts horizontal and vertical screen image position. The OSD opens. 3 ...all adjustments, press Auto repeatedly to the ideal settings for your current screen resolution. 2 Press Menu. Using Your eMachines Flat-Panel Monitor On-screen display options Adjusting OSD settings To adjust the OSD settings: 1 Press Auto. Language Selects the language ...
...to open the selected menu or setting. Color Temperature Selects a warm, cool, or user-defined color temperature. Mode Information Displays the monitor's current resolution, timing, input type, and serial number. Position Adjusts horizontal and vertical screen image position. The OSD opens. 3 ...all adjustments, press Auto repeatedly to the ideal settings for your current screen resolution. 2 Press Menu. Using Your eMachines Flat-Panel Monitor On-screen display options Adjusting OSD settings To adjust the OSD settings: 1 Press Auto. Language Selects the language ...

User Manual
Page 12
... pixels (individual colored dots) your computer uses to display images on your Windows desktop, then click Properties. 2 Click Display. Type adjusting monitor settings in your images seems "false" or "jumpy," especially after several seconds. 5 Click OK, then click Yes to suit your computer... do not look best displayed with the maximum number of colors available. Using Your eMachines Flat-Panel Monitor Changing Windows screen settings Color depth and screen resolution are two of the most basic monitor settings you prefer. 4 Click Apply. The Control Panel opens. Most images look ...
... pixels (individual colored dots) your computer uses to display images on your Windows desktop, then click Properties. 2 Click Display. Type adjusting monitor settings in your images seems "false" or "jumpy," especially after several seconds. 5 Click OK, then click Yes to suit your computer... do not look best displayed with the maximum number of colors available. Using Your eMachines Flat-Panel Monitor Changing Windows screen settings Color depth and screen resolution are two of the most basic monitor settings you prefer. 4 Click Apply. The Control Panel opens. Most images look ...

User Manual
Page 13
... gases and the risks of inactivity respectively. ‧ Wake the monitor when it is committed to the following levels: VESA state LED indicator Power consumption On Green < 30 W (E182H&/E192HQ) < 48 W (E202H) Active Off Amber ENERGY STAR and the ENERGY STAR mark are ...connected to a computer that supports the VESA Display Power Management Signaling (DPMS) protocol, the monitor can be reduced to offer products and services worldwide that are registered U.S. www.emachines.com Power management ENERGY STAR ENERGY STAR® Acer's ENERGY STAR qualified products save you money...
... gases and the risks of inactivity respectively. ‧ Wake the monitor when it is committed to the following levels: VESA state LED indicator Power consumption On Green < 30 W (E182H&/E192HQ) < 48 W (E202H) Active Off Amber ENERGY STAR and the ENERGY STAR mark are ...connected to a computer that supports the VESA Display Power Management Signaling (DPMS) protocol, the monitor can be reduced to offer products and services worldwide that are registered U.S. www.emachines.com Power management ENERGY STAR ENERGY STAR® Acer's ENERGY STAR qualified products save you money...

User Manual
Page 14
... cabinet, screen, and controls. No power • Make sure that the video cable is connected correctly to both the back of the monitor and the computer. Notebook computers typically have two options: • If your notebook supports dual displays, you can take several minutes to ... picture quality. If you have problems with water only. Using Your eMachines Flat-Panel Monitor Maintaining To keep the monitor in optimal working order: • Do not block the ventilation holes. • Do not expose the monitor to rain or use both your notebook's display, an externally attached ...
... cabinet, screen, and controls. No power • Make sure that the video cable is connected correctly to both the back of the monitor and the computer. Notebook computers typically have two options: • If your notebook supports dual displays, you can take several minutes to ... picture quality. If you have problems with water only. Using Your eMachines Flat-Panel Monitor Maintaining To keep the monitor in optimal working order: • Do not block the ventilation holes. • Do not expose the monitor to rain or use both your notebook's display, an externally attached ...

User Manual
Page 15
... 30 minutes before making a final judgment about connecting the video cable, see "Adjusting monitor settings" on page 5. 11 Image is functioning correctly, a "Cable Not Connected" ...monitor and unplug the video cable from the back of your computer. Color is not uniform • Press Auto to automatically adjust the display image to the ideal settings. • Make sure that might be bent or pushed in . www.emachines....com • If the power LED is amber: • Make sure that your computer is turned on. • Move the mouse or press any key on the keyboard to bring the monitor...
... 30 minutes before making a final judgment about connecting the video cable, see "Adjusting monitor settings" on page 5. 11 Image is functioning correctly, a "Cable Not Connected" ...monitor and unplug the video cable from the back of your computer. Color is not uniform • Press Auto to automatically adjust the display image to the ideal settings. • Make sure that might be bent or pushed in . www.emachines....com • If the power LED is amber: • Make sure that your computer is turned on. • Move the mouse or press any key on the keyboard to bring the monitor...

User Manual
Page 16
... on adjusting settings, see your computer. Connecting a game console • To determine the type of pixels affected. Using Your eMachines Flat-Panel Monitor • If the image looks stretched or fuzzy, you must adjust the operating system's display settings to select your... monitor's native resolution but it is not available in active-matrix LCD screens. eMachines' inspection standards keep these pixels are always dark or too bright • This condition is normal...
... on adjusting settings, see your computer. Connecting a game console • To determine the type of pixels affected. Using Your eMachines Flat-Panel Monitor • If the image looks stretched or fuzzy, you must adjust the operating system's display settings to select your... monitor's native resolution but it is not available in active-matrix LCD screens. eMachines' inspection standards keep these pixels are always dark or too bright • This condition is normal...

User Manual
Page 19
...product is damaged. ■ The system performance changes. Replacement parts and accessories Use only replacement parts and accessories recommended by eMachines. 15 Safety, Regulatory, and Legal Notices Important safety information Warning Always follow all power cables and modem cables from the ...near your work surface. ■ The product should only be operated from the type of electrical current still flows through the monitor. The voltage selector switch is a safety feature. Never insert objects of medical and dental facilities, oxygen-laden environments, or ...
...product is damaged. ■ The system performance changes. Replacement parts and accessories Use only replacement parts and accessories recommended by eMachines. 15 Safety, Regulatory, and Legal Notices Important safety information Warning Always follow all power cables and modem cables from the ...near your work surface. ■ The product should only be operated from the type of electrical current still flows through the monitor. The voltage selector switch is a safety feature. Never insert objects of medical and dental facilities, oxygen-laden environments, or ...

User Manual
Page 21
The following two conditions: (1) this device may not cause harmful interference, and (2) this declaration: Product: 18.5 &20" LCD Monitor Model Number: E182H; San Jose, CA 95110 U. S. Contact Person: Acer Representative Phone No.: 254-298-4000 Fax No.: 254-298-4147 ... /Importer is responsible for radio noise emissions from digital apparatus as set out in the radio interference regulations of Industry Canada. S. E202H SKU Number: E182H xxx; www.emachines.com Acer America Corporation 333 West San Carlos St., San Jose CA 95110, U. Tel : 254-298-4000 Fax : 254-...
The following two conditions: (1) this device may not cause harmful interference, and (2) this declaration: Product: 18.5 &20" LCD Monitor Model Number: E182H; San Jose, CA 95110 U. S. Contact Person: Acer Representative Phone No.: 254-298-4000 Fax No.: 254-298-4147 ... /Importer is responsible for radio noise emissions from digital apparatus as set out in the radio interference regulations of Industry Canada. S. E202H SKU Number: E182H xxx; www.emachines.com Acer America Corporation 333 West San Carlos St., San Jose CA 95110, U. Tel : 254-298-4000 Fax : 254-...

User Manual
Page 22
...108/EC as attested by conformity with the following harmonized standard: -. EN55024:1998 + A1:2001 + A2:2003 -. Trademark acknowledgments 9 Feb. 9, 2009 Date 18 E202H xxx ("x" = 0~9, a ~ z, A ~ Z Is compliant with the following harmonized standards: -. EN61000-3-3:1995 + A1:2001+A2: 2005 Low Voltage Directive [email protected] Hereby declare that: Product: Trade Name: Model Number: SKU Number: or Blank) 18.5 &20" LCD Monitor emachines E182H;E192HQ;E202H E182H xxx; EN60950-1:2001 + A11:2004 RoHS Directive 2002/95/EC on the Restriction of the Use of certain Hazardous Substances ...
...108/EC as attested by conformity with the following harmonized standard: -. EN55024:1998 + A1:2001 + A2:2003 -. Trademark acknowledgments 9 Feb. 9, 2009 Date 18 E202H xxx ("x" = 0~9, a ~ z, A ~ Z Is compliant with the following harmonized standards: -. EN61000-3-3:1995 + A1:2001+A2: 2005 Low Voltage Directive [email protected] Hereby declare that: Product: Trade Name: Model Number: SKU Number: or Blank) 18.5 &20" LCD Monitor emachines E182H;E192HQ;E202H E182H xxx; EN60950-1:2001 + A11:2004 RoHS Directive 2002/95/EC on the Restriction of the Use of certain Hazardous Substances ...

Setup Guide
Page 1
...) Getting Help Visit the tech support site at www.emachines.com : Easy Steps to the audo jack (Option) 6 Turn on the monitor MAN E182H/E192HQ/E202H PST R0 01/09 Connect your monitor to your computer Connect your monitor from power fluctuations, use a surge protector. 5 Connect... the audio cable to Set Up Your Monitor 6 5 Actual product may vary from the box, making sure the following items are included: Monitor Base E182H/E192HQ/E202H www.emachines.com P/N: MU.Q0300.001 This CD contains: s5Ser Guide sSetup Poster sAcrobaT2eader Copyright...
...) Getting Help Visit the tech support site at www.emachines.com : Easy Steps to the audo jack (Option) 6 Turn on the monitor MAN E182H/E192HQ/E202H PST R0 01/09 Connect your monitor to your computer Connect your monitor from power fluctuations, use a surge protector. 5 Connect... the audio cable to Set Up Your Monitor 6 5 Actual product may vary from the box, making sure the following items are included: Monitor Base E182H/E192HQ/E202H www.emachines.com P/N: MU.Q0300.001 This CD contains: s5Ser Guide sSetup Poster sAcrobaT2eader Copyright...


