

User Manual
Page 3
Contents Using Your eMachines Flat-Panel Monitor 1 Unpacking the monitor 2 Setting up the monitor 2 Attaching the base 2 Connecting cables 3 Connecting a security cable 4 Turning on the monitor 4 Adjusting monitor settings 5 Monitor buttons 5 On-screen display options 6 Changing Windows screen settings 8 Power management 9 ENERGY STAR 9 Energy ...Picture has shadows or "ghosts 11 Color is not uniform 11 Image is not sized or centered correctly 11 The monitor has pixels that are always dark or too bright 12 Connecting a game console 12 Video modes 13 Safety, Regulatory...
Contents Using Your eMachines Flat-Panel Monitor 1 Unpacking the monitor 2 Setting up the monitor 2 Attaching the base 2 Connecting cables 3 Connecting a security cable 4 Turning on the monitor 4 Adjusting monitor settings 5 Monitor buttons 5 On-screen display options 6 Changing Windows screen settings 8 Power management 9 ENERGY STAR 9 Energy ...Picture has shadows or "ghosts 11 Color is not uniform 11 Image is not sized or centered correctly 11 The monitor has pixels that are always dark or too bright 12 Connecting a game console 12 Video modes 13 Safety, Regulatory...

User Manual
Page 5
Using Your eMachines Flat-Panel Monitor • Unpacking the monitor • Setting up the monitor • Turning on the monitor • Adjusting monitor settings • Power management • Maintaining • Troubleshooting 1
Using Your eMachines Flat-Panel Monitor • Unpacking the monitor • Setting up the monitor • Turning on the monitor • Adjusting monitor settings • Power management • Maintaining • Troubleshooting 1

User Manual
Page 6
... button while you are missing any items, call Customer Care. Setting up the monitor To set up the monitor, first attach the base, then connect cables. Using Your eMachines Flat-Panel Monitor Unpacking the monitor Your monitor box should contain the following items: • Monitor (with neck attached) • Base (to connect to the neck) • This...
... button while you are missing any items, call Customer Care. Setting up the monitor To set up the monitor, first attach the base, then connect cables. Using Your eMachines Flat-Panel Monitor Unpacking the monitor Your monitor box should contain the following items: • Monitor (with neck attached) • Base (to connect to the neck) • This...

User Manual
Page 7
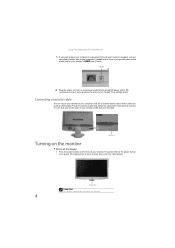
www.emachines.com Connecting cables To connect video and power cables: 1 Position your computer and the monitor so you can reach the back of each, then connect the blue VGA video cable to the blue VGA video connector under the back of the monitor. 2 * Option for Dual Model Position your computer and the monitor so... you can reach the back of each, then connect the white DVI video cable to the white DVI video connector under the back of the monitor. 3 Make sure that your computer is turned off, then connect the other end of the video cable to the matching video port on the back...
www.emachines.com Connecting cables To connect video and power cables: 1 Position your computer and the monitor so you can reach the back of each, then connect the blue VGA video cable to the blue VGA video connector under the back of the monitor. 2 * Option for Dual Model Position your computer and the monitor so... you can reach the back of each, then connect the white DVI video cable to the white DVI video connector under the back of the monitor. 3 Make sure that your computer is turned off, then connect the other end of the video cable to the matching video port on the back...
User Manual
Page 8
...eMachines Flat-Panel Monitor 5 If you want to have your computer's audio played through your monitor's speakers, connect the included audio cable to your computer's headphones or line out jack (usually color-coded green) and to your monitor from that shown.) Power button Important Turn on your monitor before turning on your monitor...to the lock slot on the back of your monitor may vary from voltage spikes. The power LED on the front of your computer desk (or to your monitor. Cable lock slot Turning on the monitor To turn on the monitor: 1 Press the power button on the power ...
...eMachines Flat-Panel Monitor 5 If you want to have your computer's audio played through your monitor's speakers, connect the included audio cable to your computer's headphones or line out jack (usually color-coded green) and to your monitor from that shown.) Power button Important Turn on your monitor before turning on your monitor...to the lock slot on the back of your monitor may vary from voltage spikes. The power LED on the front of your computer desk (or to your monitor. Cable lock slot Turning on the monitor To turn on the monitor: 1 Press the power button on the power ...
User Manual
Page 9
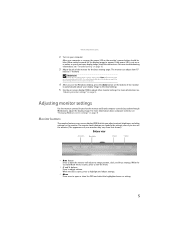
... the ideal settings for the current screen resolution. 4 After you adjust contrast, brightness, and other monitor settings. For more information, see "Adjusting monitor settings" on page 5. Monitor buttons This monitor features an on-screen display (OSD) that shown.) Bottom view Auto button Menu button < button... about computer controls, see a display image, check the connections. www.emachines.com 2 Turn on page 10. 3 Adjust the tilt of your monitor may vary from 15° back to have the monitor self-adjust its image position, clock, and focus settings. For more ...
... the ideal settings for the current screen resolution. 4 After you adjust contrast, brightness, and other monitor settings. For more information, see "Adjusting monitor settings" on page 5. Monitor buttons This monitor features an on-screen display (OSD) that shown.) Bottom view Auto button Menu button < button... about computer controls, see a display image, check the connections. www.emachines.com 2 Turn on page 10. 3 Adjust the tilt of your monitor may vary from 15° back to have the monitor self-adjust its image position, clock, and focus settings. For more ...

User Manual
Page 10
...exit. 6 Language Selects the language for Full screen, Aspect ratio mode Turns DDC/CI support on or off. Mode Information Displays the monitor's current resolution, timing, input type, and serial number. Adjusts focus and clock settings. Input Source Wide Mode DDC/CI Settings Select input...to open the selected menu or setting. OSD Settings Adjusts the horizontal and vertical position of the OSD and sets the timeout. Using Your eMachines Flat-Panel Monitor On-screen display options Adjusting OSD settings To adjust the OSD settings: 1 Press Auto. The OSD opens. 3 Press < and > ...
...exit. 6 Language Selects the language for Full screen, Aspect ratio mode Turns DDC/CI support on or off. Mode Information Displays the monitor's current resolution, timing, input type, and serial number. Adjusts focus and clock settings. Input Source Wide Mode DDC/CI Settings Select input...to open the selected menu or setting. OSD Settings Adjusts the horizontal and vertical position of the OSD and sets the timeout. Using Your eMachines Flat-Panel Monitor On-screen display options Adjusting OSD settings To adjust the OSD settings: 1 Press Auto. The OSD opens. 3 Press < and > ...

User Manual
Page 12
...such as icons and menu bars) can also right-click on your needs. Using Your eMachines Flat-Panel Monitor Changing Windows screen settings Color depth and screen resolution are two of the most basic monitor settings you prefer, then click OK. 8 If the new settings make the screen illegible ...; Highest (32-bit) = 16,700,000 colors Screen resolution is the number of pixels (individual colored dots) your computer uses to suit your monitor. To change the color depth and screen resolution in your images seems "false" or "jumpy," especially after several seconds. 5 Click OK, then ...
...such as icons and menu bars) can also right-click on your needs. Using Your eMachines Flat-Panel Monitor Changing Windows screen settings Color depth and screen resolution are two of the most basic monitor settings you prefer, then click OK. 8 If the new settings make the screen illegible ...; Highest (32-bit) = 16,700,000 colors Screen resolution is the number of pixels (individual colored dots) your computer uses to suit your monitor. To change the color depth and screen resolution in your images seems "false" or "jumpy," especially after several seconds. 5 Click OK, then ...

User Manual
Page 13
...can be reduced to a computer that are registered U.S. Products that supports the VESA Display Power Management Signaling (DPMS) protocol, the monitor can save more we reduce greenhouse gases and the risks of climate change. What is proud to offer products and services worldwide ... state LED indicator Power consumption On Green < 30 W (E182H&/E192HQ) < 48 W (E202H) Active Off Amber ENERGY STAR and the ENERGY STAR mark are ENERGY STAR qualified use . www.emachines.com Power management ENERGY STAR ENERGY STAR® Acer's ENERGY STAR qualified products save money, ...
...can be reduced to a computer that are registered U.S. Products that supports the VESA Display Power Management Signaling (DPMS) protocol, the monitor can save more we reduce greenhouse gases and the risks of climate change. What is proud to offer products and services worldwide ... state LED indicator Power consumption On Green < 30 W (E182H&/E192HQ) < 48 W (E202H) Active Off Amber ENERGY STAR and the ENERGY STAR mark are ENERGY STAR qualified use . www.emachines.com Power management ENERGY STAR ENERGY STAR® Acer's ENERGY STAR qualified products save money, ...

User Manual
Page 14
... more information about the picture quality. For more information. 10 Notebook computers typically have problems with water only. Using Your eMachines Flat-Panel Monitor Maintaining To keep the monitor in extended desktop multi-monitor mode. See your notebook's display, an externally attached display, and both the back of abrasive pad or glass cleaner. Caution...
... more information about the picture quality. For more information. 10 Notebook computers typically have problems with water only. Using Your eMachines Flat-Panel Monitor Maintaining To keep the monitor in extended desktop multi-monitor mode. See your notebook's display, an externally attached display, and both the back of abrasive pad or glass cleaner. Caution...

User Manual
Page 15
..." on page 5. 11 If the monitor is not sized or centered correctly • Press Auto to automatically adjust the display image to the ideal settings. • Change the position settings. For more information about color uniformity or brightness. www.emachines.com • If the power LED is amber: &#...8226; Make sure that your computer is turned on. • Move the mouse or press any key on the keyboard to bring the monitor out of sleep mode. • Restart your computer...
..." on page 5. 11 If the monitor is not sized or centered correctly • Press Auto to automatically adjust the display image to the ideal settings. • Change the position settings. For more information about color uniformity or brightness. www.emachines.com • If the power LED is amber: &#...8226; Make sure that your computer is turned on. • Move the mouse or press any key on the keyboard to bring the monitor out of sleep mode. • Restart your computer...

User Manual
Page 16
... to -date video drivers. • If your video card's support Web site for widescreen displays as the widescreen format becomes more popular. Using Your eMachines Flat-Panel Monitor • If the image looks stretched or fuzzy, you must adjust the operating system's display settings to a minimum. For information on your computer. See...
... to -date video drivers. • If your video card's support Web site for widescreen displays as the widescreen format becomes more popular. Using Your eMachines Flat-Panel Monitor • If the image looks stretched or fuzzy, you must adjust the operating system's display settings to a minimum. For information on your computer. See...

User Manual
Page 19
...system on a stable work area. Warning Do not use near water. Setting up your system. ■ Do not expose the monitor to rain or use eMachines products in the documentation before cleaning the system. ■ Unplug the system from the type of medical and dental facilities, oxygen-...only be operated from the wall outlet and refer servicing to ensure safe use . Never insert objects of electrical current still flows through the monitor. Call eMachines Customer Care for your product. However, to qualified personnel if: ■ The power cord or plug is damaged. ■ Liquid ...
...system on a stable work area. Warning Do not use near water. Setting up your system. ■ Do not expose the monitor to rain or use eMachines products in the documentation before cleaning the system. ■ Unplug the system from the type of medical and dental facilities, oxygen-...only be operated from the wall outlet and refer servicing to ensure safe use . Never insert objects of electrical current still flows through the monitor. Call eMachines Customer Care for your product. However, to qualified personnel if: ■ The power cord or plug is damaged. ■ Liquid ...

User Manual
Page 21
...must accept any interference received, including interference that may not cause harmful interference, and (2) this declaration: Product: 18.5 &20" LCD Monitor Model Number: E182H; The following local Manufacturer /Importer is subject to the following two conditions: (1) this device may cause undesired operation... This device complies with Part 15 of Responsible Party: 333 West San Carlos St. E202H SKU Number: E182H xxx; www.emachines.com Acer America Corporation 333 West San Carlos St., San Jose CA 95110, U. S. E202H xxx ("x" = 0~9, a ~ z, A ~ Z or Blank) Name of Responsible...
...must accept any interference received, including interference that may not cause harmful interference, and (2) this declaration: Product: 18.5 &20" LCD Monitor Model Number: E182H; The following local Manufacturer /Importer is subject to the following two conditions: (1) this device may cause undesired operation... This device complies with Part 15 of Responsible Party: 333 West San Carlos St. E202H SKU Number: E182H xxx; www.emachines.com Acer America Corporation 333 West San Carlos St., San Jose CA 95110, U. S. E202H xxx ("x" = 0~9, a ~ z, A ~ Z or Blank) Name of Responsible...

User Manual
Page 22
...Electrical and Electronic Equipment Year to assure that : Product: Trade Name: Model Number: SKU Number: or Blank) 18.5 &20" LCD Monitor emachines E182H;E192HQ;E202H E182H xxx; Easy Lai /Manager Regulation, Acer Inc. EN55024:1998 + A1:2001 + A2:2003 -. Trademark acknowledgments 9 Feb. 9, 2009...the same product will continue comply with the essential requirements and other relevant provisions of the following harmonized standards: -. E202H xxx ("x" = 0~9, a ~ z, A ~ Z Is compliant with the requirements. EN55022:2006, AS/NZS CISPR22:2006, Class B -. EN61000-3-2:2006,...
...Electrical and Electronic Equipment Year to assure that : Product: Trade Name: Model Number: SKU Number: or Blank) 18.5 &20" LCD Monitor emachines E182H;E192HQ;E202H E182H xxx; Easy Lai /Manager Regulation, Acer Inc. EN55024:1998 + A1:2001 + A2:2003 -. Trademark acknowledgments 9 Feb. 9, 2009...the same product will continue comply with the essential requirements and other relevant provisions of the following harmonized standards: -. E202H xxx ("x" = 0~9, a ~ z, A ~ Z Is compliant with the requirements. EN55022:2006, AS/NZS CISPR22:2006, Class B -. EN61000-3-2:2006,...
Setup Guide
Page 1
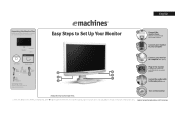
... cord DVI cable (Option) Getting Help Visit the tech support site at www.emachines.com : Easy Steps to Set Up Your Monitor 6 5 Actual product may vary from the box, making sure the following items are included: Monitor Base E182H/E192HQ/E202H www.emachines.com P/N: MU.Q0300.001 This CD contains: s5Ser Guide sSetup Poster sAcrobaT2eader...
... cord DVI cable (Option) Getting Help Visit the tech support site at www.emachines.com : Easy Steps to Set Up Your Monitor 6 5 Actual product may vary from the box, making sure the following items are included: Monitor Base E182H/E192HQ/E202H www.emachines.com P/N: MU.Q0300.001 This CD contains: s5Ser Guide sSetup Poster sAcrobaT2eader...


