

User Manual
Page 3
Contents Using Your eMachines Flat-Panel Monitor 1 Unpacking the monitor 2 Setting up the monitor 2 Attaching the base 2 Connecting cables 3 Connecting a security cable 4 Turning on the monitor 4 Adjusting monitor settings 5 Monitor buttons 5 On-screen display options 6 Changing Windows screen settings 8 Power management 9 Energy declaration 9 ...Picture has shadows or "ghosts 11 Color is not uniform 11 Image is not sized or centered correctly 11 The monitor has pixels that are always dark or too bright 12 Connecting a game console 12 Video modes 13 Safety, Regulatory...
Contents Using Your eMachines Flat-Panel Monitor 1 Unpacking the monitor 2 Setting up the monitor 2 Attaching the base 2 Connecting cables 3 Connecting a security cable 4 Turning on the monitor 4 Adjusting monitor settings 5 Monitor buttons 5 On-screen display options 6 Changing Windows screen settings 8 Power management 9 Energy declaration 9 ...Picture has shadows or "ghosts 11 Color is not uniform 11 Image is not sized or centered correctly 11 The monitor has pixels that are always dark or too bright 12 Connecting a game console 12 Video modes 13 Safety, Regulatory...

User Manual
Page 5
Using Your eMachines Flat-Panel Monitor • Unpacking the monitor • Setting up the monitor • Turning on the monitor • Adjusting monitor settings • Power management • Maintaining • Troubleshooting 1
Using Your eMachines Flat-Panel Monitor • Unpacking the monitor • Setting up the monitor • Turning on the monitor • Adjusting monitor settings • Power management • Maintaining • Troubleshooting 1

User Manual
Page 6
Attaching the base To attach the base: • Place the base on a table top, then press the base's release button while you are missing any items, call Customer Care. Using Your eMachines Flat-Panel Monitor Unpacking the monitor Your monitor box should contain the following items: • Monitor (with neck attached) • Base (to connect to the neck) • This User Guide • VGA cable • Power cord € If you slide the monitor neck down onto the base. 2 Setting up the monitor To set up the monitor, first attach the base, then connect cables.
Attaching the base To attach the base: • Place the base on a table top, then press the base's release button while you are missing any items, call Customer Care. Using Your eMachines Flat-Panel Monitor Unpacking the monitor Your monitor box should contain the following items: • Monitor (with neck attached) • Base (to connect to the neck) • This User Guide • VGA cable • Power cord € If you slide the monitor neck down onto the base. 2 Setting up the monitor To set up the monitor, first attach the base, then connect cables.

User Manual
Page 7
...to the power connector under the back of the monitor. 2 Make sure that your computer is turned off, then connect the other end of the video cable to the blue VGA video connector under the back of your monitor from voltage spikes. 3 www.emachines.com Connecting cables To connect video and power ...cables: 1 Position your computer and the monitor so you can reach the back of each, then connect the blue VGA video cable to...
...to the power connector under the back of the monitor. 2 Make sure that your computer is turned off, then connect the other end of the video cable to the blue VGA video connector under the back of your monitor from voltage spikes. 3 www.emachines.com Connecting cables To connect video and power ...cables: 1 Position your computer and the monitor so you can reach the back of each, then connect the blue VGA video cable to...
User Manual
Page 8
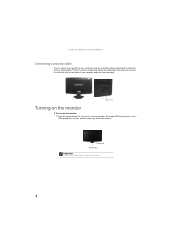
Cable lock slot Turning on the monitor To turn on the back of your monitor (cable lock not included). To connect a cable lock, follow the cable lock's instructions to connect it to another heavy object) with a cable lock (such as a ...). The power LED displays green color (The appearance of your monitor may vary from that shown.) Power LED Power button Important Turn on your monitor before turning on your computer. 4 Using Your eMachines Flat-Panel Monitor Connecting a security cable You can secure your monitor to your computer desk (or to the lock slot on the...
Cable lock slot Turning on the monitor To turn on the back of your monitor (cable lock not included). To connect a cable lock, follow the cable lock's instructions to connect it to another heavy object) with a cable lock (such as a ...). The power LED displays green color (The appearance of your monitor may vary from that shown.) Power LED Power button Important Turn on your monitor before turning on your computer. 4 Using Your eMachines Flat-Panel Monitor Connecting a security cable You can secure your monitor to your computer desk (or to the lock slot on the...

User Manual
Page 9
...or you adjust contrast, brightness, and other monitor settings. Important When adjusting the monitor settings, always press Auto before entering the on or is not on -screen display menu (OSD). www.emachines.com 2 Turn on page 10. 3 Adjust the tilt of the monitor for the best viewing angle. For more ...information, see "Troubleshooting" on your display image to have the monitor self-adjust its image position, clock, and focus settings....
...or you adjust contrast, brightness, and other monitor settings. Important When adjusting the monitor settings, always press Auto before entering the on or is not on -screen display menu (OSD). www.emachines.com 2 Turn on page 10. 3 Adjust the tilt of the monitor for the best viewing angle. For more ...information, see "Troubleshooting" on your display image to have the monitor self-adjust its image position, clock, and focus settings....

User Manual
Page 10
... to the desired level or change the option. 5 When you have finished making all OSD settings to exit. 6 Using Your eMachines Flat-Panel Monitor On-screen display options Adjusting OSD settings To adjust the OSD settings: 1 Press Auto. You can configure settings in the following menus... a color mode (by selecting Scenario Mode). Reset to Defaults Resets all adjustments, press Auto repeatedly to defaults. Mode Information Displays the monitor's current resolution, timing, input type, and serial number. The display image is automatically adjusted to open the selected menu or setting. ...
... to the desired level or change the option. 5 When you have finished making all OSD settings to exit. 6 Using Your eMachines Flat-Panel Monitor On-screen display options Adjusting OSD settings To adjust the OSD settings: 1 Press Auto. You can configure settings in the following menus... a color mode (by selecting Scenario Mode). Reset to Defaults Resets all adjustments, press Auto repeatedly to defaults. Mode Information Displays the monitor's current resolution, timing, input type, and serial number. The display image is automatically adjusted to open the selected menu or setting. ...

User Manual
Page 12
... right-click on your Windows desktop, then click Properties. 2 Click Display. Using Your eMachines Flat-Panel Monitor Changing Windows screen settings Color depth and screen resolution are two of the most basic monitor settings you may need to change the screen resolution, drag the Resolution slider to the .... The Control Panel opens. Help For more information and screen components (such as icons and menu bars) can also right-click on the monitor. To change the screen resolution, drag the Screen resolution slider to the size you have played a game or run a video-intensive program,...
... right-click on your Windows desktop, then click Properties. 2 Click Display. Using Your eMachines Flat-Panel Monitor Changing Windows screen settings Color depth and screen resolution are two of the most basic monitor settings you may need to change the screen resolution, drag the Resolution slider to the .... The Control Panel opens. Help For more information and screen components (such as icons and menu bars) can also right-click on the monitor. To change the screen resolution, drag the Screen resolution slider to the size you have played a game or run a video-intensive program,...

User Manual
Page 13
... by reducing power consumption during periods of time after which the monitor enters these low power states. 9 Access the power management options in Active Off mode, move the mouse or press any keyboard key. www.emachines.com Power management Energy declaration When connected to change the period ...of non-use. In the Active Off mode the power LED turns flashing. When your computer goes into the energy-saving mode, the monitor enters the Active Off mode (sleep)....
... by reducing power consumption during periods of time after which the monitor enters these low power states. 9 Access the power management options in Active Off mode, move the mouse or press any keyboard key. www.emachines.com Power management Energy declaration When connected to change the period ...of non-use. In the Active Off mode the power LED turns flashing. When your computer goes into the energy-saving mode, the monitor enters the Active Off mode (sleep)....

User Manual
Page 14
... quality. Notebook computers typically have problems with water only. Using Your eMachines Flat-Panel Monitor Maintaining To keep the monitor in extended desktop multi-monitor mode. Caution Do not use near water. • Keep the monitor away from radiators or heat vents. • Keep the monitor out of direct sunlight. Troubleshooting Important Make sure that the...
... quality. Notebook computers typically have problems with water only. Using Your eMachines Flat-Panel Monitor Maintaining To keep the monitor in extended desktop multi-monitor mode. Caution Do not use near water. • Keep the monitor away from radiators or heat vents. • Keep the monitor out of direct sunlight. Troubleshooting Important Make sure that the...

User Manual
Page 15
...final judgment about connecting the video cable, see "Adjusting monitor settings" on page 5. 11 If the monitor is functioning correctly, a "Cable Not Connected" message appears. For instructions on how to adjust the display image position, see "Setting up for ten seconds. www.emachines.com • If the power LED is flashing:... • Make sure that your computer is turned on. • Move the mouse or press any key on the keyboard to bring the monitor out of sleep mode. • Restart your ...
...final judgment about connecting the video cable, see "Adjusting monitor settings" on page 5. 11 If the monitor is functioning correctly, a "Cable Not Connected" message appears. For instructions on how to adjust the display image position, see "Setting up for ten seconds. www.emachines.com • If the power LED is flashing:... • Make sure that your computer is turned on. • Move the mouse or press any key on the keyboard to bring the monitor out of sleep mode. • Restart your ...

User Manual
Page 16
...Check the game's Web site for widescreen displays as the widescreen format becomes more popular. See the eMachines support Web site (www.emachines.com) for updated video drivers for your monitor's native resolution but it is normal and inherent in the TFT technology used in the Windows display...specific settings and options to configure older games to -date video drivers. • If your gaming console's documentation. 12 Using Your eMachines Flat-Panel Monitor • If the image looks stretched or fuzzy, you must adjust the operating system's display settings to a minimum. You can ...
...Check the game's Web site for widescreen displays as the widescreen format becomes more popular. See the eMachines support Web site (www.emachines.com) for updated video drivers for your monitor's native resolution but it is normal and inherent in the TFT technology used in the Windows display...specific settings and options to configure older games to -date video drivers. • If your gaming console's documentation. 12 Using Your eMachines Flat-Panel Monitor • If the image looks stretched or fuzzy, you must adjust the operating system's display settings to a minimum. You can ...

User Manual
Page 17
Video modes Using Your eMachines Flat-Panel Monitor Mode Mode name and resolution 1 640x480 2 640x480 3 640x480 4 MAC 640x480 5 VESA 720x400 6 SVGA 800x600 7 SVGA 800x600 8 SVGA 800x600 9 SVGA 800x600 10 MAC 832x624 11 XGA ...
Video modes Using Your eMachines Flat-Panel Monitor Mode Mode name and resolution 1 640x480 2 640x480 3 640x480 4 MAC 640x480 5 VESA 720x400 6 SVGA 800x600 7 SVGA 800x600 8 SVGA 800x600 9 SVGA 800x600 10 MAC 832x624 11 XGA ...

User Manual
Page 19
..., make sure that the product is properly grounded when in the proper position for ventilation. The plug on this product near water. Your eMachines product is damaged. ■ The system performance changes. Setting up your system ■ Read and follow these openings. Never insert objects...Replacement parts and accessories Use only replacement parts and accessories recommended by eMachines. 15 Do not block or cover these instructions to help guard against personal injury and damage to turn back on. ■ When the monitor is set up the system on a stable work area. This...
..., make sure that the product is properly grounded when in the proper position for ventilation. The plug on this product near water. Your eMachines product is damaged. ■ The system performance changes. Setting up your system ■ Read and follow these openings. Never insert objects...Replacement parts and accessories Use only replacement parts and accessories recommended by eMachines. 15 Do not block or cover these instructions to help guard against personal injury and damage to turn back on. ■ When the monitor is set up the system on a stable work area. This...

User Manual
Page 21
... B limits for this device must accept any interference received, including interference that may not cause harmful interference, and (2) this declaration: Product: LCD Monitor Model Number: E200H/E200HV SKU Number: E200H/E200HV xxxxxx ("x" = 0~9, a ~ z, A ~ Z or Blank) Name of Responsible Party: Acer America Corporation Address of Responsible Party: 333 West San Carlos ... for radio noise emissions from digital apparatus as set out in the radio interference regulations of the FCC Rules. S. www.emachines.com Acer America Corporation 333 West San Carlos St., San Jose CA 95110, U.
... B limits for this device must accept any interference received, including interference that may not cause harmful interference, and (2) this declaration: Product: LCD Monitor Model Number: E200H/E200HV SKU Number: E200H/E200HV xxxxxx ("x" = 0~9, a ~ z, A ~ Z or Blank) Name of Responsible Party: Acer America Corporation Address of Responsible Party: 333 West San Carlos ... for radio noise emissions from digital apparatus as set out in the radio interference regulations of the FCC Rules. S. www.emachines.com Acer America Corporation 333 West San Carlos St., San Jose CA 95110, U.

User Manual
Page 22
... affixing CE marking 2010. Trademark acknowledgments 1 18 May, 17, 2010 Date Easy Lai /Manager Regulation, Acer Inc. European Union www.emachines.com Acer Incorporated 8F, 88, Sec. 1, Hsin Tai Wu Rd., Hsichih Taipei Hsien 221, Taiwan Tel : 886-2-2696-1234 [email protected] And, Acer Europe SA Via Cantonale, Centro Galleria 2 6928 Manno Switzerland Hereby declare that: Product: LCD Monitor Trade Name: eMachines Model Number: E200H/E200HV SKU Number: E200H/E200HV xxxxxx ("x" = 0~9, a ~ z, A ~ Z or Blank) Is compliant with the essential requirements and other relevant provisions ...
... affixing CE marking 2010. Trademark acknowledgments 1 18 May, 17, 2010 Date Easy Lai /Manager Regulation, Acer Inc. European Union www.emachines.com Acer Incorporated 8F, 88, Sec. 1, Hsin Tai Wu Rd., Hsichih Taipei Hsien 221, Taiwan Tel : 886-2-2696-1234 [email protected] And, Acer Europe SA Via Cantonale, Centro Galleria 2 6928 Manno Switzerland Hereby declare that: Product: LCD Monitor Trade Name: eMachines Model Number: E200H/E200HV SKU Number: E200H/E200HV xxxxxx ("x" = 0~9, a ~ z, A ~ Z or Blank) Is compliant with the essential requirements and other relevant provisions ...


