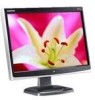
8512499 - eMachines Flat Panel Monitor User Guide
Page 3
Contents Using Your eMachines Flat-Panel Monitor 1 Unpacking the monitor 2 Connecting the monitor 3 Attaching the base 3 Connecting video inputs 4 Connecting power 5 Connecting a security cable 5 Setting up the optional stand 6 Attaching the USB stand 6 Adjusting monitor height tension 8 Adjusting monitor tilt tension ... bar 11 Starting the monitor 12 Adjusting monitor settings 13 Monitor buttons 13 On-screen display options 14 Changing Windows screen settings 17 Video modes 18 Power management 19 ENERGY STAR 19 Energy declaration 19 Maintaining 20 Troubleshooting 20 ...
8512499 - eMachines Flat Panel Monitor User Guide
Page 5
Using Your eMachines Flat-Panel Monitor • Connecting the monitor • Setting up the optional stand • Setting up the optional speaker bar • Starting the monitor • Adjusting monitor settings • Power management • Maintaining • Troubleshooting • Specifications 1
8512499 - eMachines Flat Panel Monitor User Guide
Page 6
Using Your eMachines Flat-Panel Monitor Unpacking the monitor Your monitor box should contain the following items: • Monitor (with neck attached) • Base • This User Guide • VGA cable • Power cord If you are missing any items, call Customer Care. For telephone numbers, see the label on the back of your monitor. 2
8512499 - eMachines Flat Panel Monitor User Guide
Page 7
www.emachines.com Connecting the monitor Important To attach the optional USB stand instead of the base, complete the instructions in "Setting up the monitor, first attach the base, then make your cable connections. Base buttons 3 To set up the optional stand" on a table top, then slide the monitor neck down onto the base until it clicks into place. Attaching the base To attach the base: • Place the monitor base on page 6. You may need to press the two buttons on the base to let the monitor slide on smoothly.
8512499 - eMachines Flat Panel Monitor User Guide
Page 8
... United States, you use the included right-angle VGA cable for the video connection so the speaker bar does not obstruct the cable. Using Your eMachines Flat-Panel Monitor Connecting video inputs To connect video sources to the matching video port on the back of your computer. 4 Tip... of the display. (The appearance of your computer is only available on the 19-inch model. The DVI jack is turned off, then connect the other end of the video cable to your monitor: 1 Position your computer and the monitor so you are using the optional speaker bar (described in "Setting up the...
8512499 - eMachines Flat Panel Monitor User Guide
Page 9
....emachines.com Connecting power To connect power: 1 Position your monitor so you can secure your monitor to your cable and connector may vary from voltage spikes. Connecting a security cable You can reach the back, then connect the power cord to the power connector under the back of the monitor.... (The appearance of your monitor from that shown.) 2 Plug the power cord into a correctly grounded power outlet. We recommend using a surge protector to another ...
8512499 - eMachines Flat Panel Monitor User Guide
Page 10
... neck hinge, then remove the neck from the back of the LCD panel. Let the monitor base hang down on a stable, soft (non-marring) surface. Screw Screw Screw Screw 5 Slide the adjustable stand's neck onto the base. 6 Using Your eMachines Flat-Panel Monitor Setting up to four USB devices to your computer's USB port...
8512499 - eMachines Flat Panel Monitor User Guide
Page 12
Using Your eMachines Flat-Panel Monitor 9 Slide the neck's bracket slot onto the bracket's mounting tab. 10 Press the bracket lever to the right and hold it does not stay in ... when you let go, you need to adjust the stand if the amounts of force required to remove it from the base. To adjust your monitor. However, if it , then lower the neck into place and release the lever. Screwdriver access cap 8 Adjusting...
8512499 - eMachines Flat Panel Monitor User Guide
Page 13
...screw several times before the tension is about 1 inch (2.5 cm) below eye level. If the monitor lowers by itself when you let go , turn the screw clockwise several complete turns. If the monitor changes its tilt angle when you let go, turn the screw counter-clockwise several complete turns. If...you let go . You may need to increase the tension. Height tension screw 3 Adjust the height tension screw so the monitor stays in place when you let go . www.emachines.com 2 Insert a Phillips screwdriver through the access hole in the base and onto the height tension screw (on the top...
8512499 - eMachines Flat Panel Monitor User Guide
Page 14
... and to accommodate each user's height and preference. USB In port Power connector USB 2.0 ports 2 To provide full power to your computer. Using Your eMachines Flat-Panel Monitor Ergonomic guidelines The recommended screen positioning is tilted upward. To use ) is that the top of sight is perpendicular to suit individual preference. Screen...
8512499 - eMachines Flat Panel Monitor User Guide
Page 16
... vary from that shown.) 12 Power button 2 Turn on your computer is running, the power LED on . Using Your eMachines Flat-Panel Monitor 6 Turn on page 13. After your computer. This will automatically adjust the display image to appear. The green LED to the ideal settings. 5 Use the ...on the front of your monitor. The power LED on the power button turns on. (The appearance of the power button is not blue or you see a display image, check the...
8512499 - eMachines Flat Panel Monitor User Guide
Page 17
...open a menu or setting. OSD inactive: Press to adjust the contrast. • Menu Press to open or close the OSD. 13 Monitor buttons This monitor features an on page 17. OSD inactive: Press to open the Brightness menu. • / (contrast) OSD active: Press to ...move down through Windows) to the previous menu. www.emachines.com Adjusting monitor settings Use the monitor controls (located on the monitor itself) and computer controls (accessible through menus and adjust OSD options. OSD inactive: Press to automatically optimize the...
8512499 - eMachines Flat Panel Monitor User Guide
Page 18
... to the buttons to help you have finished making all adjustments, press the Menu button at the Main Menu to exit. 14 Using Your eMachines Flat-Panel Monitor On-screen display options Adjusting OSD settings To adjust the OSD settings: Tip While the OSD is automatically adjusted to the ideal settings for...
8512499 - eMachines Flat Panel Monitor User Guide
Page 19
....emachines.com OSD menus OSD Menu Main menu Main Menu Auto Picture Geometry Advanced Reset Description Auto-Automatically adjusts your monitor to its optimum settings. Use the lowest brightness setting you can adjust color balance, change the OSD language, and display information about current monitor ...size and minimize distortions. You may need to maximize the life of the monitor backlights. Advanced-Opens the Advanced menu, where you are comfortable with to readjust brightness after the monitor warms up. Contrast-Adjusts the level of white between the lightest and ...
8512499 - eMachines Flat Panel Monitor User Guide
Page 20
... the brightness of the OSD. Language-Changes the language of the Standby and Power LED to configure the vertical position automatically. Using Your eMachines Flat-Panel Monitor OSD Menu Geometry menu Geometry H-Position V-Position Clock Phase Description H-Position-Moves the display image left and right. V-Position-Moves the display... the optimum 1440 × 900 resolution. Clock-Minimizes any horizontal distortion and clears or sharpens the displayed characters. If you prefer using your monitor at a resolution less than that you should change . For information on page 17.
8512499 - eMachines Flat Panel Monitor User Guide
Page 21
www.emachines.com Changing Windows screen settings Color depth and screen resolution are two of pixels (individual colored dots) your computer uses to display images on your monitor. Screen resolution is the number of colors available. Type adjusting monitor settings in your Windows desktop, then click Personalize. 2 ...to the highest color setting, if necessary. Most images look right, click No. Color depth is the number of the most basic monitor settings you cannot click No, the settings return to their previous values after you have played a game or run a video-intensive program...
8512499 - eMachines Flat Panel Monitor User Guide
Page 22
Using Your eMachines Flat-Panel Monitor Video modes Your monitor supports several video modes. Mode Mode name and resolution Horizontal Vertical Available in DVI mode frequency (kHz) frequency (Hz) (19-inch model) 1 VGA 640 × 350 31.469 70.087 No 2 VGA 640 × 480 31.469 59.941 Yes 3 VESA 640 × 480 37....935 59.887 Yes 16 VESA 1440 × 900 70.635 74.984 No 18 If you do not use the best mode for the monitor, the display image may look slightly "fuzzy."
8512499 - eMachines Flat Panel Monitor User Guide
Page 23
...goes into their products to the following levels: VESA state LED indicator 17-inch power consumption 19-inch power consumption On Active Off Blue Orange < 25 W This monitor complies with the EPA's International ENERGY STAR Program, which is a program designed to encourage manufacturers... of computer equipment to build circuitry into the energy saving mode, the monitor enters the Active Off mode (sleep). www.emachines.com Power management ENERGY STAR As an ENERGY STAR® Partner, eMachines has determined that supports the VESA Display Power Management Signaling (DPMS) Protocol...
8512499 - eMachines Flat Panel Monitor User Guide
Page 24
... between your notebook's display, an externally attached display, and both your primary monitor and not use any judgments about connecting the power cord, see "Connecting the monitor" on . • If you solve them. Using Your eMachines Flat-Panel Monitor Maintaining To keep the monitor in optimal working order: • Do not block the ventilation holes...
8512499 - eMachines Flat Panel Monitor User Guide
Page 25
www.emachines.com • If the power LED is orange: • Make sure that your computer is turned on. • Move the mouse or press any key on the keyboard to bring the monitor out of sleep mode. • Restart your computer with your monitor. For instructions on how to the ideal settings....Press Menu, then Auto to automatically adjust the display image to the ideal settings. • Use the position controls to the back of the monitor and your monitor connection is using the VGA cable that the video cable is not damaged. • Check the end of the video cable for ten seconds...