
User Manual
Page 3
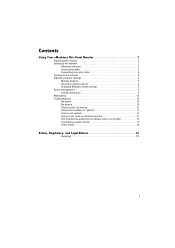
Contents Using Your eMachines Flat-Panel Monitor 1 Unpacking the monitor 2 Setting up the monitor 2 Attaching the base 2 Connecting cables 3 Connecting a security cable 4 Turning on the monitor 4 Adjusting monitor settings 5 ...
Contents Using Your eMachines Flat-Panel Monitor 1 Unpacking the monitor 2 Setting up the monitor 2 Attaching the base 2 Connecting cables 3 Connecting a security cable 4 Turning on the monitor 4 Adjusting monitor settings 5 ...

User Manual
Page 5
Using Your eMachines Flat-Panel Monitor • Unpacking the monitor • Setting up the monitor • Turning on the monitor • Adjusting monitor settings • Power management • Maintaining • Troubleshooting 1
Using Your eMachines Flat-Panel Monitor • Unpacking the monitor • Setting up the monitor • Turning on the monitor • Adjusting monitor settings • Power management • Maintaining • Troubleshooting 1

User Manual
Page 6
Attaching the base To attach the base: • Place the base on a table top, then press the base's release button while you are missing any items, call Customer Care. Setting up the monitor To set up the monitor, first attach the base, then connect cables. Using Your eMachines Flat-Panel Monitor Unpacking the monitor Your monitor box should contain the following items: • Monitor (with neck attached) • Base (to connect to the neck) • This User Guide • VGA cable • Power cord € If you slide the monitor neck down onto the base. 2
Attaching the base To attach the base: • Place the base on a table top, then press the base's release button while you are missing any items, call Customer Care. Setting up the monitor To set up the monitor, first attach the base, then connect cables. Using Your eMachines Flat-Panel Monitor Unpacking the monitor Your monitor box should contain the following items: • Monitor (with neck attached) • Base (to connect to the neck) • This User Guide • VGA cable • Power cord € If you slide the monitor neck down onto the base. 2
User Manual
Page 7
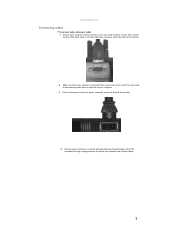
..., then connect the other end of the video cable to the blue VGA video connector under the back of your monitor from voltage spikes. 3 www.emachines.com Connecting cables To connect video and power cables: 1 Position your computer and the monitor so you can reach the back of each, then connect...
..., then connect the other end of the video cable to the blue VGA video connector under the back of your monitor from voltage spikes. 3 www.emachines.com Connecting cables To connect video and power cables: 1 Position your computer and the monitor so you can reach the back of each, then connect...
User Manual
Page 8
Using Your eMachines Flat-Panel Monitor Connecting a security cable You can secure your monitor to your computer desk (or to the lock slot on your computer. 4 Cable lock ...
Using Your eMachines Flat-Panel Monitor Connecting a security cable You can secure your monitor to your computer desk (or to the lock slot on your computer. 4 Cable lock ...
User Manual
Page 9
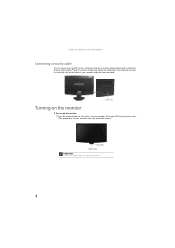
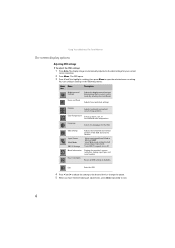
... Press to adjust other settings for the current screen resolution. 4 After you do not see "Changing Windows screen settings" on -screen display menu (OSD). www.emachines.com 2 Turn on the monitor itself) and computer controls (accessible through Windows) to adjust the display image. Important When adjusting the monitor settings, always press...
... Press to adjust other settings for the current screen resolution. 4 After you do not see "Changing Windows screen settings" on -screen display menu (OSD). www.emachines.com 2 Turn on the monitor itself) and computer controls (accessible through Windows) to adjust the display image. Important When adjusting the monitor settings, always press...
User Manual
Page 10
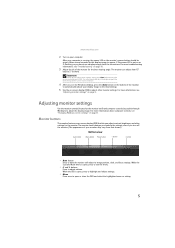
... setting. The OSD opens. 3 Press < and > to highlight a setting, then press Menu to the ideal settings for your current screen resolution. 2 Press Menu. Using Your eMachines Flat-Panel Monitor On-screen display options Adjusting OSD settings To adjust the OSD settings: 1 Press Auto. Position Adjusts horizontal and vertical screen image position...
... setting. The OSD opens. 3 Press < and > to highlight a setting, then press Menu to the ideal settings for your current screen resolution. 2 Press Menu. Using Your eMachines Flat-Panel Monitor On-screen display options Adjusting OSD settings To adjust the OSD settings: 1 Press Auto. Position Adjusts horizontal and vertical screen image position...
User Manual
Page 11
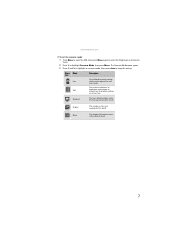
... of Text brightness and contrast to suit your needs. Graphic This enhances color and emphasizes fine detail. This is the best general-purpose mode. www.emachines.com To set the scenario mode: 1 Press Menu to open the OSD, then press Menu again to select the Brightness and Contrast menu. 2 Press > to...
... of Text brightness and contrast to suit your needs. Graphic This enhances color and emphasizes fine detail. This is the best general-purpose mode. www.emachines.com To set the scenario mode: 1 Press Menu to open the OSD, then press Menu again to select the Brightness and Contrast menu. 2 Press > to...
User Manual
Page 12
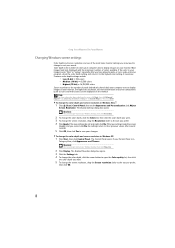
... about adjusting the screen, click Start, then click Help and Support. Type adjusting monitor settings in the Search Help box, then press ENTER. Using Your eMachines Flat-Panel Monitor Changing Windows screen settings Color depth and screen resolution are two of the most basic monitor settings you may need to change...
... about adjusting the screen, click Start, then click Help and Support. Type adjusting monitor settings in the Search Help box, then press ENTER. Using Your eMachines Flat-Panel Monitor Changing Windows screen settings Color depth and screen resolution are two of the most basic monitor settings you may need to change...

User Manual
Page 13
When your computer goes into the energy-saving mode, the monitor enters the Active Off mode (sleep). www.emachines.com Power management Energy declaration When connected to change the period of non-use. Access the power management options in Active Off mode, move the ...
When your computer goes into the energy-saving mode, the monitor enters the Active Off mode (sleep). www.emachines.com Power management Energy declaration When connected to change the period of non-use. Access the power management options in Active Off mode, move the ...
User Manual
Page 14
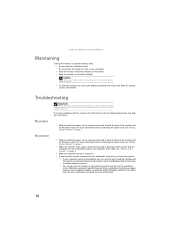
... may help you can take several minutes to both the back of the monitor and an AC power outlet. For more information. 10 Using Your eMachines Flat-Panel Monitor Maintaining To keep the monitor in optimal working order: • Do not block the ventilation holes. • Do not expose the monitor...
... may help you can take several minutes to both the back of the monitor and an AC power outlet. For more information. 10 Using Your eMachines Flat-Panel Monitor Maintaining To keep the monitor in optimal working order: • Do not block the ventilation holes. • Do not expose the monitor...

User Manual
Page 15
..." • Press Auto to automatically adjust the display image to the ideal settings. • Remove any pins that might be bent or pushed in . www.emachines.com • If the power LED is flashing: • Make sure that your computer is turned on. • Move the mouse or press any key...
..." • Press Auto to automatically adjust the display image to the ideal settings. • Remove any pins that might be bent or pushed in . www.emachines.com • If the power LED is flashing: • Make sure that your computer is turned on. • Move the mouse or press any key...

User Manual
Page 16
...you need, see "Changing Windows screen settings" on page 8. • If you are unacceptably numerous or dense on your display, contact eMachines Customer Care to -date video drivers. • If your computer. Connecting a game console • To determine the type of pixels affected... • Make sure that are adding support for widescreen displays as the widescreen format becomes more popular. See the eMachines support Web site (www.emachines.com) for updated video drivers for specific settings and options to configure older games to support widescreen: www.widescreengamingforum.com...
...you need, see "Changing Windows screen settings" on page 8. • If you are unacceptably numerous or dense on your display, contact eMachines Customer Care to -date video drivers. • If your computer. Connecting a game console • To determine the type of pixels affected... • Make sure that are adding support for widescreen displays as the widescreen format becomes more popular. See the eMachines support Web site (www.emachines.com) for updated video drivers for specific settings and options to configure older games to support widescreen: www.widescreengamingforum.com...
User Manual
Page 17
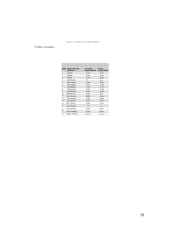
Video modes Using Your eMachines Flat-Panel Monitor Mode Mode name and resolution 1 640x480 2 640x480 3 640x480 4 MAC 640x480 5 VESA 720x400 6 SVGA 800x600 7 SVGA 800x600 8 SVGA 800x600 9 SVGA 800x600 10 MAC ...
Video modes Using Your eMachines Flat-Panel Monitor Mode Mode name and resolution 1 640x480 2 640x480 3 640x480 4 MAC 640x480 5 VESA 720x400 6 SVGA 800x600 7 SVGA 800x600 8 SVGA 800x600 9 SVGA 800x600 10 MAC ...
User Manual
Page 19
...a small amount of electrical current still flows through the monitor. Replacement parts and accessories Use only replacement parts and accessories recommended by eMachines. 15 However, to make sure that the safety instructions marked on the product and in the proper position for your system. &#... follow these openings. Never insert objects of any kind into the extension cord does not exceed the extension cord ampere rating. Call eMachines Customer Care for advice on a stable work area. Care during use this cord will only fit into the system. ■ ...
...a small amount of electrical current still flows through the monitor. Replacement parts and accessories Use only replacement parts and accessories recommended by eMachines. 15 However, to make sure that the safety instructions marked on the product and in the proper position for your system. &#... follow these openings. Never insert objects of any kind into the extension cord does not exceed the extension cord ampere rating. Call eMachines Customer Care for advice on a stable work area. Care during use this cord will only fit into the system. ■ ...

User Manual
Page 20
...we can reduce the amount of natural resources needed to produce electrical and electronic equipment, minimize the use of our natural resources, eMachines provides the following information on how you can do your part for the environment by following these simple steps: ■ When ...For additional recycling information specific to your reminder to maximize the use of landfills for credit towards the purchase of new eMachines equipment. www.emachines.com Environmental information Recycling Mercury Warning Lamp(s) inside this product contain mercury and must be disposed of in the municipal...
...we can reduce the amount of natural resources needed to produce electrical and electronic equipment, minimize the use of our natural resources, eMachines provides the following information on how you can do your part for the environment by following these simple steps: ■ When ...For additional recycling information specific to your reminder to maximize the use of landfills for credit towards the purchase of new eMachines equipment. www.emachines.com Environmental information Recycling Mercury Warning Lamp(s) inside this product contain mercury and must be disposed of in the municipal...
User Manual
Page 21
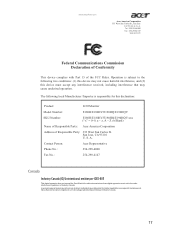
S. A. San Jose, CA 95110 U. www.emachines.com Acer America Corporation 333 West San Carlos St., San Jose CA 95110, U. Le présent appareil numérique n'émet pas de... device must accept any interference received, including interference that may not cause harmful interference, and (2) this declaration: Product: LCD Monitor Model Number: E180H/E180HV/E190HQ/E190HQV SKU Number: E180H/E180HV/E190HQ/E190HQV xxx ("x" = 0~9, a ~ z, A ~ Z or Blank) Name of Responsible Party: Acer America Corporation Address of Responsible Party: 333 West San Carlos St. S. A. ...
S. A. San Jose, CA 95110 U. www.emachines.com Acer America Corporation 333 West San Carlos St., San Jose CA 95110, U. Le présent appareil numérique n'émet pas de... device must accept any interference received, including interference that may not cause harmful interference, and (2) this declaration: Product: LCD Monitor Model Number: E180H/E180HV/E190HQ/E190HQV SKU Number: E180H/E180HV/E190HQ/E190HQV xxx ("x" = 0~9, a ~ z, A ~ Z or Blank) Name of Responsible Party: Acer America Corporation Address of Responsible Party: 333 West San Carlos St. S. A. ...
User Manual
Page 22
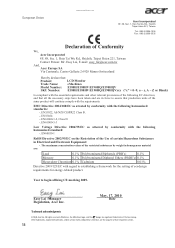
EN61000-3-2, Class D -. European Union www.emachines.com Acer Incorporated 8F, 88, Sec. 1, Hsin Tai Wu Rd., Hsichih Taipei Hsien 221, Taiwan Tel : 886-2-2696-1234 Fax : 886-2-2696-3535 ... EN55022, AS/NZS CISPR22 Class B. -. EN55024 -. Easy Lai /Manager Regulation, Acer Inc. Year to assure that : Product: LCD Monitor Trade Name: eMachines Model Number: E180H/E180HV/E190HQ/E190HQV SKU Number: E180H/E180HV/E190HQ/E190HQVxxx ("x" = 0~9, a ~ z, A ~ Z or Blank) Is compliant with the essential requirements and other relevant provisions of the restricted substances by ...
EN61000-3-2, Class D -. European Union www.emachines.com Acer Incorporated 8F, 88, Sec. 1, Hsin Tai Wu Rd., Hsichih Taipei Hsien 221, Taiwan Tel : 886-2-2696-1234 Fax : 886-2-2696-3535 ... EN55022, AS/NZS CISPR22 Class B. -. EN55024 -. Easy Lai /Manager Regulation, Acer Inc. Year to assure that : Product: LCD Monitor Trade Name: eMachines Model Number: E180H/E180HV/E190HQ/E190HQV SKU Number: E180H/E180HV/E190HQ/E190HQVxxx ("x" = 0~9, a ~ z, A ~ Z or Blank) Is compliant with the essential requirements and other relevant provisions of the restricted substances by ...


