
User Guide
Page 14
... 181 9.4 The Class Setup Screen 181 9.4.1 Add/Edit QoS Class 183 9.5 The QoS Monitor Screen 186 9.6 QoS Technical Reference 187 9.6.1 IEEE 802.1Q Tag ...187 9.6.2 IP Precedence ...187 9.6.3 DiffServ ...187 Chapter 10 Network Address Translation (NAT 189 10.1 Overview ...189 10.1.1 What You Can Do in this Chapter 189 10.1.2 What... NAT Works ...194 Chapter 11 Dynamic DNS ...197 11.1 Overview ...197 11.1.1 What You Need To Know 197 11.2 The Dynamic DNS Screen 197 14 P-2812HNU(L)-Fx Series User's Guide
... 181 9.4 The Class Setup Screen 181 9.4.1 Add/Edit QoS Class 183 9.5 The QoS Monitor Screen 186 9.6 QoS Technical Reference 187 9.6.1 IEEE 802.1Q Tag ...187 9.6.2 IP Precedence ...187 9.6.3 DiffServ ...187 Chapter 10 Network Address Translation (NAT 189 10.1 Overview ...189 10.1.1 What You Can Do in this Chapter 189 10.1.2 What... NAT Works ...194 Chapter 11 Dynamic DNS ...197 11.1 Overview ...197 11.1.1 What You Need To Know 197 11.2 The Dynamic DNS Screen 197 14 P-2812HNU(L)-Fx Series User's Guide
User Guide
Page 21
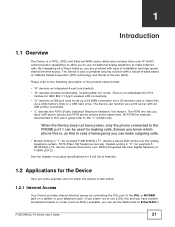
...jack on a splitter or your telephone jack. CHAPTER 1 Introduction 1.1 Overview The Device is a VDSL, ADSL and Ethernet WAN router, which also includes Voice over IP (VoIP) communication capabilities to allow you to use a DSL line and you have another broadband modem or router (such as a print server with ease of...is also a complete security solution with a robust firewall based on product specifications for a full list of emergency you are some example uses for example P-2812HNU(L)-F1, denote a device that works over the analog telephone system, POTS (Plain Old Telephone Service).
...jack on a splitter or your telephone jack. CHAPTER 1 Introduction 1.1 Overview The Device is a VDSL, ADSL and Ethernet WAN router, which also includes Voice over IP (VoIP) communication capabilities to allow you to use a DSL line and you have another broadband modem or router (such as a print server with ease of...is also a complete security solution with a robust firewall based on product specifications for a full list of emergency you are some example uses for example P-2812HNU(L)-F1, denote a device that works over the analog telephone system, POTS (Plain Old Telephone Service).
User Guide
Page 25
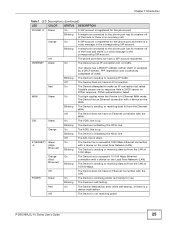
... receiving power. The Device is sending or receiving data to /from the LAN at 10/100 Mbps. Blinking The Device is sending or receiving IP traffic. P-2812HNU(L)-Fx Series User's Guide 25 A telephone connected to the phone port has its receiver off of the hook or there is an incoming call.... The phone port does not have an IP connection. Off The Device does not have a SIP account registered. The Device has a successful 10/100 Mbps Ethernet...
... receiving power. The Device is sending or receiving data to /from the LAN at 10/100 Mbps. Blinking The Device is sending or receiving IP traffic. P-2812HNU(L)-Fx Series User's Guide 25 A telephone connected to the phone port has its receiver off of the hook or there is an incoming call.... The phone port does not have an IP connection. Off The Device does not have a SIP account registered. The Device has a successful 10/100 Mbps Ethernet...
User Guide
Page 30
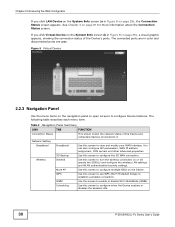
... LINK TAB FUNCTION Connection Status This screen shows the network status of the Device's ports. You can also configure ISP parameters, WAN IP address assignment, DNS servers and other advanced properties. 3G Backup Use this screen to configure the 3G WAN connection. The connected ports... color and disconnected ports are gray. Scheduling Use this screen to configure when the Device enables or disables the wireless LAN. 30 P-2812HNU(L)-Fx Series User's Guide Figure 9 Virtual Device 2.2.3 Navigation Panel Use the menu items on the navigation panel to open screens to ...
... LINK TAB FUNCTION Connection Status This screen shows the network status of the Device's ports. You can also configure ISP parameters, WAN IP address assignment, DNS servers and other advanced properties. 3G Backup Use this screen to configure the 3G WAN connection. The connected ports... color and disconnected ports are gray. Scheduling Use this screen to configure when the Device enables or disables the wireless LAN. 30 P-2812HNU(L)-Fx Series User's Guide Figure 9 Virtual Device 2.2.3 Navigation Panel Use the menu items on the navigation panel to open screens to ...
User Guide
Page 31
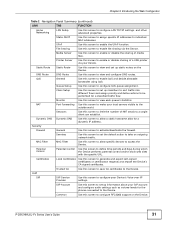
... Monitor Use this screen to enable the UPnP function. Sessions Use this screen to enable QoS and decide allowable bandwidth using QoS. P-2812HNU(L)-Fx Series User's Guide 31 QoS General Use this screen to limit the number of NAT sessions a single client can establish. Parental...this screen to save CA certificates to configure QoS queue assignment. VoIP SIP SIP Service Use this screen to configure LAN TCP/IP settings, and other advanced properties. Services Use this screen to allow specific devices to generate and export self-signed certificates or ...
... Monitor Use this screen to enable the UPnP function. Sessions Use this screen to enable QoS and decide allowable bandwidth using QoS. P-2812HNU(L)-Fx Series User's Guide 31 QoS General Use this screen to limit the number of NAT sessions a single client can establish. Parental...this screen to save CA certificates to configure QoS queue assignment. VoIP SIP SIP Service Use this screen to configure LAN TCP/IP settings, and other advanced properties. Services Use this screen to allow specific devices to generate and export self-signed certificates or ...

User Guide
Page 34
.... 5 For this example, the interface type is ADSL and the connection has the following information. PPPoE Service Name My DSL Authentication Method Auto Static IP Address 192.168.1.32 Others PPPoE Passthrough: Disabled NAT: Enabled IGMP Multicast Proxy: Enabled Apply as your WAN mode type and click Switch WAN Interface...PCR PPP Information PPP User Name [email protected] PPP Password ABCDEF! Chapter 3 Tutorials 2 Select ADSL as Default Gateway: Enable DNS Server: Static DNS IP Address (Primary: 192.168.1.254 Secondary: 192.168.1.253) 34 P-2812HNU(L)-Fx Series User's Guide
.... 5 For this example, the interface type is ADSL and the connection has the following information. PPPoE Service Name My DSL Authentication Method Auto Static IP Address 192.168.1.32 Others PPPoE Passthrough: Disabled NAT: Enabled IGMP Multicast Proxy: Enabled Apply as your WAN mode type and click Switch WAN Interface...PCR PPP Information PPP User Name [email protected] PPP Password ABCDEF! Chapter 3 Tutorials 2 Select ADSL as Default Gateway: Enable DNS Server: Static DNS IP Address (Primary: 192.168.1.254 Secondary: 192.168.1.253) 34 P-2812HNU(L)-Fx Series User's Guide

User Guide
Page 43
... NAT Port Forwarding In this tutorial, you manage the Doom server on the Device. Traffic should be forwarded to configure the port settings and IP address on a computer behind the Device. In order for more information). 1 Click Network Setting > NAT > Port Forwarding. Also, refer to... the Profile screen, select the profile you are using and click Edit. P-2812HNU(L)-Fx Series User's Guide 43 Click Add new rule. Chapter 3 Tutorials 11 If you cannot access the Internet go back to the Troubleshooting section...
... NAT Port Forwarding In this tutorial, you manage the Doom server on the Device. Traffic should be forwarded to configure the port settings and IP address on a computer behind the Device. In order for more information). 1 Click Network Setting > NAT > Port Forwarding. Also, refer to... the Profile screen, select the profile you are using and click Edit. P-2812HNU(L)-Fx Series User's Guide 43 Click Add new rule. Chapter 3 Tutorials 11 If you cannot access the Internet go back to the Troubleshooting section...

User Guide
Page 44
.... 4 The port forwarding settings you configured should appear in Status is the color yellow, meaning it is MyDSLConnection. 666 666 Enter the IP address of the Doom server. This is 192.168.1.34 for this example, which the Doom service is the default interface for this example...Select the WAN interface through which is activated. Click Apply to have access to your Doom server. 3.5 How to another VoIP device. 44 P-2812HNU(L)-Fx Series User's Guide This is forwarded. Chapter 3 Tutorials 2 Enter the following values: Service Name WAN Interface Start/End Ports Translation Start/...
.... 4 The port forwarding settings you configured should appear in Status is the color yellow, meaning it is MyDSLConnection. 666 666 Enter the IP address of the Doom server. This is 192.168.1.34 for this example, which the Doom service is the default interface for this example...Select the WAN interface through which is activated. Click Apply to have access to your Doom server. 3.5 How to another VoIP device. 44 P-2812HNU(L)-Fx Series User's Guide This is forwarded. Chapter 3 Tutorials 2 Enter the following values: Service Name WAN Interface Start/End Ports Translation Start/...

User Guide
Page 49
... Windows XP to finish. In Windows Explorer's Address bar type a double backslash "\\" followed by the IP address of the Device (the default IP address of the Device is available. Tutorial: USB Services > File Sharing > Share Configuration (2) 3.6.2 ...Access Your Shared Files From a Computer You can see the USB storage device listed in this User's Guide show you restart your computer. 3.7 Using the Media Server Feature Use the media server feature to your shared files. P-2812HNU...
... Windows XP to finish. In Windows Explorer's Address bar type a double backslash "\\" followed by the IP address of the Device (the default IP address of the Device is available. Tutorial: USB Services > File Sharing > Share Configuration (2) 3.6.2 ...Access Your Shared Files From a Computer You can see the USB storage device listed in this User's Guide show you restart your computer. 3.7 Using the Media Server Feature Use the media server feature to your shared files. P-2812HNU...
User Guide
Page 55
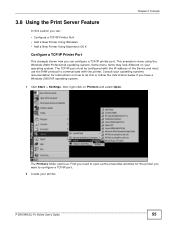
... Click Start > Settings, then right click on how to do this section you can configure a TCP/IP printer port. The TCP/IP port must be configured with the printer. P-2812HNU(L)-Fx Series User's Guide 55 Some menu items may look different on your operating systems documentation for the ...printer you want to configure a TCP/IP port. 2 Locate your printer. This example is done using the Windows 2000 Professional operating system...
... Click Start > Settings, then right click on how to do this section you can configure a TCP/IP printer port. The TCP/IP port must be configured with the printer. P-2812HNU(L)-Fx Series User's Guide 55 Some menu items may look different on your operating systems documentation for the ...printer you want to configure a TCP/IP port. 2 Locate your printer. This example is done using the Windows 2000 Professional operating system...

User Guide
Page 56
Select Standard TCP/IP Port and click New Port... Tutorial: Open Printer Properties 4 Select the Ports tab and click Add Port... Tutorial: Add a Port Window 56 P-2812HNU(L)-Fx Series User's Guide Tutorial: Printer Properties Window 5 A Printer Ports window appears. Chapter 3 Tutorials 3 Right click on your printer and select Properties.
Select Standard TCP/IP Port and click New Port... Tutorial: Open Printer Properties 4 Select the Ports tab and click Add Port... Tutorial: Add a Port Window 56 P-2812HNU(L)-Fx Series User's Guide Tutorial: Printer Properties Window 5 A Printer Ports window appears. Chapter 3 Tutorials 3 Right click on your printer and select Properties.

User Guide
Page 57
... is connected in order to use the default IP address of the Device to which you are configuring the TCP/IP printer port must be on the same LAN in the Printer Name or IP Address: field. Chapter 3 Tutorials 6 Add Standard TCP/IP Printer Port Wizard window opens up. The Port... field updates automatically to start configuring the printer port. Tutorial: Enter IP Address of the port. Tutorial: Add a Port Wizard 7 Enter the IP address of the Device, 192.168.1.1. Click Next to reflect the IP address of the Device P-2812HNU(L)-Fx Series User's Guide 57 Click Next. In our example we ...
... is connected in order to use the default IP address of the Device to which you are configuring the TCP/IP printer port must be on the same LAN in the Printer Name or IP Address: field. Chapter 3 Tutorials 6 Add Standard TCP/IP Printer Port Wizard window opens up. The Port... field updates automatically to start configuring the printer port. Tutorial: Enter IP Address of the port. Tutorial: Add a Port Wizard 7 Enter the IP address of the Device, 192.168.1.1. Click Next to reflect the IP address of the Device P-2812HNU(L)-Fx Series User's Guide 57 Click Next. In our example we ...
User Guide
Page 58
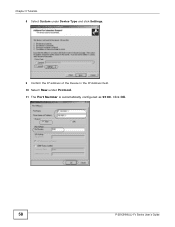
Tutorial: Custom Port Settings 9 Confirm the IP address of the Device in the IP Address field. 10 Select Raw under Device Type and click Settings. Tutorial: Custom Port Settings 58 P-2812HNU(L)-Fx Series User's Guide Click OK. Chapter 3 Tutorials 8 Select Custom under Protocol. 11 The Port Number is automatically configured as 9100.
Tutorial: Custom Port Settings 9 Confirm the IP address of the Device in the IP Address field. 10 Select Raw under Device Type and click Settings. Tutorial: Custom Port Settings 58 P-2812HNU(L)-Fx Series User's Guide Click OK. Chapter 3 Tutorials 8 Select Custom under Protocol. 11 The Port Number is automatically configured as 9100.

User Guide
Page 59
Some menu items may look different on your settings and close the wizard window. Add a New Printer Using Windows This example shows how to connect a printer to other computers on your Device using the Windows XP Professional operating system. Tutorial: Finish Adding the TCP/IP Port 13 Repeat steps 1 to 12 to add this printer to your operating system. P-2812HNU(L)-Fx Series User's Guide 59 Chapter 3 Tutorials 12 Continue through the wizard, apply your network.
Some menu items may look different on your settings and close the wizard window. Add a New Printer Using Windows This example shows how to connect a printer to other computers on your Device using the Windows XP Professional operating system. Tutorial: Finish Adding the TCP/IP Port 13 Repeat steps 1 to 12 to add this printer to your operating system. P-2812HNU(L)-Fx Series User's Guide 59 Chapter 3 Tutorials 12 Continue through the wizard, apply your network.

User Guide
Page 61
Tutorial: Add Printer Wizard: Local or Network Printer Chapter 3 Tutorials 4 Select Create a new port and Standard TCP/IP Port. Click Next. Tutorial: Add Printer Wizard: Select the Printer Port P-2812HNU(L)-Fx Series User's Guide 61 3 Select Local printer attached to this computer and click Next.
Tutorial: Add Printer Wizard: Local or Network Printer Chapter 3 Tutorials 4 Select Create a new port and Standard TCP/IP Port. Click Next. Tutorial: Add Printer Wizard: Select the Printer Port P-2812HNU(L)-Fx Series User's Guide 61 3 Select Local printer attached to this computer and click Next.

User Guide
Page 62
...to start configuring the printer port. In our example we use the printer sharing function. Tutorial: Add a Port Wizard 6 Enter the IP address of the Device to use the default IP address of the Device 62 P-2812HNU(L)-Fx Series User's Guide Note: The computer from which you are configuring the TCP.../IP printer port must be on the same LAN in order to which the printer is connected in the Printer Name or IP Address: field. Chapter 3...
...to start configuring the printer port. In our example we use the printer sharing function. Tutorial: Add a Port Wizard 6 Enter the IP address of the Device to use the default IP address of the Device 62 P-2812HNU(L)-Fx Series User's Guide Note: The computer from which you are configuring the TCP.../IP printer port must be on the same LAN in order to which the printer is connected in the Printer Name or IP Address: field. Chapter 3...

User Guide
Page 63
7 Select Custom under Protocol. 10 The Port Number is automatically configured as 9100. Click OK to go back to the previous screen and click Next. Tutorial: Custom Port Settings P-2812HNU(L)-Fx Series User's Guide 63 Tutorial: Custom Port Settings Chapter 3 Tutorials 8 Confirm the IP address of the Device in the Printer Name or IP Address field. 9 Select Raw under Device Type and click Settings.
7 Select Custom under Protocol. 10 The Port Number is automatically configured as 9100. Click OK to go back to the previous screen and click Next. Tutorial: Custom Port Settings P-2812HNU(L)-Fx Series User's Guide 63 Tutorial: Custom Port Settings Chapter 3 Tutorials 8 Confirm the IP address of the Device in the Printer Name or IP Address field. 9 Select Raw under Device Type and click Settings.

User Guide
Page 64
... Next to close the wizard window. Chapter 3 Tutorials 11 Click Finish to continue. Tutorial: Add Printer Wizard: Printer Driver 64 P-2812HNU(L)-Fx Series User's Guide Tutorial: Finish Adding the TCP/IP Port 12 Select the make of the printer that you want to connect to the print server in the Manufacturer list...
... Next to close the wizard window. Chapter 3 Tutorials 11 Click Finish to continue. Tutorial: Add Printer Wizard: Printer Driver 64 P-2812HNU(L)-Fx Series User's Guide Tutorial: Finish Adding the TCP/IP Port 12 Select the make of the printer that you want to connect to the print server in the Manufacturer list...

User Guide
Page 68
Select IP Printing from the dropdown list box. 8 In the Printer's Address field, type the IP address of the screen. Tutorial: Printer List Folder 7 Set up your Device. 9 Deselect the Use default queue on server check box. 10 Type LP1 in the Printer List configuration screen. Tutorial: Utilities Folder 6 Click the Add icon at the top of your printer in the Queue Name field. 68 P-2812HNU(L)-Fx Series User's Guide Chapter 3 Tutorials 4 Double-click the Utilities folder. Tutorial: Applications Folder 5 Double-click the Print Center icon.
Select IP Printing from the dropdown list box. 8 In the Printer's Address field, type the IP address of the screen. Tutorial: Printer List Folder 7 Set up your Device. 9 Deselect the Use default queue on server check box. 10 Type LP1 in the Printer List configuration screen. Tutorial: Utilities Folder 6 Click the Add icon at the top of your printer in the Queue Name field. 68 P-2812HNU(L)-Fx Series User's Guide Chapter 3 Tutorials 4 Double-click the Utilities folder. Tutorial: Applications Folder 5 Double-click the Print Center icon.
User Guide
Page 72
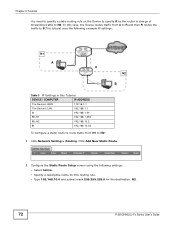
... Active. • Specify a descriptive name for the destination, N2. 72 P-2812HNU(L)-Fx Series User's Guide Click Add New Static Route. 2 Configure the Static Route Setup screen using the following example IP settings: N1 A R N2 B Table 3 IP Settings in charge of forwarding traffic to N2: 1 Click Network Setting > Routing...as the router in this routing rule. • Type 192.168.10.0 and subnet mask 255.255.255.0 for this Tutorial DEVICE / COMPUTER IP ADDRESS The Device's WAN 172.16.1.1 The Device's LAN 192.168.1.1 A 192.168.1.34 R's N1 192.168.1.253 R's N2 192.168.10...
... Active. • Specify a descriptive name for the destination, N2. 72 P-2812HNU(L)-Fx Series User's Guide Click Add New Static Route. 2 Configure the Static Route Setup screen using the following example IP settings: N1 A R N2 B Table 3 IP Settings in charge of forwarding traffic to N2: 1 Click Network Setting > Routing...as the router in this routing rule. • Type 192.168.10.0 and subnet mask 255.255.255.0 for this Tutorial DEVICE / COMPUTER IP ADDRESS The Device's WAN 172.16.1.1 The Device's LAN 192.168.1.1 A 192.168.1.34 R's N1 192.168.1.253 R's N2 192.168.10...

