User Guide
Page 1
Copyright © 2012 ZyXEL Communications Corporation NBG-416N Wireless N-lite Home Router Default Login Details LAN IP Address https://192.168.1.1 User Name admin Password 1234 Version 1.00 Editionw2w,w.4zy/x2el0.c1om2 www.zyxel.com IMPORTANT! READ CAREFULLY BEFORE USE. KEEP THIS GUIDE FOR FUTURE REFERENCE. IMPORTANT!
Copyright © 2012 ZyXEL Communications Corporation NBG-416N Wireless N-lite Home Router Default Login Details LAN IP Address https://192.168.1.1 User Name admin Password 1234 Version 1.00 Editionw2w,w.4zy/x2el0.c1om2 www.zyxel.com IMPORTANT! READ CAREFULLY BEFORE USE. KEEP THIS GUIDE FOR FUTURE REFERENCE. IMPORTANT!
User Guide
Page 2
Graphics in this book may differ slightly from the product due to ensure that the information in operating systems, operating system versions, or if you installed updated firmware/software for your device. Every effort has been made to differences in this manual is accurate. KEEP THIS GUIDE FOR FUTURE REFERENCE. READ CAREFULLY BEFORE USE. Related Documentation • Quick Start Guide The Quick Start Guide shows how to connect the NBG-416N and configure it using the Web Configurator wizard. 2 NBG-416N User's Guide IMPORTANT!
Graphics in this book may differ slightly from the product due to ensure that the information in operating systems, operating system versions, or if you installed updated firmware/software for your device. Every effort has been made to differences in this manual is accurate. KEEP THIS GUIDE FOR FUTURE REFERENCE. READ CAREFULLY BEFORE USE. Related Documentation • Quick Start Guide The Quick Start Guide shows how to connect the NBG-416N and configure it using the Web Configurator wizard. 2 NBG-416N User's Guide IMPORTANT!

User Guide
Page 3
Contents Overview Contents Overview User's Guide ...11 Introduction ...13 The Web Configurator ...19 Connection Wizard ...23 Modes ...37 Tutorials ...61 Technical Reference ...69 Wireless LAN ...71 WAN ...91 LAN ...101 DHCP Server ...105 Network Address Translation 111 Dynamic DNS ...119 Firewall ...121 Remote Management ...125 Universal Plug-and-Play (UPnP 129 System ...135 Logs ...141 Tools ...143 Sys OP Mode ...149 Language ...153 Troubleshooting ...155 NBG-416N User's Guide 3
Contents Overview Contents Overview User's Guide ...11 Introduction ...13 The Web Configurator ...19 Connection Wizard ...23 Modes ...37 Tutorials ...61 Technical Reference ...69 Wireless LAN ...71 WAN ...91 LAN ...101 DHCP Server ...105 Network Address Translation 111 Dynamic DNS ...119 Firewall ...121 Remote Management ...125 Universal Plug-and-Play (UPnP 129 System ...135 Logs ...141 Tools ...143 Sys OP Mode ...149 Language ...153 Troubleshooting ...155 NBG-416N User's Guide 3
User Guide
Page 5
...of Contents Contents Overview ...3 Table of Contents ...5 Part I: User's Guide 11 Chapter 1 Introduction...13 1.1 Overview ...13 1.2 Securing the NBG-416N ...14 1.3 LEDs ...15 1.4 The WPS Button ...16 1.5 Wall Mounting ...16 Chapter 2 The Web Configurator ...19 2.1 Overview ...19 2.2 Accessing the Web Configurator 19 2.3 Resetting the NBG-416N ...21 2.3.1 Using the RESET Button 21 Chapter 3 Connection ...3.4.5 WAN IP Address Assignment 32 3.4.6 IP Address and Subnet Mask 32 3.4.7 DNS Server Address Assignment 33 3.4.8 WAN IP and DNS Server Address Assignment 34 NBG-416N User's Guide 5
...of Contents Contents Overview ...3 Table of Contents ...5 Part I: User's Guide 11 Chapter 1 Introduction...13 1.1 Overview ...13 1.2 Securing the NBG-416N ...14 1.3 LEDs ...15 1.4 The WPS Button ...16 1.5 Wall Mounting ...16 Chapter 2 The Web Configurator ...19 2.1 Overview ...19 2.2 Accessing the Web Configurator 19 2.3 Resetting the NBG-416N ...21 2.3.1 Using the RESET Button 21 Chapter 3 Connection ...3.4.5 WAN IP Address Assignment 32 3.4.6 IP Address and Subnet Mask 32 3.4.7 DNS Server Address Assignment 33 3.4.8 WAN IP and DNS Server Address Assignment 34 NBG-416N User's Guide 5
User Guide
Page 6
... ...61 5.2 How to Connect to the Internet from an AP 61 5.2.1 Configure Wireless Security Using WPS on both your NBG-416N and Wireless Client 61 5.3 Enable and Configure Wireless Security without WPS on your NBG-416N 65 Part II: Technical Reference 69 Chapter 6 Wireless LAN...71 6.1 Overview ...71 6.2 What You Can Do ...72 6.3 What... 6.4.1 No Security ...77 6.4.2 WEP Encryption ...78 6.4.3 WPA-PSK/WPA2-PSK 80 6.5 MAC Filter ...81 6.6 Wireless LAN Advanced Screen 83 6.7 Quality of Service (QoS) Screen 85 6 NBG-416N User's Guide
... ...61 5.2 How to Connect to the Internet from an AP 61 5.2.1 Configure Wireless Security Using WPS on both your NBG-416N and Wireless Client 61 5.3 Enable and Configure Wireless Security without WPS on your NBG-416N 65 Part II: Technical Reference 69 Chapter 6 Wireless LAN...71 6.1 Overview ...71 6.2 What You Can Do ...72 6.3 What... 6.4.1 No Security ...77 6.4.2 WEP Encryption ...78 6.4.3 WPA-PSK/WPA2-PSK 80 6.5 MAC Filter ...81 6.6 Wireless LAN Advanced Screen 83 6.7 Quality of Service (QoS) Screen 85 6 NBG-416N User's Guide
User Guide
Page 7
... ...114 10.4 NAT Application Screen 115 10.5 Technical Reference ...117 10.5.1 NAT Port Forwarding: Services and Port Numbers 117 10.5.2 NAT Port Forwarding Example 118 NBG-416N User's Guide 7
... ...114 10.4 NAT Application Screen 115 10.5 Technical Reference ...117 10.5.1 NAT Port Forwarding: Services and Port Numbers 117 10.5.2 NAT Port Forwarding Example 118 NBG-416N User's Guide 7

User Guide
Page 8
... Screen ...119 Chapter 12 Firewall ...121 12.1 Overview ...121 12.2 What You Can Do ...121 12.3 What You Need To Know 122 12.3.1 About the NBG-416N Firewall 122 12.3.2 VPN Pass Through Features 122 12.4 General Firewall Screen 123 12.5 Services Screen ...123 Chapter 13 Remote Management...125 13.1 Overview ...125... 135 15.4 Time Setting Screen ...137 Chapter 16 Logs ...141 16.1 Overview ...141 16.2 What You Need to Know 141 16.3 View Log Screen ...141 8 NBG-416N User's Guide
... Screen ...119 Chapter 12 Firewall ...121 12.1 Overview ...121 12.2 What You Can Do ...121 12.3 What You Need To Know 122 12.3.1 About the NBG-416N Firewall 122 12.3.2 VPN Pass Through Features 122 12.4 General Firewall Screen 123 12.5 Services Screen ...123 Chapter 13 Remote Management...125 13.1 Overview ...125... 135 15.4 Time Setting Screen ...137 Chapter 16 Logs ...141 16.1 Overview ...141 16.2 What You Need to Know 141 16.3 View Log Screen ...141 8 NBG-416N User's Guide

User Guide
Page 9
... 20 Troubleshooting...155 20.1 Power, Hardware Connections, and LEDs 155 20.2 NBG-416N Access and Login 156 20.3 Internet Access ...158 20.4 Resetting the NBG-416N to Its Factory Defaults 159 20.5 Wireless Problems ...160 Appendix A IP... Addresses and Subnetting 161 Appendix B Setting Up Your Computer's IP Address 171 Appendix C Pop-up Windows, JavaScripts and Java Permissions 199 Appendix D Wireless LANs 209 Appendix E Common Services 223 Appendix F Legal Information 227 Index ...235 NBG-416N User's Guide...
... 20 Troubleshooting...155 20.1 Power, Hardware Connections, and LEDs 155 20.2 NBG-416N Access and Login 156 20.3 Internet Access ...158 20.4 Resetting the NBG-416N to Its Factory Defaults 159 20.5 Wireless Problems ...160 Appendix A IP... Addresses and Subnetting 161 Appendix B Setting Up Your Computer's IP Address 171 Appendix C Pop-up Windows, JavaScripts and Java Permissions 199 Appendix D Wireless LANs 209 Appendix E Common Services 223 Appendix F Legal Information 227 Index ...235 NBG-416N User's Guide...

User Guide
Page 10
Table of Contents 10 NBG-416N User's Guide
Table of Contents 10 NBG-416N User's Guide
User Guide
Page 13
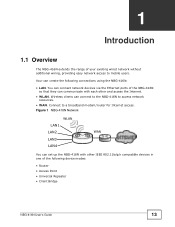
... via the Ethernet ports of your existing wired network without additional wiring, providing easy network access to mobile users. Wireless clients can create the following device modes: • Router • Access Point • Universal Repeater • Client Bridge NBG-416N User's Guide 13 Your can connect to the NBG-416N to a broadband modem/router for Internet access.
... via the Ethernet ports of your existing wired network without additional wiring, providing easy network access to mobile users. Wireless clients can create the following device modes: • Router • Access Point • Universal Repeater • Client Bridge NBG-416N User's Guide 13 Your can connect to the NBG-416N to a broadband modem/router for Internet access.
User Guide
Page 14
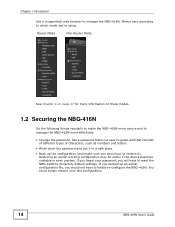
...to reset the NBG-416N to manage the NBG-416N. You could simply restore your password, you 're using. If you backed up the configuration (and make the NBG-416N more effectively. • Change the password. If you forget your last configuration. 14 NBG-416N User's Guide Menus vary ...according to which mode you will have to manage the NBG-416N more secure and to totally re-configure the...
...to reset the NBG-416N to manage the NBG-416N. You could simply restore your password, you 're using. If you backed up the configuration (and make the NBG-416N more effectively. • Change the password. If you forget your last configuration. 14 NBG-416N User's Guide Menus vary ...according to which mode you will have to manage the NBG-416N more secure and to totally re-configure the...

User Guide
Page 15
...is not ready, or has failed. NBG-416N User's Guide 15 The NBG-416N is sending/receiving data through the wireless LAN. The LAN is negotiating a WPS connection with a wireless client. The NBG-416N has a successful 10/100MB WAN connection. The NBG-416N is ready, but is sending/receiving ...data through the wireless LAN. The NBG-416N is not connected. The NBG-416N is not sending/ receiving data through the WAN. The...
...is not ready, or has failed. NBG-416N User's Guide 15 The NBG-416N is sending/receiving data through the wireless LAN. The LAN is negotiating a WPS connection with a wireless client. The NBG-416N has a successful 10/100MB WAN connection. The NBG-416N is ready, but is sending/receiving ...data through the wireless LAN. The NBG-416N is not connected. The NBG-416N is not sending/ receiving data through the WAN. The...

User Guide
Page 16
leave a small gap of the holes, then insert the screws into the full depth of about 0.5 cm. 16 NBG-416N User's Guide Do not insert the screws all the way in - When WPS is activated on a device, it has two minutes to avoid damaging pipes or cables ... not insert the screws all the way in - Then, the two devices connect and set up a secure wireless network. Chapter 1 Introduction 1.4 The WPS Button Your NBG-416N supports WiFi Protected Setup (WPS), which is an easy way to set up a secure network by the WiFi Alliance. Each WPS connection works between holes...
leave a small gap of the holes, then insert the screws into the full depth of about 0.5 cm. 16 NBG-416N User's Guide Do not insert the screws all the way in - When WPS is activated on a device, it has two minutes to avoid damaging pipes or cables ... not insert the screws all the way in - Then, the two devices connect and set up a secure wireless network. Chapter 1 Introduction 1.4 The WPS Button Your NBG-416N supports WiFi Protected Setup (WPS), which is an easy way to set up a secure network by the WiFi Alliance. Each WPS connection works between holes...

User Guide
Page 17
Chapter 1 Introduction 4 Make sure the screws are fastened well enough to hold the weight of the NBG416N with the connection cables. 5 Align the holes on the back of the NBG-416N with the screws on the screws. Figure 3 Wall Mounting Example NBG-416N User's Guide 17 Hang the NBG-416N on the wall.
Chapter 1 Introduction 4 Make sure the screws are fastened well enough to hold the weight of the NBG416N with the connection cables. 5 Align the holes on the back of the NBG-416N with the screws on the screws. Figure 3 Wall Mounting Example NBG-416N User's Guide 17 Hang the NBG-416N on the wall.

User Guide
Page 18
Chapter 1 Introduction 18 NBG-416N User's Guide
Chapter 1 Introduction 18 NBG-416N User's Guide
User Guide
Page 19
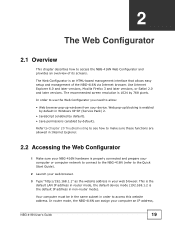
...properly connected and prepare your computer or computer network to connect to the NBG-416N (refer to access this website address. In router mode, the NBG-416N can assign your computer an IP address, NBG-416N User's Guide 19 The Web Configurator is the default IP address in order to the... Quick Start Guide). 2 Launch your web browser. 3 Type "http://192.168.1.1" as the website address in ...
...properly connected and prepare your computer or computer network to connect to the NBG-416N (refer to access this website address. In router mode, the NBG-416N can assign your computer an IP address, NBG-416N User's Guide 19 The Web Configurator is the default IP address in order to the... Quick Start Guide). 2 Launch your web browser. 3 Type "http://192.168.1.1" as the website address in ...

User Guide
Page 20
Simply log back into the NBG-416N if this happens. 5 Select the setup type you must set in the Administrator Inactivity Timer field expires (default five minutes). Chapter 2 The Web Configurator so ... and Wireless setup. • Click Go to Advanced Setup to view and configure all the NBG-416N's settings. • Select a language to go to the basic Web Configurator in that language. Figure 5 Selecting the setup mode 20 NBG-416N User's Guide To change to get an IP address automatically (computer factory default) or give it a fixed...
Simply log back into the NBG-416N if this happens. 5 Select the setup type you must set in the Administrator Inactivity Timer field expires (default five minutes). Chapter 2 The Web Configurator so ... and Wireless setup. • Click Go to Advanced Setup to view and configure all the NBG-416N's settings. • Select a language to go to the basic Web Configurator in that language. Figure 5 Selecting the setup mode 20 NBG-416N User's Guide To change to get an IP address automatically (computer factory default) or give it a fixed...
User Guide
Page 21
Chapter 2 The Web Configurator 2.3 Resetting the NBG-416N If you forget your password or IP address, or you cannot access the Web Configurator, you had previously saved, the username will be reset to ... the RESET button for longer than five seconds to set the NBG-416N back to reload the factory-default configuration file. The IP address will need to use the RESET button at the back of the NBG-416N to its factory-default configurations. NBG-416N User's Guide 21 This means that you will lose all configurations that you...
Chapter 2 The Web Configurator 2.3 Resetting the NBG-416N If you forget your password or IP address, or you cannot access the Web Configurator, you had previously saved, the username will be reset to ... the RESET button for longer than five seconds to set the NBG-416N back to reload the factory-default configuration file. The IP address will need to use the RESET button at the back of the NBG-416N to its factory-default configurations. NBG-416N User's Guide 21 This means that you will lose all configurations that you...

User Guide
Page 22
Chapter 2 The Web Configurator 22 NBG-416N User's Guide
Chapter 2 The Web Configurator 22 NBG-416N User's Guide

User Guide
Page 23
...setup. The Web Configurator's wizard setup helps you access the NBG-416N Web Configurator, click Go to skip this wizard setup and configure basic or advanced features accordingly. Figure 6 Select Wizard Basic or Advanced NBG-416N User's Guide 23 Leave a field blank if you don't have that ...information. 1 After you configure your ISP (Internet Service Provider) checklist in the Quick Start Guide to know what to access the Internet. Refer to...
...setup. The Web Configurator's wizard setup helps you access the NBG-416N Web Configurator, click Go to skip this wizard setup and configure basic or advanced features accordingly. Figure 6 Select Wizard Basic or Advanced NBG-416N User's Guide 23 Leave a field blank if you don't have that ...information. 1 After you configure your ISP (Internet Service Provider) checklist in the Quick Start Guide to know what to access the Internet. Refer to...
