
User Guide
Page 9
...21 Getting to Know Your Switch ...23 Hardware Installation and Connection ...27 Hardware Panels ...31 Technical Reference ...37 The Web Configurator ...39 Initial Setup Example ...47 Tutorials ...51 System Status and Port Statistics ...60 Basic Setting...Port Security ...151 Classifier ...154 Policy Rule ...160 Queuing Method ...165 Multicast ...168 AAA ...182 IP Source Guard ...193 Loop Guard ...215 Layer 2 Protocol Tunneling ...219 PPPoE ...223 Error Disable ...231 Static Route ...237 Differentiated Services ...240 DHCP ...244 ARP Learning ...250 Maintenance ...255 Access Control ...261 GS2200...
...21 Getting to Know Your Switch ...23 Hardware Installation and Connection ...27 Hardware Panels ...31 Technical Reference ...37 The Web Configurator ...39 Initial Setup Example ...47 Tutorials ...51 System Status and Port Statistics ...60 Basic Setting...Port Security ...151 Classifier ...154 Policy Rule ...160 Queuing Method ...165 Multicast ...168 AAA ...182 IP Source Guard ...193 Loop Guard ...215 Layer 2 Protocol Tunneling ...219 PPPoE ...223 Error Disable ...231 Static Route ...237 Differentiated Services ...240 DHCP ...244 ARP Learning ...250 Maintenance ...255 Access Control ...261 GS2200...
User Guide
Page 11
... ...27 2.3 Mounting the Switch on a Rack ...27 2.3.1 Rack-mounted Installation Requirements 27 2.3.2 Attaching the Mounting Brackets to the Switch 28 2.3.3 Mounting the Switch on a Rack 29 2.4 Wall Mounting (for GS2200-8 only 29 Chapter 3 Hardware Panels...31 3.1 Overview ...31 3.2 Front Panels ...31 3.2.1 Console Port ...33 3.2.2 Gigabit Ethernet Ports ...33 3.2.3 Mini-GBIC Slots ...34 GS2200-8/24 User's Guide 11
... ...27 2.3 Mounting the Switch on a Rack ...27 2.3.1 Rack-mounted Installation Requirements 27 2.3.2 Attaching the Mounting Brackets to the Switch 28 2.3.3 Mounting the Switch on a Rack 29 2.4 Wall Mounting (for GS2200-8 only 29 Chapter 3 Hardware Panels...31 3.1 Overview ...31 3.2 Front Panels ...31 3.2.1 Console Port ...33 3.2.2 Gigabit Ethernet Ports ...33 3.2.3 Mini-GBIC Slots ...34 GS2200-8/24 User's Guide 11
User Guide
Page 12
...VLAN ...47 5.1.2 Setting Port VID ...48 5.2 Configuring Switch Management IP Address 49 Chapter 6 Tutorials ...51 6.1 Overview ...51 6.2 How to Use DHCP Snooping on the Switch 51 6.3 How to Use DHCP Relay on the Switch 54 6.3.1 DHCP Relay... Tutorial Introduction 55 6.3.2 Creating a VLAN ...55 6.3.3 Configuring DHCP Relay ...58 6.3.4 Troubleshooting ...59 Chapter 7 System Status and Port Statistics...60 7.1 Overview ...60 7.1.1 What You Can Do ...60 7.2 Port Status Summary ...61 7.2.1 Status: Port Details ...63 12 GS2200...
...VLAN ...47 5.1.2 Setting Port VID ...48 5.2 Configuring Switch Management IP Address 49 Chapter 6 Tutorials ...51 6.1 Overview ...51 6.2 How to Use DHCP Snooping on the Switch 51 6.3 How to Use DHCP Relay on the Switch 54 6.3.1 DHCP Relay... Tutorial Introduction 55 6.3.2 Creating a VLAN ...55 6.3.3 Configuring DHCP Relay ...58 6.3.4 Troubleshooting ...59 Chapter 7 System Status and Port Statistics...60 7.1 Overview ...60 7.1.1 What You Can Do ...60 7.2 Port Status Summary ...61 7.2.1 Status: Port Details ...63 12 GS2200...

User Guide
Page 13
... 8 Basic Setting ...66 8.1 Overview ...66 8.1.1 What You Can Do ...66 8.2 System Information ...67 8.3 General Setup ...69 8.4 Introduction to VLANs ...70 8.5 Switch Setup Screen ...71 8.6 IP Setup ...72 8.6.1 Management IP Addresses ...73 8.7 Port Setup ...75 8.8 PoE Status ...76 8.8.1 PoE Setup ...79 Chapter 9 VLAN ...83 9.1 Overview ...83 9.1.1 What You Can Do ...83 9.1.2 What You... Forwarding 101 Chapter 11 Static Multicast Forward Setup ...103 11.1 Overview ...103 11.1.1 What You Can Do ...103 11.1.2 What You Need To Know ...103 GS2200-8/24 User's Guide 13
... 8 Basic Setting ...66 8.1 Overview ...66 8.1.1 What You Can Do ...66 8.2 System Information ...67 8.3 General Setup ...69 8.4 Introduction to VLANs ...70 8.5 Switch Setup Screen ...71 8.6 IP Setup ...72 8.6.1 Management IP Addresses ...73 8.7 Port Setup ...75 8.8 PoE Status ...76 8.8.1 PoE Setup ...79 Chapter 9 VLAN ...83 9.1 Overview ...83 9.1.1 What You Can Do ...83 9.1.2 What You... Forwarding 101 Chapter 11 Static Multicast Forward Setup ...103 11.1 Overview ...103 11.1.1 What You Can Do ...103 11.1.2 What You Need To Know ...103 GS2200-8/24 User's Guide 13
User Guide
Page 23
... used standalone for a group of using the Switch in various network environments. 1.1.1 Backbone Application The Switch is an ideal solution for Ethernets. Ports 5 to 8 on the GS2200-8HP and ports 1 to all models. Consumption Rack mounting Wall mounting SWITCH MODEL GS2200-24P GS2200-8HP GS2200-24P GS-2200-8HP, GS2200-24P GS2200-8, GS2200-8HP, GS2200-24, GS2200-24P GS2200-8 This section shows a few examples of...
... used standalone for a group of using the Switch in various network environments. 1.1.1 Backbone Application The Switch is an ideal solution for Ethernets. Ports 5 to 8 on the GS2200-8HP and ports 1 to all models. Consumption Rack mounting Wall mounting SWITCH MODEL GS2200-24P GS2200-8HP GS2200-24P GS-2200-8HP, GS2200-24P GS2200-8, GS2200-8HP, GS2200-24, GS2200-24P GS2200-8 This section shows a few examples of...
User Guide
Page 24
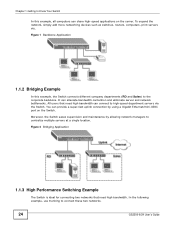
...maintenance by using a Gigabit Ethernet/mini-GBIC port on the server. To expand the network, simply add more networking devices such as switches, routers, computers, print servers etc. You can share high-speed applications on the Switch. Figure 1 Backbone Application 1.1.2 Bridging Example...can connect to high-speed department servers via the Switch. In the following example, use trunking to connect these two networks. 24 GS2200-8/24 User's Guide Figure 2 Bridging Application 1.1.3 High Performance Switching Example The Switch is ideal for connecting two networks that need high...
...maintenance by using a Gigabit Ethernet/mini-GBIC port on the server. To expand the network, simply add more networking devices such as switches, routers, computers, print servers etc. You can share high-speed applications on the Switch. Figure 1 Backbone Application 1.1.2 Bridging Example...can connect to high-speed department servers via the Switch. In the following example, use trunking to connect these two networks. 24 GS2200-8/24 User's Guide Figure 2 Bridging Application 1.1.3 High Performance Switching Example The Switch is ideal for connecting two networks that need high...
User Guide
Page 25
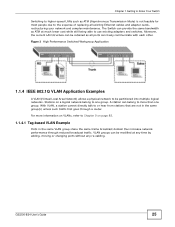
...Transmission Mode) is not feasible for most people due to the expense of replacing all ports can freely communicate with each other. For more than one group. Figure 3 High Performance Switched Workgroup Application 1.1.4 IEEE 802.1Q VLAN Application Examples A VLAN (Virtual Local Area ...Network) allows a physical network to be modified at much lower cost while still being able to use existing adapters and switches. GS2200-8/24 User's Guide 25 The Switch can be ...
...Transmission Mode) is not feasible for most people due to the expense of replacing all ports can freely communicate with each other. For more than one group. Figure 3 High Performance Switched Workgroup Application 1.1.4 IEEE 802.1Q VLAN Application Examples A VLAN (Virtual Local Area ...Network) allows a physical network to be modified at much lower cost while still being able to use existing adapters and switches. GS2200-8/24 User's Guide 25 The Switch can be ...
User Guide
Page 26
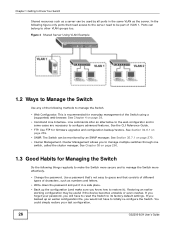
...to manage multiple switches through one switch, called the cluster manager. Line commands offer an alternative to the web configurator and in a safe place. • Back up an earlier configuration file, you know how to restore it). If you forget your last configuration. 26 GS2200-8/24 User's... not have to reset the Switch to totally re-configure the Switch. See Section 35.7.1 on page 290. 1.3 Good Habits for Managing the Switch Do the following figure only ports that need access to the server need to Manage the Switch Use any of the Switch using a (supported) web browser...
...to manage multiple switches through one switch, called the cluster manager. Line commands offer an alternative to the web configurator and in a safe place. • Back up an earlier configuration file, you know how to restore it). If you forget your last configuration. 26 GS2200-8/24 User's... not have to reset the Switch to totally re-configure the Switch. See Section 35.7.1 on page 290. 1.3 Good Habits for Managing the Switch Do the following figure only ports that need access to the server need to Manage the Switch Use any of the Switch using a (supported) web browser...
User Guide
Page 31
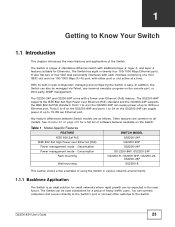
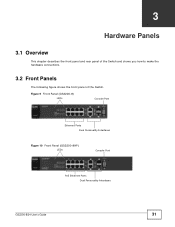
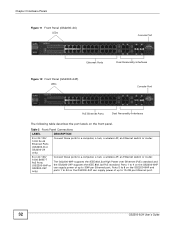
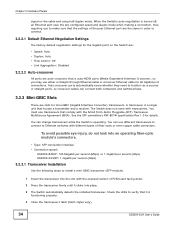
Figure 9 Front Panel (GS2200-8) LEDs Console Port Ethernet Ports Dual Personality Interfaces Figure 10 Front Panel (GS2200-8HP) LEDs Console Port PoE Ethernet Ports Dual Personality Interfaces GS2200-8/24 User's Guide 31 CHAPTER 3 Hardware Panels 3.1 Overview This chapter describes the front panel and rear panel of the Switch and shows you how to make the hardware connections. 3.2 Front Panels The following figure shows the front panel of the Switch.
Figure 9 Front Panel (GS2200-8) LEDs Console Port Ethernet Ports Dual Personality Interfaces Figure 10 Front Panel (GS2200-8HP) LEDs Console Port PoE Ethernet Ports Dual Personality Interfaces GS2200-8/24 User's Guide 31 CHAPTER 3 Hardware Panels 3.1 Overview This chapter describes the front panel and rear panel of the Switch and shows you how to make the hardware connections. 3.2 Front Panels The following figure shows the front panel of the Switch.
User Guide
Page 32
... Panel Connections LABEL DESCRIPTION 8 or 24 100/ 1000 RJ-45 Ethernet Ports (GS2200-8 or GS2200-24 only) Connect these ports to a computer, a hub, a wireless AP, an Ethernet switch or router. 8 or 24 100/ 1000 BASE-T PoE Ports (GS2200-8HP or GS2200-24P only) Connect these ports to 30W per Ethernet port. 32 GS2200-8/24 User's Guide Ports 1 to 4 on the front panel.
... Panel Connections LABEL DESCRIPTION 8 or 24 100/ 1000 RJ-45 Ethernet Ports (GS2200-8 or GS2200-24 only) Connect these ports to a computer, a hub, a wireless AP, an Ethernet switch or router. 8 or 24 100/ 1000 BASE-T PoE Ports (GS2200-8HP or GS2200-24P only) Connect these ports to 30W per Ethernet port. 32 GS2200-8/24 User's Guide Ports 1 to 4 on the front panel.

User Guide
Page 33
...mode can detect and adjust to a serial port (COM1, COM2 or other COM port) of the Switch. If the peer Ethernet port does not support autonegotiation or turns off this feature, the Switch determines the connection speed by detecting the GS2200-8/24 User's Guide 33 An auto-crossover ...(auto-MDI/MDI-X) port automatically works with terminal emulation ...
...mode can detect and adjust to a serial port (COM1, COM2 or other COM port) of the Switch. If the peer Ethernet port does not support autonegotiation or turns off this feature, the Switch determines the connection speed by detecting the GS2200-8/24 User's Guide 33 An auto-crossover ...(auto-MDI/MDI-X) port automatically works with terminal emulation ...
User Guide
Page 34
...'s connectors. • Type: SFP connection interface • Connection speed: GS2200-8/8HP: 100 Megabit per second (Mbps) or 1 Gigabit per second (Gbps) GS2200-24/24P: 1 Gigabit per second (Gbps) 3.2.3.1 Transceiver Installation Use the following steps to Ethernet switches with different types of the peer Ethernet port are auto-crossover, that comply with transceivers. When the...
...'s connectors. • Type: SFP connection interface • Connection speed: GS2200-8/8HP: 100 Megabit per second (Mbps) or 1 Gigabit per second (Gbps) GS2200-24/24P: 1 Gigabit per second (Gbps) 3.2.3.1 Transceiver Installation Use the following steps to Ethernet switches with different types of the peer Ethernet port are auto-crossover, that comply with transceivers. When the...
User Guide
Page 36
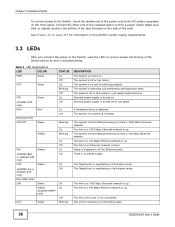
...GS2200-8/8HP only) ACT Green On Off On Off On Off On On Off Blinking DESCRIPTION The system is on the Switch's power supply requirements. 3.3 LEDs After you connect the power to the Switch, view the LEDs to ensure proper functioning of the Switch and as an aid in troubleshooting. The link to this port... other end of the supplied power cord to a power outlet. A hardware failure is receiving or transmitting data. 36 GS2200-8/24 User's Guide This port is detected. The system is functioning normally. The system is off or has failed. See Chapter 43 on page 307...
...GS2200-8/8HP only) ACT Green On Off On Off On Off On On Off Blinking DESCRIPTION The system is on the Switch's power supply requirements. 3.3 LEDs After you connect the power to the Switch, view the LEDs to ensure proper functioning of the Switch and as an aid in troubleshooting. The link to this port... other end of the supplied power cord to a power outlet. A hardware failure is receiving or transmitting data. 36 GS2200-8/24 User's Guide This port is detected. The system is functioning normally. The system is off or has failed. See Chapter 43 on page 307...

User Guide
Page 41
... links in the navigation panel. Advanced Application GS2200-8/24 User's Guide 41 Chapter 4 The Web Configurator E - IP Setup This link takes you to a screen where you can configure the IP address, subnet mask (necessary for individual Switch ports. Port Setup This link takes you to a screen... where you can set up global Switch parameters such as VLAN type, GARP and priority queues. PoE (For GS2200-8HP or GS2200-24P only) This link takes you to a screen...
... links in the navigation panel. Advanced Application GS2200-8/24 User's Guide 41 Chapter 4 The Web Configurator E - IP Setup This link takes you to a screen where you can configure the IP address, subnet mask (necessary for individual Switch ports. Port Setup This link takes you to a screen... where you can set up global Switch parameters such as VLAN type, GARP and priority queues. PoE (For GS2200-8HP or GS2200-24P only) This link takes you to a screen...
User Guide
Page 42
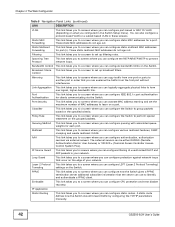
... one logical, higher-bandwidth link. A static route defines how the Switch should forward traffic by configuring the TCP/IP parameters manually. 42 GS2200-8/24 User's Guide Mirroring This link takes you to screens where you can copy traffic from the first port without interference. The external servers can use to identify and authenticate...
... one logical, higher-bandwidth link. A static route defines how the Switch should forward traffic by configuring the TCP/IP parameters manually. 42 GS2200-8/24 User's Guide Mirroring This link takes you to screens where you can copy traffic from the first port without interference. The external servers can use to identify and authenticate...
User Guide
Page 45
... the Switch or forget the administrator password, you see the initial screen. 3 When you will be reset to "1234" and the IP address to enter Debug Mode within 3 seconds ..." GS2200-8/24 User's Guide 45 Note: Be careful not to lock yourself and others out of the console port will ...need to reload the factory-default configuration file or reset the Switch back to begin a session. To upload the configuration file, ...
... the Switch or forget the administrator password, you see the initial screen. 3 When you will be reset to "1234" and the IP address to enter Debug Mode within 3 seconds ..." GS2200-8/24 User's Guide 45 Note: Be careful not to lock yourself and others out of the console port will ...need to reload the factory-default configuration file or reset the Switch back to begin a session. To upload the configuration file, ...
User Guide
Page 47
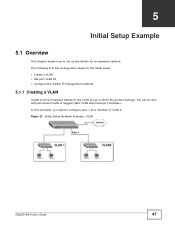
... Network Example: VLAN GS2200-8/24 User's Guide 47 You can do this example, you want to the VLAN group in which the port(s) belongs. In this with port-based VLAN or tagged static VLAN with fixed port members. CHAPTER 5 Initial Setup Example 5.1 Overview This chapter shows how to set up the Switch for the initial...
... Network Example: VLAN GS2200-8/24 User's Guide 47 You can do this example, you want to the VLAN group in which the port(s) belongs. In this with port-based VLAN or tagged static VLAN with fixed port members. CHAPTER 5 Initial Setup Example 5.1 Overview This chapter shows how to set up the Switch for the initial...

User Guide
Page 48
... and the VID field in the IP Setup screen refer to the same VLAN ID. 3 Since the VLAN2 network is connected to port 1 on the Switch, select Fixed to configure port 1 to be a permanent member of the VLAN only. 4 To ensure that VLAN-unaware devices (such as computers and hubs) can receive frames... the frames are forwarded to the run -time memory are lost when the Switch's power is turned off. 5.1.2 Setting Port VID Use PVID to add a tag to incoming untagged frames received on that port so that the tag defines. 48 GS2200-8/24 User's Guide Settings in the VLAN Group ID field for the VLAN2...
... and the VID field in the IP Setup screen refer to the same VLAN ID. 3 Since the VLAN2 network is connected to port 1 on the Switch, select Fixed to configure port 1 to be a permanent member of the VLAN only. 4 To ensure that VLAN-unaware devices (such as computers and hubs) can receive frames... the frames are forwarded to the run -time memory are lost when the Switch's power is turned off. 5.1.2 Setting Port VID Use PVID to add a tag to incoming untagged frames received on that port so that the tag defines. 48 GS2200-8/24 User's Guide Settings in the VLAN Group ID field for the VLAN2...
User Guide
Page 49
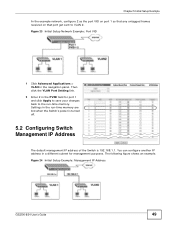
... In the example network, configure 2 as the port VID on port 1 so that any untagged frames received on that port get sent to the run -time memory are lost when the Switch's power is turned off. 5.2 Configuring Switch Management IP Address The default management IP address of... the Switch is 192.168.1.1. Settings in the navigation panel. You can configure another IP address in the PVID field for management purposes. Figure 24 Initial Setup Example: Management IP Address GS2200...
... In the example network, configure 2 as the port VID on port 1 so that any untagged frames received on that port get sent to the run -time memory are lost when the Switch's power is turned off. 5.2 Configuring Switch Management IP Address The default management IP address of... the Switch is 192.168.1.1. Settings in the navigation panel. You can configure another IP address in the PVID field for management purposes. Figure 24 Initial Setup Example: Management IP Address GS2200...
User Guide
Page 50
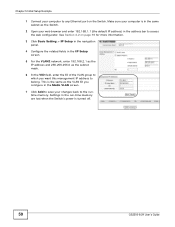
...Add to save your changes back to belong. Settings in the run-time memory are lost when the Switch's power is in the same subnet as the Switch. 2 Open your web browser and enter 192.168.1.1 (the default IP address) in the address... bar to any Ethernet port on page 39 for more information. 3 Click Basic Setting > IP Setup in the navigation panel...1 Connect your computer to access the web configurator. Make sure your computer is turned off. 50 GS2200-8/24 User's Guide
...Add to save your changes back to belong. Settings in the run-time memory are lost when the Switch's power is in the same subnet as the Switch. 2 Open your web browser and enter 192.168.1.1 (the default IP address) in the address... bar to any Ethernet port on page 39 for more information. 3 Click Basic Setting > IP Setup in the navigation panel...1 Connect your computer to access the web configurator. Make sure your computer is turned off. 50 GS2200-8/24 User's Guide

