

User Guide
Page 12
...Your Password 58 4.4 Saving Your Configuration 58 4.5 Switch Lockout ...59 4.6 Resetting the Switch ...59 4.6.1 Reload the Configuration File 59 4.7 Logging Out of the Web Configurator 60 4.8 Help ...61 Chapter 5 Initial Setup Example...63 5.1 Overview ...63 5.1.1 Creating a VLAN ...63 5.1.2 Setting Port VID ...64 5.2 Configuring Switch Management IP Address 65 Chapter 6 System Status and Port Statistics 67 6.1 Overview ...67 6.2 Port Status Summary ...67 6.2.1 Status: Port Details 68 Chapter 7 Basic Setting ...73 7.1 Overview ...73 7.2 System Information ...73 12 ES-3148 User's Guide
...Your Password 58 4.4 Saving Your Configuration 58 4.5 Switch Lockout ...59 4.6 Resetting the Switch ...59 4.6.1 Reload the Configuration File 59 4.7 Logging Out of the Web Configurator 60 4.8 Help ...61 Chapter 5 Initial Setup Example...63 5.1 Overview ...63 5.1.1 Creating a VLAN ...63 5.1.2 Setting Port VID ...64 5.2 Configuring Switch Management IP Address 65 Chapter 6 System Status and Port Statistics 67 6.1 Overview ...67 6.2 Port Status Summary ...67 6.2.1 Status: Port Details 68 Chapter 7 Basic Setting ...73 7.1 Overview ...73 7.2 System Information ...73 12 ES-3148 User's Guide

User Guide
Page 24
...133 Load Factory Default: Start 240 Figure 134 Reboot System: Confirmation 241 Figure 135 Management > Maintenance > Firmware Upgrade 241 Figure 136 Management > Maintenance > Restore Configuration 242 Figure 137 Management > Maintenance > Backup Configuration 242 Figure 138 Management > Access Control 245 Figure 139 SNMP Management Model 246 Figure 140 Management > Access Control > SNMP 251 Figure 141 Management > Access Control > SNMP > Trap Group 253 Figure 142 Management > Access Control > Logins 254 Figure 143 SSH Communication Example 255 Figure 144 How SSH Works ...255 Figure...
...133 Load Factory Default: Start 240 Figure 134 Reboot System: Confirmation 241 Figure 135 Management > Maintenance > Firmware Upgrade 241 Figure 136 Management > Maintenance > Restore Configuration 242 Figure 137 Management > Maintenance > Backup Configuration 242 Figure 138 Management > Access Control 245 Figure 139 SNMP Management Model 246 Figure 140 Management > Access Control > SNMP 251 Figure 141 Management > Access Control > SNMP > Trap Group 253 Figure 142 Management > Access Control > Logins 254 Figure 143 SSH Communication Example 255 Figure 144 How SSH Works ...255 Figure...

User Guide
Page 25
... Content Security 323 Figure 207 Network Number and Host ID 326 Figure 208 Subnetting Example: Before Subnetting 328 Figure 209 Subnetting Example: After Subnetting 329 Figure 210 Conflicting Computer IP Addresses Example 333 ES-3148 User's Guide 25 List of Figures Figure 168 Windows XP: Start Menu ...299 Figure 169 Windows XP: Control Panel 299 Figure 170 Windows XP: Control Panel: Network Connections: Properties 300 Figure 171 Windows XP: Local Area Connection Properties...
... Content Security 323 Figure 207 Network Number and Host ID 326 Figure 208 Subnetting Example: Before Subnetting 328 Figure 209 Subnetting Example: After Subnetting 329 Figure 210 Conflicting Computer IP Addresses Example 333 ES-3148 User's Guide 25 List of Figures Figure 168 Windows XP: Start Menu ...299 Figure 169 Windows XP: Control Panel 299 Figure 170 Windows XP: Control Panel: Network Connections: Properties 300 Figure 171 Windows XP: Local Area Connection Properties...

User Guide
Page 29
... FTP Upload to Cluster Member Example 272 Table 115 Management > Clustering Management > Configuration 273 Table 116 Management > MAC Table 276 Table 117 Management > ARP Table 278 Table 118 Management > Configure Clone 280 Table 119 Hardware and Environmental Specifications 287 Table 120 Feature Specifications ...288 Table 121 Standards Supported ...289 Table 122 Console/Dial Backup Port Pin Assignments 291 Table 123 Ethernet Cable Pin Assignments 291 Table 124 IP Address Network Number and Host ID Example 326 ES-3148 User's Guide...
... FTP Upload to Cluster Member Example 272 Table 115 Management > Clustering Management > Configuration 273 Table 116 Management > MAC Table 276 Table 117 Management > ARP Table 278 Table 118 Management > Configure Clone 280 Table 119 Hardware and Environmental Specifications 287 Table 120 Feature Specifications ...288 Table 121 Standards Supported ...289 Table 122 Console/Dial Backup Port Pin Assignments 291 Table 123 Ethernet Cable Pin Assignments 291 Table 124 IP Address Network Number and Host ID Example 326 ES-3148 User's Guide...

User Guide
Page 44
... detect and adjust to install a mini GBIC transceiver (SFP module). 1 Insert the transceiver into the slot with a straight-through or crossover Ethernet cable. 3.1.1.1 Default Ethernet Settings The factory default negotiation settings for the Ethernet ports on the switch are: • Speed: Auto • Duplex: Auto • Flow control: Off 3.1.2 Mini-GBIC Slots These are two pairs of PCB board facing down. 44 ES-3148 User's Guide You can be...
... detect and adjust to install a mini GBIC transceiver (SFP module). 1 Insert the transceiver into the slot with a straight-through or crossover Ethernet cable. 3.1.1.1 Default Ethernet Settings The factory default negotiation settings for the Ethernet ports on the switch are: • Speed: Auto • Duplex: Auto • Flow control: Off 3.1.2 Mini-GBIC Slots These are two pairs of PCB board facing down. 44 ES-3148 User's Guide You can be...

User Guide
Page 64
... check box to set the Switch to remove VLAN tags before sending. 5 Click Add to save the settings to the run -time memory are forwarded to the VLAN group that the tag defines. Figure 21 Initial Setup Network Example: Port VID 64 ES-3148 User's Guide In the example network, configure 2 as the port VID on port 1 so that any untagged frames received on that port so that the frames are lost when the Switch's power is connected...
... check box to set the Switch to remove VLAN tags before sending. 5 Click Add to save the settings to the run -time memory are forwarded to the VLAN group that the tag defines. Figure 21 Initial Setup Network Example: Port VID 64 ES-3148 User's Guide In the example network, configure 2 as the port VID on port 1 so that any untagged frames received on that port so that the frames are lost when the Switch's power is connected...

User Guide
Page 65
... the web configurator. See Section 4.2 on the Switch. ES-3148 User's Guide 65 The following figure shows an example. Make sure your computer is in the same subnet as the Switch. 2 Open your web browser and enter 192.168.1.1 (the default IP address) in the run -time memory. Chapter 5 Initial Setup Example example 5.2 Configuring Switch Management IP Address The default management IP address of the Switch is turned off. 1 Click Advanced Application > VLAN > VLAN Port Setting. 2 Enter 2 in a different subnet for management purposes. You can configure another IP address...
... the web configurator. See Section 4.2 on the Switch. ES-3148 User's Guide 65 The following figure shows an example. Make sure your computer is in the same subnet as the Switch. 2 Open your web browser and enter 192.168.1.1 (the default IP address) in the run -time memory. Chapter 5 Initial Setup Example example 5.2 Configuring Switch Management IP Address The default management IP address of the Switch is turned off. 1 Click Advanced Application > VLAN > VLAN Port Setting. 2 Enter 2 in a different subnet for management purposes. You can configure another IP address...
User Guide
Page 75
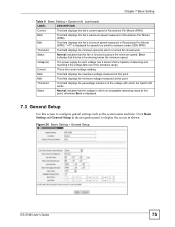
" MIN This field displays this fan's minimum speed measured in Revolutions Per Minute (RPM). Chapter 7 Basic Setting Table 9 Basic Setting > System Info (continued) LABEL DESCRIPTION Current This field displays this fan's current speed in Revolutions Per Minute (RPM). MAX This field displays this fan's maximum speed measured in Revolutions Per Minute (RPM).
" MIN This field displays this fan's minimum speed measured in Revolutions Per Minute (RPM). Chapter 7 Basic Setting Table 9 Basic Setting > System Info (continued) LABEL DESCRIPTION Current This field displays this fan's current speed in Revolutions Per Minute (RPM). MAX This field displays this fan's maximum speed measured in Revolutions Per Minute (RPM).

User Guide
Page 79
... 3 Typically used for "spare bandwidth". ES-3148 User's Guide 79 Use the next two fields to configure the priority level-to be managed over the network. Cancel Click Cancel to begin configuring this screen afresh. 7.6 IP Setup Use the IP Setup screen to configure the default gateway device, the default domain name server and add IP domains. 7.6.1 IP Interfaces The Switch needs an IP address for it is for video that can map to the 8 priority levels. The factory default subnet...
... 3 Typically used for "spare bandwidth". ES-3148 User's Guide 79 Use the next two fields to configure the priority level-to be managed over the network. Cancel Click Cancel to begin configuring this screen afresh. 7.6 IP Setup Use the IP Setup screen to configure the default gateway device, the default domain name server and add IP domains. 7.6.1 IP Interfaces The Switch needs an IP address for it is for video that can map to the 8 priority levels. The factory default subnet...

User Guide
Page 82
... be managed using the specified IP address. Use this port. Chapter 7 Basic Setting Table 12 Basic Setting > IP Setup (continued) LABEL DESCRIPTION Manageable This field displays whether the Switch can enter up to set the common settings and then make them. Figure 29 Basic Setting > Port Setup The following table describes the labels in some settings the same for Gigabit connections. 82 ES-3148 User's Guide Table 13 Basic Setting > Port Setup LABEL DESCRIPTION Port This is enabled. Enter...
... be managed using the specified IP address. Use this port. Chapter 7 Basic Setting Table 12 Basic Setting > IP Setup (continued) LABEL DESCRIPTION Manageable This field displays whether the Switch can enter up to set the common settings and then make them. Figure 29 Basic Setting > Port Setup The following table describes the labels in some settings the same for Gigabit connections. 82 ES-3148 User's Guide Table 13 Basic Setting > Port Setup LABEL DESCRIPTION Port This is enabled. Enter...
User Guide
Page 121
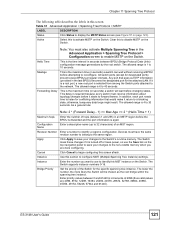
... network. Bridge Priority Set the priority of hops (between 0 and 61440 in an MSTP region before changing states. ES-3148 User's Guide 121 Hello Time This is turned off or loses power, so use to identify this to reconfigure. Revision Number Enter a number to forward frames. Any port that would make it is a root port, a new root port is 4 to enable MSTP on the Switch. otherwise, temporary data loops might result. Devices...
... network. Bridge Priority Set the priority of hops (between 0 and 61440 in an MSTP region before changing states. ES-3148 User's Guide 121 Hello Time This is turned off or loses power, so use to identify this to reconfigure. Revision Number Enter a number to forward frames. Any port that would make it is a root port, a new root port is 4 to enable MSTP on the Switch. otherwise, temporary data loops might result. Devices...
User Guide
Page 178
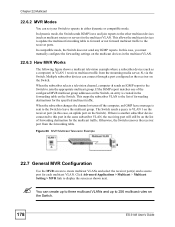
... Switch. 178 ES-3148 User's Guide In compatible mode, the Switch does not send any IGMP reports. Multiple subscriber devices can connect through a port configured as multicast routers or servers) in either dynamic or compatible mode. The Switch sends a query to display the screen as a computer) in the same subscriber VLAN, the receiving port will still be on the Switch. Click Advanced Applications > Multicast > Multicast Setting > MVR link to VLAN 1 on the receiver port (in this port in VLAN 1 receives multicast traffic...
... Switch. 178 ES-3148 User's Guide In compatible mode, the Switch does not send any IGMP reports. Multiple subscriber devices can connect through a port configured as multicast routers or servers) in either dynamic or compatible mode. The Switch sends a query to display the screen as a computer) in the same subscriber VLAN, the receiving port will still be on the Switch. Click Advanced Applications > Multicast > Multicast Setting > MVR link to VLAN 1 on the receiver port (in this port in VLAN 1 receives multicast traffic...

User Guide
Page 186
.... 186 ES-3148 User's Guide Figure 94 Advanced Application > Auth and Acct 23.2.1 RADIUS Server Setup Use this screen to validate an unlimited number of the device. In essence, RADIUS and TACACS+ authentication both ) and then set up the authentication priority and accounting settings. Table 62 RADIUS vs TACACS+ RADIUS TACACS+ Transport Protocol UDP (User Datagram Protocol) TCP (Transmission Control Protocol) Encryption Encrypts the password sent...
.... 186 ES-3148 User's Guide Figure 94 Advanced Application > Auth and Acct 23.2.1 RADIUS Server Setup Use this screen to validate an unlimited number of the device. In essence, RADIUS and TACACS+ authentication both ) and then set up the authentication priority and accounting settings. Table 62 RADIUS vs TACACS+ RADIUS TACACS+ Transport Protocol UDP (User Datagram Protocol) TCP (Transmission Control Protocol) Encryption Encrypts the password sent...

User Guide
Page 188
... ES-3148 User's Guide Shared Secret Specify a password (up to configure your TACACS+ server settings. The Switch loses these changes if it is 1813. Index This is not sent over the network. You need not change this value unless your changes to the Switch's run -time memory. Click on the top navigation panel to remove an existing RADIUS server entry from the Switch. This entry is turned off or loses power, so use...
... ES-3148 User's Guide Shared Secret Specify a password (up to configure your TACACS+ server settings. The Switch loses these changes if it is 1813. Index This is not sent over the network. You need not change this value unless your changes to the Switch's run -time memory. Click on the top navigation panel to remove an existing RADIUS server entry from the Switch. This entry is turned off or loses power, so use...

User Guide
Page 239
... go to the Firmware Upgrade screen. Restore Click Click Here to go to the Restore Configuration screen. Configuration Backup Click Click Here to go to the factory default settings. Default ES-3148 User's Guide 239 Table 93 Management > Maintenance LABEL DESCRIPTION Current This field displays which configuration (Configuration 1 or Configuration 2) is currently operating on the Switch. Configuration Load Factory Click Click Here to reset the configuration to the Backup Configuration screen. Figure 132 Management > Maintenance The following...
... go to the Firmware Upgrade screen. Restore Click Click Here to go to the Restore Configuration screen. Configuration Backup Click Click Here to go to the factory default settings. Default ES-3148 User's Guide 239 Table 93 Management > Maintenance LABEL DESCRIPTION Current This field displays which configuration (Configuration 1 or Configuration 2) is currently operating on the Switch. Configuration Load Factory Click Click Here to reset the configuration to the Backup Configuration screen. Figure 132 Management > Maintenance The following...
User Guide
Page 254
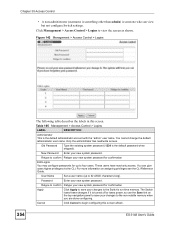
... CLI. Figure 142 Management > Access Control > Logins 254 The following table describes the labels in this screen afresh. You cannot change the default administrator user name. Retype to confirm Retype your changes to 32 ASCII characters long). The Switch loses these changes if it is turned off or loses power, so use the Save link on assigning privileges see the CLI Reference Guide. Old Password Type the existing system password...
... CLI. Figure 142 Management > Access Control > Logins 254 The following table describes the labels in this screen afresh. You cannot change the default administrator user name. Retype to confirm Retype your changes to 32 ASCII characters long). The Switch loses these changes if it is turned off or loses power, so use the Save link on assigning privileges see the CLI Reference Guide. Old Password Type the existing system password...

User Guide
Page 295
APPENDIX A Setting up Your Computer's IP Address All computers must have IP addresses that your computers have a 10M or 100M Ethernet adapter card and TCP/IP installed. ES-3148 User's Guide 295 If you manually assign IP information instead of UNIX/LINUX include the software components you need to install and use TCP/ IP on computers using dynamic assignment, make sure that place them in order to open the Network window. Windows 95/98/Me/NT/2000/XP/Vista...
APPENDIX A Setting up Your Computer's IP Address All computers must have IP addresses that your computers have a 10M or 100M Ethernet adapter card and TCP/IP installed. ES-3148 User's Guide 295 If you manually assign IP information instead of UNIX/LINUX include the software components you need to install and use TCP/ IP on computers using dynamic assignment, make sure that place them in order to open the Network window. Windows 95/98/Me/NT/2000/XP/Vista...

User Guide
Page 296
... Add. 3 Select the manufacturer and model of installed components. If you need a network adapter, the TCP/IP protocol and Client for Microsoft Networks from the list of network clients and then click OK. 5 Restart your network adapter and then click OK. Appendix A Setting up Your Computer's IP Address Figure 165 WIndows 95/98/Me: Network: Configuration Installing Components The Network window Configuration tab displays a list of your computer so the changes you made take effect. 296 ES-3148 User's Guide...
... Add. 3 Select the manufacturer and model of installed components. If you need a network adapter, the TCP/IP protocol and Client for Microsoft Networks from the list of network clients and then click OK. 5 Restart your network adapter and then click OK. Appendix A Setting up Your Computer's IP Address Figure 165 WIndows 95/98/Me: Network: Configuration Installing Components The Network window Configuration tab displays a list of your computer so the changes you made take effect. 296 ES-3148 User's Guide...
User Guide
Page 321
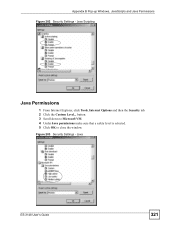
Figure 203 Security Settings - Java ES-3148 User's Guide 321 button. 3 Scroll down to Microsoft VM. 4 Under Java permissions make sure that a safety level is selected. 5 Click OK to close the window. Appendix B Pop-up Windows, JavaScripts and Java Permissions Figure 202 Security Settings - Java Scripting Java Permissions 1 From Internet Explorer, click Tools, Internet Options and then the Security tab. 2 Click the Custom Level...
Figure 203 Security Settings - Java ES-3148 User's Guide 321 button. 3 Scroll down to Microsoft VM. 4 Under Java permissions make sure that a safety level is selected. 5 Click OK to close the window. Appendix B Pop-up Windows, JavaScripts and Java Permissions Figure 202 Security Settings - Java Scripting Java Permissions 1 From Internet Explorer, click Tools, Internet Options and then the Security tab. 2 Click the Custom Level...

User Guide
Page 356
... 240 configuration, saving 58 connections hardware 43 console port 43 settings 46 contact information 349 copying port settings, See port cloning 280 copyright 345 CPU management port 98 current date 76 current time 76 customer support 349 what it does 225 DSCP (DiffServ Code Point) 225 dual personality interfaces 43 dynamic link aggregation 131 E egress port 101 Ethernet broadcast address 277 Ethernet port test 263 Ethernet ports 43 default settings 44 external authentication server 186 D daylight saving time 76 DHCP 233 configuration...
... 240 configuration, saving 58 connections hardware 43 console port 43 settings 46 contact information 349 copying port settings, See port cloning 280 copyright 345 CPU management port 98 current date 76 current time 76 customer support 349 what it does 225 DSCP (DiffServ Code Point) 225 dual personality interfaces 43 dynamic link aggregation 131 E egress port 101 Ethernet broadcast address 277 Ethernet port test 263 Ethernet ports 43 default settings 44 external authentication server 186 D daylight saving time 76 DHCP 233 configuration...


