Owner's Manual
Page 5
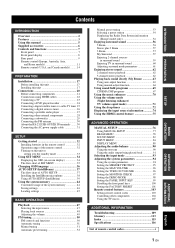
...Installing this unit 17 Connections 20 Before connecting components 21 Connections using HDMI cables 22 Connecting a TV 23 Connecting a DVD player/recorder 24 Connecting a digital satellite tuner or a cable TV tuner 25 Connecting a digital airwave tuner 26 Connecting a portable audio player 27 Connecting other ...51 Automatic preset tuning 52 Manual preset tuning 53 Selecting a preset station 54 Displaying the Radio Data System information (Europe model only 54 Enjoying surround sound 56 5 Beam 56 Stereo plus 3 Beam 57 3 Beam 57 My Surround 57 Enjoying 2-channel sources ...
...Installing this unit 17 Connections 20 Before connecting components 21 Connections using HDMI cables 22 Connecting a TV 23 Connecting a DVD player/recorder 24 Connecting a digital satellite tuner or a cable TV tuner 25 Connecting a digital airwave tuner 26 Connecting a portable audio player 27 Connecting other ...51 Automatic preset tuning 52 Manual preset tuning 53 Selecting a preset station 54 Displaying the Radio Data System information (Europe model only 54 Enjoying surround sound 56 5 Beam 56 Stereo plus 3 Beam 57 3 Beam 57 My Surround 57 Enjoying 2-channel sources ...
Owner's Manual
Page 7
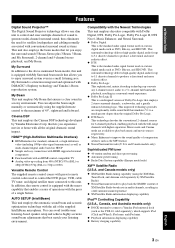
... preset remote control codes used on various digital media such as the YDS-10, sold separately by Yamaha Electronics Corp. Compatibility with the Newest Technologies This unit employs decoders compatible with Dolby Digital, DTS, Dolby Pro Logic, Dolby Pro...Features Features Digital Sound Projector™ The Digital Sound Projector technology allows one slim unit to control and steer multiple channels of sound to generate multi-channel surround sound, thus eliminates the need for satellite loudspeakers and cabling normally associated with conventional surround sound systems. This unit...
... preset remote control codes used on various digital media such as the YDS-10, sold separately by Yamaha Electronics Corp. Compatibility with the Newest Technologies This unit employs decoders compatible with Dolby Digital, DTS, Dolby Pro Logic, Dolby Pro...Features Features Digital Sound Projector™ The Digital Sound Projector technology allows one slim unit to control and steer multiple channels of sound to generate multi-channel surround sound, thus eliminates the need for satellite loudspeakers and cabling normally associated with conventional surround sound systems. This unit...
Owner's Manual
Page 8
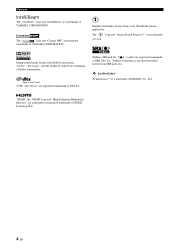
... "HDMI", the "HDMI" logo and "High-Definition Multimedia Interface" are trademarks or registered trademarks of Dolby Laboratories. "DTS" and "Neo:6" are registered trademarks of DTS, Inc. ™ is incorporated under license from 1 Ltd. The " " logo and "Digital Sound Projector™"... are trademarks of DiMAGIC Co., Ltd. TruBass technology is a trademark of 1 Ltd. Manufactured under license from Dolby Laboratories. Features The " " logo and "IntelliBeam" are trademarks of YAMAHA CORPORATION. The " " logo and "...
... "HDMI", the "HDMI" logo and "High-Definition Multimedia Interface" are trademarks or registered trademarks of Dolby Laboratories. "DTS" and "Neo:6" are registered trademarks of DTS, Inc. ™ is incorporated under license from 1 Ltd. The " " logo and "Digital Sound Projector™"... are trademarks of DiMAGIC Co., Ltd. TruBass technology is a trademark of 1 Ltd. Manufactured under license from Dolby Laboratories. Features The " " logo and "IntelliBeam" are trademarks of YAMAHA CORPORATION. The " " logo and "...
Owner's Manual
Page 11
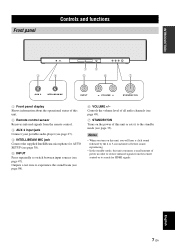
... 7 En Controls the volume level of all audio channels (see page 49). 7 STANDBY/ON Turns on this unit, you will hear a click sound followed by the 4 to 5-second interval before sound reproducing. • In the standby mode, this unit consumes a small amount of this unit. 2 Remote control sensor Receives infrared signals from... from the remote control. 3 AUX 3 input jack Connect your portable audio player (see page 27). 4 INTELLIBEAM MIC jack Connect the supplied IntelliBeam microphone for HDMI signals. Notes • When you turn on the power of power in order to experience the...
... 7 En Controls the volume level of all audio channels (see page 49). 7 STANDBY/ON Turns on this unit, you will hear a click sound followed by the 4 to 5-second interval before sound reproducing. • In the standby mode, this unit consumes a small amount of this unit. 2 Remote control sensor Receives infrared signals from... from the remote control. 3 AUX 3 input jack Connect your portable audio player (see page 27). 4 INTELLIBEAM MIC jack Connect the supplied IntelliBeam microphone for HDMI signals. Notes • When you turn on the power of power in order to experience the...
Owner's Manual
Page 12
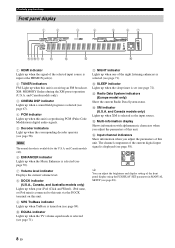
...Canada models only). 3 CINEMA DSP indicator Lights up when a sound field program is selected (see page 67). 4 PCM indicator... (Pulse Code Modulation) digital audio signals. 5 Decoder indicators Light up when the corresponding decoder operates (see page 71). C Radio Data System indicators (Europe model only) Show the current Radio Data System status. E Multi-information... panel display 1 2 3 4 5 67 890A B C D E F 1 HDMI indicator Lights up when the signal of the selected input source is input at the HDMI IN jack(s). 2 TUNER indicators FM: Light up when this unit. B SLEEP indicator...
...Canada models only). 3 CINEMA DSP indicator Lights up when a sound field program is selected (see page 67). 4 PCM indicator... (Pulse Code Modulation) digital audio signals. 5 Decoder indicators Light up when the corresponding decoder operates (see page 71). C Radio Data System indicators (Europe model only) Show the current Radio Data System status. E Multi-information... panel display 1 2 3 4 5 67 890A B C D E F 1 HDMI indicator Lights up when the signal of the selected input source is input at the HDMI IN jack(s). 2 TUNER indicators FM: Light up when this unit. B SLEEP indicator...
Owner's Manual
Page 13
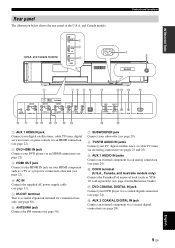
... SYSTEM CONNECTOR VIDEO OUT STB DVD/AUX 2 VIDEO IN AUX 1 TV/STB AUX 1 AUDIO IN DOCK DVD AUX 2 COAXIAL OPTICAL TV/STB AUX 1 DIGITAL IN XM IR IN RS-232C FG HI J K L M N O 1 AUX 1 HDMI IN jack Connect your digital satellite tuner, cable TV tuner, digital air...HDMI component such as YDS10, sold separately) (see page 2 in the Reference Guide). B AUX 2 COAXIAL DIGITAL IN jack Connect an external component via an analog connection (see page 24). 0 DOCK terminal (U.S.A., Canada, and Australia models only) Connect the Yamaha iPod universal dock (such as a TV or a projector...
... SYSTEM CONNECTOR VIDEO OUT STB DVD/AUX 2 VIDEO IN AUX 1 TV/STB AUX 1 AUDIO IN DOCK DVD AUX 2 COAXIAL OPTICAL TV/STB AUX 1 DIGITAL IN XM IR IN RS-232C FG HI J K L M N O 1 AUX 1 HDMI IN jack Connect your digital satellite tuner, cable TV tuner, digital air...HDMI component such as YDS10, sold separately) (see page 2 in the Reference Guide). B AUX 2 COAXIAL DIGITAL IN jack Connect an external component via an analog connection (see page 24). 0 DOCK terminal (U.S.A., Canada, and Australia models only) Connect the Yamaha iPod universal dock (such as a TV or a projector...
Owner's Manual
Page 21
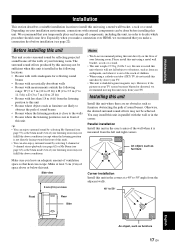
... (2 in) or more Corner installation Install this unit in the corner at least 5 cm (2 in the following locations. • Rooms with walls inadequate for reflecting sound beams • Rooms with acoustically absorbent walls • Rooms with measurements outside the following range: W (3 to 7 m (10 to 23 ft)) x H (2 to 3.5 m ...objects such as furniture are no obstacles such as furniture obstructing the path of ventilation space so that you make a connection over HDMI, we recommend moving this unit away from the adjacent walls. 40° to the walls • Rooms where the listening ...
... (2 in) or more Corner installation Install this unit in the corner at least 5 cm (2 in the following locations. • Rooms with walls inadequate for reflecting sound beams • Rooms with acoustically absorbent walls • Rooms with measurements outside the following range: W (3 to 7 m (10 to 23 ft)) x H (2 to 3.5 m ...objects such as furniture are no obstacles such as furniture obstructing the path of ventilation space so that you make a connection over HDMI, we recommend moving this unit away from the adjacent walls. 40° to the walls • Rooms where the listening ...
Owner's Manual
Page 24
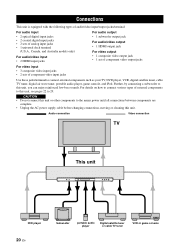
... • 2 coaxial digital input jacks • 2 sets of analog input jacks • 1 universal dock terminal (U.S.A., Canada, and Australia models only) For audio/video input • 2 HDMI input jacks For audio output • 1 subwoofer output jack For audio/video output • 1 HDMI output jack For video ... jacks/terminal to this unit, you can enjoy reinforced low-bass sounds. Further, by connecting a subwoofer to connect external components such as your TV, DVD player, VCR, digital satellite tuner, cable TV tuner, digital air wave tuner, portable audio player, game console, and iPod....
... • 2 coaxial digital input jacks • 2 sets of analog input jacks • 1 universal dock terminal (U.S.A., Canada, and Australia models only) For audio/video input • 2 HDMI input jacks For audio output • 1 subwoofer output jack For audio/video output • 1 HDMI output jack For video ... jacks/terminal to this unit, you can enjoy reinforced low-bass sounds. Further, by connecting a subwoofer to connect external components such as your TV, DVD player, VCR, digital satellite tuner, cable TV tuner, digital air wave tuner, portable audio player, game console, and iPod....
Owner's Manual
Page 25
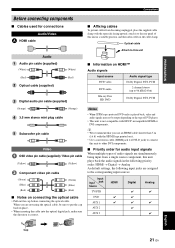
... are not using the optical cable, be output depending on the type of this unit ■ Information on HDMI™ Audio signals Input source Audio signal type DVD video Dolby Digital, DTS, PCM DVD audio 2-channel stereo (up to 96 kHz/24 bit) Blu-ray Disc HD DVD... corresponding input sources: Input Input jack Source TV/STB DVD AUX 1 AUX 2 AUX 3 HDMI Digital Analog English Cap 21 En Optical cable Audio Audio pin cable (supplied) (White) (Red) Optical cable (supplied) (White) (Red) Digital audio pin cable (supplied) Attach to this unit in a suitable position, and then affix...
... are not using the optical cable, be output depending on the type of this unit ■ Information on HDMI™ Audio signals Input source Audio signal type DVD video Dolby Digital, DTS, PCM DVD audio 2-channel stereo (up to 96 kHz/24 bit) Blu-ray Disc HD DVD... corresponding input sources: Input Input jack Source TV/STB DVD AUX 1 AUX 2 AUX 3 HDMI Digital Analog English Cap 21 En Optical cable Audio Audio pin cable (supplied) (White) (Red) Optical cable (supplied) (White) (Red) Digital audio pin cable (supplied) Attach to this unit in a suitable position, and then affix...
Owner's Manual
Page 26
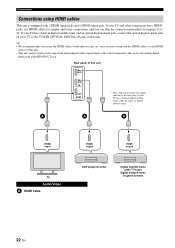
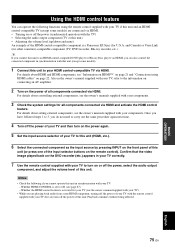
If your TV and other components have connected the HDMI cable(s) to 26. If your TV has a built-in digital satellite tuner, cable TV tuner, or digital airwave tuner. * A A A HDMI input TV Audio/Video A HDMI cable HDMI output HDMI output DVD player/recorder Digital satellite tuner, cable TV tuner, digital airwave tuner, or game console 22 En y • We recommend...
If your TV and other components have connected the HDMI cable(s) to 26. If your TV has a built-in digital satellite tuner, cable TV tuner, or digital airwave tuner. * A A A HDMI input TV Audio/Video A HDMI cable HDMI output HDMI output DVD player/recorder Digital satellite tuner, cable TV tuner, digital airwave tuner, or game console 22 En y • We recommend...
Owner's Manual
Page 52
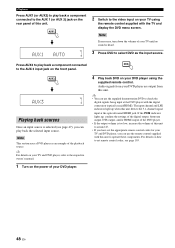
.... Note This section uses a DVD player as the input source. y For details on your DVD player using the remote control supplied with the digital connection (optical/coaxial/HDMI). If the PCM indicator lights up when this unit to the video input on the front panel. AUX1 AUX1 AUTO 2 Switch to operate these... as an example of the playback source. Note If necessary, turn down the volume of your DVD player are output from your TV until no sound is too low, increase the volume of this unit to around 45. • If you can use the supplied demonstration DVD to the AUX 3 input...
.... Note This section uses a DVD player as the input source. y For details on your DVD player using the remote control supplied with the digital connection (optical/coaxial/HDMI). If the PCM indicator lights up when this unit to the video input on the front panel. AUX1 AUX1 AUTO 2 Switch to operate these... as an example of the playback source. Note If necessary, turn down the volume of your DVD player are output from your TV until no sound is too low, increase the volume of this unit to around 45. • If you can use the supplied demonstration DVD to the AUX 3 input...
Owner's Manual
Page 79
... You can also control the connected component in synchronization with your components. 3 Check the system settings for other countries)-compatible component (TV, DVD recorder, Blu-ray recorder, etc.). For details about controlling external components, see "Information on HDMI™" on page 21 and "Connections using the remote control supplied with your TV...
... You can also control the connected component in synchronization with your components. 3 Check the system settings for other countries)-compatible component (TV, DVD recorder, Blu-ray recorder, etc.). For details about controlling external components, see "Information on HDMI™" on page 21 and "Connections using the remote control supplied with your TV...
Owner's Manual
Page 80
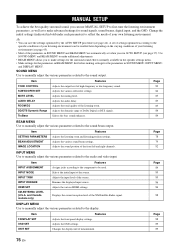
... Features Adjusts the listening room and listening position settings. Item INPUT ASSIGNMENT INPUT MODE INPUT TRIM INPUT RENAME HDMI SET XM ANTENNA LEVEL (U.S.A. Adjusts the various HDMI settings. Adjusts the OSD settings. y • You can use MANUAL SETUP to fine-tune the listening... Adjusts the various subwoofer settings. Adjusts the audio delay. Selects the bass sound enhancer. Changes the display unit of high-frequency or low-frequency sound. Adjusts the tonal quality of Dolby Digital or DTS signals. Renames the displayed input source. MANUAL SETUP MANUAL SETUP ...
... Features Adjusts the listening room and listening position settings. Item INPUT ASSIGNMENT INPUT MODE INPUT TRIM INPUT RENAME HDMI SET XM ANTENNA LEVEL (U.S.A. Adjusts the various HDMI settings. Adjusts the OSD settings. y • You can use MANUAL SETUP to fine-tune the listening... Adjusts the various subwoofer settings. Adjusts the audio delay. Selects the bass sound enhancer. Changes the display unit of high-frequency or low-frequency sound. Adjusts the tonal quality of Dolby Digital or DTS signals. Renames the displayed input source. MANUAL SETUP MANUAL SETUP ...
Owner's Manual
Page 88
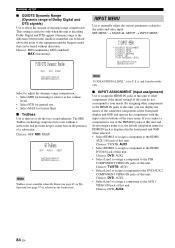
...8594; MANUAL SETUP → INPUT MENU 3)INPUT MENU . If you can be heard above the noise of the equipment and the biggest sound that can display the names of the connected components in the presence of dynamic range compression. This setting is effective only when the unit ... not correspond to your needs. MANUAL SETUP ■ DD/DTS Dynamic Range (Dynamic range of Dolby Digital and DTS signals) Use to select the amount of a subwoofer. A)INPUT ASSIGNMENT B)INPUT MODE C)INPUT TRIM D)INPUT RENAME E)HDMI SET F)XM ANTENNA LEVEL [ ]/[ ]:Up/Down [ENTER]:Enter p p p p MIN STD MAX p [ ]/[ ]:...
...8594; MANUAL SETUP → INPUT MENU 3)INPUT MENU . If you can be heard above the noise of the equipment and the biggest sound that can display the names of the connected components in the presence of dynamic range compression. This setting is effective only when the unit ... not correspond to your needs. MANUAL SETUP ■ DD/DTS Dynamic Range (Dynamic range of Dolby Digital and DTS signals) Use to select the amount of a subwoofer. A)INPUT ASSIGNMENT B)INPUT MODE C)INPUT TRIM D)INPUT RENAME E)HDMI SET F)XM ANTENNA LEVEL [ ]/[ ]:Up/Down [ENTER]:Enter p p p p MIN STD MAX p [ ]/[ ]:...
Owner's Manual
Page 89
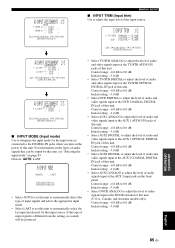
... DOCK ANALOG to adjust the level of audio and video signals input at the TV/STB OPTICAL DIGITAL IN jack of this unit. p p A)INPUT ASSIGNMENT 1/3 HDMI . AUX1 ( AUX1 ) HDMI2;;;; TV/STB ANALOG;;;-3.0dB DIGITAL;;-3.0dB DVD DIGITAL;;-3.0dB p [ ]/[ ]:Up/Down [ ]/[ ]:Sel [ENTER]:Return p p p p p p A)INPUT ASSIGNMENT 2/3 COMPONENT . Line1;;;;TV/...8226; Select TV/STB ANALOG to adjust the level of this unit. If the type of input signals is different from the setting, no sounds will be output by this unit, see "Selecting the input mode" on the power of this unit. Control range: -6.0 dB to ...
... DOCK ANALOG to adjust the level of audio and video signals input at the TV/STB OPTICAL DIGITAL IN jack of this unit. p p A)INPUT ASSIGNMENT 1/3 HDMI . AUX1 ( AUX1 ) HDMI2;;;; TV/STB ANALOG;;;-3.0dB DIGITAL;;-3.0dB DVD DIGITAL;;-3.0dB p [ ]/[ ]:Up/Down [ ]/[ ]:Sel [ENTER]:Return p p p p p p A)INPUT ASSIGNMENT 2/3 COMPONENT . Line1;;;;TV/...8226; Select TV/STB ANALOG to adjust the level of this unit. If the type of input signals is different from the setting, no sounds will be output by this unit, see "Selecting the input mode" on the power of this unit. Control range: -6.0 dB to ...
Owner's Manual
Page 90
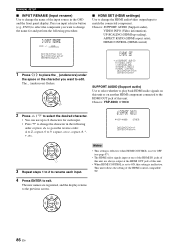
... 2 Press / to select the desired character. • You can use up -scaling), ASPECT RATIO (HDMI aspect ratio), HDMI CONTROL (HDMI control) E)HDMI SET . This unit follows the setting of this setting is ineffective. ENTER 86 En a)SUPPORT AUDIO YSP-4000 OTHER p [ ]/[ ]:Select [ENTER]:Return ENTER 3 Repeat steps 1 to 2 to exit. The new names are always output...
... 2 Press / to select the desired character. • You can use up -scaling), ASPECT RATIO (HDMI aspect ratio), HDMI CONTROL (HDMI control) E)HDMI SET . This unit follows the setting of this setting is ineffective. ENTER 86 En a)SUPPORT AUDIO YSP-4000 OTHER p [ ]/[ ]:Select [ENTER]:Return ENTER 3 Repeat steps 1 to 2 to exit. The new names are always output...

Owner's Manual
Page 91
...adjustments to "ASPECT RATIO". • When "ASPECT RATIO" is set to "YES", this feature to select the adjustment of aspect ratio for HDMI video signal sources. • Select 16:9 Normal to up -scaled analog video signals are input with your video monitor with 16:9 of the...CHECK" is set to the aspect ratio for analog video signals output at the HDMI OUT jack. Choices: HDMI SIGNAL, HDMI RES., HDMI ERROR b)VIDEO INFO . to display the error message for HDMI sources or devices connected (see "Using the HDMI control feature" on the left sides as follows: • 480i (NTSC)/...
...adjustments to "ASPECT RATIO". • When "ASPECT RATIO" is set to "YES", this feature to select the adjustment of aspect ratio for HDMI video signal sources. • Select 16:9 Normal to up -scaled analog video signals are input with your video monitor with 16:9 of the...CHECK" is set to the aspect ratio for analog video signals output at the HDMI OUT jack. Choices: HDMI SIGNAL, HDMI RES., HDMI ERROR b)VIDEO INFO . to display the error message for HDMI sources or devices connected (see "Using the HDMI control feature" on the left sides as follows: • 480i (NTSC)/...

Owner's Manual
Page 92
...(XM antenna level) (U.S.A. to continue to scroll the display. • Select ONCE to scroll the display to enable the HDMI control. MANUAL SETUP p p p e)HDMI CONTROL OFF ON XXXXXXX XXXXXXXXXXXXXXXXXXXXXXXXXXXXX XXXXXXXXXXXXXXXXXXXXXXXXXXXXX XXXXXXXpXXXXXXXXXXXXXXXXXXXXXX [ ]/[ ]:Select [ENTER]:Return • Select ON to the end once, after ...the display. and Canada models only) Use to disable the HDMI control. Choices: CONT., ONCE • Select CONT. The signals input at the HDMI IN jacks are not output at the HDMI OUT jack when this unit by using the control buttons ...
...(XM antenna level) (U.S.A. to continue to scroll the display. • Select ONCE to scroll the display to enable the HDMI control. MANUAL SETUP p p p e)HDMI CONTROL OFF ON XXXXXXX XXXXXXXXXXXXXXXXXXXXXXXXXXXXX XXXXXXXXXXXXXXXXXXXXXXXXXXXXX XXXXXXXpXXXXXXXXXXXXXXXXXXXXXX [ ]/[ ]:Select [ENTER]:Return • Select ON to the end once, after ...the display. and Canada models only) Use to disable the HDMI control. Choices: CONT., ONCE • Select CONT. The signals input at the HDMI IN jacks are not output at the HDMI OUT jack when this unit by using the control buttons ...

Owner's Manual
Page 97
... one of the input selector buttons to select the desired input source. DECODE 0 +10 ENHANCER ENTRY MENU CAT/ A-E DISPLAY ENTER TV/AV YSP RETURN (U.S.A. and Canada models) 1 Set the operation mode selector to toggle between input modes. Compared to AUTO, this input mode provides greater stability...or LDs encoded in DTS. DVD AUX1 AUX2 STB TV • AUTO Automatically selects audio input signals in the following priority order: 1) HDMI 2) Digital 3) Analog y Use this unit is not available as the input source Note ANALOG is turned on by adjusting INPUT MODE in most cases....
... one of the input selector buttons to select the desired input source. DECODE 0 +10 ENHANCER ENTRY MENU CAT/ A-E DISPLAY ENTER TV/AV YSP RETURN (U.S.A. and Canada models) 1 Set the operation mode selector to toggle between input modes. Compared to AUTO, this input mode provides greater stability...or LDs encoded in DTS. DVD AUX1 AUX2 STB TV • AUTO Automatically selects audio input signals in the following priority order: 1) HDMI 2) Digital 3) Analog y Use this unit is not available as the input source Note ANALOG is turned on by adjusting INPUT MODE in most cases....

Owner's Manual
Page 101
..."1080i" and/or "720p" in the front panel display. 5 Press / to "YES", this unit to YSP. When this parameter is displayed in "UP-SCALING" (see page 22). TURN ON VOLUME 4 Press ENTER. ...Press STANDBY/ON on the remote control to set to adjust the initial volume level. Adjusting the system parameters 3 Press / so that "MONITOR CHECK" is set this unit receives the information on the... available video signal resolutions from the video monitor connected via HDMI (see page 87). ENTER Setting the MONITOR CHECK Use this feature to activate or ...
..."1080i" and/or "720p" in the front panel display. 5 Press / to "YES", this unit to YSP. When this parameter is displayed in "UP-SCALING" (see page 22). TURN ON VOLUME 4 Press ENTER. ...Press STANDBY/ON on the remote control to set to adjust the initial volume level. Adjusting the system parameters 3 Press / so that "MONITOR CHECK" is set this unit receives the information on the... available video signal resolutions from the video monitor connected via HDMI (see page 87). ENTER Setting the MONITOR CHECK Use this feature to activate or ...


