

Owners Manual
Page 5
... SIRIUS Satellite Radio™ subscription.. 35 SIRIUS Satellite Radio™ operations 35 Registering the SIRIUS Satellite Radio™ channels 37 Setting the Parental Lock 38 Displaying the SIRIUS Satellite Radio™ information 39 Using iPod 40 Controlling iPod 40 Using Bluetooth™ components... 14 Connecting other components 15 Connecting an external amplifier 16 Using REMOTE IN/OUT jacks 17 Connecting a Yamaha iPod universal dock or Bluetooth™ wireless audio receiver 17 Using the VIDEO AUX jacks on the front panel .... 17 Connecting the FM and AM antennas ...
... SIRIUS Satellite Radio™ subscription.. 35 SIRIUS Satellite Radio™ operations 35 Registering the SIRIUS Satellite Radio™ channels 37 Setting the Parental Lock 38 Displaying the SIRIUS Satellite Radio™ information 39 Using iPod 40 Controlling iPod 40 Using Bluetooth™ components... 14 Connecting other components 15 Connecting an external amplifier 16 Using REMOTE IN/OUT jacks 17 Connecting a Yamaha iPod universal dock or Bluetooth™ wireless audio receiver 17 Using the VIDEO AUX jacks on the front panel .... 17 Connecting the FM and AM antennas ...
Owners Manual
Page 8
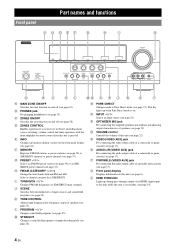
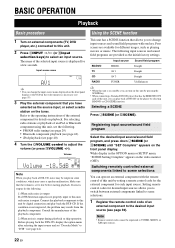
...FM/AM preset station (see page 30) or an XM/ SIRIUS preset channel (see page 33). H FM/AM (CATEGORY l / h) Change the tuner bands between linked sets of speakers (see page 22). L PROGRAM l / h Changes sound field programs (see page 22). O INPUT l / h Selects an input source (see page 25)....U Front panel display Displays information on the front panel display (see page 54). 4 En Q VOLUME control Controls the volume of a receiver set in Zone2, including input source switching, volume control and tuner operation, with the main amplifier or remote control after this unit is on and...
...FM/AM preset station (see page 30) or an XM/ SIRIUS preset channel (see page 33). H FM/AM (CATEGORY l / h) Change the tuner bands between linked sets of speakers (see page 22). L PROGRAM l / h Changes sound field programs (see page 22). O INPUT l / h Selects an input source (see page 25)....U Front panel display Displays information on the front panel display (see page 54). 4 En Q VOLUME control Controls the volume of a receiver set in Zone2, including input source switching, volume control and tuner operation, with the main amplifier or remote control after this unit is on and...

Owners Manual
Page 9
...signals from this unit. b DOCK terminal For connecting an optional Yamaha iPod universal dock (YDS11) or Bluetooth wireless audio receiver (YBA-10) (see page 11). e ANTENNA jack For connecting...1/2 For connecting external components for Zone2 (see page 57) to an external amplifier set in this unit to an external component (see page 15). Connect the presence speakers ...PRESENCE CENTER SURROUND SURROUND BACK/ BI-AMP CENTER OPTICAL ( TV ) AV 1 COAXIAL AV 2 COAXIAL (CD) AV 3 OPTICAL AV 4 AV 5 AV 6 AV OUT AUDIO1 AUDIO2 FRONT SURROUND SUR.BACK SUBWOOFER MULTI CH INPUT AUDIO OUT...
...signals from this unit. b DOCK terminal For connecting an optional Yamaha iPod universal dock (YDS11) or Bluetooth wireless audio receiver (YBA-10) (see page 11). e ANTENNA jack For connecting...1/2 For connecting external components for Zone2 (see page 57) to an external amplifier set in this unit to an external component (see page 15). Connect the presence speakers ...PRESENCE CENTER SURROUND SURROUND BACK/ BI-AMP CENTER OPTICAL ( TV ) AV 1 COAXIAL AV 2 COAXIAL (CD) AV 3 OPTICAL AV 4 AV 5 AV 6 AV OUT AUDIO1 AUDIO2 FRONT SURROUND SUR.BACK SUBWOOFER MULTI CH INPUT AUDIO OUT...
Owners Manual
Page 10
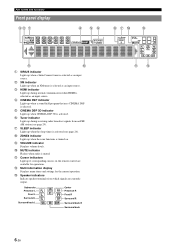
...currently output. h ZONE2 indicator Lights up when an XM tuner is selected as an input source. l Multi information display Displays menu items and settings for operations. MUTE PL SW PR L CR SL SR SBL SB SBR k m 6 En e CINEMA DSP 3D indicator Lights up if...volume levels. Part names and functions Front panel display cb a SIRIUS XM d ef STEREO 3 TUNED k l a SIRIUS indicator Lights up during receiving radio broadcast signals from which signals are available for the current operation. c HDMI indicator Lights up when a SiriusConnect tuner is muted. f Tuner ...
...currently output. h ZONE2 indicator Lights up when an XM tuner is selected as an input source. l Multi information display Displays menu items and settings for operations. MUTE PL SW PR L CR SL SR SBL SB SBR k m 6 En e CINEMA DSP 3D indicator Lights up if...volume levels. Part names and functions Front panel display cb a SIRIUS XM d ef STEREO 3 TUNED k l a SIRIUS indicator Lights up during receiving radio broadcast signals from which signals are available for the current operation. c HDMI indicator Lights up when a SiriusConnect tuner is muted. f Tuner ...

Owners Manual
Page 11
... external components using the external control keys separately from the remote control. Selects a Yamaha iPod universal dock/Bluetooth wireless audio receiver connected to the previous screen or ends the menu display. Selects a SiriusConnect tuner ...V-AUX [A]/[B] DOCK TUNER SIRIUS XM MULTI Selects HDMI inputs 1 through 6. Remote control a b e h i j k l m o s MAIN ZONE2 TRANSMIT CODE SET POWER SOURCE 1 1 5 SLEEP POWER HDMI 2 3 4 AV 2 3 4 AUDIO 6 1 2 V-AUX [ A ] [ B ] DOCK TUNER SIRIUS CATEGORY FM AM INFO MEMORY XM PRESET MULTI TUN./CH MOVIE ENHANCER SUR...
... external components using the external control keys separately from the remote control. Selects a Yamaha iPod universal dock/Bluetooth wireless audio receiver connected to the previous screen or ends the menu display. Selects a SiriusConnect tuner ...V-AUX [A]/[B] DOCK TUNER SIRIUS XM MULTI Selects HDMI inputs 1 through 6. Remote control a b e h i j k l m o s MAIN ZONE2 TRANSMIT CODE SET POWER SOURCE 1 1 5 SLEEP POWER HDMI 2 3 4 AV 2 3 4 AUDIO 6 1 2 V-AUX [ A ] [ B ] DOCK TUNER SIRIUS CATEGORY FM AM INFO MEMORY XM PRESET MULTI TUN./CH MOVIE ENHANCER SUR...
Owners Manual
Page 12
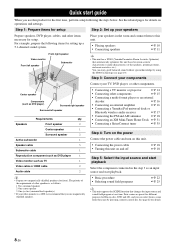
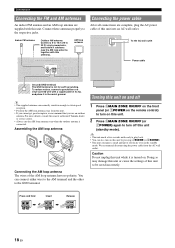
...-format player or an external decoder ☞P. 16 • Connecting an external amplifier ☞P. 16 • Connecting a Yamaha iPod universal dock or Bluetooth wireless audio receiver ☞P. 17 • Connecting the FM and AM antennas ☞P. 18 • Connecting an XM Mini-Tuner Home ... • Connecting speakers ☞P. 10 ☞P. 11 y • This unit has a YPAO (Yamaha Parametric Room Acoustic Optimizer) that you use this unit based on operations and settings. Step 3: Connect your components Connect your speakers in the step 3 as TV 1 Video cable or ...
...-format player or an external decoder ☞P. 16 • Connecting an external amplifier ☞P. 16 • Connecting a Yamaha iPod universal dock or Bluetooth wireless audio receiver ☞P. 17 • Connecting the FM and AM antennas ☞P. 18 • Connecting an XM Mini-Tuner Home ... • Connecting speakers ☞P. 10 ☞P. 11 y • This unit has a YPAO (Yamaha Parametric Room Acoustic Optimizer) that you use this unit based on operations and settings. Step 3: Connect your components Connect your speakers in the step 3 as TV 1 Video cable or ...
Owners Manual
Page 13
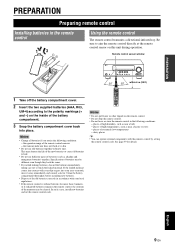
Be sure to the polarity markings (+ and -) on this remote control by setting the remote control code. If the leaked material comes into contact with your eyes or mouth, rinse it away immediately and consult a doctor. places of ... immediately, taking care not to leak. • Do not use old batteries together with this unit during operation. In such a case, install new batteries and set the remote control code. the transmit indicator does not flash or is without batteries for details. Notes • Do not spill water or other liquids...
Be sure to the polarity markings (+ and -) on this remote control by setting the remote control code. If the leaked material comes into contact with your eyes or mouth, rinse it away immediately and consult a doctor. places of ... immediately, taking care not to leak. • Do not use old batteries together with this unit during operation. In such a case, install new batteries and set the remote control code. the transmit indicator does not flash or is without batteries for details. Notes • Do not spill water or other liquids...
Owners Manual
Page 15
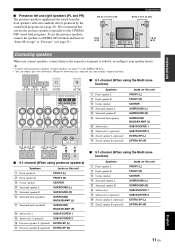
... the presence speakers especially for the CINEMA DSP sound field programs. To use the presence speakers, connect the speakers to EXTRA SP terminals and then set "Extra SP Assign" to "Presence" (see page 51). 0.5 to 1 m (1 to 3 ft) PL Connections 0.5 to 1 m (1 to two subwoofers. When two subwoofers are connected, the same sound...
... the presence speakers especially for the CINEMA DSP sound field programs. To use the presence speakers, connect the speakers to EXTRA SP terminals and then set "Extra SP Assign" to "Presence" (see page 51). 0.5 to 1 m (1 to 3 ft) PL Connections 0.5 to 1 m (1 to two subwoofers. When two subwoofers are connected, the same sound...
Owners Manual
Page 16
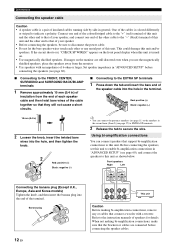
... insulated cables running side by side in the terminal. This could damage this unit as shown below. If the circuit shorts out, "CHECK SP WIRES!" Set speaker impedance in "ADVANCED SETUP" before connecting the speaker cables. One of speakers for details. If images on . • Use magnetically shielded speakers. Before connecting...
... insulated cables running side by side in the terminal. This could damage this unit as shown below. If the circuit shorts out, "CHECK SP WIRES!" Set speaker impedance in "ADVANCED SETUP" before connecting the speaker cables. One of speakers for details. If images on . • Use magnetically shielded speakers. Before connecting...
Owners Manual
Page 19
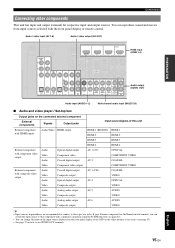
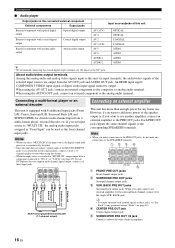
... 12V 0.1A MAX. If your Yamaha component has the Remote in parentheses are recommended to connect to the respective jacks. TRIGGER OUT FRONT CENTER HDMI input (HDMI 1-4) OPTICAL ( TV ) AV 1 COAXIAL AV 2 COAXIAL (CD) AV 3 OPTICAL AV 4 AV 5 AV 6 AV OUT AUDIO1 AUDIO2 FRONT SURROUND SUR....BACK SUBWOOFER AUDIO ZO MULTI CH INPUT OUT O Audio output (AUDIO OUT) Audio input (AUDIO 1-2) Multi channel audio input (MULTI CH) ■ Audio and video player / Set-top box ...
... 12V 0.1A MAX. If your Yamaha component has the Remote in parentheses are recommended to connect to the respective jacks. TRIGGER OUT FRONT CENTER HDMI input (HDMI 1-4) OPTICAL ( TV ) AV 1 COAXIAL AV 2 COAXIAL (CD) AV 3 OPTICAL AV 4 AV 5 AV 6 AV OUT AUDIO1 AUDIO2 FRONT SURROUND SUR....BACK SUBWOOFER AUDIO ZO MULTI CH INPUT OUT O Audio output (AUDIO OUT) Audio input (AUDIO 1-2) Multi channel audio input (MULTI CH) ■ Audio and video player / Set-top box ...
Owners Manual
Page 20
...player does not support multi-channel digital output, connect it to accommodate for the surround back channel, connect it to these jacks, set input source to the analog audio terminal. y • To output surround back channel signals at least a 5.1channel speaker system ...AV 2 AV 3 (CD) COAXIAL COAXIAL External component with a built-in amplifier. 16 En BACK jack. If you want to the SPEAKERS terminals. When using the AUDIO OUT jack: connect an external component to "MULTI CH," the analog audio input jacks assigned as the corresponding SPEAKERS terminals. However, if you set...
...player does not support multi-channel digital output, connect it to accommodate for the surround back channel, connect it to these jacks, set input source to the analog audio terminal. y • To output surround back channel signals at least a 5.1channel speaker system ...AV 2 AV 3 (CD) COAXIAL COAXIAL External component with a built-in amplifier. 16 En BACK jack. If you want to the SPEAKERS terminals. When using the AUDIO OUT jack: connect an external component to "MULTI CH," the analog audio input jacks assigned as the corresponding SPEAKERS terminals. However, if you set...
Owners Manual
Page 22
... copper plate at its tip, and place it outdoors (use the AM loop antenna together with this unit. For more details, consult the nearest authorized Yamaha dealer or service center. • Always use an outdoor antenna. AM loop antenna US DOCK COMPONENT VIDEO PR PB Y (BD/DVD) XM HDMI OUT...or lSCENE). • This unit consumes a small amount of this unit into an AC wall outlet. Doing so may damage this unit or cause the settings of electricity even in the moist ground. TRIGGER OUT FRO CENTER Ground (GND terminal) The GND terminal is not for earth grounding. y • The ...
... copper plate at its tip, and place it outdoors (use the AM loop antenna together with this unit. For more details, consult the nearest authorized Yamaha dealer or service center. • Always use an outdoor antenna. AM loop antenna US DOCK COMPONENT VIDEO PR PB Y (BD/DVD) XM HDMI OUT...or lSCENE). • This unit consumes a small amount of this unit into an AC wall outlet. Doing so may damage this unit or cause the settings of electricity even in the moist ground. TRIGGER OUT FRO CENTER Ground (GND terminal) The GND terminal is not for earth grounding. y • The ...
Owners Manual
Page 23
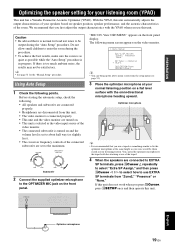
... input source of the video monitor. • The connected subwoofer is in your listening room (YPAO) This unit has a Yamaha Parametric Acoustic Optimizer (YPAO). We recommend that you first adjust the output characteristics with the omni-directional microphone heading upward. If ...press mSETUP once and then operate this unit automatically adjusts the output characteristics of the room. INTRODUCTION PREPARATION BASIC OPERATION Optimizing the speaker setting for your listening position. Do not allow small children to enter the room during the "Auto Setup" procedure. y •...
... input source of the video monitor. • The connected subwoofer is in your listening room (YPAO) This unit has a Yamaha Parametric Acoustic Optimizer (YPAO). We recommend that you first adjust the output characteristics with the omni-directional microphone heading upward. If ...press mSETUP once and then operate this unit automatically adjusts the output characteristics of the room. INTRODUCTION PREPARATION BASIC OPERATION Optimizing the speaker setting for your listening position. Do not allow small children to enter the room during the "Auto Setup" procedure. y •...
Owners Manual
Page 24
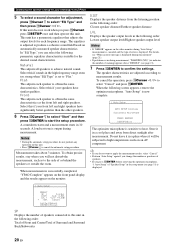
...strong when "EQ Type" is successfully completed, "YPAO Complete" appears on the front panel display and the results appear on an AV component. Store it will not disturb the measurement, such as the front left and right speakers have similar qualities. Natural This ... is now complete. 1 Auto Setup AUTO SETUP Complete Disconnect Microphone PRESS [ENTER] [SETUP]:Exit The optimizer microphone is displayed. Optimizing the speaker setting for your speakers have significantly better qualities than the other speakers. 6 Press oCursor n to select "Start" and then press oENTER to start the...
...strong when "EQ Type" is successfully completed, "YPAO Complete" appears on the front panel display and the results appear on an AV component. Store it will not disturb the measurement, such as the front left and right speakers have similar qualities. Natural This ... is now complete. 1 Auto Setup AUTO SETUP Complete Disconnect Microphone PRESS [ENTER] [SETUP]:Exit The optimizer microphone is displayed. Optimizing the speaker setting for your speakers have significantly better qualities than the other speakers. 6 Press oCursor n to select "Start" and then press oENTER to start the...
Owners Manual
Page 25
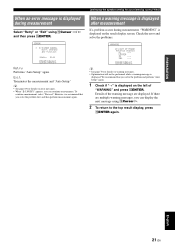
Exit Terminates the measurement and "Auto Setup." Optimizing the speaker setting for your listening room (YPAO) When a warning message is displayed after measurement If a problem occurs during measurement Select "Retry" or "Exit" using oCursor h. 2 To return ...
Exit Terminates the measurement and "Auto Setup." Optimizing the speaker setting for your listening room (YPAO) When a warning message is displayed after measurement If a problem occurs during measurement Select "Retry" or "Exit" using oCursor h. 2 To return ...
Owners Manual
Page 26
... iPod or Bluetooth component using this unit by pressing the SCENE key. • When connecting a Yamaha DVD/CD player that allows you have selected as the source input, or select a radio station...sources and sound field programs with the remote control of the playback component. 2) When noise is set "Decoder Mode" to "DTS" (see page 40) 4 Turn the QVOLUME control to change ...you can operate an external component with one key. BD/DVD TV CD RADIO Input source HDMI 1 AV 1 AV 3 TUNER Sound field program Straight Straight Straight 7ch Enhancer y • When this unit by selecting...
... iPod or Bluetooth component using this unit by pressing the SCENE key. • When connecting a Yamaha DVD/CD player that allows you have selected as the source input, or select a radio station...sources and sound field programs with the remote control of the playback component. 2) When noise is set "Decoder Mode" to "DTS" (see page 40) 4 Turn the QVOLUME control to change ...you can operate an external component with one key. BD/DVD TV CD RADIO Input source HDMI 1 AV 1 AV 3 TUNER Sound field program Straight Straight Straight 7ch Enhancer y • When this unit by selecting...

Owners Manual
Page 27
... control) You can be controlled remotely just by selecting a scene. Notes • When you want to change. Notes • The tone control settings are not effective during playback in Pure Direct mode. • If you control this unit plays back the selected source with the least circuitry. ADVANCED...to select "Treble" or "Bass." Press NPURE DIRECT (or kPURE DIRECT) to +10.0 dB The display returns the previous screen soon after you set Pure Direct mode on again once you release the key. The front panel display turns on . Treble 0.0dB 2 Adjust the frequency range using ...
... control) You can be controlled remotely just by selecting a scene. Notes • When you want to change. Notes • The tone control settings are not effective during playback in Pure Direct mode. • If you control this unit plays back the selected source with the least circuitry. ADVANCED...to select "Treble" or "Bass." Press NPURE DIRECT (or kPURE DIRECT) to +10.0 dB The display returns the previous screen soon after you set Pure Direct mode on again once you release the key. The front panel display turns on . Treble 0.0dB 2 Adjust the frequency range using ...
Owners Manual
Page 28
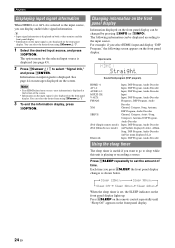
...menu displayed) List Bluetooth: Input, DSP Program, Audio Decoder Using the sleep timer The sleep timer is useful if you want to go to set , the SLEEP indicator on the front panel display can display audio/video signal information. Each time you press fSLEEP, the front panel display ..., error information is displayed at the bottom of the screen. • Information on the input signal is also displayed on input signals is set the amount of time. Changing information on the front panel display Information displayed on the front panel display lights up. Press fSLEEP repeatedly to ...
...menu displayed) List Bluetooth: Input, DSP Program, Audio Decoder Using the sleep timer The sleep timer is useful if you want to go to set , the SLEEP indicator on the front panel display can display audio/video signal information. Each time you press fSLEEP, the front panel display ..., error information is displayed at the bottom of the screen. • Information on the input signal is also displayed on input signals is set the amount of time. Changing information on the front panel display Information displayed on the front panel display lights up. Press fSLEEP repeatedly to ...
Owners Manual
Page 32
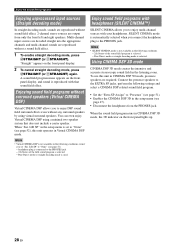
...page 47). • Disconnect the headphones from only the front left and right speakers. Note • Virtual CINEMA DSP is automatically selected when you set to "Presence" (see page 51). • Enables the CINEMA DSP 3D in CINEMA DSP 3D mode, the 3D indicator on the front panel ...with your headphones. headphone plug is connected to the EXTRA SP jacks, perform the following conditions. - 2ch Stereo of the field sound program is set "Sur. Connect the presence speakers to the PHONES jack. - 7ch Stereo of the sound field program is selected. When "Sur. "Straight" ...
...page 47). • Disconnect the headphones from only the front left and right speakers. Note • Virtual CINEMA DSP is automatically selected when you set to "Presence" (see page 51). • Enables the CINEMA DSP 3D in CINEMA DSP 3D mode, the 3D indicator on the front panel ...with your headphones. headphone plug is connected to the EXTRA SP jacks, perform the following conditions. - 2ch Stereo of the field sound program is set "Sur. Connect the presence speakers to the PHONES jack. - 7ch Stereo of the sound field program is selected. When "Sur. "Straight" ...
Owners Manual
Page 33
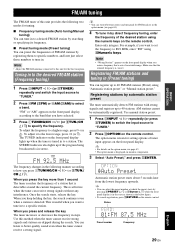
...if you press and release the key The tuner increases or decreases the frequency in stereo. Note • "Wrong Station!" The option menu screen for setting options of FM/AM stations by pressing iPRESET k / n or oCursor k / n while the front panel display is detectable around the current frequency.... up if the program being broadcasted is tuned in (Preset tuning) You can listen to 40 stations. y • You can receive strong signals without any interference. When you want to specify the frequency. The STEREO indicator also lights up to better quality sound even...
...if you press and release the key The tuner increases or decreases the frequency in stereo. Note • "Wrong Station!" The option menu screen for setting options of FM/AM stations by pressing iPRESET k / n or oCursor k / n while the front panel display is detectable around the current frequency.... up if the program being broadcasted is tuned in (Preset tuning) You can listen to 40 stations. y • You can receive strong signals without any interference. When you want to specify the frequency. The STEREO indicator also lights up to better quality sound even...


