
Owners Manual
Page 93
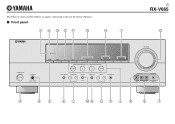
The letters in circles and the numbers in squares correspond to those in the Owner's Manual. ■ Front panel V U DEF G H I U RX-V665 Q MAIN ZONE ON/OFF PHONES SILENT CINEMA HDMI THROUGH ZONE2 ON/OFF ZONE2 CONTROL INFO MEMORY BD/DVD l PRESET h SCENE TV CD FM AM l CATEGORY h l TUNING/CH h RADIO TONE CONTROL PROGRAM l h STRAIGHT EFFECT PURE DIRECT INPUT OPTIMIZER MIC l h VOLUME VIDEO AUX VIDEO AUDIO PORTABLE A BC KL MN O P J R S T
The letters in circles and the numbers in squares correspond to those in the Owner's Manual. ■ Front panel V U DEF G H I U RX-V665 Q MAIN ZONE ON/OFF PHONES SILENT CINEMA HDMI THROUGH ZONE2 ON/OFF ZONE2 CONTROL INFO MEMORY BD/DVD l PRESET h SCENE TV CD FM AM l CATEGORY h l TUNING/CH h RADIO TONE CONTROL PROGRAM l h STRAIGHT EFFECT PURE DIRECT INPUT OPTIMIZER MIC l h VOLUME VIDEO AUX VIDEO AUDIO PORTABLE A BC KL MN O P J R S T
Hookup Example
Page 2
...Yamaha iPod universal dock (such as the input source of the owner's manual). 4. Use the Left/Right Arrow buttons on the remote control. 4. Selecting the input source (AV5-6, AUDIO1-2, and V-AUX) of speakers for 7.1 (Surround Back terminals.) or Bi Amp (Surround Back terminals.) Setting the Extra Speaker Terminals Note: The RX-V665... speaker is connected to AV 5-6 or Audio 1-2 by analog connection. Press the Enter Button on the remote to change the Extra to exit the Setup Menu. 14. Config, Extra.........None will come up on your iPod stationed in the receiver LED Screen. 6. Use...
...Yamaha iPod universal dock (such as the input source of the owner's manual). 4. Use the Left/Right Arrow buttons on the remote control. 4. Selecting the input source (AV5-6, AUDIO1-2, and V-AUX) of speakers for 7.1 (Surround Back terminals.) or Bi Amp (Surround Back terminals.) Setting the Extra Speaker Terminals Note: The RX-V665... speaker is connected to AV 5-6 or Audio 1-2 by analog connection. Press the Enter Button on the remote to change the Extra to exit the Setup Menu. 14. Config, Extra.........None will come up on your iPod stationed in the receiver LED Screen. 6. Use...


