
Quick Guide
Page 11
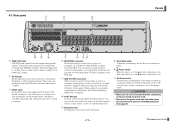
You can select which signal is saved in the position, the power is +4 dBu. These jacks are used to connect the console to output AUX channels and STEREO channels. When connecting to a power outlet, first connect the power cord to the console, then connect the power cord to connect...use the connected foot switch as an audio interface. Use these jacks to the power outlet. When using with a computer running Microsoft Windows, the Yamaha Steinberg USB Driver is -62 dBu to be used to connect the console to a computer, allowing the console to edit Scene memories and Libraries ...
You can select which signal is saved in the position, the power is +4 dBu. These jacks are used to connect the console to output AUX channels and STEREO channels. When connecting to a power outlet, first connect the power cord to the console, then connect the power cord to connect...use the connected foot switch as an audio interface. Use these jacks to the power outlet. When using with a computer running Microsoft Windows, the Yamaha Steinberg USB Driver is -62 dBu to be used to connect the console to a computer, allowing the console to edit Scene memories and Libraries ...
Quick Guide
Page 14
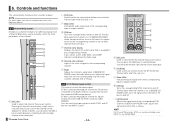
..., ID, or port name that is on and off . ST IN2 is on. 3 Meter LEDs Indicate the audio signal level of the corresponding input or output channel. 4 [ON] key Turns the corresponding ST IN channel on and off . 5 [LEVEL] knob Adjusts the signal level of the stereo pair. 2 [CUE] key Used.... Controls and functions This section briefly introduces the console's features. TF series Quick Guide 2 [CUE] key Used to the AUX or FX bus on . You can control the channel on . 6. HINT For TF5 and TF3 consoles, ST IN can switch the input signals for signals sent from the USB TO HOST connector...
..., ID, or port name that is on and off . ST IN2 is on. 3 Meter LEDs Indicate the audio signal level of the corresponding input or output channel. 4 [ON] key Turns the corresponding ST IN channel on and off . 5 [LEVEL] knob Adjusts the signal level of the stereo pair. 2 [CUE] key Used.... Controls and functions This section briefly introduces the console's features. TF series Quick Guide 2 [CUE] key Used to the AUX or FX bus on . You can control the channel on . 6. HINT For TF5 and TF3 consoles, ST IN can switch the input signals for signals sent from the USB TO HOST connector...
Reference Manual
Page 2
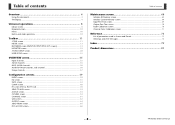
... Library screen ...8 Keyboard screen ...10 Menu ...10 Button and slider operations 10 Toolbar 11 SCENE screen ...11 METER screen ...13 RECORDER screen (INPUT/OUTPUT/TITLE LIST screen 14 MONITOR screen 18 SYSTEM SETUP screen 20 USER SETUP screen 25 OVERVIEW screen 35 Input channels...35 Stereo channels ...35 AUX1... GATE screen ...44 COMP screen ...46 FX screen (FX1/2, INS FX1-6 48 SEND TO AUX screen 53 ASSIGN screen...54 CH VIEW screen ...54 CH NAME screen 61 GEQ screen...62 OUTPUT screen ...64 SEND FROM screen 65 DCA ASSIGN screen 66 Table of contents Maintenance screen 68 ...
... Library screen ...8 Keyboard screen ...10 Menu ...10 Button and slider operations 10 Toolbar 11 SCENE screen ...11 METER screen ...13 RECORDER screen (INPUT/OUTPUT/TITLE LIST screen 14 MONITOR screen 18 SYSTEM SETUP screen 20 USER SETUP screen 25 OVERVIEW screen 35 Input channels...35 Stereo channels ...35 AUX1... GATE screen ...44 COMP screen ...46 FX screen (FX1/2, INS FX1-6 48 SEND TO AUX screen 53 ASSIGN screen...54 CH VIEW screen ...54 CH NAME screen 61 GEQ screen...62 OUTPUT screen ...64 SEND FROM screen 65 DCA ASSIGN screen 66 Table of contents Maintenance screen 68 ...

Reference Manual
Page 3
... Recalling a Preset...9 Editing a Preset...9 Displaying configuration screens 11 Recalling a Scene...12 Editing a Scene...12 Setting the input ...15 Setting the output ...15 Recording...17 Playing back files stored on a USB storage device 17 Checking the input signals 19 Setting the oscillator...20 Using safe recall......LPF ...43 Setting the gate...45 Setting the compressor 47 Setting an effect ...49 Setting an insert effect 49 Adjusting the SEND TO AUX level 53 Using GEQ ...63 Adjusting the SEND FROM level 65 Assigning channels to a DCA group 66 Using the maintenance screen 68 ...
... Recalling a Preset...9 Editing a Preset...9 Displaying configuration screens 11 Recalling a Scene...12 Editing a Scene...12 Setting the input ...15 Setting the output ...15 Recording...17 Playing back files stored on a USB storage device 17 Checking the input signals 19 Setting the oscillator...20 Using safe recall......LPF ...43 Setting the gate...45 Setting the compressor 47 Setting an effect ...49 Setting an insert effect 49 Adjusting the SEND TO AUX level 53 Using GEQ ...63 Adjusting the SEND FROM level 65 Assigning channels to a DCA group 66 Using the maintenance screen 68 ...

Reference Manual
Page 6
...61543;page 54) FX RTN 1/2 1 Displays the FX1 screen. (page 48) ձ 2 Displays the EQ screen. (page 41) 3 Displays the SEND TO AUX screen. (page 53) 4 Displays the ASSIGN screen. (page 54) ղ 5 Displays the CH VIEW screen. (page 54) ճ մ .... (page 41) շ 3 Displays the GEQ screen. (page 62) 4 Displays the COMP screen. (page 46) 5 Displays the OUTPUT screen. (page 64) 6 Displays the CH VIEW screen. (page 54) ձ ղ ճ մ յ ն շ - 6 -
...61543;page 54) FX RTN 1/2 1 Displays the FX1 screen. (page 48) ձ 2 Displays the EQ screen. (page 41) 3 Displays the SEND TO AUX screen. (page 53) 4 Displays the ASSIGN screen. (page 54) ղ 5 Displays the CH VIEW screen. (page 54) ճ մ .... (page 41) շ 3 Displays the GEQ screen. (page 62) 4 Displays the COMP screen. (page 46) 5 Displays the OUTPUT screen. (page 64) 6 Displays the CH VIEW screen. (page 54) ձ ղ ճ մ յ ն շ - 6 -
Reference Manual
Page 14
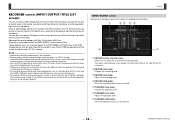
... Allows you to configure inputs and outputs for playback and recording. ձ ղճ յն մ շ 1 RECORD source selection menu Allows you to record signals from the STEREO and AUX buses to select the source that will be displayed properly. The source selected here is connected to the iPad connector...
... Allows you to configure inputs and outputs for playback and recording. ձ ղճ յն մ շ 1 RECORD source selection menu Allows you to record signals from the STEREO and AUX buses to select the source that will be displayed properly. The source selected here is connected to the iPad connector...

Reference Manual
Page 26
... No Assign PARAMETER 1 Brightness Bank Change CH ON Specific CH PARAMETER 2 CH 1-40, ST IN 1, ST IN 2, FX 1, FX 2, DCA 1-8, AUX 1-8, AUX 9/10-19/20, STEREO, SUB Description No feature is assigned For V1.1 and later, you to assign features to the corresponding key. Selects the channel...brightness banks. FUNCTION PARAMETER 1 Inc Dec CH Select Specific CH CUE Specific CH Effect Help Meter Monitor Oscillator Bypass Peak Hold ON Output Source Select Oscillator On Specific CH Bookmark Page Change Bookmark with the bookmark. Touch and hold on the RECORDER screen. Same as the...
... No Assign PARAMETER 1 Brightness Bank Change CH ON Specific CH PARAMETER 2 CH 1-40, ST IN 1, ST IN 2, FX 1, FX 2, DCA 1-8, AUX 1-8, AUX 9/10-19/20, STEREO, SUB Description No feature is assigned For V1.1 and later, you to assign features to the corresponding key. Selects the channel...brightness banks. FUNCTION PARAMETER 1 Inc Dec CH Select Specific CH CUE Specific CH Effect Help Meter Monitor Oscillator Bypass Peak Hold ON Output Source Select Oscillator On Specific CH Bookmark Page Change Bookmark with the bookmark. Touch and hold on the RECORDER screen. Same as the...

Reference Manual
Page 28
...Bank Change CH ON Specific CH CH Select Inc Dec Specific CH Clear Cue CUE Specific CH Effect Help Meter Monitor Bypass Peak Hold ON Output Source Select Mute Master Oscillator Input FX Oscillator On Specific CH Bookmark Page Change Bookmark with the bookmark. The selected channel is saved with... 2 CH 1-40, ST IN 1, ST IN 2, FX 1, FX 2, DCA 1-8, AUX 1-8, AUX 9/10-19/20, STEREO, SUB CH 1-40, ST IN 1L-ST IN 2R, FX1L-FX2R, AUX 1-8, AUX 9-20, STEREO L, STEREO R, SUB CH 1-40, ST IN 1, ST IN 2, FX 1, FX 2, DCA 1-8, AUX 1-8, AUX 9/10-19/20, STEREO, SUB FX 1, FX 2, INS FX 1-6 STEREO, SUB...
...Bank Change CH ON Specific CH CH Select Inc Dec Specific CH Clear Cue CUE Specific CH Effect Help Meter Monitor Bypass Peak Hold ON Output Source Select Mute Master Oscillator Input FX Oscillator On Specific CH Bookmark Page Change Bookmark with the bookmark. The selected channel is saved with... 2 CH 1-40, ST IN 1, ST IN 2, FX 1, FX 2, DCA 1-8, AUX 1-8, AUX 9/10-19/20, STEREO, SUB CH 1-40, ST IN 1L-ST IN 2R, FX1L-FX2R, AUX 1-8, AUX 9-20, STEREO L, STEREO R, SUB CH 1-40, ST IN 1, ST IN 2, FX 1, FX 2, DCA 1-8, AUX 1-8, AUX 9/10-19/20, STEREO, SUB FX 1, FX 2, INS FX 1-6 STEREO, SUB...

Reference Manual
Page 35
...COMP screen. (page 46) 5 Displays the FX1 screen. (page 48) 6 Displays the FX2 screen. (page 48) 7 Displays the SEND TO AUX screen. (page 53) 8 Displays the ASSIGN screen. (page 54) 9 Displays the CH VIEW screen. (page 54) OVERVIEW screen Stereo channels ճ...screen. (page 39) 2 Displays the EQ screen. (page 41) 3 Displays the FX1/FX2 screen. (page 48) 4 Displays the SEND TO AUX screen. (page 53) 5 Displays the ASSIGN screen. (page 54) 6 Displays the CH VIEW screen. (page 54) 7 Displays the GEQ ...
...COMP screen. (page 46) 5 Displays the FX1 screen. (page 48) 6 Displays the FX2 screen. (page 48) 7 Displays the SEND TO AUX screen. (page 53) 8 Displays the ASSIGN screen. (page 54) 9 Displays the CH VIEW screen. (page 54) OVERVIEW screen Stereo channels ճ...screen. (page 39) 2 Displays the EQ screen. (page 41) 3 Displays the FX1/FX2 screen. (page 48) 4 Displays the SEND TO AUX screen. (page 53) 5 Displays the ASSIGN screen. (page 54) 6 Displays the CH VIEW screen. (page 54) 7 Displays the GEQ ...

Reference Manual
Page 41
...setting allows you adjust the settings of the EQ and filter. The available high-band filters are LPF, high-shelving type, and bell type. 6 EQ output level meter Displays the post-EQ level. 7 EQ graph Displays the parameter settings of each band, the results are HPF, low-shelving type, and bell..., you can drag the handles displayed in the graph. EQ screen Controls the EQ for each channel. 4-band parametric EQ is available for CH 1-32, AUX 1-20, and STEREO. 2-band parametric EQ is available for 1-knob EQ mode. - 41 - For other channels (i.e., for channels that do not have an HPF), ...
...setting allows you adjust the settings of the EQ and filter. The available high-band filters are LPF, high-shelving type, and bell type. 6 EQ output level meter Displays the post-EQ level. 7 EQ graph Displays the parameter settings of each band, the results are HPF, low-shelving type, and bell..., you can drag the handles displayed in the graph. EQ screen Controls the EQ for each channel. 4-band parametric EQ is available for CH 1-32, AUX 1-20, and STEREO. 2-band parametric EQ is available for 1-knob EQ mode. - 41 - For other channels (i.e., for channels that do not have an HPF), ...

Reference Manual
Page 55
... for the selected channel. post-fader signal is displayed in gray. 0 ASSIGN box Displays the ASSIGN screen. (page 54) A Channel output level slider Adjusts the fader level for the corresponding feature. Send level, the selected channel's fader level, and the actual send level grouped with... the DCA is displayed in the horizontal bar. Pre-fader signal is sent to display the SEND TO AUX screen. D Direct out point button Allows you can also display the corresponding effect's configuration screen by touching again. C Direct out port ...
... for the selected channel. post-fader signal is displayed in gray. 0 ASSIGN box Displays the ASSIGN screen. (page 54) A Channel output level slider Adjusts the fader level for the corresponding feature. Send level, the selected channel's fader level, and the actual send level grouped with... the DCA is displayed in the horizontal bar. Pre-fader signal is sent to display the SEND TO AUX screen. D Direct out point button Allows you can also display the corresponding effect's configuration screen by touching again. C Direct out port ...

Reference Manual
Page 56
... safe on and off for the corresponding channel. When selected, you mute the input mute group, any channels in gray. 9 SEND TO AUX box Touch when selected to the corresponding effects module. Send level, the selected channel's fader level, and the actual send level grouped with...ռջ 1 Channel name Touch to the effects module is displayed in gray. 0 ASSIGN box Displays the ASSIGN screen. (page 54) A Channel output level slider Adjusts the fader level for the selected channel. 8 FX1/FX2 boxes Displays the effect type. You can display the RECALL SAFE screen (...
... safe on and off for the corresponding channel. When selected, you mute the input mute group, any channels in gray. 9 SEND TO AUX box Touch when selected to the corresponding effects module. Send level, the selected channel's fader level, and the actual send level grouped with...ռջ 1 Channel name Touch to the effects module is displayed in gray. 0 ASSIGN box Displays the ASSIGN screen. (page 54) A Channel output level slider Adjusts the fader level for the selected channel. 8 FX1/FX2 boxes Displays the effect type. You can display the RECALL SAFE screen (...

Reference Manual
Page 57
... screen by touching the jump button in green; post-fader signal is displayed in gray. 9 SEND TO AUX box Touch when selected to adjust the effects send level. Touch to display information for the corresponding feature. ...;page 22) by touching again. The information displayed here indicates whether the signal sent to the AUX bus is the pre-fader or post-fader signal. The information displayed here indicates whether the signal... ASSIGN box Displays the ASSIGN screen. (page 54) A Channel output level slider Adjusts the fader level for the corresponding channel. B Channel...
... screen by touching the jump button in green; post-fader signal is displayed in gray. 9 SEND TO AUX box Touch when selected to adjust the effects send level. Touch to display information for the corresponding feature. ...;page 22) by touching again. The information displayed here indicates whether the signal sent to the AUX bus is the pre-fader or post-fader signal. The information displayed here indicates whether the signal... ASSIGN box Displays the ASSIGN screen. (page 54) A Channel output level slider Adjusts the fader level for the corresponding channel. B Channel...

Reference Manual
Page 58
... on and off for the selected channel. 7 SEND TO AUX box Touch when selected to each AUX bus. post-fader signal is displayed in gray. 8 ASSIGN box Displays the ASSIGN screen. (page 54) 9 Channel output level slider Adjusts the fader level for the selected channel. ...0 Channel output level meter Displays the channel's output signal level. 5 Channel...
... on and off for the selected channel. 7 SEND TO AUX box Touch when selected to each AUX bus. post-fader signal is displayed in gray. 8 ASSIGN box Displays the ASSIGN screen. (page 54) 9 Channel output level slider Adjusts the fader level for the selected channel. ...0 Channel output level meter Displays the channel's output signal level. 5 Channel...

Reference Manual
Page 59
... boxes Touch to display information for a different channel. 2 Recall Safe button Turns recall safe on and off for the corresponding channel. AUX 9-AUX 20 ձ ղ ճ մյ Configuration screens 1 Channel name Touch to display the configuration screen for the corresponding ... turn the corresponding feature on and off. 5 OUTPUT box Displays the OUTPUT screen. (page 64) 6 Channel output level slider Adjusts the fader level for the selected channel. 7 Channel output level meter Displays the channel's output signal level. You can display the RECALL SAFE ...
... boxes Touch to display information for a different channel. 2 Recall Safe button Turns recall safe on and off for the corresponding channel. AUX 9-AUX 20 ձ ղ ճ մյ Configuration screens 1 Channel name Touch to display the configuration screen for the corresponding ... turn the corresponding feature on and off. 5 OUTPUT box Displays the OUTPUT screen. (page 64) 6 Channel output level slider Adjusts the fader level for the selected channel. 7 Channel output level meter Displays the channel's output signal level. You can display the RECALL SAFE ...

Reference Manual
Page 64
... button Determines whether the stereo channel is displayed. For three or more numbers, "+" is output or not. 2 Out Gain text box Allows you can be output. When selected, you to display the keyboard and enter a value. - 64 - Output channel type AUX 1-8 AUX9/10-AUX19/20 SUB STEREO ○ : Displayed - : Not displayed ST button - ○...
... button Determines whether the stereo channel is displayed. For three or more numbers, "+" is output or not. 2 Out Gain text box Allows you can be output. When selected, you to display the keyboard and enter a value. - 64 - Output channel type AUX 1-8 AUX9/10-AUX19/20 SUB STEREO ○ : Displayed - : Not displayed ST button - ○...

Reference Manual
Page 76
TF Series Reference Manual Reference AUX Channel Library Recall Can use Scene Recall Safe ...O O O O O O O PEQ O O O O O O O O O GEQ*1 O O O O O O O O*3 COMP O O O O O O O O Ins FX*2 O O O O O O O O TO ST Assign*2 O O O O O O O ON O O O O Fader O O O O Level O O O Pan Send From ON O O O O O Pre O O O Balance O O O O O O O OUTPUT Out Gain O O O O Φ O O O O O O O O O O O O Recall Safe O CUE O *1 AUX 1-8 only *2 AUX 9/10-19/20 only *3 Only when L/R LINK for GEQ is turned on - 76 -
TF Series Reference Manual Reference AUX Channel Library Recall Can use Scene Recall Safe ...O O O O O O O PEQ O O O O O O O O O GEQ*1 O O O O O O O O*3 COMP O O O O O O O O Ins FX*2 O O O O O O O O TO ST Assign*2 O O O O O O O ON O O O O Fader O O O O Level O O O Pan Send From ON O O O O O Pre O O O Balance O O O O O O O OUTPUT Out Gain O O O O Φ O O O O O O O O O O O O Recall Safe O CUE O *1 AUX 1-8 only *2 AUX 9/10-19/20 only *3 Only when L/R LINK for GEQ is turned on - 76 -
Reference Manual
Page 79
... P Peak Hold 13 Phantom power 20, 39 Phase 39 PHONES jack 18 Playback 14 Playback mode 16 Preset 8 R Recall on/off checkboxes 8 RECORDER screen (INPUT/ OUTPUT/TITLE LIST screen) ........ 14 RECORDER screen menu 17 Recording 14 RTA display 62 S SAVE/LOAD screen menu 33 Scene 11 SCENE screen 11 SCENE screen... menu 12 SEND FROM screen 65 Send pan 65 SEND TO AUX screen 53 Stereo channels 35 Stereo link 39 SUB channels 36 Subnet mask 23 SYSTEM SETUP screen 20 T Time stamp 24 Toolbar 11 U USER ...
... P Peak Hold 13 Phantom power 20, 39 Phase 39 PHONES jack 18 Playback 14 Playback mode 16 Preset 8 R Recall on/off checkboxes 8 RECORDER screen (INPUT/ OUTPUT/TITLE LIST screen) ........ 14 RECORDER screen menu 17 Recording 14 RTA display 62 S SAVE/LOAD screen menu 33 Scene 11 SCENE screen 11 SCENE screen... menu 12 SEND FROM screen 65 Send pan 65 SEND TO AUX screen 53 Stereo channels 35 Stereo link 39 SUB channels 36 Subnet mask 23 SYSTEM SETUP screen 20 T Time stamp 24 Toolbar 11 U USER ...

Reference Manual
Page 80
R Recall safe Using recall safe 22 Recalling a Preset 9 Recalling a Scene 12 Recording Recording 17 S Setting Channel colors 72 Compressor 47 Effects 49 Fader calibration 71 Gate 45 Input 15 Insert effects 49 Oscillator 20 Output 15 PREFERENCE screen 32 SEND FROM level 65 SEND TO AUX level 53 Stereo link, input source 40 - 80 - Index TF Series Reference Manual
R Recall safe Using recall safe 22 Recalling a Preset 9 Recalling a Scene 12 Recording Recording 17 S Setting Channel colors 72 Compressor 47 Effects 49 Fader calibration 71 Gate 45 Input 15 Insert effects 49 Oscillator 20 Output 15 PREFERENCE screen 32 SEND FROM level 65 SEND TO AUX level 53 Stereo link, input source 40 - 80 - Index TF Series Reference Manual


