
Owner's Manual
Page 3
...15 for proper grounding and, in particular, specifies that may be used according to the instructions found to be the source of interference, which can not locate the appropriate retailer, please contact Yamaha Electronics Corp., U.S.A. 6660 Orangethorpe Ave, Buena Park, CA 90620...stand, tripod, bracket, or table specified by Yamaha may cause interference harmful to coaxial type cable. This equipment generates/uses radio frequencies and, if not installed and used . Utilize power outlets that your authority, granted by Yamaha Corporation of other apparatus (including amplifiers) that...
...15 for proper grounding and, in particular, specifies that may be used according to the instructions found to be the source of interference, which can not locate the appropriate retailer, please contact Yamaha Electronics Corp., U.S.A. 6660 Orangethorpe Ave, Buena Park, CA 90620...stand, tripod, bracket, or table specified by Yamaha may cause interference harmful to coaxial type cable. This equipment generates/uses radio frequencies and, if not installed and used . Utilize power outlets that your authority, granted by Yamaha Corporation of other apparatus (including amplifiers) that...

Owner's Manual
Page 4
... other than specified is dangerous and may happen if batteries are incorrectly replaced. Yamaha will not be set this unit. - Contact qualified Yamaha service personnel when any reasons. 15 When not planning to use batteries of this manual carefully. As long as they may cause fire, damage... - vacation), disconnect the AC power plug from direct sunlight, heat sources, vibration, dust, moisture, and/or cold. Keep it may be used. Burning objects (i.e. this sound system in order not to obstruct heat radiation. It may cause damage and/or discoloration on the rear of power...
... other than specified is dangerous and may happen if batteries are incorrectly replaced. Yamaha will not be set this unit. - Contact qualified Yamaha service personnel when any reasons. 15 When not planning to use batteries of this manual carefully. As long as they may cause fire, damage... - vacation), disconnect the AC power plug from direct sunlight, heat sources, vibration, dust, moisture, and/or cold. Keep it may be used. Burning objects (i.e. this sound system in order not to obstruct heat radiation. It may cause damage and/or discoloration on the rear of power...
Owner's Manual
Page 5
... jacks and cable plugs 13 Connecting a TV monitor or projector 14 Connecting other components 15 Connecting a Yamaha iPod universal dock or Bluetooth™ wireless audio receiver 16 Using the VIDEO AUX jacks on the front panel .... 16 Connecting the FM and AM antennas 17 Connecting ... (Frequency tuning 28 Registering FM/AM stations and tuning in (Preset tuning 28 Using iPod 30 Controlling iPod 30 Using Bluetooth™ components 32 Pairing the Bluetooth™ wireless audio receiver and your Bluetooth component 32 Playback of the Bluetooth™ component 32 ADVANCED OPERATION...
... jacks and cable plugs 13 Connecting a TV monitor or projector 14 Connecting other components 15 Connecting a Yamaha iPod universal dock or Bluetooth™ wireless audio receiver 16 Using the VIDEO AUX jacks on the front panel .... 16 Connecting the FM and AM antennas 17 Connecting ... (Frequency tuning 28 Registering FM/AM stations and tuning in (Preset tuning 28 Using iPod 30 Controlling iPod 30 Using Bluetooth™ components 32 Pairing the Bluetooth™ wireless audio receiver and your Bluetooth component 32 Playback of the Bluetooth™ component 32 ADVANCED OPERATION...
Owner's Manual
Page 7
...BASIC OPERATION ADVANCED OPERATION ADDITIONAL INFORMATION APPENDIX English 3 En DTS is a trademark of HDMI Licensing LLC. Supplied accessories Check that you received all of the parts. • ☞ indicates the page describing the related information. In case of differences between the front...SILENT CINEMA" is a trademark of Yamaha Corporation. In case the key names differ between the manual and product, the product has priority. • "ASTANDBY/ON" or "gHDMI 1" (example) indicates the name of Bluetooth SIG and is used by using either the keys on the front ...
...BASIC OPERATION ADVANCED OPERATION ADDITIONAL INFORMATION APPENDIX English 3 En DTS is a trademark of HDMI Licensing LLC. Supplied accessories Check that you received all of the parts. • ☞ indicates the page describing the related information. In case of differences between the front...SILENT CINEMA" is a trademark of Yamaha Corporation. In case the key names differ between the manual and product, the product has priority. • "ASTANDBY/ON" or "gHDMI 1" (example) indicates the name of Bluetooth SIG and is used by using either the keys on the front ...
Owner's Manual
Page 10
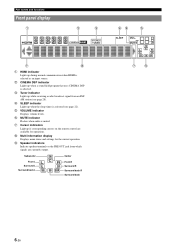
... indicator Lights up when a sound field program that uses CINEMA DSP is selected. b CINEMA DSP indicator Lights up during normal communication when HDMI is selected as an input source. MUTE SW L CR SL SR SBL SB SBR g i 6 En d SLEEP indicator Lights up while receiving a radio broadcast signal from which signals are available...
... indicator Lights up when a sound field program that uses CINEMA DSP is selected. b CINEMA DSP indicator Lights up during normal communication when HDMI is selected as an input source. MUTE SW L CR SL SR SBL SB SBR g i 6 En d SLEEP indicator Lights up while receiving a radio broadcast signal from which signals are available...

Owner's Manual
Page 11
...AV 2 3 4 AUDIO 6 1 2 V-AUX [ A ] [ B ] DOCK TUNER FM AM PRESET TUNING INFO MEMORY MOVIE ENHANCER SUR. c CODE SET Sets remote control codes for external component operations (see page 21). f POWER Switches this unit. Selects AUDIO inputs 1 and 2. Selects a Yamaha iPod universal dock/ Bluetooth wireless audio receiver...component operation keys Operate recording, playback etc. ADDITIONAL INFORMATION APPENDIX English 7 En To control external components using the rExternal component operation keys separately from the remote control. l SETUP Displays the setup menu (see...
...AV 2 3 4 AUDIO 6 1 2 V-AUX [ A ] [ B ] DOCK TUNER FM AM PRESET TUNING INFO MEMORY MOVIE ENHANCER SUR. c CODE SET Sets remote control codes for external component operations (see page 21). f POWER Switches this unit. Selects AUDIO inputs 1 and 2. Selects a Yamaha iPod universal dock/ Bluetooth wireless audio receiver...component operation keys Operate recording, playback etc. ADDITIONAL INFORMATION APPENDIX English 7 En To control external components using the rExternal component operation keys separately from the remote control. l SETUP Displays the setup menu (see...

Owner's Manual
Page 12
...necessary for setup Step 2: Set up a 5.1-channel sound system. Center speaker Components (such as an input source and start guide When you use magnetically shielded speakers. • Connecting a TV monitor or projector ☞P. 14 • Connecting other components. Step 1: Prepare items for...another amplifier connected. • If your TV, DVD player, or other components ☞P. 15 • Connecting a Yamaha iPod universal dock or Bluetooth wireless audio receiver ☞P. 16 • Connecting the FM and AM antennas ☞P. 17 Step 4: Turn on the power Connect ...
...necessary for setup Step 2: Set up a 5.1-channel sound system. Center speaker Components (such as an input source and start guide When you use magnetically shielded speakers. • Connecting a TV monitor or projector ☞P. 14 • Connecting other components. Step 1: Prepare items for...another amplifier connected. • If your TV, DVD player, or other components ☞P. 15 • Connecting a Yamaha iPod universal dock or Bluetooth wireless audio receiver ☞P. 16 • Connecting the FM and AM antennas ☞P. 17 Step 4: Turn on the power Connect ...

Owner's Manual
Page 13
...batteries, discard the batteries immediately, taking care not to leak. • Do not use old batteries together with your local regulations. • If the remote control is dim • Do not use different types of the battery compartment. 3 Snap the battery compartment cover back into ...control. • Do not drop the remote control. • Do not leave or store the remote control in the remote control 13 Using the remote control The remote control transmits a directional infrared ray. If the leaked material comes into contact with this unit during operation. the...
...batteries, discard the batteries immediately, taking care not to leak. • Do not use old batteries together with your local regulations. • If the remote control is dim • Do not use different types of the battery compartment. 3 Snap the battery compartment cover back into ...control. • Do not drop the remote control. • Do not leave or store the remote control in the remote control 13 Using the remote control The remote control transmits a directional infrared ray. If the leaked material comes into contact with this unit during operation. the...

Owner's Manual
Page 14
... recommended the following speaker layout in order to reduce reflections from the surround left and right speakers (FL and FR) The front speakers are used for the front channel sounds (stereo sound) and effect sounds. To obtain a natural sound flow in the 5.1-channel speaker layout, place them... with the front surfaces of the screen from each other, ideally at the same distance as the Yamaha Active Servo Processing Subwoofer System. When using a screen, place it exterior to the front left and right speakers facing slightly inward to obtain the optimum surround effect. 7.1-channel...
... recommended the following speaker layout in order to reduce reflections from the surround left and right speakers (FL and FR) The front speakers are used for the front channel sounds (stereo sound) and effect sounds. To obtain a natural sound flow in the 5.1-channel speaker layout, place them... with the front surfaces of the screen from each other, ideally at the same distance as the Yamaha Active Servo Processing Subwoofer System. When using a screen, place it exterior to the front left and right speakers facing slightly inward to obtain the optimum surround effect. 7.1-channel...

Owner's Manual
Page 15
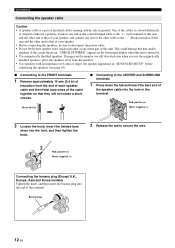
... page 18) or "Speaker Setup" of the PRE OUT terminals. To obtain the balanced sound during playback, set the speaker output characteristics in advance using the Yamaha Parametric Room Acoustic Optimize (YPAO, see page 39). INTRODUCTION PREPARATION BASIC OPERATION Connections Connecting speakers When you to create the maximum of the external amplifier...
... page 18) or "Speaker Setup" of the PRE OUT terminals. To obtain the balanced sound during playback, set the speaker output characteristics in advance using the Yamaha Parametric Room Acoustic Optimize (YPAO, see page 39). INTRODUCTION PREPARATION BASIC OPERATION Connections Connecting speakers When you to create the maximum of the external amplifier...
Owner's Manual
Page 16
... other cable to the "-" (black) terminal of this unit is turned on the monitor are still distorted even when you use the magnetically shielded speakers, place the speakers away from the monitor. • Use speakers with an impedance of the speaker cable into the hole in the terminal. If images on . •...; Use magnetically shielded speakers. Red: positive (+) Black: negative (-) 2 Loosen the knob, insert the twisted bare wires into the end of this unit and/or speakers. Connecting ...
... other cable to the "-" (black) terminal of this unit is turned on the monitor are still distorted even when you use the magnetically shielded speakers, place the speakers away from the monitor. • Use speakers with an impedance of the speaker cable into the hole in the terminal. If images on . •...; Use magnetically shielded speakers. Red: positive (+) Black: negative (-) 2 Loosen the knob, insert the twisted bare wires into the end of this unit and/or speakers. Connecting ...

Owner's Manual
Page 17
... signals. A video signal input to this unit is output from the output terminals in MONITOR OUT to white jacks (L). Use video pin cables. Use jacks and cables appropriate for components that include luminance (Y), chrominance blue (PB) and chrominance red (PR) components. To transmit...the video monitor. ■ Video jacks Jack and cables VIDEO jacks VIDEO V (yellow) Description To transmit conventional composite video signals. Use optical fiber cables for digital audio signals. Input HDMI COMPONENT VIDEO PR PB Y VIDEO Output HDMI COMPONENT VIDEO PR PB Y VIDEO COMPONENT...
... signals. A video signal input to this unit is output from the output terminals in MONITOR OUT to white jacks (L). Use video pin cables. Use jacks and cables appropriate for components that include luminance (Y), chrominance blue (PB) and chrominance red (PR) components. To transmit...the video monitor. ■ Video jacks Jack and cables VIDEO jacks VIDEO V (yellow) Description To transmit conventional composite video signals. Use optical fiber cables for digital audio signals. Input HDMI COMPONENT VIDEO PR PB Y VIDEO Output HDMI COMPONENT VIDEO PR PB Y VIDEO COMPONENT...

Owner's Manual
Page 18
... ■ To connect an HDMI video monitor Jacks on components a HDMI input Jacks on standby. Connecting to the AV input 1 allows you use the AV input 1. Jacks on components Jacks on this unit to the AV input 1 with the remote control of this unit via the component input terminal are output from the composite...
... ■ To connect an HDMI video monitor Jacks on components a HDMI input Jacks on standby. Connecting to the AV input 1 allows you use the AV input 1. Jacks on components Jacks on this unit to the AV input 1 with the remote control of this unit via the component input terminal are output from the composite...

Owner's Manual
Page 19
...VIDEO PR HDMI 2 FM GND AM PB Y VIDEO MONITOR OUT HDMI 3 HDMI 4 FRONT OPTICAL ( TV ) AV 1 COAXIAL AV 2 COAXIAL (CD) AV 3 OPTICAL AV 4 AV 5 AV 6 AV OUT AUDIO1 AUDIO2 AUDIO OUT HDMI input (HDMI 1-4) CE Audio output (AUDIO OUT) Audio input (AUDIO 1-2) &#...AV 2 OPTICAL COMPONENT VIDEO COAXIAL Video Component video output COMPONENT VIDEO External component with the front panel display or remote control. If your Yamaha component has the Remote in parentheses are recommended to connect to the external components, make sure that component with a single key operation using...
...VIDEO PR HDMI 2 FM GND AM PB Y VIDEO MONITOR OUT HDMI 3 HDMI 4 FRONT OPTICAL ( TV ) AV 1 COAXIAL AV 2 COAXIAL (CD) AV 3 OPTICAL AV 4 AV 5 AV 6 AV OUT AUDIO1 AUDIO2 AUDIO OUT HDMI input (HDMI 1-4) CE Audio output (AUDIO OUT) Audio input (AUDIO 1-2) &#...AV 2 OPTICAL COMPONENT VIDEO COAXIAL Video Component video output COMPONENT VIDEO External component with the front panel display or remote control. If your Yamaha component has the Remote in parentheses are recommended to connect to the external components, make sure that component with a single key operation using...
Owner's Manual
Page 20
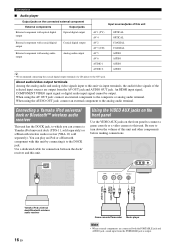
... both the PORTABLE jack and AUDIO jack, sound input from the AV OUT jack and AUDIO OUT jack. Connecting a Yamaha iPod universal dock or Bluetooth™ wireless audio receiver This unit has the DOCK jack, to which you can play ...AV 5 AV 6 AUDIO AUDIO AUDIO 1 AUDIO AUDIO 2 y • We recommend connecting the coaxial digital output terminal of this unit by connecting it to the AV3 jack. When using the AUDIO OUT jack: connect an external component to this unit. You can connect a Yamaha iPod universal dock (YDS-11, sold separately) or a Bluetooth wireless audio receiver...
... both the PORTABLE jack and AUDIO jack, sound input from the AV OUT jack and AUDIO OUT jack. Connecting a Yamaha iPod universal dock or Bluetooth™ wireless audio receiver This unit has the DOCK jack, to which you can play ...AV 5 AV 6 AUDIO AUDIO AUDIO 1 AUDIO AUDIO 2 y • We recommend connecting the coaxial digital output terminal of this unit by connecting it to the AV3 jack. When using the AUDIO OUT jack: connect an external component to this unit. You can connect a Yamaha iPod universal dock (YDS-11, sold separately) or a Bluetooth wireless audio receiver...

Owner's Manual
Page 21
... antenna. Caution Do not unplug this unit while it in the standby mode. For more details, consult the nearest authorized Yamaha dealer or service center. • Always use the AM loop antenna even when the outdoor antenna is turned on. Doing so may damage this unit or cause the ...supplied with this unit. We recommend disconnecting the power cable from this unit. • If you cannot get good reception, we recommend that you use the AM loop antenna together with a copper plate at its tip, and place it is connected. AM loop antenna DOCK COMPONENT VIDEO PR PB Y...
... antenna. Caution Do not unplug this unit while it in the standby mode. For more details, consult the nearest authorized Yamaha dealer or service center. • Always use the AM loop antenna even when the outdoor antenna is turned on. Doing so may damage this unit or cause the ...supplied with this unit. We recommend disconnecting the power cable from this unit. • If you cannot get good reception, we recommend that you use the AM loop antenna together with a copper plate at its tip, and place it is connected. AM loop antenna DOCK COMPONENT VIDEO PR PB Y...

Owner's Manual
Page 22
... volume to enter the room during the "Auto Setup" procedure. Caution • Be advised that you use a tripod or something similar to fix the optimizer microphone at the proper level while the surround speakers being...8226; The connected subwoofer is turned on the front panel display. UT OPTIMIZER MIC h VIDEO AUX VIDEO AUDIO PORTABLE Using Auto Setup Optimizer microphone 1 Check the following . • All speakers and subwoofer are connected properly. • Headphones...See page 39 for your listening room (YPAO) This unit has a Yamaha Parametric Acoustic Optimizer (YPAO).
... volume to enter the room during the "Auto Setup" procedure. Caution • Be advised that you use a tripod or something similar to fix the optimizer microphone at the proper level while the surround speakers being...8226; The connected subwoofer is turned on the front panel display. UT OPTIMIZER MIC h VIDEO AUX VIDEO AUDIO PORTABLE Using Auto Setup Optimizer microphone 1 Check the following . • All speakers and subwoofer are connected properly. • Headphones...See page 39 for your listening room (YPAO) This unit has a Yamaha Parametric Acoustic Optimizer (YPAO).

Owner's Manual
Page 24
...measurement and "Auto Setup." When a warning message is displayed after measurement If a problem occurs during measurement Select "Retry" or "Exit" using nCursor h. 2 To return to the top result display, press nENTER again. 20 En Optimizing the speaker setting for your listening room (...messages. • When "E-5:NOISY" appears, you solve the problem first and then perform measurement again. We recommend that you can display the next message using nCursor l / h and then press nENTER. y • See page 51 for details on the front panel display. To continue measurement, select ...
...measurement and "Auto Setup." When a warning message is displayed after measurement If a problem occurs during measurement Select "Retry" or "Exit" using nCursor h. 2 To return to the top result display, press nENTER again. 20 En Optimizing the speaker setting for your listening room (...messages. • When "E-5:NOISY" appears, you solve the problem first and then perform measurement again. We recommend that you can display the next message using nCursor l / h and then press nENTER. y • See page 51 for details on the front panel display. To continue measurement, select ...

Owner's Manual
Page 25
...settings. Refer to scene selections You can turn on the front panel display. Input source Sound field program BD/DVD TV CD RADIO HDMI 1 AV 1 AV 3 TUNER Straight Straight Straight 7ch Enhancer y • When this unit, only noise is not improved, the problem may cause a speaker malfunction....• iPod playback (see page 30) 4 Turn the PVOLUME control to a TUNER input. The name of an iPod or Bluetooth component using this unit by setting a remote control code for the external component for each input source. For selecting radio stations or playback of the selected...
...settings. Refer to scene selections You can turn on the front panel display. Input source Sound field program BD/DVD TV CD RADIO HDMI 1 AV 1 AV 3 TUNER Straight Straight Straight 7ch Enhancer y • When this unit, only noise is not improved, the problem may cause a speaker malfunction....• iPod playback (see page 30) 4 Turn the PVOLUME control to a TUNER input. The name of an iPod or Bluetooth component using this unit by setting a remote control code for the external component for each input source. For selecting radio stations or playback of the selected...

Owner's Manual
Page 26
... as shown below. Sleep 60min. Control range: -10.0 dB to turn the Direct mode on or off. When you select a sound field program while using KPROGRAM l / h. The following features are divided to left and right speakers to obtain desired tone. 1 Press JTONE CONTROL on the front panel repeatedly to... returns to SILENT CINEMA mode. When setting it back off , sounds may not match those from the front left and right channels. 22 En Using the sleep timer The sleep timer is on, the front panel display becomes dim. Muting audio output temporarily (MUTE) 1 Press qMUTE on the ...
... as shown below. Sleep 60min. Control range: -10.0 dB to turn the Direct mode on or off. When you select a sound field program while using KPROGRAM l / h. The following features are divided to left and right speakers to obtain desired tone. 1 Press JTONE CONTROL on the front panel repeatedly to... returns to SILENT CINEMA mode. When setting it back off , sounds may not match those from the front left and right channels. 22 En Using the sleep timer The sleep timer is on, the front panel display becomes dim. Muting audio output temporarily (MUTE) 1 Press qMUTE on the ...


