Owner's Manual
Page 5
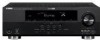
...11 Information on jacks and cable plugs 13 Connecting a TV monitor or projector 14 Connecting other components 15 Connecting a Yamaha iPod universal dock or Bluetooth™ wireless audio receiver 16 Using the VIDEO AUX jacks on the front panel .... 16 Connecting the FM and AM antennas 17 Connecting ... the remote control 44 Setting remote control codes 44 Resetting all remote control codes 44 Advanced setup 45 APPENDIX Troubleshooting 46 General 46 HDMI 49 Tuner (FM/AM 49 Remote control 50 iPod 50 Bluetooth 51 Auto Setup (YPAO 51 Glossary 53 Sound field program information ...
...11 Information on jacks and cable plugs 13 Connecting a TV monitor or projector 14 Connecting other components 15 Connecting a Yamaha iPod universal dock or Bluetooth™ wireless audio receiver 16 Using the VIDEO AUX jacks on the front panel .... 16 Connecting the FM and AM antennas 17 Connecting ... the remote control 44 Setting remote control codes 44 Resetting all remote control codes 44 Advanced setup 45 APPENDIX Troubleshooting 46 General 46 HDMI 49 Tuner (FM/AM 49 Remote control 50 iPod 50 Bluetooth 51 Auto Setup (YPAO 51 Glossary 53 Sound field program information ...
Owner's Manual
Page 6
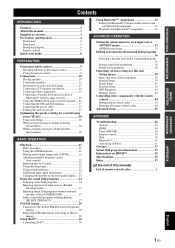
...preset tuning ■ HDMI™ (High-Definition Multimedia Interface) • HDMI interface for standard, enhanced or highdefinition video as well as YBA-10, sold separately) or Bluetooth wireless audio receiver (such as multi-...channel digital audio. - High refresh rate and high resolution video signals capability - High definition digital audio format signals capability ■ DOCK terminal • DOCK terminal to connect a Yamaha...
...preset tuning ■ HDMI™ (High-Definition Multimedia Interface) • HDMI interface for standard, enhanced or highdefinition video as well as YBA-10, sold separately) or Bluetooth wireless audio receiver (such as multi-...channel digital audio. - High refresh rate and high resolution video signals capability - High definition digital audio format signals capability ■ DOCK terminal • DOCK terminal to connect a Yamaha...
Owner's Manual
Page 7
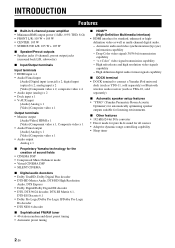
...a trademark of Yamaha Corporation. Manufactured under U.S. "HDMI," the "HDMI" logo and "High-Definition Multimedia Interface" are trademarks of HDMI Licensing LLC. "SILENT CINEMA" is a trademark of Yamaha Corporation. INTRODUCTION ...PREPARATION About this manual for your operation. • Some operations can be performed by Yamaha in part as a result of DTS, Inc. © 1996-2007 DTS, Inc. DTS is given in the U.S. All Rights Reserved. Supplied accessories Check that you received...
...a trademark of Yamaha Corporation. Manufactured under U.S. "HDMI," the "HDMI" logo and "High-Definition Multimedia Interface" are trademarks of HDMI Licensing LLC. "SILENT CINEMA" is a trademark of Yamaha Corporation. INTRODUCTION ...PREPARATION About this manual for your operation. • Some operations can be performed by Yamaha in part as a result of DTS, Inc. © 1996-2007 DTS, Inc. DTS is given in the U.S. All Rights Reserved. Supplied accessories Check that you received...

Owner's Manual
Page 8
...the audio output cable of speakers (see page 18). Part names and functions Front panel UTD E FG H P STANDBY /ON PHONES SILENT CINEMA HDMI THROUGH INFO MEMORY l PRESET h FM BD/DVD SCENE TV CD AM RADIO l TUNING h TONE CONTROL PROGRAM l h STRAIGHT EFFECT DIRECT INPUT ...JK LM N O I SCENE Switches between standby and on this unit (see page 21). J TONE CONTROL Adjusts high-frequency/low-frequency output of an HDMI signal input to AM (see page 6). D MEMORY Registers FM/AM stations as preset stations (see page 29). K PROGRAM l / h Changes sound ...
...the audio output cable of speakers (see page 18). Part names and functions Front panel UTD E FG H P STANDBY /ON PHONES SILENT CINEMA HDMI THROUGH INFO MEMORY l PRESET h FM BD/DVD SCENE TV CD AM RADIO l TUNING h TONE CONTROL PROGRAM l h STRAIGHT EFFECT DIRECT INPUT ...JK LM N O I SCENE Switches between standby and on this unit (see page 21). J TONE CONTROL Adjusts high-frequency/low-frequency output of an HDMI signal input to AM (see page 6). D MEMORY Registers FM/AM stations as preset stations (see page 29). K PROGRAM l / h Changes sound ...
Owner's Manual
Page 9
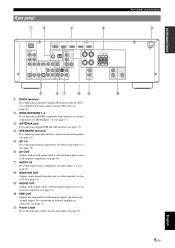
.... (BD/DVD) HDMI 1 COMPONENT VIDEO PR HDMI 2 FM GND AM PB Y VIDEO MONITOR OUT HDMI 3 HDMI 4 FRONT SPEAKERS CENTER SURROUND OPTICAL ( TV ) AV 1 COAXIAL AV 2 COAXIAL (CD) AV 3 OPTICAL AV 4 AV 5 AV 6 AV OUT AUDIO1 AUDIO2 AUDIO OUT SURROUND BACK SUBWOOFER PRE OUT e fg hi j a DOCK terminal For connecting an optional Yamaha iPod universal dock (YDS11) or Bluetooth wireless audio receiver (YBA-10...
.... (BD/DVD) HDMI 1 COMPONENT VIDEO PR HDMI 2 FM GND AM PB Y VIDEO MONITOR OUT HDMI 3 HDMI 4 FRONT SPEAKERS CENTER SURROUND OPTICAL ( TV ) AV 1 COAXIAL AV 2 COAXIAL (CD) AV 3 OPTICAL AV 4 AV 5 AV 6 AV OUT AUDIO1 AUDIO2 AUDIO OUT SURROUND BACK SUBWOOFER PRE OUT e fg hi j a DOCK terminal For connecting an optional Yamaha iPod universal dock (YDS11) or Bluetooth wireless audio receiver (YBA-10...
Owner's Manual
Page 10
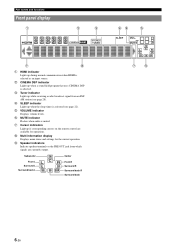
... back R Surround back df e SLEEP VOL. Part names and functions Front panel display a b c STEREO TUNED g h a HDMI indicator Lights up during normal communication when HDMI is selected. e VOLUME indicator Displays volume levels. c Tuner indicator Lights up while receiving a radio broadcast signal from which signals are available for the current operation. h Multi information display Displays...
... back R Surround back df e SLEEP VOL. Part names and functions Front panel display a b c STEREO TUNED g h a HDMI indicator Lights up during normal communication when HDMI is selected. e VOLUME indicator Displays volume levels. c Tuner indicator Lights up while receiving a radio broadcast signal from which signals are available for the current operation. h Multi information display Displays...

Owner's Manual
Page 11
...on the front panel display (see pages 22 and 24). Selects a Yamaha iPod universal dock/ Bluetooth wireless audio receiver connected to the previous screen or ends the menu screen. f POWER ...Yamaha iPod universal dock (see page 44). s Numeric keys Enter numbers. Selects a preset station. Changes tuning frequencies. k SCENE Switches between FM and AM. m OPTION Displays the option menu (see page 22). INTRODUCTION PREPARATION BASIC OPERATION ADVANCED OPERATION Remote control a d g h i j k l n r TRANSMIT CODE SET POWER SOURCE 1 1 5 SLEEP POWER HDMI 2 3 4 AV...
...on the front panel display (see pages 22 and 24). Selects a Yamaha iPod universal dock/ Bluetooth wireless audio receiver connected to the previous screen or ends the menu screen. f POWER ...Yamaha iPod universal dock (see page 44). s Numeric keys Enter numbers. Selects a preset station. Changes tuning frequencies. k SCENE Switches between FM and AM. m OPTION Displays the option menu (see page 22). INTRODUCTION PREPARATION BASIC OPERATION ADVANCED OPERATION Remote control a d g h i j k l n r TRANSMIT CODE SET POWER SOURCE 1 1 5 SLEEP POWER HDMI 2 3 4 AV...

Owner's Manual
Page 12
... • If your speakers Prepare speakers, DVD player, cables, and other components ☞P. 15 • Connecting a Yamaha iPod universal dock or Bluetooth wireless audio receiver ☞P. 16 • Connecting the FM and AM antennas ☞P. 17 Step 4: Turn on the power Connect the... speaker 2 Active subwoofer 1 Speaker cable 5 Subwoofer cable 1 Reproduction component such as DVD player 1 Video monitor such as TV 1 Video cable or HDMI cable 2 Audio cable 2 y • Prepare two speakers (for details on and off ☞P. 17 ☞P. 17 Step 5: Select the input...
... • If your speakers Prepare speakers, DVD player, cables, and other components ☞P. 15 • Connecting a Yamaha iPod universal dock or Bluetooth wireless audio receiver ☞P. 16 • Connecting the FM and AM antennas ☞P. 17 Step 4: Turn on the power Connect the... speaker 2 Active subwoofer 1 Speaker cable 5 Subwoofer cable 1 Reproduction component such as DVD player 1 Video monitor such as TV 1 Video cable or HDMI cable 2 Audio cable 2 y • Prepare two speakers (for details on and off ☞P. 17 ☞P. 17 Step 5: Select the input...

Owner's Manual
Page 15
... back speaker volume with a surround back channel. To obtain the balanced sound during playback, set the speaker output characteristics in advance using the Yamaha Parametric Room Acoustic Optimize (YPAO, see page 18) or "Speaker Setup" of the PRE OUT terminals. For a 6.1-channel system, connect... the external amplifier to the SURROUND BACK L jack of the setup menu (see page 39). ba c DMI 3 HDMI 4 FRONT SPEAKERS CENTER SURROUND Connecting the surround back speakers Connecting an external amplifier to the SURROUND BACK L/R jacks of the PRE OUT terminals allows...
... back speaker volume with a surround back channel. To obtain the balanced sound during playback, set the speaker output characteristics in advance using the Yamaha Parametric Room Acoustic Optimize (YPAO, see page 18) or "Speaker Setup" of the PRE OUT terminals. For a 6.1-channel system, connect... the external amplifier to the SURROUND BACK L jack of the setup menu (see page 39). ba c DMI 3 HDMI 4 FRONT SPEAKERS CENTER SURROUND Connecting the surround back speakers Connecting an external amplifier to the SURROUND BACK L/R jacks of the PRE OUT terminals allows...

Owner's Manual
Page 17
... you are connected, connect both VIDEO jack and COMPONENT VIDEO jack in MONITOR OUT for components that you use a commercially available 19-pin HDMI cable no longer than 5 meters (16 feet) with a COMPONENT VIDEO output signal are connecting. ■ Audio jacks ■ Video...for digital audio signals. y • We recommend that include luminance (Y), chrominance blue (PB) and chrominance red (PR) components. Use HDMI cables. ADVANCED OPERATION ADDITIONAL INFORMATION APPENDIX English 13 En Use jacks and cables appropriate for the same kind of signal as the input signal....
... you are connected, connect both VIDEO jack and COMPONENT VIDEO jack in MONITOR OUT for components that you use a commercially available 19-pin HDMI cable no longer than 5 meters (16 feet) with a COMPONENT VIDEO output signal are connecting. ■ Audio jacks ■ Video...for digital audio signals. y • We recommend that include luminance (Y), chrominance blue (PB) and chrominance red (PR) components. Use HDMI cables. ADVANCED OPERATION ADDITIONAL INFORMATION APPENDIX English 13 En Use jacks and cables appropriate for the same kind of signal as the input signal....

Owner's Manual
Page 18
...Y VIDEO MONITOR OUT ■ To connect an HDMI video monitor Jacks on components a HDMI input Jacks on this unit HDMI OUT y • This unit supports the HDMI control function. FM GND AM O OPTICAL ( TV ) AV 1 COAXIAL AV 2 COAXIAL (CD) AV 3 OPTICAL AV 4 AV 5 AV 6 AV OUT AUDIO1 14 En Connections Connecting a TV monitor... input terminal are output from this unit, make sure that supports the HDMI control, operations of this unit. Connecting to the AV input 1 allows you to switch an input source to the AV input 1 with the remote control of the TV. TV, or projector...
...Y VIDEO MONITOR OUT ■ To connect an HDMI video monitor Jacks on components a HDMI input Jacks on this unit HDMI OUT y • This unit supports the HDMI control function. FM GND AM O OPTICAL ( TV ) AV 1 COAXIAL AV 2 COAXIAL (CD) AV 3 OPTICAL AV 4 AV 5 AV 6 AV OUT AUDIO1 14 En Connections Connecting a TV monitor... input terminal are output from this unit, make sure that supports the HDMI control, operations of this unit. Connecting to the AV input 1 allows you to switch an input source to the AV input 1 with the remote control of the TV. TV, or projector...

Owner's Manual
Page 19
... OPERATION ADVANCED OPERATION ADDITIONAL INFORMATION DOCK COMPONENT VIDEO PR PB Y VIDEO HDMI OUT ANTENNA UNBAL. (BD/DVD) HDMI 1 COMPONENT VIDEO PR HDMI 2 FM GND AM PB Y VIDEO MONITOR OUT HDMI 3 HDMI 4 FRONT OPTICAL ( TV ) AV 1 COAXIAL AV 2 COAXIAL (CD) AV 3 OPTICAL AV 4 AV 5 AV 6 AV OUT AUDIO1 AUDIO2 AUDIO OUT HDMI input (HDMI 1-4) CE Audio output (AUDIO OUT) Audio input (AUDIO 1-2) ■ Audio and...
... OPERATION ADVANCED OPERATION ADDITIONAL INFORMATION DOCK COMPONENT VIDEO PR PB Y VIDEO HDMI OUT ANTENNA UNBAL. (BD/DVD) HDMI 1 COMPONENT VIDEO PR HDMI 2 FM GND AM PB Y VIDEO MONITOR OUT HDMI 3 HDMI 4 FRONT OPTICAL ( TV ) AV 1 COAXIAL AV 2 COAXIAL (CD) AV 3 OPTICAL AV 4 AV 5 AV 6 AV OUT AUDIO1 AUDIO2 AUDIO OUT HDMI input (HDMI 1-4) CE Audio output (AUDIO OUT) Audio input (AUDIO 1-2) ■ Audio and...
Owner's Manual
Page 20
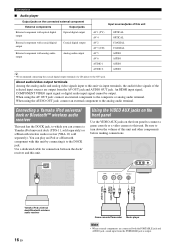
... universal dock/Bluetooth wireless audio receiver 16 En Game console/Camcorder Music player Note • When external components are output from the PORTABLE jack is output. DOCK COMPONENT VIDEO PR PB Y VIDEO HDMI OUT ANTENNA UNBAL. An HDMI input signal, COMPONENT VIDEO input ...output AV 2 AV 3 (CD) COAXIAL COAXIAL External component with this unit. Connections ■ Audio player Output jacks on the front panel to connect a game console or a video camera to the analog audio terminal. Connecting a Yamaha iPod universal dock or Bluetooth™ wireless audio receiver ...
... universal dock/Bluetooth wireless audio receiver 16 En Game console/Camcorder Music player Note • When external components are output from the PORTABLE jack is output. DOCK COMPONENT VIDEO PR PB Y VIDEO HDMI OUT ANTENNA UNBAL. An HDMI input signal, COMPONENT VIDEO input ...output AV 2 AV 3 (CD) COAXIAL COAXIAL External component with this unit. Connections ■ Audio player Output jacks on the front panel to connect a game console or a video camera to the analog audio terminal. Connecting a Yamaha iPod universal dock or Bluetooth™ wireless audio receiver ...

Owner's Manual
Page 21
...of electricity even in the moist ground. AM loop antenna DOCK COMPONENT VIDEO PR PB Y VIDEO HDMI OUT ANTENNA UNBAL. (BD/DVD) HDMI 1 COMPONENT VIDEO PR HDMI 2 FM GND AM PB Y VIDEO MONITOR OUT HDMI 3 F Ground (GND terminal) The GND terminal is connected. Press and hold Insert Release ...obtain good reception. • Position the AM loop antenna away from the AC wall outlet. For more details, consult the nearest authorized Yamaha dealer or service center. • Always use the AM loop antenna even when the outdoor antenna is not for earth grounding. Connecting ...
...of electricity even in the moist ground. AM loop antenna DOCK COMPONENT VIDEO PR PB Y VIDEO HDMI OUT ANTENNA UNBAL. (BD/DVD) HDMI 1 COMPONENT VIDEO PR HDMI 2 FM GND AM PB Y VIDEO MONITOR OUT HDMI 3 F Ground (GND terminal) The GND terminal is connected. Press and hold Insert Release ...obtain good reception. • Position the AM loop antenna away from the AC wall outlet. For more details, consult the nearest authorized Yamaha dealer or service center. • Always use the AM loop antenna even when the outdoor antenna is not for earth grounding. Connecting ...

Owner's Manual
Page 25
... unit, see page 30) 4 Turn the PVOLUME control to adjust the volume (or press oVOLUME +/-). Input source Sound field program BD/DVD TV CD RADIO HDMI 1 AV 1 AV 3 TUNER Straight Straight Straight 7ch Enhancer y • When this unit by digital connection and play back a DTS-CD, noise may be registered to scene selections...
... unit, see page 30) 4 Turn the PVOLUME control to adjust the volume (or press oVOLUME +/-). Input source Sound field program BD/DVD TV CD RADIO HDMI 1 AV 1 AV 3 TUNER Straight Straight Straight 7ch Enhancer y • When this unit by digital connection and play back a DTS-CD, noise may be registered to scene selections...

Owner's Manual
Page 27
... display can be displayed according to display an error message. 4 To end the information display, press mOPTION. Dolby D Note • If an HDMI related error occurs, when an HDMI related error has occurred, press nCursor to the input source. HDMI1-4: Input, DSP Program, Audio Decoder AV1-6: Input, DSP Program, Audio Decoder AUDIO1...
... display can be displayed according to display an error message. 4 To end the information display, press mOPTION. Dolby D Note • If an HDMI related error occurs, when an HDMI related error has occurred, press nCursor to the input source. HDMI1-4: Input, DSP Program, Audio Decoder AV1-6: Input, DSP Program, Audio Decoder AUDIO1...
Owner's Manual
Page 38
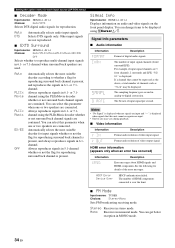
.... You can get better reception in analog-to whether a flag for reproducing surround back channel is displayed. The number of HDMI components connected is present, and always reproduces signals in 6.1- Auto DTS Automatically selects audio input signals. Other input signals are ...PLIIx Movie PLIIx Music EX/ES Off Automatically selects the most suitable decoder for input signals whether or not the flag for reproduction. Mono Receives in 6.1- Setting the option menu for each input source (OPTION menu) ■ Decoder Mode Input source: HDMI1-4, AV1-4 Choices: ...
.... You can get better reception in analog-to whether a flag for reproducing surround back channel is displayed. The number of HDMI components connected is present, and always reproduces signals in 6.1- Auto DTS Automatically selects audio input signals. Other input signals are ...PLIIx Movie PLIIx Music EX/ES Off Automatically selects the most suitable decoder for input signals whether or not the flag for reproduction. Mono Receives in 6.1- Setting the option menu for each input source (OPTION menu) ■ Decoder Mode Input source: HDMI1-4, AV1-4 Choices: ...

Owner's Manual
Page 42
... Input Rename DSP Parameter Memory Guard Function Sets items for the sound field programs. Protects some settings against accidental alteration. Set items for HDMI and display. Selects an equalizer that the volume will not be displayed on . Sets on the front panel display. Adjust the dynamic range... (difference between video signals input from the HDMI IN jack. For details, read "Basic operation of the front panel display. Set various items for the front panel display. Sets brightness...
... Input Rename DSP Parameter Memory Guard Function Sets items for the sound field programs. Protects some settings against accidental alteration. Set items for HDMI and display. Selects an equalizer that the volume will not be displayed on . Sets on the front panel display. Adjust the dynamic range... (difference between video signals input from the HDMI IN jack. For details, read "Basic operation of the front panel display. Set various items for the front panel display. Sets brightness...

Owner's Manual
Page 43
... setting, press lSETUP. The setup menu screen appears. 2 Select a menu using gInput selection keys. For example, the following screen appears when you select "Function Setup." 1 HDMI y • You can set using nCursor k / n, and change other channels. Speaker Setup You can return to set various items for manual adjustment. For details on...
... setting, press lSETUP. The setup menu screen appears. 2 Select a menu using gInput selection keys. For example, the following screen appears when you select "Function Setup." 1 HDMI y • You can set using nCursor k / n, and change other channels. Speaker Setup You can return to set various items for manual adjustment. For details on...

Owner's Manual
Page 45
... the volume to be displayed depending on the oscillator, select "On" using a graphic equalizer. L/Sur. EQ Select Choices: PEQ/GEQ*/Off Select an equalizer type. HDMI Auto Choices: Off*/On Automatically adjusts output timing of the external amplifier. ■ D)Equalizer Adjusts sound quality and tone using a parametric graphic equalizer. ADDITIONAL INFORMATION...
... the volume to be displayed depending on the oscillator, select "On" using a graphic equalizer. L/Sur. EQ Select Choices: PEQ/GEQ*/Off Select an equalizer type. HDMI Auto Choices: Off*/On Automatically adjusts output timing of the external amplifier. ■ D)Equalizer Adjusts sound quality and tone using a parametric graphic equalizer. ADDITIONAL INFORMATION...


