
Owner's Manual
Page 10
...+ 140 W Center: 140 W Surround: 140 W + 140 W Surround back: 140 W + 140 W Front presence: 50 W + 50 W Rear presence: 50 W + 50 W Sound field programs ☞ P. 58 ◆ Proprietary Yamaha technology for the creation of sound fields ◆ THX Ultra2 Plus surround modes ☞ P. 87 ◆ CINEMA... main zone and Zone 2/Zone 3/ Zone 4 using a Web browser ☞ P. 120 Automatic speaker setup features ◆ Advanced YPAO (Yamaha Parametric Room Acoustic Optimizer) for automatic speaker setup ☞ P. 46 ◆ Specialized parametric equalizer for the standing wave reduction ☞ P....
...+ 140 W Center: 140 W Surround: 140 W + 140 W Surround back: 140 W + 140 W Front presence: 50 W + 50 W Rear presence: 50 W + 50 W Sound field programs ☞ P. 58 ◆ Proprietary Yamaha technology for the creation of sound fields ◆ THX Ultra2 Plus surround modes ☞ P. 87 ◆ CINEMA... main zone and Zone 2/Zone 3/ Zone 4 using a Web browser ☞ P. 120 Automatic speaker setup features ◆ Advanced YPAO (Yamaha Parametric Room Acoustic Optimizer) for automatic speaker setup ☞ P. 46 ◆ Specialized parametric equalizer for the standing wave reduction ☞ P....
Owner's Manual
Page 13
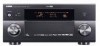
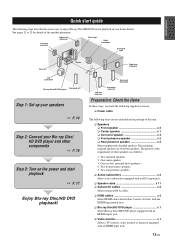
.../HD DVD movie playback in the package of this unit. ❏ Speakers ❏ Front speaker x 2 ❏ Center speaker x 1 ❏ Surround speaker x 4 ❏ Front presence speaker x 2 ❏ Rear presence speaker x 2 Select magnetically shielded speakers. Two surround speakers 2. Two rear presence speakers ❏ Active subwoofers x 2 Select active subwoofers equipped with an RCA input jack. ❏ Speaker cable x 11 ❏ Subwoofer cables x 2 Select monaural RCA cables. ❏ HDMI...
.../HD DVD movie playback in the package of this unit. ❏ Speakers ❏ Front speaker x 2 ❏ Center speaker x 1 ❏ Surround speaker x 4 ❏ Front presence speaker x 2 ❏ Rear presence speaker x 2 Select magnetically shielded speakers. Two surround speakers 2. Two rear presence speakers ❏ Active subwoofers x 2 Select active subwoofers equipped with an RCA input jack. ❏ Speaker cable x 11 ❏ Subwoofer cables x 2 Select monaural RCA cables. ❏ HDMI...

Owner's Manual
Page 14
Right front presence speaker Right rear presence speaker Loosen Insert Tighten Surround right speaker Surround back right speaker Front right speaker Center speaker For other speaker configurations If you want to prevent short circuits. 3 Do not let the bare speaker wires touch each other. 4 Do not let the bare speaker wires touch any metal part of this unit and the subwoofers are unplugged...
Right front presence speaker Right rear presence speaker Loosen Insert Tighten Surround right speaker Surround back right speaker Front right speaker Center speaker For other speaker configurations If you want to prevent short circuits. 3 Do not let the bare speaker wires touch each other. 4 Do not let the bare speaker wires touch any metal part of this unit and the subwoofers are unplugged...

Owner's Manual
Page 15
Note Check the impedance of "SPEAKER IMP." Surround left speaker Surround back left speaker Front left channel (L), right channel (R), "+" (red line) and "-" (white line) properly. If the impedance of your speaker is 6-ohm, change the setting of the speaker you are connecting. in "Advanced setup" (see page 142). model) Quick start guide Left rear Left front presence speaker presence speaker Be sure to connect the left speaker 15 En Introduction 0 10 Subwoofer cable Left subwoofer 0 10 Right subwoofer Subwoofer cable (U.S.A.
Note Check the impedance of "SPEAKER IMP." Surround left speaker Surround back left speaker Front left channel (L), right channel (R), "+" (red line) and "-" (white line) properly. If the impedance of your speaker is 6-ohm, change the setting of the speaker you are connecting. in "Advanced setup" (see page 142). model) Quick start guide Left rear Left front presence speaker presence speaker Be sure to connect the left speaker 15 En Introduction 0 10 Subwoofer cable Left subwoofer 0 10 Right subwoofer Subwoofer cable (U.S.A.

Owner's Manual
Page 19
Preparation Preparation Connections 20 Rear panel ...20 Placing speakers ...21 Connecting speakers ...23 Using subwoofers ...26 Using presence speakers ...27 Connecting the speaker cable 28 Information on jacks and cable plugs 29 Information on HDMI™ ...29 Audio and video signal flow 30 Connecting a...40 Connecting the FM and AM antennas 41 Connecting the power cable 42 Setting the speaker impedance and language 43 Turning this unit on and off 43 Front panel display ...44 Optimizing the speaker setting for your listening room (YPAO) ...46 Before starting the automatic setup 46 ...
Preparation Preparation Connections 20 Rear panel ...20 Placing speakers ...21 Connecting speakers ...23 Using subwoofers ...26 Using presence speakers ...27 Connecting the speaker cable 28 Information on jacks and cable plugs 29 Information on HDMI™ ...29 Audio and video signal flow 30 Connecting a...40 Connecting the FM and AM antennas 41 Connecting the power cable 42 Setting the speaker impedance and language 43 Turning this unit on and off 43 Front panel display ...44 Optimizing the speaker setting for your listening room (YPAO) ...46 Before starting the automatic setup 46 ...

Owner's Manual
Page 20
... jacks 0 COMPONENT VIDEO MONITOR OUT jacks A ANTENNA terminals (For HD radio, U.S.A. Connections Connections Rear panel 1 23 4 5 6 7 8 SPEAKERS + R REAR PRESENCE /ZONE FRONT PRESENCE /ZONE SURROUND SUR. BACK FRONT PRESENCE REAR PRESENCE CD MULTI CH INPUT ZONE OUT PRE OUT GND 5 AC OUTLETS SWITCHED BD/ HD DVD 6... DVD 7 AC IN DTV 8 COAXIAL DIGITAL IN ANTENNA-2 GND AM FM SPEAKERS + L REAR PRESENCE /ZONE FRONT PRESENCE /ZONE SURROUND (SINGLE) SUR. BACK/ BI-AMP B FRONT B/ ZONE EXTRA SP A FRONT A CENTER USB NETWORK HDMI...
... jacks 0 COMPONENT VIDEO MONITOR OUT jacks A ANTENNA terminals (For HD radio, U.S.A. Connections Connections Rear panel 1 23 4 5 6 7 8 SPEAKERS + R REAR PRESENCE /ZONE FRONT PRESENCE /ZONE SURROUND SUR. BACK FRONT PRESENCE REAR PRESENCE CD MULTI CH INPUT ZONE OUT PRE OUT GND 5 AC OUTLETS SWITCHED BD/ HD DVD 6... DVD 7 AC IN DTV 8 COAXIAL DIGITAL IN ANTENNA-2 GND AM FM SPEAKERS + L REAR PRESENCE /ZONE FRONT PRESENCE /ZONE SURROUND (SINGLE) SUR. BACK/ BI-AMP B FRONT B/ ZONE EXTRA SP A FRONT A CENTER USB NETWORK HDMI...

Owner's Manual
Page 21
... of the video monitor should be the same. Preparation Connections Placing speakers The speaker layout below . Surround left and right speakers The front speakers are used for details. Using di-pole speakers It is for effect and surround sounds. Front and rear presence left and right channels for the accurate playback with sound field programs. See page...
... of the video monitor should be the same. Preparation Connections Placing speakers The speaker layout below . Surround left and right speakers The front speakers are used for details. Using di-pole speakers It is for effect and surround sounds. Front and rear presence left and right channels for the accurate playback with sound field programs. See page...

Owner's Manual
Page 23
.... Preparation Connections Connecting speakers Be sure to connect the left speaker speaker 23 En This could damage this unit for the Zone 2, Zone 3, and/or Zone 4 speakers (see page 143). ■ For the 11.2/11.1 (or 9.2/9.1) -channel speaker setting Right front presence speaker Right rear presence speaker Left rear presence speaker Left front presence speaker SPEAKERS + R REAR PRESENCE /ZONE FRONT PRESENCE /ZONE SURROUND SUR. model) SPEAKERS + L REAR PRESENCE /ZONE FRONT PRESENCE /ZONE SURROUND...
.... Preparation Connections Connecting speakers Be sure to connect the left speaker speaker 23 En This could damage this unit for the Zone 2, Zone 3, and/or Zone 4 speakers (see page 143). ■ For the 11.2/11.1 (or 9.2/9.1) -channel speaker setting Right front presence speaker Right rear presence speaker Left rear presence speaker Left front presence speaker SPEAKERS + R REAR PRESENCE /ZONE FRONT PRESENCE /ZONE SURROUND SUR. model) SPEAKERS + L REAR PRESENCE /ZONE FRONT PRESENCE /ZONE SURROUND...

Owner's Manual
Page 27
... left SBR: Surround back right RPL: Rear presence left SL RPR: Rear presence right * * Place the rear presence left and right speakers so that the distance between the rear presence left and right speakers. 27 En Note If "Front Presence" is same as the distance between front presence left and right speakers is set to "None", the rear presence speakers also do not function and you...
... left SBR: Surround back right RPL: Rear presence left SL RPR: Rear presence right * * Place the rear presence left and right speakers so that the distance between the rear presence left and right speakers. 27 En Note If "Front Presence" is same as the distance between front presence left and right speakers is set to "None", the rear presence speakers also do not function and you...

Owner's Manual
Page 36
... PRE OUT jack outputs the same channel signals as the corresponding SPEAKERS terminals. When "PREAMP MODE" is reduced. 12 3456 (FRONT) (SINGLE) L R FRONT SURROUND CENTER (REAR) SUBWOOFER SUR. BACK PRE OUT FRONT PRESENCE REAR PRESENCE 7 PRE OUT jack 1 FRONT 2 SURROUND 3 SUBWOOFER 4 SUR.BACK 5 FRONT PRESENCE 6 REAR PRESENCE 7 CENTER Output audio channel Front left/right Surround left/right Subwoofer...
... PRE OUT jack outputs the same channel signals as the corresponding SPEAKERS terminals. When "PREAMP MODE" is reduced. 12 3456 (FRONT) (SINGLE) L R FRONT SURROUND CENTER (REAR) SUBWOOFER SUR. BACK PRE OUT FRONT PRESENCE REAR PRESENCE 7 PRE OUT jack 1 FRONT 2 SURROUND 3 SUBWOOFER 4 SUR.BACK 5 FRONT PRESENCE 6 REAR PRESENCE 7 CENTER Output audio channel Front left/right Surround left/right Subwoofer...

Owner's Manual
Page 45
H PRE AMP indicator Lights up when this unit is in the "Speaker Level" (see page 143). Presence speaker indicators Light up according to setting for "Front Presence" and "Rear Presence" (see page 100) in "Speaker Set" when this unit is tuned into the HD Radio reception band. y You can be stored ...is in the auto setup procedure (see page 46) or the speaker level setting procedure in the pre-amplifier mode (see page 102). E VIRTUAL indicator Lights up when this unit is receiving a strong signal for "Front Presence", "Rear Presence" (see page 100), and "Surround Back" (see page 100)...
H PRE AMP indicator Lights up when this unit is in the "Speaker Level" (see page 143). Presence speaker indicators Light up according to setting for "Front Presence" and "Rear Presence" (see page 100) in "Speaker Set" when this unit is tuned into the HD Radio reception band. y You can be stored ...is in the auto setup procedure (see page 46) or the speaker level setting procedure in the pre-amplifier mode (see page 102). E VIRTUAL indicator Lights up when this unit is receiving a strong signal for "Front Presence", "Rear Presence" (see page 100), and "Surround Back" (see page 100)...

Owner's Manual
Page 50
... 3 minutes to make fine adjustments of this page. Choices: Natural, Flat, Front - Refer to the steps 1 and 2 of the connected speaker is reversed. - "NRM" appears when the polarity of the front speakers, surround speakers, front presence speakers and rear presence speakers at the measured point. Using advanced automatic setup You can use the parametric equalizer. "---" appears when no...
... 3 minutes to make fine adjustments of this page. Choices: Natural, Flat, Front - Refer to the steps 1 and 2 of the connected speaker is reversed. - "NRM" appears when the polarity of the front speakers, surround speakers, front presence speakers and rear presence speakers at the measured point. Using advanced automatic setup You can use the parametric equalizer. "---" appears when no...

Owner's Manual
Page 65
... panel display automatically turns off . Adjusting the speaker level You can also select the speaker by using GUI menu. R Surround right speaker SB L Surround back left speaker SB R Surround back right speaker SWFR L Subwoofer left SWFR R Subwoofer right FP L Front presence left speaker FP R Front presence right speaker RP L Rear presence left speaker RP R Rear presence right speaker y Once you can adjust the output level...
... panel display automatically turns off . Adjusting the speaker level You can also select the speaker by using GUI menu. R Surround right speaker SB L Surround back left speaker SB R Surround back right speaker SWFR L Subwoofer left SWFR R Subwoofer right FP L Front presence left speaker FP R Front presence right speaker RP L Rear presence left speaker RP R Rear presence right speaker y Once you can adjust the output level...

Owner's Manual
Page 88
THX Loudness Plus Front Center Surround Surround Back Front Presence Rear Presence Subwoofer Speaker Distance Speaker Level Configuration Phase Bass Out 88 En and Canada models only) TUNER MULTI CH PHONO CD CD-R MD/TAPE BD/HD DVD DVD DTV CBL/... Message On Screen Position Wall Paper Test Tone THX Set Speaker Set Speakers Headphones Speakers Headphones Control Bass Treble Auto Bypass HDMI Auto Auto Manual THX Ultra2 SWFR Bndry Gain Comp SB Speaker Dist. Graphical user interface (GUI) menu Graphical user interface (GUI) menu RX-Z11 GUI menu tree Stereo/Surround ☞ P. 91 Input Select &#...
THX Loudness Plus Front Center Surround Surround Back Front Presence Rear Presence Subwoofer Speaker Distance Speaker Level Configuration Phase Bass Out 88 En and Canada models only) TUNER MULTI CH PHONO CD CD-R MD/TAPE BD/HD DVD DVD DTV CBL/... Message On Screen Position Wall Paper Test Tone THX Set Speaker Set Speakers Headphones Speakers Headphones Control Bass Treble Auto Bypass HDMI Auto Auto Manual THX Ultra2 SWFR Bndry Gain Comp SB Speaker Dist. Graphical user interface (GUI) menu Graphical user interface (GUI) menu RX-Z11 GUI menu tree Stereo/Surround ☞ P. 91 Input Select &#...

Owner's Manual
Page 100
... will be sent to the subwoofers or to the speakers set to select the configuration of the listening room. None Select this setting when you use the rear presence speakers. Rear Presence (Rear presence speakers) Use this unit. Choice Descriptions Yes None Select this... setting when you want to use the surround back speakers. Choice Descriptions Front & Rear Stereo Select this setting when you place ...
... will be sent to the subwoofers or to the speakers set to select the configuration of the listening room. None Select this setting when you use the rear presence speakers. Rear Presence (Rear presence speakers) Use this unit. Choice Descriptions Yes None Select this... setting when you want to use the surround back speakers. Choice Descriptions Front & Rear Stereo Select this setting when you place ...

Owner's Manual
Page 101
... setting: 3.00 m (10.0 ft) Control step: 0.05 m (0.2 ft) Speaker Distance Adjusted speaker Front L Front left speaker Front R Front right speaker Center Center speaker Surround L Surround left speaker Surround R Surround right speaker Surround Back L Surround back left speaker Surround Back R Surround back right speaker Front Presence L Front presence left speaker Front Presence R Front presence right speaker Rear Presence L Rear presence left speaker Rear Presence R Rear presence right speaker Subwoofer L Subwoofer left (or front) subwoofer to the...
... setting: 3.00 m (10.0 ft) Control step: 0.05 m (0.2 ft) Speaker Distance Adjusted speaker Front L Front left speaker Front R Front right speaker Center Center speaker Surround L Surround left speaker Surround R Surround right speaker Surround Back L Surround back left speaker Surround Back R Surround back right speaker Front Presence L Front presence left speaker Front Presence R Front presence right speaker Rear Presence L Rear presence left speaker Rear Presence R Rear presence right speaker Subwoofer L Subwoofer left (or front) subwoofer to the...

Owner's Manual
Page 102
... setting: 0.0 dB Control step: 0.5 dB Speaker Level Adjusted speaker Front L Front left speaker Front R Front right speaker Center Center speaker Surround L Surround left speaker Surround R Surround right speaker Surround Back L Surround back left speaker Surround Back R Surround back right speaker Front Presence L Front presence left speaker Front Presence R Front presence right speaker Rear Presence L Rear presence left speaker Rear Presence R Rear presence right speaker Subwoofer L Subwoofer left speakers and each speaker to 75 dB. Notes • The...
... setting: 0.0 dB Control step: 0.5 dB Speaker Level Adjusted speaker Front L Front left speaker Front R Front right speaker Center Center speaker Surround L Surround left speaker Surround R Surround right speaker Surround Back L Surround back left speaker Surround Back R Surround back right speaker Front Presence L Front presence left speaker Front Presence R Front presence right speaker Rear Presence L Rear presence left speaker Rear Presence R Rear presence right speaker Subwoofer L Subwoofer left speakers and each speaker to 75 dB. Notes • The...

Owner's Manual
Page 139
... exit the GUI menu. S.BACK R.PRNS Zone indications M: Main zone 2: Zone 2 3: Zone 3 4: Zone 4 Speaker terminal indications F.PRNS: FRONT PRESENCE speaker terminals EXTRA: EXTRA SP speaker terminals FRONT: FRONT A speaker terminals CENTER: CENTER speaker terminals SUR.: SURROUND speaker terminals S.BACK: SUR.BACK speaker terminals R.PRNS: REAR PRESENCE speaker terminals PREAMP MODE When "PREAMP MODE" in the front panel display. The top GUI...
... exit the GUI menu. S.BACK R.PRNS Zone indications M: Main zone 2: Zone 2 3: Zone 3 4: Zone 4 Speaker terminal indications F.PRNS: FRONT PRESENCE speaker terminals EXTRA: EXTRA SP speaker terminals FRONT: FRONT A speaker terminals CENTER: CENTER speaker terminals SUR.: SURROUND speaker terminals S.BACK: SUR.BACK speaker terminals R.PRNS: REAR PRESENCE speaker terminals PREAMP MODE When "PREAMP MODE" in the front panel display. The top GUI...

Owner's Manual
Page 153
Only right surround back channel signal is skipped. An internal error occurred. Check the rear presence speaker connections. Run "Auto Setup" again. "Wiring" check procedure is detected. See page 23 - - 23 - 46 99 ... speaker connections. A front presence channel signal is too loud. Surround back speakers are connected, though surround L/R speakers are not detected. Remedy Check the front L/R speaker connections. Readjust the speaker installation so that all speakers are correct. • If error "E10" occurs repeatedly, please contact a qualified Yamaha service...
Only right surround back channel signal is skipped. An internal error occurred. Check the rear presence speaker connections. Run "Auto Setup" again. "Wiring" check procedure is detected. See page 23 - - 23 - 46 99 ... speaker connections. A front presence channel signal is too loud. Surround back speakers are connected, though surround L/R speakers are not detected. Remedy Check the front L/R speaker connections. Readjust the speaker installation so that all speakers are correct. • If error "E10" occurs repeatedly, please contact a qualified Yamaha service...

Owner's Manual
Page 171
... operations 129 Projector connection 31 PURE DIRECT 65 Pure Direct 106 Pure Direct 106 ■Q Quick automatic setup 47 ■R Rear panel 20 Rear Presence 100 Rear Presence L Level 94 Rear Presence R Level 94 Rear presence speakers 27, 100 Rear USB port connection 40 Recital/Opera 61 RECOUT indicator, Front panel display ......... 44 REMOTE CON AMP 143 Remote control code default...
... operations 129 Projector connection 31 PURE DIRECT 65 Pure Direct 106 Pure Direct 106 ■Q Quick automatic setup 47 ■R Rear panel 20 Rear Presence 100 Rear Presence L Level 94 Rear Presence R Level 94 Rear presence speakers 27, 100 Rear USB port connection 40 Recital/Opera 61 RECOUT indicator, Front panel display ......... 44 REMOTE CON AMP 143 Remote control code default...


