Owner's Manual
Page 5
... 5 OPTION MENU 96 Remote control features 100 Controlling this unit, a TV, or other components.......... 100 Setting remote control codes 102 Using multi-zone configuration 103 Connecting Zone 2 103 Controlling Zone 2 104 Advanced setup 106 Using the advanced setup 106 ADDITIONAL INFORMATION Troubleshooting 110 Resetting the system 119 Glossary 120 Sound field program information...
... 5 OPTION MENU 96 Remote control features 100 Controlling this unit, a TV, or other components.......... 100 Setting remote control codes 102 Using multi-zone configuration 103 Connecting Zone 2 103 Controlling Zone 2 104 Advanced setup 106 Using the advanced setup 106 ADDITIONAL INFORMATION Troubleshooting 110 Resetting the system 119 Glossary 120 Sound field program information...

Owner's Manual
Page 6
... ◆ SCENE templates for customizing capability ◆ Controlling Yamaha SCENE control signal support component (some models only) working with preset remote control codes capability ◆ Zone 2 custom installation facility ◆ Bi-amplification connection capability ◆ Sleep timer Supplied accessories Check that allow you received all sources ◆ Adaptive dynamic range controlling capability ◆...
... ◆ SCENE templates for customizing capability ◆ Controlling Yamaha SCENE control signal support component (some models only) working with preset remote control codes capability ◆ Zone 2 custom installation facility ◆ Bi-amplification connection capability ◆ Sleep timer Supplied accessories Check that allow you received all sources ◆ Adaptive dynamic range controlling capability ◆...
Owner's Manual
Page 10
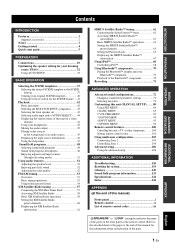
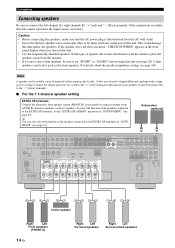
...let the bare speaker wires touch each other. 4 Do not let the bare speaker wires touch any metal part of this unit. Subwoofer AV receiver PRE OUSTINGLE CENTER DOCK VIDE RROUND SUR. Cables are unplugged from the AC wall outlets. 2 Twist the exposed wires of the speaker cables ...together to each speaker. BACK 1 2 SUBWOOFER SIRIUS XM ANTENNA AM GND DVD DTV/CBL 1 2 OPTICAL DIGITAL INPUT FRONT B/ZONE B/ ZONE 2/PRESENCE R EXTRA SP L CD DVD 3 4 COAXIAL FRONT A R L FM 75Ω UNBAL. TOTAL 0.8A MAX. Connect the striped (grooved, etc.) cable ...
...let the bare speaker wires touch each other. 4 Do not let the bare speaker wires touch any metal part of this unit. Subwoofer AV receiver PRE OUSTINGLE CENTER DOCK VIDE RROUND SUR. Cables are unplugged from the AC wall outlets. 2 Twist the exposed wires of the speaker cables ...together to each speaker. BACK 1 2 SUBWOOFER SIRIUS XM ANTENNA AM GND DVD DTV/CBL 1 2 OPTICAL DIGITAL INPUT FRONT B/ZONE B/ ZONE 2/PRESENCE R EXTRA SP L CD DVD 3 4 COAXIAL FRONT A R L FM 75Ω UNBAL. TOTAL 0.8A MAX. Connect the striped (grooved, etc.) cable ...
Owner's Manual
Page 11
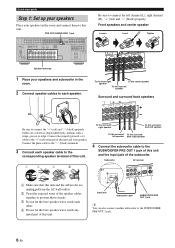
... Connecting an external amplifier ☞ P. 24 • Connecting a DVD player via analog multi-channel audio connection ☞ P. 25 • Connecting a Yamaha iPod universal dock or Bluetooth adapter ☞ P. 25 • Using the REMOTE IN/OUT jacks ☞ P. 26 • Using the VIDEO AUX ... AM GND DVD DTV/CBL 1 2 OPTICAL DIGITAL INPUT FRONT B/ZONE B/ ZONE 2/PRESENCE R EXTRA SP L CD DVD 3 4 COAXIAL FRONT A R L FM 75Ω UNBAL. REMOTE TRIGGER OUT +12V IN OUT 15mA MAX. Video monitor AV receiver Video input jack VIDEO IN DVD PB OUT IN OUT VCR DVR...
... Connecting an external amplifier ☞ P. 24 • Connecting a DVD player via analog multi-channel audio connection ☞ P. 25 • Connecting a Yamaha iPod universal dock or Bluetooth adapter ☞ P. 25 • Using the REMOTE IN/OUT jacks ☞ P. 26 • Using the VIDEO AUX ... AM GND DVD DTV/CBL 1 2 OPTICAL DIGITAL INPUT FRONT B/ZONE B/ ZONE 2/PRESENCE R EXTRA SP L CD DVD 3 4 COAXIAL FRONT A R L FM 75Ω UNBAL. REMOTE TRIGGER OUT +12V IN OUT 15mA MAX. Video monitor AV receiver Video input jack VIDEO IN DVD PB OUT IN OUT VCR DVR...

Owner's Manual
Page 13
... control ☞ P. 100 • Adjusting the advanced parameters ☞ P. 106 ■ Additional feature • Automatically turning off this unit to the standby mode. Press KMAIN ZONE ON/OFF to set to the standby mode and consumes a small amount of power in order to do with this unit ☞ P. 68 • Using... English 9 En To turn on this unit... INTRODUCTION ■ After using this unit from the remote control. Quick start guide What do you want to receive infrared signals from the standby mode, press the desired SSCENE buttons (or 6SCENE) or KMAIN...
... control ☞ P. 100 • Adjusting the advanced parameters ☞ P. 106 ■ Additional feature • Automatically turning off this unit to the standby mode. Press KMAIN ZONE ON/OFF to set to the standby mode and consumes a small amount of power in order to do with this unit ☞ P. 68 • Using... English 9 En To turn on this unit... INTRODUCTION ■ After using this unit from the remote control. Quick start guide What do you want to receive infrared signals from the standby mode, press the desired SSCENE buttons (or 6SCENE) or KMAIN...

Owner's Manual
Page 14
.... TOTAL C DVR 8 9 0 Name 1 XM jack (U.S.A. and Canada models only) SIRIUS jack (U.S.A. BACK 1 2 SUBWOOFER SIRIUS XM ANTENNA AM GND DVD DTV/CBL 1 2 OPTICAL DIGITAL INPUT FRONT B/ZONE B/ ZONE 2/PRESENCE R EXTRA SP L CD DVD 3 4 COAXIAL FRONT A R L FM 75Ω UNBAL. REMOTE TRIGGER OUT +12V IN OUT 15mA MAX. and Canada models only) 2 AUDIO jacks... PRE OUT SINGLE CENTER R IN MD/ OUT CD (PLAY) CD-R (REC) DVD DTV/CBL IN OUT DVR IN OUT VCR SUB SB (8CH) SURROUND WOOFER ZONE 2 HDMI OUT FRONT SURROUND SUR. TOTAL 0.8A MAX.
.... TOTAL C DVR 8 9 0 Name 1 XM jack (U.S.A. and Canada models only) SIRIUS jack (U.S.A. BACK 1 2 SUBWOOFER SIRIUS XM ANTENNA AM GND DVD DTV/CBL 1 2 OPTICAL DIGITAL INPUT FRONT B/ZONE B/ ZONE 2/PRESENCE R EXTRA SP L CD DVD 3 4 COAXIAL FRONT A R L FM 75Ω UNBAL. REMOTE TRIGGER OUT +12V IN OUT 15mA MAX. and Canada models only) 2 AUDIO jacks... PRE OUT SINGLE CENTER R IN MD/ OUT CD (PLAY) CD-R (REC) DVD DTV/CBL IN OUT DVR IN OUT VCR SUB SB (8CH) SURROUND WOOFER ZONE 2 HDMI OUT FRONT SURROUND SUR. TOTAL 0.8A MAX.
Owner's Manual
Page 18
... OUT FRONT SURROUND SUR. BACK 1 2 SUBWOOFER SIRIUS XM ANTENNA AM GND DVD DTV/CBL 1 2 OPTICAL DIGITAL INPUT FRONT B/ZONE B/ ZONE 2/PRESENCE R EXTRA SP L CD DVD 3 4 COAXIAL FRONT A R L FM 75Ω UNBAL. DVD DTV/CBL IN1 IN2 SPEAKERS CENTER SURROUND R L ...unit. • Use the magnetically shielded speakers. If the connections are short-circuited, "CHECK SP WIRES" appears in another room (ZONE B), presence speakers, or Zone 2 speakers. For details about the speaker impedance setting, see page 28). 4 ohm speakers can also select the function of insulated...
... OUT FRONT SURROUND SUR. BACK 1 2 SUBWOOFER SIRIUS XM ANTENNA AM GND DVD DTV/CBL 1 2 OPTICAL DIGITAL INPUT FRONT B/ZONE B/ ZONE 2/PRESENCE R EXTRA SP L CD DVD 3 4 COAXIAL FRONT A R L FM 75Ω UNBAL. DVD DTV/CBL IN1 IN2 SPEAKERS CENTER SURROUND R L ...unit. • Use the magnetically shielded speakers. If the connections are short-circuited, "CHECK SP WIRES" appears in another room (ZONE B), presence speakers, or Zone 2 speakers. For details about the speaker impedance setting, see page 28). 4 ohm speakers can also select the function of insulated...

Owner's Manual
Page 19
...) CD-R (REC) DVD DTV/CBL IN OUT DVR IN OUT VCR SUB SB (8CH) SURROUND WOOFER ZONE 2 HDMI OUT FRONT SURROUND SUR. BACK 1 2 SUBWOOFER DVD DTV/CBL 1 2 OPTICAL DIGITAL INPUT FRONT B/ZONE B/ ZONE 2/PRESENCE R EXTRA SP L CD DVD 3 4 COAXIAL FRONT A R L DVD DTV/CBL IN1 IN2...PLAY) CD-R (REC) DVD DTV/CBL IN OUT DVR IN OUT VCR SUB SB (8CH) SURROUND WOOFER ZONE 2 HDMI OUT FRONT SURROUND SUR. BACK 1 2 SUBWOOFER DVD DTV/CBL 1 2 OPTICAL DIGITAL INPUT FRONT B/ZONE B/ ZONE 2/PRESENCE R EXTRA SP L CD DVD 3 4 COAXIAL FRONT A R L DVD DTV/CBL IN1 IN2...
...) CD-R (REC) DVD DTV/CBL IN OUT DVR IN OUT VCR SUB SB (8CH) SURROUND WOOFER ZONE 2 HDMI OUT FRONT SURROUND SUR. BACK 1 2 SUBWOOFER DVD DTV/CBL 1 2 OPTICAL DIGITAL INPUT FRONT B/ZONE B/ ZONE 2/PRESENCE R EXTRA SP L CD DVD 3 4 COAXIAL FRONT A R L DVD DTV/CBL IN1 IN2...PLAY) CD-R (REC) DVD DTV/CBL IN OUT DVR IN OUT VCR SUB SB (8CH) SURROUND WOOFER ZONE 2 HDMI OUT FRONT SURROUND SUR. BACK 1 2 SUBWOOFER DVD DTV/CBL 1 2 OPTICAL DIGITAL INPUT FRONT B/ZONE B/ ZONE 2/PRESENCE R EXTRA SP L CD DVD 3 4 COAXIAL FRONT A R L DVD DTV/CBL IN1 IN2...

Owner's Manual
Page 24
BACK 1 2 SUBWOOFER DVD DTV/CBL 1 2 OPTICAL DIGITAL INPUT FRONT B/ZONE B/ ZONE 2/PRESENCE R EXTRA SP L CD DVD 3 4 COAXIAL FRONT A R L DVD DTV/CBL IN1 IN2 SPEAKERS CENTER SURROUND R L OUT SURROUND BACK/BI-AMP R L S VIDEO DVD DTV/CBL IN ... PRE OUT SINGLE CENTER DOCK VIDEO VIDEO MD/ OUT CD-R (REC) DVD DTV/CBL IN OUT DVR IN OUT VCR SUB SB (8CH) SURROUND WOOFER ZONE 2 HDMI OUT FRONT SURROUND SUR.
BACK 1 2 SUBWOOFER DVD DTV/CBL 1 2 OPTICAL DIGITAL INPUT FRONT B/ZONE B/ ZONE 2/PRESENCE R EXTRA SP L CD DVD 3 4 COAXIAL FRONT A R L DVD DTV/CBL IN1 IN2 SPEAKERS CENTER SURROUND R L OUT SURROUND BACK/BI-AMP R L S VIDEO DVD DTV/CBL IN ... PRE OUT SINGLE CENTER DOCK VIDEO VIDEO MD/ OUT CD-R (REC) DVD DTV/CBL IN OUT DVR IN OUT VCR SUB SB (8CH) SURROUND WOOFER ZONE 2 HDMI OUT FRONT SURROUND SUR.

Owner's Manual
Page 25
...), the converted video signals are unplugged from the AC wall outlets. BACK 1 2 SUBWOOFER SIRIUS XM ANTENNA AM GND DVD DTV/CBL 1 2 OPTICAL DIGITAL INPUT FRONT B/ZONE B/ ZONE 2/PRESENCE R EXTRA SP L CD DVD 3 4 COAXIAL FRONT A R L FM 75Ω UNBAL. DVD IN1 DTV/CBL IN2 SPEAKERS CENTER SURROUND R L OUT SURROUND BACK/BI-AMP R L DOCK... PRE OUT SINGLE CENTER R IN MD/ OUT CD (PLAY) CD-R (REC) DVD DTV/CBL IN OUT DVR IN OUT VCR SUB SB (8CH) SURROUND WOOFER ZONE 2 HDMI OUT FRONT SURROUND SUR. Notes • When "VIDEO CONV."
...), the converted video signals are unplugged from the AC wall outlets. BACK 1 2 SUBWOOFER SIRIUS XM ANTENNA AM GND DVD DTV/CBL 1 2 OPTICAL DIGITAL INPUT FRONT B/ZONE B/ ZONE 2/PRESENCE R EXTRA SP L CD DVD 3 4 COAXIAL FRONT A R L FM 75Ω UNBAL. DVD IN1 DTV/CBL IN2 SPEAKERS CENTER SURROUND R L OUT SURROUND BACK/BI-AMP R L DOCK... PRE OUT SINGLE CENTER R IN MD/ OUT CD (PLAY) CD-R (REC) DVD DTV/CBL IN OUT DVR IN OUT VCR SUB SB (8CH) SURROUND WOOFER ZONE 2 HDMI OUT FRONT SURROUND SUR. Notes • When "VIDEO CONV."

Owner's Manual
Page 26
... Audio out Audio in VCR S-video out S-video in Video in Component video out ■ Connecting a set-top box Optical out Audio out Satellite receiver, cable TV receiver or HDTV decoder S-video out Video out Component video out Y PB PR HDMI out O RL Y PB PR V S AUDIO L MULTI CH INPUT... FRONT (8CH) CENTER PRE OUT SINGLE CENTER R IN MD/ OUT CD (PLAY) CD-R (REC) DVD DTV/CBL IN OUT DVR IN OUT VCR SUB SB (8CH) SURROUND WOOFER ZONE...
... Audio out Audio in VCR S-video out S-video in Video in Component video out ■ Connecting a set-top box Optical out Audio out Satellite receiver, cable TV receiver or HDTV decoder S-video out Video out Component video out Y PB PR HDMI out O RL Y PB PR V S AUDIO L MULTI CH INPUT... FRONT (8CH) CENTER PRE OUT SINGLE CENTER R IN MD/ OUT CD (PLAY) CD-R (REC) DVD DTV/CBL IN OUT DVR IN OUT VCR SUB SB (8CH) SURROUND WOOFER ZONE...

Owner's Manual
Page 27
... (8CH) CENTER PRE OU R IN MD/ OUT CD (PLAY) CD-R (REC) DVD DTV/CBL IN OUT DVR IN OUT VCR SUB SB (8CH) SURROUND WOOFER ZONE 2 HDMI OUT FRONT SURROUND S SIRIUS XM ANTENNA AM GND DVD DTV/CBL 1 2 OPTICAL DIGITAL INPUT FRONT...
... (8CH) CENTER PRE OU R IN MD/ OUT CD (PLAY) CD-R (REC) DVD DTV/CBL IN OUT DVR IN OUT VCR SUB SB (8CH) SURROUND WOOFER ZONE 2 HDMI OUT FRONT SURROUND S SIRIUS XM ANTENNA AM GND DVD DTV/CBL 1 2 OPTICAL DIGITAL INPUT FRONT...
Owner's Manual
Page 30
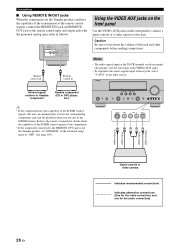
... the advanced setup menu to "OFF" (see page 109). Infrared signal receiver or Yamaha component Yamaha component (CD or DVD player, etc.) VOLUME SPEAKERS EDIT SEARCH MODE BAND CATEGORY A/B/C/D/E PRESET/TUNING/CH MEMORY INFO ZONE 2 ON/OFF ZONE 2 CONTROL STANDBY /ON SYSTEM OFF PHONES SILENT CINEMA TONE CONTROL SCENE 1...input at these jacks, select "V-AUX" as follows. Connections ■ Using REMOTE IN/OUT jacks When the components are the Yamaha products and have the capability of the remote control signals, connect the REMOTE IN jack and REMOTE OUT jack to the remote ...
... the advanced setup menu to "OFF" (see page 109). Infrared signal receiver or Yamaha component Yamaha component (CD or DVD player, etc.) VOLUME SPEAKERS EDIT SEARCH MODE BAND CATEGORY A/B/C/D/E PRESET/TUNING/CH MEMORY INFO ZONE 2 ON/OFF ZONE 2 CONTROL STANDBY /ON SYSTEM OFF PHONES SILENT CINEMA TONE CONTROL SCENE 1...input at these jacks, select "V-AUX" as follows. Connections ■ Using REMOTE IN/OUT jacks When the components are the Yamaha products and have the capability of the remote control signals, connect the REMOTE IN jack and REMOTE OUT jack to the remote ...

Owner's Manual
Page 32
...the total power consumption of your other components to these outlet(s). TONE CONTROL While holding down MAIN ZONE ON/OFF 3 Rotate the NPROGRAM selector to save the new setting and turn on page 124... on the front panel to turn off for details. 2 Press and hold MTONE CONTROL and then press KMAIN ZONE ON/OFF to "6Ω MIN" as the front speakers. 1 Press LSYSTEM OFF on , and the advanced...while this unit is charging connected iPod even when this unit is cut off when the main zone and Zone 2 are to any connected components. Connect the power cable of the components that can be ...
...the total power consumption of your other components to these outlet(s). TONE CONTROL While holding down MAIN ZONE ON/OFF 3 Rotate the NPROGRAM selector to save the new setting and turn on page 124... on the front panel to turn off for details. 2 Press and hold MTONE CONTROL and then press KMAIN ZONE ON/OFF to "6Ω MIN" as the front speakers. 1 Press LSYSTEM OFF on , and the advanced...while this unit is charging connected iPod even when this unit is cut off when the main zone and Zone 2 are to any connected components. Connect the power cable of the components that can be ...

Owner's Manual
Page 33
...; Turning on this unit Press KMAIN ZONE ON/OFF (or HPOWER) to turn on the main zone by pressing SSCENE (or 6SCENE) buttons. ■ Set the main zone to the standby mode Press KMAIN ZONE ON/OFF (or ISTANDBY) to set the main zone and Zone 2 (see page 104) to receive infrared signals from the remote control...
...; Turning on this unit Press KMAIN ZONE ON/OFF (or HPOWER) to turn on the main zone by pressing SSCENE (or 6SCENE) buttons. ■ Set the main zone to the standby mode Press KMAIN ZONE ON/OFF (or ISTANDBY) to set the main zone and Zone 2 (see page 104) to receive infrared signals from the remote control...

Owner's Manual
Page 34
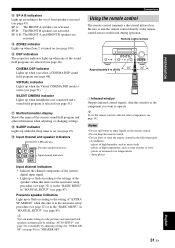
...of the stationed iPod in the paring or the Bluetooth adapter is searching the Bluetooth component (see page 70). • Light up while the Yamaha Bluetooth adapter is connected to the Bluetooth component (see page 70). 4 ENHANCER indicator Lights up when headphones are used without any of the ...ADAPTIVE DRC MASTER AUDIO q DIGITAL PLUS HD 96 q TRUE HD ES 24 q PL x MATRIX DISCRETE neural PCM DSD V-AUX DTV/CBL DOCK ENHANCER SP ZONE 2 A B SILENT CINEMA DVD MD/CD-R CD TUNER XM SIRIUS YPAO MEMORY VOL. A Decoder indicators The respective indicator lights up when any modifications (see...
...of the stationed iPod in the paring or the Bluetooth adapter is searching the Bluetooth component (see page 70). • Light up while the Yamaha Bluetooth adapter is connected to the Bluetooth component (see page 70). 4 ENHANCER indicator Lights up when headphones are used without any of the ...ADAPTIVE DRC MASTER AUDIO q DIGITAL PLUS HD 96 q TRUE HD ES 24 q PL x MATRIX DISCRETE neural PCM DSD V-AUX DTV/CBL DOCK ENHANCER SP ZONE 2 A B SILENT CINEMA DVD MD/CD-R CD TUNER XM SIRIUS YPAO MEMORY VOL. A Decoder indicators The respective indicator lights up when any modifications (see...
Owner's Manual
Page 35
E ZONE2 indicator Lights up when Zone 2 is in the automatic setup procedure (see page 32) or in the "BASIC MENU" in "MANUAL SETUP" (see page 87). CINEMA DSP indicator Lights up ...
E ZONE2 indicator Lights up when Zone 2 is in the automatic setup procedure (see page 32) or in the "BASIC MENU" in "MANUAL SETUP" (see page 87). CINEMA DSP indicator Lights up ...

Owner's Manual
Page 36
... optimizer microphone collects and this unit analyzes the sound your listening room (YPAO) This unit employs the YPAO (Yamaha Parametric Room Acoustic Optimizer) technology which lets you avoid troublesome listening-based speaker setup and achieves highly accurate sound adjustments... surface with the omni-directional microphone heading upward. "MIC ON View OSD menu" appears in your listening position. EXTRA SP ASSIGN >ZONE2 FRONT B ZONE B PRESENCE NONE SETUP;;;;;;;AUTO EQ;;;;;;;NATURAL START [ ]/[ ]:Up/Down [ ]/[[]:Select 3 Place the optimizer microphone at the same height as the front...
... optimizer microphone collects and this unit analyzes the sound your listening room (YPAO) This unit employs the YPAO (Yamaha Parametric Room Acoustic Optimizer) technology which lets you avoid troublesome listening-based speaker setup and achieves highly accurate sound adjustments... surface with the omni-directional microphone heading upward. "MIC ON View OSD menu" appears in your listening position. EXTRA SP ASSIGN >ZONE2 FRONT B ZONE B PRESENCE NONE SETUP;;;;;;;AUTO EQ;;;;;;;NATURAL START [ ]/[ ]:Up/Down [ ]/[[]:Select 3 Place the optimizer microphone at the same height as the front...

Owner's Manual
Page 37
...UNDO" to undo the last "AUTO SETUP" settings and restore the previous settings. • Select "DEFAULT" to reset the "AUTO SETUP" parameters to the Zone 2 speakers. Choices: NATURAL, FLAT, FRONT • Select "NATURAL" to deactivate the EXTRA SP terminals. Note If you select "ON" in the room....quality. • Select "FRONT" to adjust the frequency response of each speaker in "EXTRA SP ASSIGN". English 33 En Choices: FRONT B, ZONE2, ZONE B, PRESENCE, NONE • When you use the alternative front speaker system (see page 13) Select "PRESENCE" to set the function of the speakers...
...UNDO" to undo the last "AUTO SETUP" settings and restore the previous settings. • Select "DEFAULT" to reset the "AUTO SETUP" parameters to the Zone 2 speakers. Choices: NATURAL, FLAT, FRONT • Select "NATURAL" to deactivate the EXTRA SP terminals. Note If you select "ON" in the room....quality. • Select "FRONT" to adjust the frequency response of each speaker in "EXTRA SP ASSIGN". English 33 En Choices: FRONT B, ZONE2, ZONE B, PRESENCE, NONE • When you use the alternative front speaker system (see page 13) Select "PRESENCE" to set the function of the speakers...

Owner's Manual
Page 47
... main room are muted. Note Sound field programs cannot be selected when the component connected to the MULTI CH INPUT jacks is set to "PRESENCE", "ZONE 2" or "NONE" (see page 25) as the input source. FRONT A FRONT B OFF FRONT A and FRONT B Notes • FRONT A and B or FRONT B setting is... not available when "EXTRA SP ASSIGN" is selected as the input source. BASIC OPERATION English 43 En Note If you activate the Zone B speakers, all the speakers in "INPUT MENU" to the FRONT A and/or EXTRA SP speaker terminals. The active front speaker set the parameters for...
... main room are muted. Note Sound field programs cannot be selected when the component connected to the MULTI CH INPUT jacks is set to "PRESENCE", "ZONE 2" or "NONE" (see page 25) as the input source. FRONT A FRONT B OFF FRONT A and FRONT B Notes • FRONT A and B or FRONT B setting is... not available when "EXTRA SP ASSIGN" is selected as the input source. BASIC OPERATION English 43 En Note If you activate the Zone B speakers, all the speakers in "INPUT MENU" to the FRONT A and/or EXTRA SP speaker terminals. The active front speaker set the parameters for...


