
Owner's Manual
Page 16
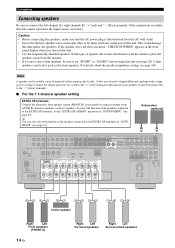
... with sound field programs by using a speaker combination other speaker combinations You can enjoy multi-channel sources with the placement in "MANUAL SETUP" (see page 11). y We recommend that you also add the presence speakers for the effect sounds of each speaker are mixed... down and output at the connected speakers. 12 En Surround left and right speakers Subwoofer(s) The functions and settings of the CINEMA DSP sound field program. For other than the 7.1/ 6.1/5.1-channel speaker combinations. Surround back speaker...
... with sound field programs by using a speaker combination other speaker combinations You can enjoy multi-channel sources with the placement in "MANUAL SETUP" (see page 11). y We recommend that you also add the presence speakers for the effect sounds of each speaker are mixed... down and output at the connected speakers. 12 En Surround left and right speakers Subwoofer(s) The functions and settings of the CINEMA DSP sound field program. For other than the 7.1/ 6.1/5.1-channel speaker combinations. Surround back speaker...
Owner's Manual
Page 18
...to "6Ω MIN" before using this unit. REMOTE TRIGGER OUT +12V IN OUT 15mA MAX. to the EXTRA SP terminals in "AUTO SETUP" (see page 85). Caution • Before connecting the speakers, make sure that the AC power plug is actually a pair of this... unit cannot reproduce the input sources accurately. BACK 1 2 SUBWOOFER SIRIUS XM ANTENNA AM GND DVD DTV/CBL 1 2 OPTICAL DIGITAL INPUT FRONT B/ZONE B/ ZONE 2/PRESENCE R EXTRA SP L CD DVD 3 4 COAXIAL FRONT A...
...to "6Ω MIN" before using this unit. REMOTE TRIGGER OUT +12V IN OUT 15mA MAX. to the EXTRA SP terminals in "AUTO SETUP" (see page 85). Caution • Before connecting the speakers, make sure that the AC power plug is actually a pair of this... unit cannot reproduce the input sources accurately. BACK 1 2 SUBWOOFER SIRIUS XM ANTENNA AM GND DVD DTV/CBL 1 2 OPTICAL DIGITAL INPUT FRONT B/ZONE B/ ZONE 2/PRESENCE R EXTRA SP L CD DVD 3 4 COAXIAL FRONT A...

Owner's Manual
Page 36
...on and the volume level is set to about half way (or slightly less). ❏ The crossover frequency controls of each subwoofer is set to the OPTIMIZER MIC jack on a flat level surface with the omni-directional microphone heading upward. y It is ...8226; Initial settings are seated in your listening room (YPAO) This unit employs the YPAO (Yamaha Parametric Room Acoustic Optimizer) technology which lets you avoid troublesome listening-based speaker setup and achieves highly accurate sound adjustments automatically. OPTIMIZING THE SPEAKER SETTING FOR YOUR LISTENING ROOM (YPAO)...
...on and the volume level is set to about half way (or slightly less). ❏ The crossover frequency controls of each subwoofer is set to the OPTIMIZER MIC jack on a flat level surface with the omni-directional microphone heading upward. y It is ...8226; Initial settings are seated in your listening room (YPAO) This unit employs the YPAO (Yamaha Parametric Room Acoustic Optimizer) technology which lets you avoid troublesome listening-based speaker setup and achieves highly accurate sound adjustments automatically. OPTIMIZING THE SPEAKER SETTING FOR YOUR LISTENING ROOM (YPAO)...

Owner's Manual
Page 38
...SP Displays the number of the room while this unit is indicated as the one output at the SUBWOOFER PRE OUT 1 jack. Optimizing the speaker setting for this unit to complete the auto setup procedure. For more accurate measurements, keep quiet or leave the room. Press [ENTER] Once you ...speaker distance Speaker level LVL Displays the speaker output level in step 5, no test tones are output at the SUBWOOFER PRE OUT 2 jack is canceled and an error screen appears. AUTO SETUP Measurement Complete Press [ENTER] NOTICE Loud test tones are set to "REVERSE". 34 En Once all items ...
...SP Displays the number of the room while this unit is indicated as the one output at the SUBWOOFER PRE OUT 1 jack. Optimizing the speaker setting for this unit to complete the auto setup procedure. For more accurate measurements, keep quiet or leave the room. Press [ENTER] Once you ...speaker distance Speaker level LVL Displays the speaker output level in step 5, no test tones are output at the SUBWOOFER PRE OUT 2 jack is canceled and an error screen appears. AUTO SETUP Measurement Complete Press [ENTER] NOTICE Loud test tones are set to "REVERSE". 34 En Once all items ...

Owner's Manual
Page 39
... on top of the speaker output level (LEVEL) y If you are not satisfied with the results or want to manually adjust each speaker (EQ) AUTO SETUP RESULT SP : 3/4/0.1 DIST: 14.0/17.0ft LVL : -9.0/+6.5dB . >SET CANCEL [ ]/[ ]:Up/Down [ENTER]:Enter 13 Make sure the pointer is ...) Results of the speaker distance from direct sunlight and do not place it on the characteristics of your subwoofer. • In the "EQ" results, different values may be set for your selection. AUTO SETUP RESULT SP : 3/4/0.1 DIST: 14.0/17.0ft LVL : -9.0/+6.5dB . >SET CANCEL [ ]/[ ]:Up/Down [ENTER]:Enter Choices...
... on top of the speaker output level (LEVEL) y If you are not satisfied with the results or want to manually adjust each speaker (EQ) AUTO SETUP RESULT SP : 3/4/0.1 DIST: 14.0/17.0ft LVL : -9.0/+6.5dB . >SET CANCEL [ ]/[ ]:Up/Down [ENTER]:Enter 13 Make sure the pointer is ...) Results of the speaker distance from direct sunlight and do not place it on the characteristics of your subwoofer. • In the "EQ" results, different values may be set for your selection. AUTO SETUP RESULT SP : 3/4/0.1 DIST: 14.0/17.0ft LVL : -9.0/+6.5dB . >SET CANCEL [ ]/[ ]:Up/Down [ENTER]:Enter Choices...

Owner's Manual
Page 40
... to toggle between the warning displays. y If you select "PROCEED", this unit detects potential problems during the "AUTO SETUP" procedure, "WARNING" appears in the "W-3: LEVEL ERROR" display, adjust the volume level of the subwoofer(s). 3 Press 8ENTER to return to confirm your selection. The following display is pointing at "WARNING" and then press...
... to toggle between the warning displays. y If you select "PROCEED", this unit detects potential problems during the "AUTO SETUP" procedure, "WARNING" appears in the "W-3: LEVEL ERROR" display, adjust the volume level of the subwoofer(s). 3 Press 8ENTER to return to confirm your selection. The following display is pointing at "WARNING" and then press...
Owner's Manual
Page 56
...; If you want to adjust the balance of bass and treble for level settings) - Note This operation will override the level adjustments made in "AUTO SETUP" (see page 32) and "SP LEVEL" (see page 87). 1 Press 7LEVEL on , the "LEVEL" adjustment menu appears in the video monitor. 2 ... the value. • Press 8l to decrease the value. R Surround right speaker SBL Surround back left speaker SBR Surround back right speaker SWFR Subwoofer PRNS L Presence left and right speaker channels. Press PPURE DIRECT (or DPURE DIRECT) to turn off . Display Adjusted speaker FRONT L Front left...
...; If you want to adjust the balance of bass and treble for level settings) - Note This operation will override the level adjustments made in "AUTO SETUP" (see page 32) and "SP LEVEL" (see page 87). 1 Press 7LEVEL on , the "LEVEL" adjustment menu appears in the video monitor. 2 ... the value. • Press 8l to decrease the value. R Surround right speaker SBL Surround back left speaker SBR Surround back right speaker SWFR Subwoofer PRNS L Presence left and right speaker channels. Press PPURE DIRECT (or DPURE DIRECT) to turn off . Display Adjusted speaker FRONT L Front left...

Owner's Manual
Page 84
... number of the front speakers. Change the initial settings (indicated in bold under each parameter) to reflect the needs of your subwoofer if bass sounds are lacking or unclear. CENTER SP Selects the size of the surround speakers. UNIT Selects the unit to the... OUT Selects the speakers that output the LFE (low-frequency effect) and the low-frequency signals. SUBWOOFER PHASE Switches the phase of your listening environment. ■ Auto setup AUTO SETUP Use this feature to automatically adjust speaker and system parameters (see page 85). CUSTOMIZING THIS UNIT (...
... number of the front speakers. Change the initial settings (indicated in bold under each parameter) to reflect the needs of your subwoofer if bass sounds are lacking or unclear. CENTER SP Selects the size of the surround speakers. UNIT Selects the unit to the... OUT Selects the speakers that output the LFE (low-frequency effect) and the low-frequency signals. SUBWOOFER PHASE Switches the phase of your listening environment. ■ Auto setup AUTO SETUP Use this feature to automatically adjust speaker and system parameters (see page 85). CUSTOMIZING THIS UNIT (...
Owner's Manual
Page 89
... ]/[ ]: Up/Down [ENTER]: Enter p [ y Set "TEST TONE" to "ON" to the EXTRA SP terminals. Customizing this unit (MANUAL SETUP) LFE/bass out LFE/BASS OUT Use this setting when you use another front speaker system in another front speaker system in the main zone... speakers BOTH Output No output No output SWFR Output No output No output FRONT No output Output No output Low-frequency signals output Choice Subwoofer(s) and speakers Subwoofer(s) Front speakers Other speakers BOTH *1 *2 *3 SWFR *4 *3 *3 FRONT No output *1 *3 *1 Output(s) the low-frequency signals of...
... ]/[ ]: Up/Down [ENTER]: Enter p [ y Set "TEST TONE" to "ON" to the EXTRA SP terminals. Customizing this unit (MANUAL SETUP) LFE/bass out LFE/BASS OUT Use this setting when you use another front speaker system in another front speaker system in the main zone... speakers BOTH Output No output No output SWFR Output No output No output FRONT No output Output No output Low-frequency signals output Choice Subwoofer(s) and speakers Subwoofer(s) Front speakers Other speakers BOTH *1 *2 *3 SWFR *4 *3 *3 FRONT No output *1 *3 *1 Output(s) the low-frequency signals of...

Owner's Manual
Page 91
...Front right speaker CNTR Center speaker SUR.L Surround left speaker SUR.R Surround right speaker SBL Surround back left speaker SBR Surround back right speaker SWFR Subwoofer PR.L Presence left speakers and each speaker selected in "SPEAKER SET" (see page 85). Choices: 40Hz, 60Hz, 80Hz, 90Hz, 100Hz, ...the setting of "LFE/BASS OUT" in "SPEAKER SET" (see page 85). ADVANCED OPERATION English 87 En Customizing this unit (MANUAL SETUP) ■ Speaker level B)SP LEVEL Use this feature to manually balance the speaker levels between the front left or surround left speaker ...
...Front right speaker CNTR Center speaker SUR.L Surround left speaker SUR.R Surround right speaker SBL Surround back left speaker SBR Surround back right speaker SWFR Subwoofer PR.L Presence left speakers and each speaker selected in "SPEAKER SET" (see page 85). Choices: 40Hz, 60Hz, 80Hz, 90Hz, 100Hz, ...the setting of "LFE/BASS OUT" in "SPEAKER SET" (see page 85). ADVANCED OPERATION English 87 En Customizing this unit (MANUAL SETUP) ■ Speaker level B)SP LEVEL Use this feature to manually balance the speaker levels between the front left or surround left speaker ...

Owner's Manual
Page 92
... L;;;10.0ft FRONT R;;;10.0ft CENTER;;;;;8.5ft SUR. R Surround right speaker SBL Surround back left speaker SBR Surround back right speaker SWFR Subwoofer PRNS L Presence left speaker PRNS R Presence right speaker Notes • The available speaker channels differ depending on the setting of the speakers... This unit does not output the test tone for the "SPEAKER SET", "SP LEVEL", and "SP DISTANCE" settings. Customizing this unit (MANUAL SETUP) ■ Speaker distance C)SP DISTANCE Use this is not possible in feet. and Canada models]: feet (ft) [Other models]: meters (m) ...
... L;;;10.0ft FRONT R;;;10.0ft CENTER;;;;;8.5ft SUR. R Surround right speaker SBL Surround back left speaker SBR Surround back right speaker SWFR Subwoofer PRNS L Presence left speaker PRNS R Presence right speaker Notes • The available speaker channels differ depending on the setting of the speakers... This unit does not output the test tone for the "SPEAKER SET", "SP LEVEL", and "SP DISTANCE" settings. Customizing this unit (MANUAL SETUP) ■ Speaker distance C)SP DISTANCE Use this is not possible in feet. and Canada models]: feet (ft) [Other models]: meters (m) ...

Owner's Manual
Page 95
... is decoding bitstream signals. Preserves the greatest amount of "LFE/BASS OUT" (see page 85), some signals may not be applied to your subwoofer or headphones. Headphones HEADPHONE Adjusts the headphone LFE level. STD MAX Adjusts the dynamic range to 0 dB Control step: 1 dB B)LFE LEVEL... . ADVANCED OPERATION English 91 En Customizing this unit (MANUAL SETUP) ■ Dynamic range C)DYNAMIC RANGE Use this feature to adjust the output level of the LFE (lowfrequency effect) channel according to the capacity...
... is decoding bitstream signals. Preserves the greatest amount of "LFE/BASS OUT" (see page 85), some signals may not be applied to your subwoofer or headphones. Headphones HEADPHONE Adjusts the headphone LFE level. STD MAX Adjusts the dynamic range to 0 dB Control step: 1 dB B)LFE LEVEL... . ADVANCED OPERATION English 91 En Customizing this unit (MANUAL SETUP) ■ Dynamic range C)DYNAMIC RANGE Use this feature to adjust the output level of the LFE (lowfrequency effect) channel according to the capacity...
Owner's Manual
Page 122
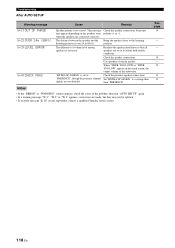
... optimal. • If an error message "E-10" occurs repeatedly, contact a qualified Yamaha service center. When "SWFR: TOO LOUD"or "SWFR: TOO LOW" appears in locations with similar conditions. Troubleshooting After AUTO SETUP Warning message Cause Remedy W-1:OUT OF PHASE W-2:OVER 24m (80ft) W-3:LEVEL ERROR ...speaker connections. "EXTRA SP ASSIGN" is excessive. Notes • If the "ERROR" or "WARNING" screens appears, check the cause of the subwoofer. See page 14 - - 14 - 32 14 33 118 En Bring the speaker closer to a setting other signals are connected correctly. Use ...
... optimal. • If an error message "E-10" occurs repeatedly, contact a qualified Yamaha service center. When "SWFR: TOO LOUD"or "SWFR: TOO LOW" appears in locations with similar conditions. Troubleshooting After AUTO SETUP Warning message Cause Remedy W-1:OUT OF PHASE W-2:OVER 24m (80ft) W-3:LEVEL ERROR ...speaker connections. "EXTRA SP ASSIGN" is excessive. Notes • If the "ERROR" or "WARNING" screens appears, check the cause of the subwoofer. See page 14 - - 14 - 32 14 33 118 En Bring the speaker closer to a setting other signals are connected correctly. Use ...

Owner's Manual
Page 130
...Initial configuration 98 Audio select, Initial configuration ....... 98 Audio signal flow 19 Auto delay, Lip sync 92 AUTO SETUP 32, 80 Auto setup 80 AUTO SETUP, Troubleshooting ....... 117 AUTO TUNING 53 AUTO, Lip sync 92 Automatic tuning mode, FM/AM tuning 53 Available ...28 Connection, projector 20 Connection, PVR 22 Connection, set-top boxes 22 Connection, SiriusConnect tuner ......... 62 Connection, speaker cable 16 Connection, SUBWOOFER PRE OUT jack 24 Connection, SUR.BACK PRE OUT jacks .......... 24 Connection, SURROUND PRE OUT jacks ........ 24 Connection, TV monitor 20 ...
...Initial configuration 98 Audio select, Initial configuration ....... 98 Audio signal flow 19 Auto delay, Lip sync 92 AUTO SETUP 32, 80 Auto setup 80 AUTO SETUP, Troubleshooting ....... 117 AUTO TUNING 53 AUTO, Lip sync 92 Automatic tuning mode, FM/AM tuning 53 Available ...28 Connection, projector 20 Connection, PVR 22 Connection, set-top boxes 22 Connection, SiriusConnect tuner ......... 62 Connection, speaker cable 16 Connection, SUBWOOFER PRE OUT jack 24 Connection, SUR.BACK PRE OUT jacks .......... 24 Connection, SURROUND PRE OUT jacks ........ 24 Connection, TV monitor 20 ...
Owner's Manual
Page 133
... 87 Subwoofer phase, Speaker settings ......87 SUBWOOFER PRE OUT jack connection 24 Supplied accessories 2 Support audio, HDMI set 98 SUR. TRIM, Input menu 94 VOLTAGE SELECTOR 4 VOLUME level indicator 30 Volume menu, Manual setup 81 Volume Trim, Input menu 94 ■W W-1:OUT OF PHASE, Automatic setup warning message 118 W-2:OVER 24m (80ft), Automatic setup warning...
... 87 Subwoofer phase, Speaker settings ......87 SUBWOOFER PRE OUT jack connection 24 Supplied accessories 2 Support audio, HDMI set 98 SUR. TRIM, Input menu 94 VOLTAGE SELECTOR 4 VOLUME level indicator 30 Volume menu, Manual setup 81 Volume Trim, Input menu 94 ■W W-1:OUT OF PHASE, Automatic setup warning message 118 W-2:OVER 24m (80ft), Automatic setup warning...


