
Owner's Manual
Page 6
...Yamaha Parametric Room Acoustic Optimizer) for automatic speaker setup ◆ 192-kHz/24-bit D/A converter ◆ OSD (on-screen display) menus that you received all sources ◆ Adaptive dynamic range controlling capability ◆ Adaptive DSP effect level controlling capability ◆ iPod controlling capability ◆ Remote control with preset remote control...by Digital Content Protection, LLC. ◆ Analog video to HDMI digital video up-conversion (composite video ↔ S-video ↔ component video → HDMI digital video) capability for monitor out DOCK terminal ◆...
...Yamaha Parametric Room Acoustic Optimizer) for automatic speaker setup ◆ 192-kHz/24-bit D/A converter ◆ OSD (on-screen display) menus that you received all sources ◆ Adaptive dynamic range controlling capability ◆ Adaptive DSP effect level controlling capability ◆ iPod controlling capability ◆ Remote control with preset remote control...by Digital Content Protection, LLC. ◆ Analog video to HDMI digital video up-conversion (composite video ↔ S-video ↔ component video → HDMI digital video) capability for monitor out DOCK terminal ◆...

Owner's Manual
Page 7
..., Inc. © 1996-2007 DTS, Inc. and other U.S. "HDMI", the "HDMI" logo and "High-Definition Multimedia Interface" are trademark of the parts on the front panel or the remote control. Since hearing damage from Dolby Laboratories. Manufactured under U.S. "SIRIUS", ..."SiriusConnect", the SIRIUS dog logo, channel names and logos are trademarks owned by Yamaha...
..., Inc. © 1996-2007 DTS, Inc. and other U.S. "HDMI", the "HDMI" logo and "High-Definition Multimedia Interface" are trademark of the parts on the front panel or the remote control. Since hearing damage from Dolby Laboratories. Manufactured under U.S. "SIRIUS", ..."SiriusConnect", the SIRIUS dog logo, channel names and logos are trademarks owned by Yamaha...

Owner's Manual
Page 14
... 4 ZONE2 OUT jacks 5 PRE OUT jacks 6 DOCK terminal 7 Video component jacks (VIDEO and S VIDEO) COMPONENT VIDEO jacks 8 ANTENNA terminals 9 REMOTE IN/OUT jacks 0 Speaker terminals A HDMI jacks B VOLTAGE SELECTOR (Asia and General models only) C AC OUTLET(S) Page 57 62 21 17-23 25 103 24 25 17-22 17-22 27... 26 11-16 18 4 28 A B C 9 TRIGGER OUT jack This is control expansion jack for custom installation. 10 En DVD DTV/CBL IN1 IN2 SPEAKERS CENTER SURROUND R L OUT SURROUND BACK/BI-AMP R L SINGLE DOCK VIDEO VIDEO S VIDEO...
... 4 ZONE2 OUT jacks 5 PRE OUT jacks 6 DOCK terminal 7 Video component jacks (VIDEO and S VIDEO) COMPONENT VIDEO jacks 8 ANTENNA terminals 9 REMOTE IN/OUT jacks 0 Speaker terminals A HDMI jacks B VOLTAGE SELECTOR (Asia and General models only) C AC OUTLET(S) Page 57 62 21 17-23 25 103 24 25 17-22 17-22 27... 26 11-16 18 4 28 A B C 9 TRIGGER OUT jack This is control expansion jack for custom installation. 10 En DVD DTV/CBL IN1 IN2 SPEAKERS CENTER SURROUND R L OUT SURROUND BACK/BI-AMP R L SINGLE DOCK VIDEO VIDEO S VIDEO...

Owner's Manual
Page 34
... adapter is searching the Bluetooth component (see page 70). • Light up while the Yamaha Bluetooth adapter is connected to the Bluetooth component (see page 70). 4 ENHANCER indicator Lights ...8226; Lights up to the DOCK terminal of the selected input source is input at the HDMI IN jacks (see page 45). 30 En Presence sound field Surround left of the XM ... are connected (see page 18). 2 ADAPTIVE DRC indicator Lights up when the adaptive dynamic range control feature is only applicable to show the currently selected input source. Connections Front panel display 1 23...
... adapter is searching the Bluetooth component (see page 70). • Light up while the Yamaha Bluetooth adapter is connected to the Bluetooth component (see page 70). 4 ENHANCER indicator Lights ...8226; Lights up to the DOCK terminal of the selected input source is input at the HDMI IN jacks (see page 45). 30 En Presence sound field Surround left of the XM ... are connected (see page 18). 2 ADAPTIVE DRC indicator Lights up when the adaptive dynamic range control feature is only applicable to show the currently selected input source. Connections Front panel display 1 23...
Owner's Manual
Page 48
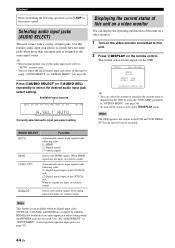
...AUDIO SELECT) This unit comes with a variety of this unit. 2 Press ODISPLAY on the remote control. The current status screen appears in the following order: (1) HDMI (2) Digital signals (3) Analog signals Selects only HDMI signals. Use "I/O ASSIGNMENT" in the following order: (1) Digital signals input at the COAXIAL jack ...When no sound is not available as an audio input jack select setting when the HDMI IN jacks are not used. Playback Before performing the following operations, press 5AMP on the remote control. Available input sources MULTI CH VCR DVR V-AUX DTV/CBL DVD MD/CD-R...
...AUDIO SELECT) This unit comes with a variety of this unit. 2 Press ODISPLAY on the remote control. The current status screen appears in the following order: (1) HDMI (2) Digital signals (3) Analog signals Selects only HDMI signals. Use "I/O ASSIGNMENT" in the following order: (1) Digital signals input at the COAXIAL jack ...When no sound is not available as an audio input jack select setting when the HDMI IN jacks are not used. Playback Before performing the following operations, press 5AMP on the remote control. Available input sources MULTI CH VCR DVR V-AUX DTV/CBL DVD MD/CD-R...

Owner's Manual
Page 50
...the current input signal. 1 Press 5AMP and then press MMENU on the remote control again to exit from a continuous signal to automatically switch decoders ("Surround EX", etc.). Out of the connected HDMI components is displayed as "Composite" or "S-Video". The connected monitor is not...]:Up/Down [ENTER]:Enter p p 2 Press 8n repeatedly to toggle between the audio and video information displays. 4 Press MMENU on the remote control. Notes "---" appears when this unit to make a discrete signal. Cause The number of resolution. ANALOG RES. Flag data encoded in the input ...
...the current input signal. 1 Press 5AMP and then press MMENU on the remote control again to exit from a continuous signal to automatically switch decoders ("Surround EX", etc.). Out of the connected HDMI components is displayed as "Composite" or "S-Video". The connected monitor is not...]:Up/Down [ENTER]:Enter p p 2 Press 8n repeatedly to toggle between the audio and video information displays. 4 Press MMENU on the remote control. Notes "---" appears when this unit to make a discrete signal. Cause The number of resolution. ANALOG RES. Flag data encoded in the input ...

Owner's Manual
Page 96
... OFF Functions Activates the optimum decoder to play back signals in "AUTO". Does not use the automatic lip sync: Select "OFF". Control range: 0 to 240 ms Control step: 1 ms y "offset" indicates the difference between the value of the audio delay that you do not want to use...: 0 to "ON". If the video monitor is compatible with the automatic lip sync or you set "HDMI AUTO" to 240 ms Control step: 1 ms 92 En HDMI AUTO;;;;;;OFF AUTO;;;;;;;;;---ms (offset;;;---ms) MANUAL;;;;;;;;;0ms ■ Extended surround E)EXTD SUR. Plays back Dolby Digital or DTS signals in 6.1/ 7.1...
... OFF Functions Activates the optimum decoder to play back signals in "AUTO". Does not use the automatic lip sync: Select "OFF". Control range: 0 to 240 ms Control step: 1 ms y "offset" indicates the difference between the value of the audio delay that you do not want to use...: 0 to "ON". If the video monitor is compatible with the automatic lip sync or you set "HDMI AUTO" to 240 ms Control step: 1 ms 92 En HDMI AUTO;;;;;;OFF AUTO;;;;;;;;;---ms (offset;;;---ms) MANUAL;;;;;;;;;0ms ■ Extended surround E)EXTD SUR. Plays back Dolby Digital or DTS signals in 6.1/ 7.1...

Owner's Manual
Page 97
... are reassigned, you can select the corresponding component by using the RINPUT selector on the front panel (or the input selector buttons on the remote control). A) SIRIUS B) XM C) TUNER D) CD E) MD/CD-R F) DVD G) DTV/CBL [ ]/[ ]: Up/Down [ENTER]: Enter 4 INPUT MENU 2/2 . TRIM PARENTAL LOCK INPUT ...RENAME VOL. TRIM BGV INPUT CH FRONT INPUT RENAME VOL. TRIM DECODER MODE INPUT RENAME VOL. COMPONENT IN;;;[B]* COAXIAL IN;;;;NONE OPTICAL IN;;;;NONE HDMI IN;;;;;;;;[3] Current( DTV/CBL ) [p]/[[]: Select [ENTER]: Enter y • "NONE" appears in the display example above may not be used ...
... are reassigned, you can select the corresponding component by using the RINPUT selector on the front panel (or the input selector buttons on the remote control). A) SIRIUS B) XM C) TUNER D) CD E) MD/CD-R F) DVD G) DTV/CBL [ ]/[ ]: Up/Down [ENTER]: Enter 4 INPUT MENU 2/2 . TRIM PARENTAL LOCK INPUT ...RENAME VOL. TRIM BGV INPUT CH FRONT INPUT RENAME VOL. TRIM DECODER MODE INPUT RENAME VOL. COMPONENT IN;;;[B]* COAXIAL IN;;;;NONE OPTICAL IN;;;;NONE HDMI IN;;;;;;;;[3] Current( DTV/CBL ) [p]/[[]: Select [ENTER]: Enter y • "NONE" appears in the display example above may not be used ...

Owner's Manual
Page 98
When you select "DTS" and digital audio signals are assigned to avoid sudden changes in the standby mode. Control range: -6.0 dB to "Setting the Parental Lock" on page 65 for details. Refer to +6.0 dB Control step: 0.5 dB Initial setting: 0.0 dB C) TUNER INPUT RENAME . p [ [ ]/[ ]: Up/Down [p]/[[]: Adjust y This... are input. K) DVR INPUT RENAME DVR . Decoder mode DECODER MODE Use this unit is only available when the digital audio input jacks (HDMI, OPTICAL, and/or COAXIAL) are input, this feature to set the code number for each input. • Press 8n to change the...
When you select "DTS" and digital audio signals are assigned to avoid sudden changes in the standby mode. Control range: -6.0 dB to "Setting the Parental Lock" on page 65 for details. Refer to +6.0 dB Control step: 0.5 dB Initial setting: 0.0 dB C) TUNER INPUT RENAME . p [ [ ]/[ ]: Up/Down [p]/[[]: Adjust y This... are input. K) DVR INPUT RENAME DVR . Decoder mode DECODER MODE Use this unit is only available when the digital audio input jacks (HDMI, OPTICAL, and/or COAXIAL) are input, this feature to set the code number for each input. • Press 8n to change the...
Owner's Manual
Page 100
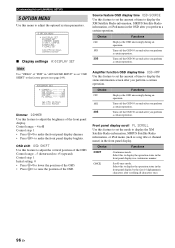
Control range: - 4 to 0 Control step: 1 • Press 8l to make the front panel display dimmer. • Press 8h to adjust the optional system parameters. 5 OPTION MENU . Choice Functions CONT Continuous mode. CONFIG E)HDMI SET F)ZONE2 SET [ ]/[ ]: Up/Down [ENTER]: Enter ■ Display settings A)DISPLAY SET... presets (see page 109). Select this feature to set "OSD SHIFT" to display the operation status in a continuous manner. Control range: -5 (downward) to +5 (upward) Control step: 1 Initial setting: 0 • Press 8l to lower the position of the OSD. • Press 8h to ...
Control range: - 4 to 0 Control step: 1 • Press 8l to make the front panel display dimmer. • Press 8h to adjust the optional system parameters. 5 OPTION MENU . Choice Functions CONT Continuous mode. CONFIG E)HDMI SET F)ZONE2 SET [ ]/[ ]: Up/Down [ENTER]: Enter ■ Display settings A)DISPLAY SET... presets (see page 109). Select this feature to set "OSD SHIFT" to display the operation status in a continuous manner. Control range: -5 (downward) to +5 (upward) Control step: 1 Initial setting: 0 • Press 8l to lower the position of the OSD. • Press 8h to ...
Owner's Manual
Page 114
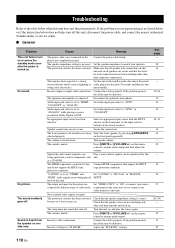
... is set to "HDMI", Set Audio input jack select to the standby mode, disconnect the power external electric shock (such as a CD-ROM. The front speakers to "RX-V663" in after the ...HDMI components connected to "AUTO" or "COAX/OPT". Non-standard video signals are Set "VIDEO CONV." The sleep timer has turned this unit, disconnect the power cable, and contact the nearest authorized Yamaha.... Disconnect the optimizer microphone. No appropriate input source has been selected. on the remote control to the table below does not help, turn on , and play the source again....
... is set to "HDMI", Set Audio input jack select to the standby mode, disconnect the power external electric shock (such as a CD-ROM. The front speakers to "RX-V663" in after the ...HDMI components connected to "AUTO" or "COAX/OPT". Non-standard video signals are Set "VIDEO CONV." The sleep timer has turned this unit, disconnect the power cable, and contact the nearest authorized Yamaha.... Disconnect the optimizer microphone. No appropriate input source has been selected. on the remote control to the table below does not help, turn on , and play the source again....

Owner's Manual
Page 125
... of Dolby Digital, allowing dialog normalization and dynamic range control. ■ DSD Direct Stream Digital (DSD) technology stores audio signals on demand by HDMI version 1.3 and designed for the optical disc players and AV receivers/amplifiers of the future, Dolby TrueHD also remains fully ...home theater experience. These features deliver audio commentaries (for example, the additional commentaries made by HDMI version 1.3 and designed for the optical disc players and AV receivers/amplifiers of 24-bit/96 kHz audio simultaneously. Supporting bitrates up to 18.0 Mbps, Dolby ...
... of Dolby Digital, allowing dialog normalization and dynamic range control. ■ DSD Direct Stream Digital (DSD) technology stores audio signals on demand by HDMI version 1.3 and designed for the optical disc players and AV receivers/amplifiers of the future, Dolby TrueHD also remains fully ...home theater experience. These features deliver audio commentaries (for example, the additional commentaries made by HDMI version 1.3 and designed for the optical disc players and AV receivers/amplifiers of 24-bit/96 kHz audio simultaneously. Supporting bitrates up to 18.0 Mbps, Dolby ...
Owner's Manual
Page 132
...96 OSD-AMP, Display settings 96 OSD-SOURCE, Display settings .........96 Other components controlling by remote control 101 Other components controlling, Remote control 101 OUT OF PHASE, Automatic setup warning message 118 Out of Res., HDMI message 46 OVER 24m (80ft), Automatic setup warning message 118 ■P P.INIT... field program 49 ROOM SIZE, Sound field parameter 75 Room size, Sound field parameter ...... 75 ■S S VIDEO jacks 17 S.AUDIO, HDMI set 98 S.INIT.DLY, Sound field parameter 74 S.LIVENESS, Sound field parameter 75 S.ROOM SIZE, Sound field parameter 75 SB INI.DLY,...
...96 OSD-AMP, Display settings 96 OSD-SOURCE, Display settings .........96 Other components controlling by remote control 101 Other components controlling, Remote control 101 OUT OF PHASE, Automatic setup warning message 118 Out of Res., HDMI message 46 OVER 24m (80ft), Automatic setup warning message 118 ■P P.INIT... field program 49 ROOM SIZE, Sound field parameter 75 Room size, Sound field parameter ...... 75 ■S S VIDEO jacks 17 S.AUDIO, HDMI set 98 S.INIT.DLY, Sound field parameter 74 S.LIVENESS, Sound field parameter 75 S.ROOM SIZE, Sound field parameter 75 SB INI.DLY,...
Owner's Manual
Page 133
... 43 Selection, MULTI CH INPUT component 43 Selection, SCENE template 37 SET MENU usage 84 Setting SCENE template input source, Remote control 41 Set-top box connection 22 Shuffle, iPod playback 69 SIGNAL INFO 46 Signal information 83 SILENT CINEMA 51 SILENT CINEMA indicator ... message 115 SUBWOOFER PHASE, Speaker settings 87 Subwoofer phase, Speaker settings ......87 SUBWOOFER PRE OUT jack connection 24 Supplied accessories 2 Support audio, HDMI set 98 SUR. TRIM, Input menu 94 VOLTAGE SELECTOR 4 VOLUME level indicator 30 Volume menu, Manual setup 81 Volume Trim, Input menu ...
... 43 Selection, MULTI CH INPUT component 43 Selection, SCENE template 37 SET MENU usage 84 Setting SCENE template input source, Remote control 41 Set-top box connection 22 Shuffle, iPod playback 69 SIGNAL INFO 46 Signal information 83 SILENT CINEMA 51 SILENT CINEMA indicator ... message 115 SUBWOOFER PHASE, Speaker settings 87 Subwoofer phase, Speaker settings ......87 SUBWOOFER PRE OUT jack connection 24 Supplied accessories 2 Support audio, HDMI set 98 SUR. TRIM, Input menu 94 VOLTAGE SELECTOR 4 VOLUME level indicator 30 Volume menu, Manual setup 81 Volume Trim, Input menu ...


