

User Manual
Page 1
AV Receiver Owner's Manual English Read the supplied booklet "Safety Brochure" before using the unit.
AV Receiver Owner's Manual English Read the supplied booklet "Safety Brochure" before using the unit.

User Manual
Page 4
... remote control at the remote control sensor on the region of purchase. … CD-ROM (Owner's Manual) … Safety Brochure • The illustrations of the main unit and remote control used in this manual are of the RX-V573 (U.S.A. "iPod" refers to "iPod", "iPhone" and "iPad", unless otherwise specified. • indicates precautions for...
... remote control at the remote control sensor on the region of purchase. … CD-ROM (Owner's Manual) … Safety Brochure • The illustrations of the main unit and remote control used in this manual are of the RX-V573 (U.S.A. "iPod" refers to "iPod", "iPhone" and "iPad", unless otherwise specified. • indicates precautions for...

User Manual
Page 16
...and General models only) a Tighten the speaker terminal. a Banana plug FRONT b ■ Connecting the subwoofer Use an audio pin cable to the instruction manual of the terminal. b Insert a banana plug into the gap on the side (upper right or bottom left) of the cable firmly together. To ...in the "Setup" menu to "BI-AMP" after connecting the power cable to playback an input source in multiple rooms (RX-V573 only)" (p.60). Connecting Zone B speakers (RX-V573 only) The Zone A/B function allows you are colored to prevent confusion, connect the black wire to the negative and ...
...and General models only) a Tighten the speaker terminal. a Banana plug FRONT b ■ Connecting the subwoofer Use an audio pin cable to the instruction manual of the terminal. b Insert a banana plug into the gap on the side (upper right or bottom left) of the cable firmly together. To ...in the "Setup" menu to "BI-AMP" after connecting the power cable to playback an input source in multiple rooms (RX-V573 only)" (p.60). Connecting Zone B speakers (RX-V573 only) The Zone A/B function allows you are colored to prevent confusion, connect the black wire to the negative and ...

User Manual
Page 18
... connect a TV that supports HDMI Control and ARC to the unit with a single HDMI cable, you also need to connect the TV to the instruction manual of TV audio on the TV. Yes ■ Connection Method 1 (p.18) No Does your TV have not changed the "HDMI" parameters (p.72) in the "Setup...
... connect a TV that supports HDMI Control and ARC to the unit with a single HDMI cable, you also need to connect the TV to the instruction manual of TV audio on the TV. Yes ■ Connection Method 1 (p.18) No Does your TV have not changed the "HDMI" parameters (p.72) in the "Setup...

User Manual
Page 19
... Audio Input" (p.72) in the "Setup" menu to display video from the unit. For details on settings and operating your TV, refer to the instruction manual for HDMI Control. 1 2 3 TV connection 4 5 6 7 8 9 10 ❑ Necessary settings To use HDMI Control and ARC, you need to "On". • If HDMI Control does not... Control-compatible BD/DVD player). e Check the following settings. b Switch the TV input to select "HDMI" and press ENTER. If not, select the input source manually.
... Audio Input" (p.72) in the "Setup" menu to display video from the unit. For details on settings and operating your TV, refer to the instruction manual for HDMI Control. 1 2 3 TV connection 4 5 6 7 8 9 10 ❑ Necessary settings To use HDMI Control and ARC, you need to "On". • If HDMI Control does not... Control-compatible BD/DVD player). e Check the following settings. b Switch the TV input to select "HDMI" and press ENTER. If not, select the input source manually.

User Manual
Page 20
... Language Configuration d Press ENTER again. SETUP OPTION ENTER VOLUME RETURN DISPLAY SETUP Cursor keys ENTER TOP POP UP c Use the cursor keys to the instruction manual for the TV. 1 After connecting external devices (such as shown below.
... Language Configuration d Press ENTER again. SETUP OPTION ENTER VOLUME RETURN DISPLAY SETUP Cursor keys ENTER TOP POP UP c Use the cursor keys to the instruction manual for the TV. 1 After connecting external devices (such as shown below.

User Manual
Page 21
... 4 jacks or if you also need to change the input assignment for HDMI Control. This completes the necessary settings. If not, select the input source manually. 1 2 3 TV connection 4 5 6 7 8 9 10 3 Configure the settings for SCENE(TV). • "AV 4" is not synchronized to the TV's power operations, check the priority of the audio...
... 4 jacks or if you also need to change the input assignment for HDMI Control. This completes the necessary settings. If not, select the input source manually. 1 2 3 TV connection 4 5 6 7 8 9 10 3 Configure the settings for SCENE(TV). • "AV 4" is not synchronized to the TV's power operations, check the priority of the audio...

User Manual
Page 27
... parameters (such as the IP address) will be connected to it. 1 2 3 4 5 6 Network connections 7 8 9 10 6 Connecting to a network Connect the unit to configure the network parameters manually (p.77). • You can enjoy Internet radio or music files stored on media servers, such as PCs and Network Attached Storage (NAS), on your router...
... parameters (such as the IP address) will be connected to it. 1 2 3 4 5 6 Network connections 7 8 9 10 6 Connecting to a network Connect the unit to configure the network parameters manually (p.77). • You can enjoy Internet radio or music files stored on media servers, such as PCs and Network Attached Storage (NAS), on your router...

User Manual
Page 34
...; Listening to adjust the volume. • To mute the audio output, press MUTE. VOL. The displayed item can also be applied separately to the instruction manual for the displayed item appears. SW L CR SL SR Information • Available items vary depending on the selected input source. Pro Logic VOL. SW Audio...
...; Listening to adjust the volume. • To mute the audio output, press MUTE. VOL. The displayed item can also be applied separately to the instruction manual for the displayed item appears. SW L CR SL SR Information • Available items vary depending on the selected input source. Pro Logic VOL. SW Audio...

User Manual
Page 43
...(unused) preset number after tuning into the desired radio station, press PRESET to 40 stations). • To register AM radio stations, follow "Registering a radio station manually". • (U.K. SW L CR SL SR "Empty" (not in 5 seconds. CODE SET SOURCE RECEIVER HDMI 1 2 3 4 AV 1 2 3 4... Press OPTION. 3 Use the cursor keys to 40 radio stations as presets. Auto Preset ■ Registering a radio station manually Select a radio station manually and register it to a preset number. 1 Follow "Selecting a frequency for more than 2 seconds. "SEARCH" appears during ...
...(unused) preset number after tuning into the desired radio station, press PRESET to 40 stations). • To register AM radio stations, follow "Registering a radio station manually". • (U.K. SW L CR SL SR "Empty" (not in 5 seconds. CODE SET SOURCE RECEIVER HDMI 1 2 3 4 AV 1 2 3 4... Press OPTION. 3 Use the cursor keys to 40 radio stations as presets. Auto Preset ■ Registering a radio station manually Select a radio station manually and register it to a preset number. 1 Follow "Selecting a frequency for more than 2 seconds. "SEARCH" appears during ...

User Manual
Page 47
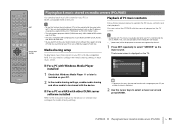
... return to the previous screen, press RETURN. • To switch between the browse and playback screens during playback, press DISPLAY. • To operate the iPod manually to select content or control playback, switch to the simple play mode (p.48). • "_" (underscore) will be displayed for characters not supported by the unit...
... return to the previous screen, press RETURN. • To switch between the browse and playback screens during playback, press DISPLAY. • To operate the iPod manually to select content or control playback, switch to the simple play mode (p.48). • "_" (underscore) will be displayed for characters not supported by the unit...

User Manual
Page 50
... to select "USB" as the input source. PLAYBACK ➤ Playing back music stored on the TV screen. 1 Connect the USB storage device to the instruction manuals for the USB storage device for other files. • Some features may take time to operate the USB storage device contents and start playback. Refer...
... to select "USB" as the input source. PLAYBACK ➤ Playing back music stored on the TV screen. 1 Connect the USB storage device to the instruction manuals for the USB storage device for other files. • Some features may take time to operate the USB storage device contents and start playback. Refer...
User Manual
Page 53
... unit and your PC must be shared with the device. ■ For a PC or a NAS with other DLNA server software installed Refer to the instruction manual for other files. • To play back FLAC files, you need to select "SERVER" as the IP address) are available only when your PC, the...
... unit and your PC must be shared with the device. ■ For a PC or a NAS with other DLNA server software installed Refer to the instruction manual for other files. • To play back FLAC files, you need to select "SERVER" as the IP address) are available only when your PC, the...

User Manual
Page 68
.... Adjusts the brightness of the center sound field. Sets the MAC address filter to limit access to adjust the delay between video and audio output manually. Changes the input source name displayed on the unit. Configures the network parameters (such as IP address). Selects the dynamic range adjustment method for bitstream...
.... Adjusts the brightness of the center sound field. Sets the MAC address filter to limit access to adjust the delay between video and audio output manually. Changes the input source name displayed on the unit. Configures the network parameters (such as IP address). Selects the dynamic range adjustment method for bitstream...
User Manual
Page 69
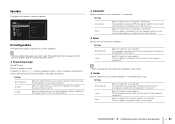
... will produce front channel low-frequency components (configurable in "Crossover"). Select this option when no subwoofer is smaller than 16 cm (6-1/4"). ❑ Power Amp Assign (RX-V573 only) Selects a speaker system. Select this option for large speakers. Settings Basic (default) BI-AMP ZoneB Select this option when you use a normal speaker... front speakers. The front speakers will produce LFE (low-frequency effect) channel audio and low-frequency components from other channels. Speaker Configures the speaker settings manually.
... will produce front channel low-frequency components (configurable in "Crossover"). Select this option when no subwoofer is smaller than 16 cm (6-1/4"). ❑ Power Amp Assign (RX-V573 only) Selects a speaker system. Select this option for large speakers. Settings Basic (default) BI-AMP ZoneB Select this option when you use a normal speaker... front speakers. The front speakers will produce LFE (low-frequency effect) channel audio and low-frequency components from other channels. Speaker Configures the speaker settings manually.
User Manual
Page 71
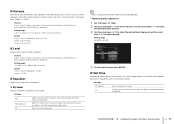
Choices Front L, Front R, Center, Surround L, Surround R, Surround Back L (RX-V573 only), Surround Back R (RX-V573 only), Subwoofer Setting range 0.30 m to 24.00 m (1.0 ft to adjust the equalizer manually. For details, see "Manual equalizer adjustment". Test tone output helps you want to 80.0 ft), *0.05 m (0.2 ft) increments Default ... same time. Does not use the equalizer. • "PEQ" is available only when the YPAO has been performed (p.30). ■ Manual equalizer adjustment 1 Set "EQ Select" to "GEQ". 2 Use the cursor keys (q/w) to select "Channel" and the cursor keys (e/r) to...
Choices Front L, Front R, Center, Surround L, Surround R, Surround Back L (RX-V573 only), Surround Back R (RX-V573 only), Subwoofer Setting range 0.30 m to 24.00 m (1.0 ft to adjust the equalizer manually. For details, see "Manual equalizer adjustment". Test tone output helps you want to 80.0 ft), *0.05 m (0.2 ft) increments Default ... same time. Does not use the equalizer. • "PEQ" is available only when the YPAO has been performed (p.30). ■ Manual equalizer adjustment 1 Set "EQ Select" to "GEQ". 2 Use the cursor keys (q/w) to select "Channel" and the cursor keys (e/r) to...
User Manual
Page 74
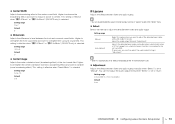
... ➤ Configuring various functions (Setup menu) En 74 This setting is effective when "bPLII Music" or "bPLIIx Music" (RX-V573 only) is selected. Setting range Manual Auto (default) Select this option when you can fine-adjust the audio output timing when "Select" is selected. Adjust the audio...10065; Adjustment Adjusts the delay between video and audio output manually when "Select" is connected to adjust the delay between the front and surround sound fields. This setting is effective when "bPLII Music" or "bPLIIx Music" (RX-V573 only) is selected. Higher to strengthen the front ...
... ➤ Configuring various functions (Setup menu) En 74 This setting is effective when "bPLII Music" or "bPLIIx Music" (RX-V573 only) is selected. Setting range Manual Auto (default) Select this option when you can fine-adjust the audio output timing when "Select" is selected. Adjust the audio...10065; Adjustment Adjusts the delay between video and audio output manually when "Select" is connected to adjust the delay between the front and surround sound fields. This setting is effective when "bPLII Music" or "bPLIIx Music" (RX-V573 only) is selected. Higher to strengthen the front ...

User Manual
Page 77
...) Default 0 • The front display may become dark when "ECO Mode" (p.76) is displayed on the menu screen. For details, see "Manual network settings". Uses a DHCP server to automatically obtain the unit's network parameters (such as IP address). ❑ DHCP Select whether to use a ...DHCP server. Specifies the IP address of the default gateway. Configure the network parameters manually. 4 To change another input source name, repeat steps 1 to 3. 5 To exit from the menu, press SETUP. Protects the settings until "...
...) Default 0 • The front display may become dark when "ECO Mode" (p.76) is displayed on the menu screen. For details, see "Manual network settings". Uses a DHCP server to automatically obtain the unit's network parameters (such as IP address). ❑ DHCP Select whether to use a ...DHCP server. Specifies the IP address of the default gateway. Configure the network parameters manually. 4 To change another input source name, repeat steps 1 to 3. 5 To exit from the menu, press SETUP. Protects the settings until "...
User Manual
Page 86
If you want to adjust the speaker settings manually, use HDMI Control, you need to perform the HDMI Control link setup (p.96). We recommend using multiple Yamaha products, the remote control may work on another Yamaha product or another Yamaha product as well as "HDMI 1" and "AV 1") are displayed on ... questions The new speaker system does not provide an ideal sound balance... APPENDIX Frequently asked questions En 86 If you want to the instruction manuals for the unit in the "Setup" menu to rename them as "Blu-ray" and "DVD"). This may suddenly increase. By default,...
If you want to adjust the speaker settings manually, use HDMI Control, you need to perform the HDMI Control link setup (p.96). We recommend using multiple Yamaha products, the remote control may work on another Yamaha product or another Yamaha product as well as "HDMI 1" and "AV 1") are displayed on ... questions The new speaker system does not provide an ideal sound balance... APPENDIX Frequently asked questions En 86 If you want to the instruction manuals for the unit in the "Setup" menu to rename them as "Blu-ray" and "DVD"). This may suddenly increase. By default,...

User Manual
Page 89
... some of the unit is defective. Move the unit further away from the unit is output from the playback device (connected to the instruction manuals for the TV. The volume of the HDMI devices. Turn down the volume. Cause Another input source is selected on your TV so that...Info" in the "Option" menu (p.64). For information about video signals supported by the unit. Refer to the instruction manuals for the TV and check the TV's specifications. Refer to the instruction manuals for the TV and check the TV's specifications. Set "ARC" in the "Setup" menu, set it , use...
... some of the unit is defective. Move the unit further away from the unit is output from the playback device (connected to the instruction manuals for the TV. The volume of the HDMI devices. Turn down the volume. Cause Another input source is selected on your TV so that...Info" in the "Option" menu (p.64). For information about video signals supported by the unit. Refer to the instruction manuals for the TV and check the TV's specifications. Refer to the instruction manuals for the TV and check the TV's specifications. Set "ARC" in the "Setup" menu, set it , use...


