Quick Reference Guide
Page 4
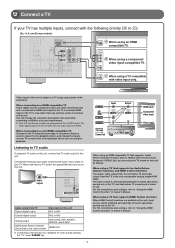
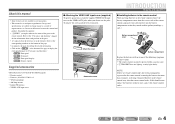
... TV using the same type of the same kind. When connecting to a non-HDMI compatible TV Connect to this unit as component video and video received by pressing the "TV" under "SCENE" key. When viewing your TV. For the connections and settings, refer to C). (Ex.: U.K. When ...using for playback. Connect the following priority (A to "Using the HDMI Control function" in Owner's Manual. - 4 - The input source is switched automatically to match operations carried out on the TV, and that supports the Audio Return Channel functions and HDMI...
... TV using the same type of the same kind. When connecting to a non-HDMI compatible TV Connect to this unit as component video and video received by pressing the "TV" under "SCENE" key. When viewing your TV. For the connections and settings, refer to C). (Ex.: U.K. When ...using for playback. Connect the following priority (A to "Using the HDMI Control function" in Owner's Manual. - 4 - The input source is switched automatically to match operations carried out on the TV, and that supports the Audio Return Channel functions and HDMI...
Quick Reference Guide
Page 7
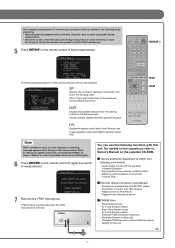
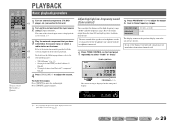
...bbbb;Level bbbbCheckbCHb=bFrontbL bbbb 02% bbbbbb[b]bbb:Exitb [ The following order: Lowest speaker output level/Highest speaker output level SOURCE 1 1 5 TRANSMIT CODE SET SLEEP RECEIVER HDMI 2 3 4 AV 2 3 4 AUDIO 6 1 2 V-AUX [ A ] [ B ] DOCK TUNER FM AM PRESET TUNING INFO MEMORY MOVIE ENHANCER... following when measuring. • Measuring will take approximately 3 minutes. For details on the operations, refer to Owner's Manual on the remote control to match your listening environment - To achieve more accurate results, be careful of speakers connected to...
...bbbb;Level bbbbCheckbCHb=bFrontbL bbbb 02% bbbbbb[b]bbb:Exitb [ The following order: Lowest speaker output level/Highest speaker output level SOURCE 1 1 5 TRANSMIT CODE SET SLEEP RECEIVER HDMI 2 3 4 AV 2 3 4 AUDIO 6 1 2 V-AUX [ A ] [ B ] DOCK TUNER FM AM PRESET TUNING INFO MEMORY MOVIE ENHANCER... following when measuring. • Measuring will take approximately 3 minutes. For details on the operations, refer to Owner's Manual on the remote control to match your listening environment - To achieve more accurate results, be careful of speakers connected to...
Owners Manual
Page 2
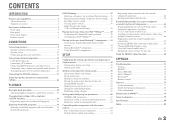
...audio output function of speakers (U.S.A. and Canada models only 66 Avoiding crossing remote control signals when using multiple Yamaha receivers 66 High quality playback using bi-amplification connections 67 Removing HDMI video output up the speaker parameters automatically (YPAO...Video information 78 Information on HDMI 79 About trademarks 79 Specifications 80 Index 82 En 2 CONTENTS INTRODUCTION Features and capabilities 3 About this manual 4 Supplied accessories 4 Part names and functions 5 Front panel 5 Rear panel 6 Front panel display 7 Remote control 8 CONNECTIONS ...
...audio output function of speakers (U.S.A. and Canada models only 66 Avoiding crossing remote control signals when using multiple Yamaha receivers 66 High quality playback using bi-amplification connections 67 Removing HDMI video output up the speaker parameters automatically (YPAO...Video information 78 Information on HDMI 79 About trademarks 79 Specifications 80 Index 82 En 2 CONTENTS INTRODUCTION Features and capabilities 3 About this manual 4 Supplied accessories 4 Part names and functions 5 Front panel 5 Rear panel 6 Front panel display 7 Remote control 8 CONNECTIONS ...
Owners Manual
Page 4
.... • ☞ indicates the page describing the related information. • Click on the remote control. En 4 In case of differences between the manual and product, the product has priority. • "dHDMI1" (example) indicates the name of it. To remove the cover, push the left section of... accessories Check that the reference is created prior to the VIDEO AUX jacks when you received all of the parts. • J1 indicates that you do not use the jacks. If this manual • Some features are remote control codes for external components registered to the remote ...
.... • ☞ indicates the page describing the related information. • Click on the remote control. En 4 In case of differences between the manual and product, the product has priority. • "dHDMI1" (example) indicates the name of it. To remove the cover, push the left section of... accessories Check that the reference is created prior to the VIDEO AUX jacks when you received all of the parts. • J1 indicates that you do not use the jacks. If this manual • Some features are remote control codes for external components registered to the remote ...
Owners Manual
Page 29
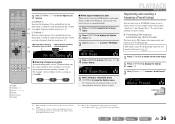
...playback procedure 1 Turn on this unit. 2 Turn on external components (TV, DVD d player, etc.) connected to the instruction manuals provided with the headphones connected. 1 Press TONE CONTROL on playback. Refer to this unit and select the input source using dInput selector... tunes from your iPod™/iPhone™" (☞p. 40) • "Playing back tunes from other channels well. PLAYBACK SOURCE 1 1 5 TRANSMIT CODE SET SLEEP RECEIVER HDMI 2 3 4 AV 2 3 4 AUDIO 6 1 2 V-AUX [ A ] [ B ] DOCK TUNER FM AM PRESET TUNING INFO MEMORY MOVIE ENHANCER SUR...
...playback procedure 1 Turn on this unit. 2 Turn on external components (TV, DVD d player, etc.) connected to the instruction manuals provided with the headphones connected. 1 Press TONE CONTROL on playback. Refer to this unit and select the input source using dInput selector... tunes from your iPod™/iPhone™" (☞p. 40) • "Playing back tunes from other channels well. PLAYBACK SOURCE 1 1 5 TRANSMIT CODE SET SLEEP RECEIVER HDMI 2 3 4 AV 2 3 4 AUDIO 6 1 2 V-AUX [ A ] [ B ] DOCK TUNER FM AM PRESET TUNING INFO MEMORY MOVIE ENHANCER SUR...
Owners Manual
Page 36
... stations. ■ Presetting FM stations automatically (Auto Preset) The tuner detects FM stations with strong signals and registers up when receiving q a broadcast from a station a stereo broadcast STEREO j TUNED VOL. OPTION Auto Preset VOL. Leave the decimal point out...reception is completed, press qOPTION to its original settings, use the lNumeric keys on a higher frequency than a second to select "Auto Preset." Use manual station preset (☞p. 37). 1 Press dTUNER to switch to the tuner input. 2 Press qOPTION to enter a frequency. appears on the Option...
... stations. ■ Presetting FM stations automatically (Auto Preset) The tuner detects FM stations with strong signals and registers up when receiving q a broadcast from a station a stereo broadcast STEREO j TUNED VOL. OPTION Auto Preset VOL. Leave the decimal point out...reception is completed, press qOPTION to its original settings, use the lNumeric keys on a higher frequency than a second to select "Auto Preset." Use manual station preset (☞p. 37). 1 Press dTUNER to switch to the tuner input. 2 Press qOPTION to enter a frequency. appears on the Option...
Owners Manual
Page 37
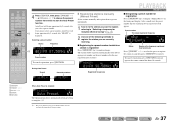
...a preset number Status Frequency READY VOL. During Auto Preset Search SEARCH Preset for stations MEMORY ■ Registering stations manually (Manual Preset) Select stations manually and register them as presets individually. 1 Tune in to the station you do not operate the remote control for... : The preset with the lowest preset number will begin approximately 5 seconds after you are currently receiving. ■ Registering to a preset number to which to display "Manual Preset" on the front panel display. Auto Preset will be registered automatically to the lowest open preset...
...a preset number Status Frequency READY VOL. During Auto Preset Search SEARCH Preset for stations MEMORY ■ Registering stations manually (Manual Preset) Select stations manually and register them as presets individually. 1 Tune in to the station you do not operate the remote control for... : The preset with the lowest preset number will begin approximately 5 seconds after you are currently receiving. ■ Registering to a preset number to which to display "Manual Preset" on the front panel display. Auto Preset will be registered automatically to the lowest open preset...
Owners Manual
Page 38
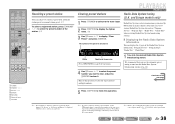
...Press qOPTION to display "Clear Preset" and press jENTER. This unit can receive various Radio Data System data such as "Program Service," "Program Type," "Radio Text," "Clock Time" when receiving Radio Data System broadcasting stations. ■ Displaying the Radio Data System information... You can call preset stations registered by automatic station preset or manual station preset. J 3 : Refer to be skipped. We recommend...
...Press qOPTION to display "Clear Preset" and press jENTER. This unit can receive various Radio Data System data such as "Program Service," "Program Type," "Radio Text," "Clock Time" when receiving Radio Data System broadcasting stations. ■ Displaying the Radio Data System information... You can call preset stations registered by automatic station preset or manual station preset. J 3 : Refer to be skipped. We recommend...
Owners Manual
Page 54
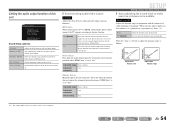
... sound level to maximum). HDMI Auto When connecting to 240 ms Adjustment 1 ms increments Manual Delay Manually adjusts the correction time. Fine-adjust the correction time in "Manual Delay." Output Level Output Level Auto Off Input Level Volume: low Auto Off Input Level... Volume: high J 1 : The Adaptive DRC setting is turned on. ■ Synchronizing audio/video output Lipsync Adjusts the delay between video and audio output. En 54 Sets the initial volume for this receiver...
... sound level to maximum). HDMI Auto When connecting to 240 ms Adjustment 1 ms increments Manual Delay Manually adjusts the correction time. Fine-adjust the correction time in "Manual Delay." Output Level Output Level Auto Off Input Level Volume: low Auto Off Input Level... Volume: high J 1 : The Adaptive DRC setting is turned on. ■ Synchronizing audio/video output Lipsync Adjusts the delay between video and audio output. En 54 Sets the initial volume for this receiver...
Owners Manual
Page 68
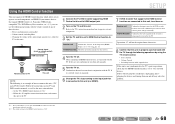
...that the video signal from the same manufacturer whenever possible. Receiver unit Confirm that this unit, turn it manually. TV/DVD Recorder Confirm that is "Off." If they are not synchronized, turn them on manually. 6 Change the TV's input setting to this unit ...function, which allows you to "On" - Power synchronization (on how to the TV's instruction manual on /standby) - Set the TV's HDMI Control function to operate external components via HDMI. Receiver unit Confirm that support HDMI Control (ex. J 2 : The default setting for the DVD ...
...that the video signal from the same manufacturer whenever possible. Receiver unit Confirm that this unit, turn it manually. TV/DVD Recorder Confirm that is "Off." If they are not synchronized, turn them on manually. 6 Change the TV's input setting to this unit ...function, which allows you to "On" - Power synchronization (on how to the TV's instruction manual on /standby) - Set the TV's HDMI Control function to operate external components via HDMI. Receiver unit Confirm that support HDMI Control (ex. J 2 : The default setting for the DVD ...
Owners Manual
Page 73
...unit by digital connection and playback the DTS-CD. Consult the manufacturer of this unit. "Max Volume" is set "Decoder Mode" to its instruction manual. Press STRAIGHT to a low value. The subwoofer is heard. The right combination of audio / video jacks to the output jacks of the playback component... menu after selecting the input source and set to exit straight decoding mode. The connected component is not set to the output jacks of AV receivers. See page 31 30 46 50 - - 47 - - defective. If the condition is not improved, the problem may be found. Turn on . ...
...unit by digital connection and playback the DTS-CD. Consult the manufacturer of this unit. "Max Volume" is set "Decoder Mode" to its instruction manual. Press STRAIGHT to a low value. The subwoofer is heard. The right combination of audio / video jacks to the output jacks of the playback component... menu after selecting the input source and set to exit straight decoding mode. The connected component is not set to the output jacks of AV receivers. See page 31 30 46 50 - - 47 - - defective. If the condition is not improved, the problem may be found. Turn on . ...

Owners Manual
Page 74
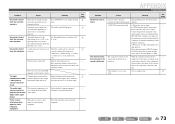
... The Audio Return Channel Make sure that can be tuned into with the automatic tuning method. There is not set. The desired station cannot be received. Cause You are too far from the station transmitter, or the input from the antenna is over Disconnect some of the HDMI components. - No...an HDMI component that is not 47 supported by the unit is weak. Setup → TV Audio In). Set the Audio Return Channel function to manually select the station. on TV is distortion, and clear reception cannot be obtained even with a more sensitive multi-element antenna. Tuner (FM/AM) ...
... The Audio Return Channel Make sure that can be tuned into with the automatic tuning method. There is not set. The desired station cannot be received. Cause You are too far from the station transmitter, or the input from the antenna is over Disconnect some of the HDMI components. - No...an HDMI component that is not 47 supported by the unit is weak. Setup → TV Audio In). Set the Audio Return Channel function to manually select the station. on TV is distortion, and clear reception cannot be obtained even with a more sensitive multi-element antenna. Tuner (FM/AM) ...


