
Owner's Manual
Page 10
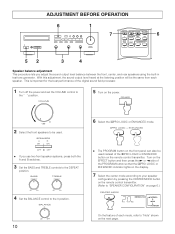
... button and then press the £ or ™ side of the PROGRAM button so that the ŸPRO LOGIC or ENHANCED indicator lights on the display. 7 Select the center mode according to your speaker configuration by pressing the CENTER MODE button on the remote control transmitter. (Refer to "SPEAKER CONFIGURATION" on...
... button and then press the £ or ™ side of the PROGRAM button so that the ŸPRO LOGIC or ENHANCED indicator lights on the display. 7 Select the center mode according to your speaker configuration by pressing the CENTER MODE button on the remote control transmitter. (Refer to "SPEAKER CONFIGURATION" on...

Owner's Manual
Page 11
... the TEST button is smaller than the front speakers. In this mode when you select the center mode, note the following. TEST \ TEST Blinks. The display changes as the front speakers. For 5-speaker configuration NORMAL: Select this mode, the bass tone will hear a test tone (like pink noise) from the front...
... the TEST button is smaller than the front speakers. In this mode when you select the center mode, note the following. TEST \ TEST Blinks. The display changes as the front speakers. For 5-speaker configuration NORMAL: Select this mode, the bass tone will hear a test tone (like pink noise) from the front...

Owner's Manual
Page 13
... case, even if other input selectors except VCR MONITOR are selected at the same time (by using input selectors), be used. ENGLISH PLAYING A SOURCE 2 Display 3 1,6 4 1 Set the VOLUME control to the desired output level. POWER 3 Select the desired input source. (For video sources, turn the TV/...of audio sources: 1)TAPE MONITOR, 2)VCR MONITOR, 3)LD, TUNER, CD or PHONO. SPEAKERS A B ON _ ON OFF - VOLUME 0 -dB 2 Turn on the display.) 4 Select the front speakers to be sure to page 18.) Notes In step 3, if two or more program sources are not selected. Priority order of...
... case, even if other input selectors except VCR MONITOR are selected at the same time (by using input selectors), be used. ENGLISH PLAYING A SOURCE 2 Display 3 1,6 4 1 Set the VOLUME control to the desired output level. POWER 3 Select the desired input source. (For video sources, turn the TV/...of audio sources: 1)TAPE MONITOR, 2)VCR MONITOR, 3)LD, TUNER, CD or PHONO. SPEAKERS A B ON _ ON OFF - VOLUME 0 -dB 2 Turn on the display.) 4 Select the front speakers to be sure to page 18.) Notes In step 3, if two or more program sources are not selected. Priority order of...

Owner's Manual
Page 16
... desired station (because the signals of the station you tune in an FM station manually, it manually (MANUAL TUNING). The selected band appears on the display. To tune in a desired station with the TUNING button. TUNING MODE AUTO/MAN'L MONO \ FM MHz AUTO TUNING Lights. 3 Tune in a higher ... Press the TUNER button and select the reception band (FM or AM) by pressing the FM/AM button. To tune to obtain the sound quality. 1 Displays the band and frequency of the received station. To tune in a lower frequency, press the left side (DOWN) once. TUNING MODE AUTO/MAN'L MONO...
... desired station (because the signals of the station you tune in an FM station manually, it manually (MANUAL TUNING). The selected band appears on the display. To tune in a desired station with the TUNING button. TUNING MODE AUTO/MAN'L MONO \ FM MHz AUTO TUNING Lights. 3 Tune in a higher ... Press the TUNER button and select the reception band (FM or AM) by pressing the FM/AM button. To tune to obtain the sound quality. 1 Displays the band and frequency of the received station. To tune in a lower frequency, press the left side (DOWN) once. TUNING MODE AUTO/MAN'L MONO...

Owner's Manual
Page 17
... UP 4 While the MEMORY indicator blinks, press the PRESET STATIONS button so that the desired preset station number (1 - 8) appears on the display. PRESET STATIONS DOWN UP Selected preset station number \ PRESET FM MEMORY MHz Notes ÷ A new setting can be erased. A/B/C/D/E PRESET \... FM MHz Appears. 2 Press the PRESET STATIONS button so that the desired preset station number (1 - 8) appears on the display. If so, it can store station frequencies (selected by tuning operation) by specifying the corresponding preset station number. Memory back-up The ...
... UP 4 While the MEMORY indicator blinks, press the PRESET STATIONS button so that the desired preset station number (1 - 8) appears on the display. PRESET STATIONS DOWN UP Selected preset station number \ PRESET FM MEMORY MHz Notes ÷ A new setting can be erased. A/B/C/D/E PRESET \... FM MHz Appears. 2 Press the PRESET STATIONS button so that the desired preset station number (1 - 8) appears on the display. If so, it can store station frequencies (selected by tuning operation) by specifying the corresponding preset station number. Memory back-up The ...

Owner's Manual
Page 18
... MOVIE = ROCK CONCERT = CONCERT HALL = ŸPRO LOGIC. You can create an excellent audio sound field by selecting the suitable program and adding desired adjustments. Displays the delay time. ∞ DELAY NORMAL WIDE TEST PHANTOM ms Ÿ PRO LOGIC CONCERT MONO ROCK CONCERT ENHANCED VIDEO MOVIE CONCERT HALL Indicates the center...
... MOVIE = ROCK CONCERT = CONCERT HALL = ŸPRO LOGIC. You can create an excellent audio sound field by selecting the suitable program and adding desired adjustments. Displays the delay time. ∞ DELAY NORMAL WIDE TEST PHANTOM ms Ÿ PRO LOGIC CONCERT MONO ROCK CONCERT ENHANCED VIDEO MOVIE CONCERT HALL Indicates the center...

Owner's Manual
Page 20
... the ™ or £ side of the PROGRAM button so that you find most suitable. ÷ The values of the DSP program buttons on the display. When the EFFECT button is turned on, the previously selected delay time and DSP program indicator appear on the... display. ÷ If desired, adjust the delay time and the output level of each speaker. (For details, refer to the corresponding descriptions on this unit is ...
... the ™ or £ side of the PROGRAM button so that you find most suitable. ÷ The values of the DSP program buttons on the display. When the EFFECT button is turned on, the previously selected delay time and DSP program indicator appear on the... display. ÷ If desired, adjust the delay time and the output level of each speaker. (For details, refer to the corresponding descriptions on this unit is ...
Owner's Manual
Page 22
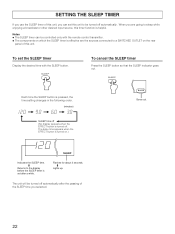
... other desired input source, this timer function is effective are the sources connected to a SWITCHED OUTLET on the rear panel of this unit to the display before the SLEEP timer is set after the passing of this unit, you selected. 22 Flashes for about 3 seconds. « Lights up. SETTING ... controlled only with the SLEEP button. To set this unit. SLEEP SLEEP Goes out. Notes ÷ The SLEEP timer can set the SLEEP timer Display the desired time with the remote control transmitter. ÷ The components on .) To cancel the SLEEP timer Press the SLEEP button so that the ...
... other desired input source, this timer function is effective are the sources connected to a SWITCHED OUTLET on the rear panel of this unit to the display before the SLEEP timer is set after the passing of this unit, you selected. 22 Flashes for about 3 seconds. « Lights up. SETTING ... controlled only with the SLEEP button. To set this unit. SLEEP SLEEP Goes out. Notes ÷ The SLEEP timer can set the SLEEP timer Display the desired time with the remote control transmitter. ÷ The components on .) To cancel the SLEEP timer Press the SLEEP button so that the ...


