
Owner's Manual
Page 5
...production. and Canada models only 13 Information on jacks and cable plugs 14 Connecting video components 15 Connecting audio components 17 Connecting a Yamaha iPod universal dock 18 Using the VIDEO AUX jacks on the front panel .... 18 Connecting the FM and AM antennas 19 Connecting... 8 What do you want to the attached sheet or the top pages of this manual for the information about each position of remote control codes iii BASIC OPERATION ADVANCED OPERATION ADDITIONAL INFORMATION APPENDIX BASIC OPERATION Selecting the SCENE templates 26 Selecting the desired SCENE template 26...
...production. and Canada models only 13 Information on jacks and cable plugs 14 Connecting video components 15 Connecting audio components 17 Connecting a Yamaha iPod universal dock 18 Using the VIDEO AUX jacks on the front panel .... 18 Connecting the FM and AM antennas 19 Connecting... 8 What do you want to the attached sheet or the top pages of this manual for the information about each position of remote control codes iii BASIC OPERATION ADVANCED OPERATION ADDITIONAL INFORMATION APPENDIX BASIC OPERATION Selecting the SCENE templates 26 Selecting the desired SCENE template 26...

Owner's Manual
Page 6
... digital audio signal jacks ◆ Sleep timer ◆ Cinema and music night listening modes ◆ Remote control with preset remote control codes Manufactured under license from excessive volume levels. 2 En One that of DTS, Inc. Neural... Surround™ name and related logos are trademarks of XM Satellite Radio broadcasts in multi-channels, resulting in a full surround sound experience iPod controlling capability ◆ DOCK terminal to connect a Yamaha...
... digital audio signal jacks ◆ Sleep timer ◆ Cinema and music night listening modes ◆ Remote control with preset remote control codes Manufactured under license from excessive volume levels. 2 En One that of DTS, Inc. Neural... Surround™ name and related logos are trademarks of XM Satellite Radio broadcasts in multi-channels, resulting in a full surround sound experience iPod controlling capability ◆ DOCK terminal to connect a Yamaha...
Owner's Manual
Page 7
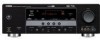
...installing new batteries. • Do not throw away batteries with your local voltage using a straight slot screwdriver. Remote control CODE SET TRANSMIT POWER TV POWER AV STANDBY POWER CD DVD DOCK V-AUX MD CD-R CBL DTV MULTI CH IN AUDIO SEL TUNER XM DVR TV...MENU MENU SRCH MODE ENTER A-E/CAT. dispose of them immediately. INTRODUCTION Getting started Getting started ■ Checking the supplied accessories Check that you received all of the batteries if you notice the following parts. DISPLAY Optimizer microphone AM loop antenna Indoor FM antenna REC SCENE 1 2 3 ...
...installing new batteries. • Do not throw away batteries with your local voltage using a straight slot screwdriver. Remote control CODE SET TRANSMIT POWER TV POWER AV STANDBY POWER CD DVD DOCK V-AUX MD CD-R CBL DTV MULTI CH IN AUDIO SEL TUNER XM DVR TV...MENU MENU SRCH MODE ENTER A-E/CAT. dispose of them immediately. INTRODUCTION Getting started Getting started ■ Checking the supplied accessories Check that you received all of the batteries if you notice the following parts. DISPLAY Optimizer microphone AM loop antenna Indoor FM antenna REC SCENE 1 2 3 ...

Owner's Manual
Page 13
...41 • Using your listening room (AUTO SETUP) ☞ P. 22 • Manually adjusting various parameters of this unit ☞ P. 49 • Setting the remote control ☞ P. 59 • Adjusting the advanced parameters ☞ P. 64 ■ Additional features Automatically turning off this unit ☞ P. 34 English 9 ... for the SCENE buttons. y If you cannot find the desired situation, you must tune into the desired radio station in order to receive infrared signals from the standby mode, press 1STANDBY/ ON (or GSTANDBY). Press FSCENE 4 (or FSCENE 4) to 40 for details. Note...
...41 • Using your listening room (AUTO SETUP) ☞ P. 22 • Manually adjusting various parameters of this unit ☞ P. 49 • Setting the remote control ☞ P. 59 • Adjusting the advanced parameters ☞ P. 64 ■ Additional features Automatically turning off this unit ☞ P. 34 English 9 ... for the SCENE buttons. y If you cannot find the desired situation, you must tune into the desired radio station in order to receive infrared signals from the standby mode, press 1STANDBY/ ON (or GSTANDBY). Press FSCENE 4 (or FSCENE 4) to 40 for details. Note...
Owner's Manual
Page 22
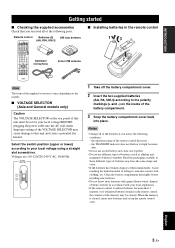
... VOLUME VIDEO VIDEO AUX L AUDIO R PORTABLE VIDEO VIDEO AUX L AUDIO R PORTABLE 3.5 mm stereo mini plug V L R Video output Audio output Audio output Yamaha iPod universal dock (YDS-10, sold separately) (U.S.A. Using the VIDEO AUX jacks on the front panel Use the VIDEO AUX jacks on the rear panel...DOCK 2. Once the connection is equipped with the DOCK terminal on the rear panel, the priority order of this unit using the supplied remote control. Notes • To reproduce the source signals input at the AUDIO jacks, PORTABLE jack and the DOCK terminal on the rear...
... VOLUME VIDEO VIDEO AUX L AUDIO R PORTABLE VIDEO VIDEO AUX L AUDIO R PORTABLE 3.5 mm stereo mini plug V L R Video output Audio output Audio output Yamaha iPod universal dock (YDS-10, sold separately) (U.S.A. Using the VIDEO AUX jacks on the front panel Use the VIDEO AUX jacks on the rear panel...DOCK 2. Once the connection is equipped with the DOCK terminal on the rear panel, the priority order of this unit using the supplied remote control. Notes • To reproduce the source signals input at the AUDIO jacks, PORTABLE jack and the DOCK terminal on the rear...

Owner's Manual
Page 23
...unit Ground For maximum safety and minimum interference, connect the antenna GND terminal to turn on this unit, there will be connected to receive infrared signals from this unit. AM loop Indoor FM antenna antenna (supplied) (supplied) ANTENNA AM GND FM 75 UNBAL. English ... maximum power or the total power consumption of power in order to these antennas should always be placed away from the remote control. Consult the nearest authorized Yamaha dealer or service center about outdoor antennas. • The AM loop antenna should provide sufficient signal strength. IN MD/...
...unit Ground For maximum safety and minimum interference, connect the antenna GND terminal to turn on this unit, there will be connected to receive infrared signals from this unit. AM loop Indoor FM antenna antenna (supplied) (supplied) ANTENNA AM GND FM 75 UNBAL. English ... maximum power or the total power consumption of power in order to these antennas should always be placed away from the remote control. Consult the nearest authorized Yamaha dealer or service center about outdoor antennas. • The AM loop antenna should provide sufficient signal strength. IN MD/...

Owner's Manual
Page 25
...TV Operates the TV assigned to operate. places of some buttons depends on the operation mode selector position. Be sure to aim the remote control directly at the component you want to DTV/CBL (see page 61). STANDBY /ON PHONES SILENT CINEMA SPEAKERS A/B/OFF OPTIMIZER MIC...operation. KOperation mode selector The function of high humidity, such as near a bath - places of extremely low temperatures - ■ Using the remote control The remote control transmits a directional infrared ray. places of high temperature, such as near a heater or stove - Notes • Do not spill water...
...TV Operates the TV assigned to operate. places of some buttons depends on the operation mode selector position. Be sure to aim the remote control directly at the component you want to DTV/CBL (see page 61). STANDBY /ON PHONES SILENT CINEMA SPEAKERS A/B/OFF OPTIMIZER MIC...operation. KOperation mode selector The function of high humidity, such as near a bath - places of extremely low temperatures - ■ Using the remote control The remote control transmits a directional infrared ray. places of high temperature, such as near a heater or stove - Notes • Do not spill water...

Owner's Manual
Page 30
...library and assign the templates to confirm the selection. The selected SCENE template is assigned to the button. 1 Front panel or 1 Remote control Notes • If you may need to select the desired template. SELECTING THE SCENE TEMPLATES Selecting the SCENE templates This unit... in the front panel display. 3 seconds 3 seconds 1 or 1 Front panel Remote control DVD Movie View 3 Press the FSCENE (or FSCENE) button again to the selected SCENE buttons on the remote control. Remote control SCENE template library (Image) 1 Assign the SCENE template to the SCENE button...
...library and assign the templates to confirm the selection. The selected SCENE template is assigned to the button. 1 Front panel or 1 Remote control Notes • If you may need to select the desired template. SELECTING THE SCENE TEMPLATES Selecting the SCENE templates This unit... in the front panel display. 3 seconds 3 seconds 1 or 1 Front panel Remote control DVD Movie View 3 Press the FSCENE (or FSCENE) button again to the selected SCENE buttons on the remote control. Remote control SCENE template library (Image) 1 Assign the SCENE template to the SCENE button...

Owner's Manual
Page 33
... a SCENE template Create the original SCENE template SCENE template library (Image) 1 Assign to confirm the new name. The SCENE template customizing screen appears on the remote control. Select "SCENE" in step 3 of the selected parameter. AMP SOURCE TV 1 3 seconds 3 Press Dk / n to select the desired parameter of the SCENE template and...
... a SCENE template Create the original SCENE template SCENE template library (Image) 1 Assign to confirm the new name. The SCENE template customizing screen appears on the remote control. Select "SCENE" in step 3 of the selected parameter. AMP SOURCE TV 1 3 seconds 3 Press Dk / n to select the desired parameter of the SCENE template and...

Owner's Manual
Page 34
...page 32 32 37 33 34 36 34 30 En Notes • Choose a sound field program based on your listening preference, not merely on the remote control, showing which source component is automatically set to the "STRAIGHT" mode (see page 36). • To display information about the currently selected input... DVR V-AUX DTV/CBL DVD MD/CD-R TUNER CD XM INPUT: DVD Currently selected input source y The corresponding input selector button on the remote control for the currently selected input source lights up for approximately 5 seconds after you press any buttons on the name of the selected sound field...
...page 32 32 37 33 34 36 34 30 En Notes • Choose a sound field program based on your listening preference, not merely on the remote control, showing which source component is automatically set to the "STRAIGHT" mode (see page 36). • To display information about the currently selected input... DVR V-AUX DTV/CBL DVD MD/CD-R TUNER CD XM INPUT: DVD Currently selected input source y The corresponding input selector button on the remote control for the currently selected input source lights up for approximately 5 seconds after you press any buttons on the name of the selected sound field...

Owner's Manual
Page 36
... press CLEVEL repeatedly to select the speaker you can also select the speaker by pressing Dk / n. 2 Press Dl / h on the remote control, you increase or decrease the high-frequency or low-frequency sound to an extreme level, the tonal quality of the surround speakers may... R Front right speaker CENTER Center speaker SUR.L Surround left speaker SUR.R Surround right speaker SWFR Subwoofer y Once you press CLEVEL on the remote control to adjust the speaker output level. Notes • Speaker and headphone adjustments are not effective. • The front panel display automatically ...
... press CLEVEL repeatedly to select the speaker you can also select the speaker by pressing Dk / n. 2 Press Dl / h on the remote control, you increase or decrease the high-frequency or low-frequency sound to an extreme level, the tonal quality of the surround speakers may... R Front right speaker CENTER Center speaker SUR.L Surround left speaker SUR.R Surround right speaker SWFR Subwoofer y Once you press CLEVEL on the remote control to adjust the speaker output level. Notes • Speaker and headphone adjustments are not effective. • The front panel display automatically ...

Owner's Manual
Page 37
... on the input source and surround sound settings you do not want to use this unit to AMP and then press NSET MENU on the remote control. The top "SET MENU" display appears in the front panel display. Playback ■ Displaying signal information You can display the format, sampling frequency, channel...
... on the input source and surround sound settings you do not want to use this unit to AMP and then press NSET MENU on the remote control. The top "SET MENU" display appears in the front panel display. Playback ■ Displaying signal information You can display the format, sampling frequency, channel...

Owner's Manual
Page 38
... OUTLET(S) (see page 36). Press the input selector buttons on the video monitor. y • To cancel the sleep timer, press MSLEEP on the remote control repeatedly until "SLEEP OFF" appears in the front panel display when the audio output is muted and disappears from the video source on the... remote control to mute the audio output. Press LMUTE again to the left and right headphone channels. SLEEP 120min SLEEP 90min SLEEP OFF SLEEP 30min...
... OUTLET(S) (see page 36). Press the input selector buttons on the video monitor. y • To cancel the sleep timer, press MSLEEP on the remote control repeatedly until "SLEEP OFF" appears in the front panel display when the audio output is muted and disappears from the video source on the... remote control to mute the audio output. Press LMUTE again to the left and right headphone channels. SLEEP 120min SLEEP 90min SLEEP OFF SLEEP 30min...

Owner's Manual
Page 39
... dynamic and thrilling sound effects as you can enjoy sports relays broadcast in the stadium. It restrains reverberation to the "STRAIGHT" mode (see page 36). Remote control button Program Pop/Rock MUSIC Hall Jazz Game ENTERTAIN TV Sports Movie Spacious MOVIE Movie Dramatic STEREO 2ch Stereo 5ch Stereo Music Enh. 2ch...
... dynamic and thrilling sound effects as you can enjoy sports relays broadcast in the stadium. It restrains reverberation to the "STRAIGHT" mode (see page 36). Remote control button Program Pop/Rock MUSIC Hall Jazz Game ENTERTAIN TV Sports Movie Spacious MOVIE Movie Dramatic STEREO 2ch Stereo 5ch Stereo Music Enh. 2ch...

Owner's Manual
Page 44
... Selecting preset stations You can tune into any desired station simply by pressing the numeric buttons on the remote control. The example below describes the procedure to exchange preset station "E1" with the remote control, set the operation mode selector (K) to SOURCE and then press ATUNER to 8) directly by selecting the preset...
... Selecting preset stations You can tune into any desired station simply by pressing the numeric buttons on the remote control. The example below describes the procedure to exchange preset station "E1" with the remote control, set the operation mode selector (K) to SOURCE and then press ATUNER to 8) directly by selecting the preset...

Owner's Manual
Page 47
... 4CATEGORY (or DA-E/CAT. The display changes as follows. 2 Press 4CATEGORY (or DA-E/CAT. For details, see "Setting XM Satellite Radio preset channels" on the remote control. ■ Direct Number Access mode 1 Press NSRCH MODE repeatedly to select "ALL CH SEARCH" or "CAT SEARCH". 2 Press the numeric buttons (B) to enter the...
... 4CATEGORY (or DA-E/CAT. The display changes as follows. 2 Press 4CATEGORY (or DA-E/CAT. For details, see "Setting XM Satellite Radio preset channels" on the remote control. ■ Direct Number Access mode 1 Press NSRCH MODE repeatedly to select "ALL CH SEARCH" or "CAT SEARCH". 2 Press the numeric buttons (B) to enter the...

Owner's Manual
Page 49
... XM Satellite Radio information screens, press CTITLE repeatedly while the current XM Satellite Radio information screen is released if you press DENTER on the remote control again or if you press 7DISPLAY (or ODISPLAY) while the XM Satellite Radio information display is being hold. XM Satellite Radio tuning ... character that cannot be displayed with a space. The XM Satellite Radio information screen on hold is released if you press DENTER on the remote control again or if you change the XM Satellite Radio channel. • This unit can indicate up to two XM Satellite Radio information ...
... XM Satellite Radio information screens, press CTITLE repeatedly while the current XM Satellite Radio information screen is released if you press DENTER on the remote control again or if you press 7DISPLAY (or ODISPLAY) while the XM Satellite Radio information display is being hold. XM Satellite Radio tuning ... character that cannot be displayed with a space. The XM Satellite Radio information screen on hold is released if you press DENTER on the remote control again or if you change the XM Satellite Radio channel. • This unit can indicate up to two XM Satellite Radio information ...
Owner's Manual
Page 50
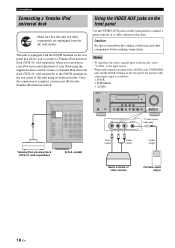
...components" on page 61. • For a complete list of status messages that cannot be compatible depending on your iPod. 46 En Use the simple remote mode to enjoy watching the photos or video clips stored on . Notes • Only iPod (Click and Wheel), iPod nano, and iPod mini ...front panel display and in the OSD, see the "iPod" section in "Troubleshooting" on page 70. • Once your iPod is stationed in a Yamaha iPod universal dock, this unit begins signal transmission with underscores "_". • The "Settings" parameters can also use the Compressed Music Enhancer mode of this unit...
...components" on page 61. • For a complete list of status messages that cannot be compatible depending on your iPod. 46 En Use the simple remote mode to enjoy watching the photos or video clips stored on . Notes • Only iPod (Click and Wheel), iPod nano, and iPod mini ...front panel display and in the OSD, see the "iPod" section in "Troubleshooting" on page 70. • Once your iPod is stationed in a Yamaha iPod universal dock, this unit begins signal transmission with underscores "_". • The "Settings" parameters can also use the Compressed Music Enhancer mode of this unit...

Owner's Manual
Page 51
... > Artists > Albums > Songs > Genres > Composers > Settings > 2 Press Dk / n / l / h to navigate the iPod menu and then press DENTER to SOURCE and then press ODISPLAY on the remote control.
... > Artists > Albums > Songs > Genres > Composers > Settings > 2 Press Dk / n / l / h to navigate the iPod menu and then press DENTER to SOURCE and then press ODISPLAY on the remote control.
Owner's Manual
Page 54
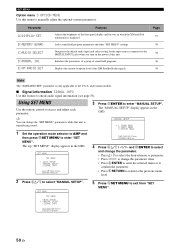
... NSET MENU to enter "SET MENU". INI E)XM RADIO SET Features Adjusts the brightness of the XM Satellite Radio signals. p p Using SET MENU Use the remote control to select "MANUAL SETUP". The "MANUAL SETUP" display appears in the OSD. ;MANUAL SETUP . 1 SOUND MENU 2 INPUT MENU 3 OPTION MENU [ ]/[ ]:Up/Down [ENTER]:Enter...
... NSET MENU to enter "SET MENU". INI E)XM RADIO SET Features Adjusts the brightness of the XM Satellite Radio signals. p p Using SET MENU Use the remote control to select "MANUAL SETUP". The "MANUAL SETUP" display appears in the OSD. ;MANUAL SETUP . 1 SOUND MENU 2 INPUT MENU 3 OPTION MENU [ ]/[ ]:Up/Down [ENTER]:Enter...


