
MCXSP10 Manual
Page 1
U RX-V4600 AV Receiver OWNER'S MANUAL
U RX-V4600 AV Receiver OWNER'S MANUAL

MCXSP10 Manual
Page 7
...AM loop antenna (Canada, Asia, General, China, Korea, Australia, U.K. and Europe models) 3 INTRODUCTION GETTING STARTED Supplied accessories Please check that you received all of the following parts. and Europe models) Indoor FM antenna (U.S.A., Canada, Asia, General, China and Korea models) Indoor FM antenna (Australia,...terminal wrench Optimizer microphone 75-ohm/300-ohm antenna adapter (U.K. model only) AM loop antenna (U.S.A. Remote control POWER TV POWER AV STANDBY SYSTEM POWER A B AUDIO SELECT SLEEP PHONO TUNER CD MULTI CH IN V-AUX CBL/SAT MD/TAPE CD-R DTV VCR...
...AM loop antenna (Canada, Asia, General, China, Korea, Australia, U.K. and Europe models) 3 INTRODUCTION GETTING STARTED Supplied accessories Please check that you received all of the following parts. and Europe models) Indoor FM antenna (U.S.A., Canada, Asia, General, China and Korea models) Indoor FM antenna (Australia,...terminal wrench Optimizer microphone 75-ohm/300-ohm antenna adapter (U.K. model only) AM loop antenna (U.S.A. Remote control POWER TV POWER AV STANDBY SYSTEM POWER A B AUDIO SELECT SLEEP PHONO TUNER CD MULTI CH IN V-AUX CBL/SAT MD/TAPE CD-R DTV VCR...

MCXSP10 Manual
Page 9
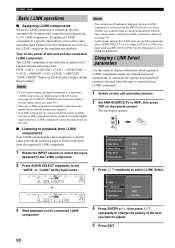
... you want to listen to or watch. 3 AUDIO SELECT Toggles the priority for more input jacks on the main unit only or sets it to receive infrared-signals from the remote control. • You can reproduce sound.
... you want to listen to or watch. 3 AUDIO SELECT Toggles the priority for more input jacks on the main unit only or sets it to receive infrared-signals from the remote control. • You can reproduce sound.

MCXSP10 Manual
Page 10
... on the rear panel each time the corresponding button is directed to the front left /right and center channels (see page 83). C Remote control sensor Receives signals from an external source such as the input source.
... on the rear panel each time the corresponding button is directed to the front left /right and center channels (see page 83). C Remote control sensor Receives signals from an external source such as the input source.
MCXSP10 Manual
Page 14
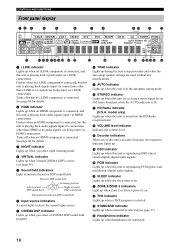
... no i.LINK component is playing back audio signals input via connections other than HDMI or no signals are used without any of this unit is receiving a stereo signal for an FM stereo broadcast while the AUTO indicator is in the automatic tuning mode. 0 STEREO indicator Lights up when this unit's decoders...
... no i.LINK component is playing back audio signals input via connections other than HDMI or no signals are used without any of this unit is receiving a stereo signal for an FM stereo broadcast while the AUTO indicator is in the automatic tuning mode. 0 STEREO indicator Lights up when this unit's decoders...

MCXSP10 Manual
Page 31
... is normal for each channel's parametric equalizer to reduce coloration across the channels and create a cohesive sound field. PREPARATION AUTO SETUP AUTO SETUP Introduction This receiver employs YAMAHA Parametric Room Acoustic Optimizer (YPAO) technology which speakers are seated in your listening position. Optimizer microphone setup 1 Connect the supplied optimizer microphone to affix...
... is normal for each channel's parametric equalizer to reduce coloration across the channels and create a cohesive sound field. PREPARATION AUTO SETUP AUTO SETUP Introduction This receiver employs YAMAHA Parametric Room Acoustic Optimizer (YPAO) technology which speakers are seated in your listening position. Optimizer microphone setup 1 Connect the supplied optimizer microphone to affix...

MCXSP10 Manual
Page 45
... MD/TAPE CD-R CD TU HiFi DSP AUTO TUNED 1530 kHz When tuned into a station, the TUNED indicator lights up and the frequency of the received station is shown on the front panel display. "FM" or "AM" appears on the front panel display. ■ Manual tuning If the signal from the...
... MD/TAPE CD-R CD TU HiFi DSP AUTO TUNED 1530 kHz When tuned into a station, the TUNED indicator lights up and the frequency of the received station is shown on the front panel display. "FM" or "AM" appears on the front panel display. ■ Manual tuning If the signal from the...

MCXSP10 Manual
Page 46
...-up circuit prevents the stored data from the AC outlet, or the power supply is completed, the front panel display shows the frequency of the received stations does not reach 40 (E8), automatic preset tuning has automatically stopped after searching all been stored up to 40 (8 stations in 5 groups, A1 through...
...-up circuit prevents the stored data from the AC outlet, or the power supply is completed, the front panel display shows the frequency of the received stations does not reach 40 (E8), automatic preset tuning has automatically stopped after searching all been stored up to 40 (8 stations in 5 groups, A1 through...

MCXSP10 Manual
Page 47
... MEMORY TUNED 630 kHz dB VOLUME LR Preset group 43 PRESET/ TUNING 3 4 2,5 1 Tune into a station, the front panel display shows the frequency of the station received. 2 Press MEMORY (MAN'L/AUTO FM). V-AUX DVR/VCR2 VCR 1 CBL/SAT DTV SP A A :AM DVD MD/TAPE CD-R CD TUNER PHONO TUNED 630 kHz dB...
... MEMORY TUNED 630 kHz dB VOLUME LR Preset group 43 PRESET/ TUNING 3 4 2,5 1 Tune into a station, the front panel display shows the frequency of the station received. 2 Press MEMORY (MAN'L/AUTO FM). V-AUX DVR/VCR2 VCR 1 CBL/SAT DTV SP A A :AM DVD MD/TAPE CD-R CD TUNER PHONO TUNED 630 kHz dB...

MCXSP10 Manual
Page 49
... will be played back instead even in the automatic tuning mode, and the HD indicator does not light up , the broadcast being received contains an HD Radio digital signal. ■ HD Radio manual tuning Manual tuning is equipped with radically improved audio quality and reception as... well as song titles, artist names, album names, and genres) from up and the frequency of the received station is displayed in the front panel. Follow steps 1 through 3 as described in "Manual tuning" on a single FM HD Radio channel. Follow...
... will be played back instead even in the automatic tuning mode, and the HD indicator does not light up , the broadcast being received contains an HD Radio digital signal. ■ HD Radio manual tuning Manual tuning is equipped with radically improved audio quality and reception as... well as song titles, artist names, album names, and genres) from up and the frequency of the received station is displayed in the front panel. Follow steps 1 through 3 as described in "Manual tuning" on a single FM HD Radio channel. Follow...

MCXSP10 Manual
Page 50
...programs. Press PRG SELECT again within 2 seconds to HD8 can be selected only when they contain data programs. Displaying HD Radio™ information There are received. CD PHONO dB VOLUME LR y HD Radio information is available only when data programs are 3 types of the 8 HD Radio audio programs (HD1... SP AUTO HD A HiFi DSP TUNED FM Radio - If the music information is long, it automatically scrolls to HD8) when the unit is received as data in the tuner mode. Press DISPLAY on the broadcasting station and the time period. • The audio programs from HD2 to select ...
...programs. Press PRG SELECT again within 2 seconds to HD8 can be selected only when they contain data programs. Displaying HD Radio™ information There are received. CD PHONO dB VOLUME LR y HD Radio information is available only when data programs are 3 types of the 8 HD Radio audio programs (HD1... SP AUTO HD A HiFi DSP TUNED FM Radio - If the music information is long, it automatically scrolls to HD8) when the unit is received as data in the tuner mode. Press DISPLAY on the broadcasting station and the time period. • The audio programs from HD2 to select ...

MCXSP10 Manual
Page 59
.../TAPE DVD DTV CBL/SAT 3 Select the desired input (CD, DVD, etc.), then press h to access and adjust. ■ Information (Information) There are received. 2 Select Input Select, then press h. Input Select > TUNER > Information > Current Information Volume Trim Rename Station Music Station information (Band / Frequency / Station ...of the artist Page 4: the details of the album Page 5: the details of GUI displays that show HD Radio information when the unit is received as data in the front panel display menu (see page 46). ■ I /O Assignment > Coaxial Input, then select 7 CD. Music...
.../TAPE DVD DTV CBL/SAT 3 Select the desired input (CD, DVD, etc.), then press h to access and adjust. ■ Information (Information) There are received. 2 Select Input Select, then press h. Input Select > TUNER > Information > Current Information Volume Trim Rename Station Music Station information (Band / Frequency / Station ...of the artist Page 4: the details of the album Page 5: the details of GUI displays that show HD Radio information when the unit is received as data in the front panel display menu (see page 46). ■ I /O Assignment > Coaxial Input, then select 7 CD. Music...

MCXSP10 Manual
Page 76
... AMP codes Select one of the following codes to use. "L:DVD") and the selected component name (ex. In this unit using multiple YAMAHA receivers/amplifiers, you want to press and hold LEARN for the component you can set a different type of this manual. However, you want ...8226; If you do not complete each of the following steps within 30 seconds, the setting mode will be able to operate the other YAMAHA receivers/amplifiers (see page 86) 2602 To operate this unit using the default code. AMP library code (remote control setting) Function Remote control AMP...
... AMP codes Select one of the following codes to use. "L:DVD") and the selected component name (ex. In this unit using multiple YAMAHA receivers/amplifiers, you want to press and hold LEARN for the component you can set a different type of this manual. However, you want ...8226; If you do not complete each of the following steps within 30 seconds, the setting mode will be able to operate the other YAMAHA receivers/amplifiers (see page 86) 2602 To operate this unit using the default code. AMP library code (remote control setting) Function Remote control AMP...

MCXSP10 Manual
Page 80
...buttons below are factory set a remote control code (see page 77). The buttons listed as the input source, this unit plays the last station received before the unit was set up for DTV takes priority over the one for PHONO. *3 When TUNER is set in order SYSTEM POWER CD (CD... possible to perform a series of operations with the press of these signals in the standby mode. *4 Playback can turn on some components (including YAMAHA components) connected to this unit by pressing the CD macro button. The Macro feature lets you can be synchronized with this unit depending on the...
...buttons below are factory set a remote control code (see page 77). The buttons listed as the input source, this unit plays the last station received before the unit was set up for DTV takes priority over the one for PHONO. *3 When TUNER is set in order SYSTEM POWER CD (CD... possible to perform a series of operations with the press of these signals in the standby mode. *4 Playback can turn on some components (including YAMAHA components) connected to this unit by pressing the CD macro button. The Macro feature lets you can be synchronized with this unit depending on the...

MCXSP10 Manual
Page 86
... This unit (or other component) MAIN SYSTEM ZONE 2 VIDEO IN ZONE 3 AUDIO IN Infrared emitter Amplifier Remote control Infrared signal receiver Amplifier Remote control Infrared signal receiver Main room Second room Third room REMOTE OUT REMOTE 1 IN REMOTE 2 IN Notes • When not using the supplied remote ...the second/third room. • To avoid unexpected noise, DO NOT USE the Zone 2/Zone 3 feature with your requirements. • Some YAMAHA models are sent to the second and third rooms. Any source you consult This unit with CDs encoded in the main room. Up to ...
... This unit (or other component) MAIN SYSTEM ZONE 2 VIDEO IN ZONE 3 AUDIO IN Infrared emitter Amplifier Remote control Infrared signal receiver Amplifier Remote control Infrared signal receiver Main room Second room Third room REMOTE OUT REMOTE 1 IN REMOTE 2 IN Notes • When not using the supplied remote ...the second/third room. • To avoid unexpected noise, DO NOT USE the Zone 2/Zone 3 feature with your requirements. • Some YAMAHA models are sent to the second and third rooms. Any source you consult This unit with CDs encoded in the main room. Up to ...

MCXSP10 Manual
Page 95
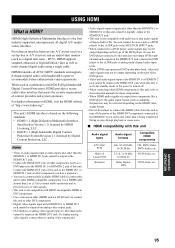
... (AUDIO) components only. This unit's i.LINK interface was based on . • Other i.LINK components connected to this unit's i.LINK connectors, be output to send and receive digital audio signals (bitstreams such as MPEG2-TS (BS digital, etc.) or DV (DV camera, DVD recorder, etc.), are not compatible with this unit is...
... (AUDIO) components only. This unit's i.LINK interface was based on . • Other i.LINK components connected to this unit's i.LINK connectors, be output to send and receive digital audio signals (bitstreams such as MPEG2-TS (BS digital, etc.) or DV (DV camera, DVD recorder, etc.), are not compatible with this unit is...
MCXSP10 Manual
Page 96
... and audio input signals from the registered i.LINK component. 1 Rotate the INPUT selector to select the input assigned to each input and inputs that component received via the i.LINK connection for simultaneous playback. HDMI i.LINK Select Stereo/Surround Input Select Information Information Select Auto Play 4 Press ENTER or h, then press k / n repeatedly...
... and audio input signals from the registered i.LINK component. 1 Rotate the INPUT selector to select the input assigned to each input and inputs that component received via the i.LINK connection for simultaneous playback. HDMI i.LINK Select Stereo/Surround Input Select Information Information Select Auto Play 4 Press ENTER or h, then press k / n repeatedly...

MCXSP10 Manual
Page 97
... when an input stream from being accidentally deleted. • Select i.LINK Status to display operation status of i.LINK signals that are currently being received. When you want to assign, then press h. 2 Press k / n repeatedly to select the input for your i.LINK component supports audio signal... information: operation status of registered i.LINK components, registered i.LINK components that have been deleted, and i.LINK signals that are currently being received. You can select to assign the i.LINK component to any of the various inputs (PHONO to V-AUX). To delete, press ENTER...
... when an input stream from being accidentally deleted. • Select i.LINK Status to display operation status of i.LINK signals that are currently being received. When you want to assign, then press h. 2 Press k / n repeatedly to select the input for your i.LINK component supports audio signal... information: operation status of registered i.LINK components, registered i.LINK components that have been deleted, and i.LINK signals that are currently being received. You can select to assign the i.LINK component to any of the various inputs (PHONO to V-AUX). To delete, press ENTER...
MCXSP10 Manual
Page 99
... standby mode or the power is turned off. • When connecting other HDMI-compatible components. USING HDMI USING HDMI What is set -top box or A/V receiver) and an audio/video monitor (such as a digital television - Providing an interface between any A/V source (such as multi-channel digital audio using a single cable. Doing...
... standby mode or the power is turned off. • When connecting other HDMI-compatible components. USING HDMI USING HDMI What is set -top box or A/V receiver) and an audio/video monitor (such as a digital television - Providing an interface between any A/V source (such as multi-channel digital audio using a single cable. Doing...
MCXSP10 Manual
Page 101
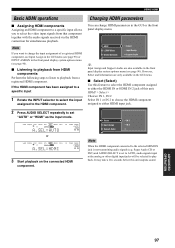
... has been assigned to a specific input 1 Rotate the INPUT selector to select the input assigned to playback from that component together with the audio signals received via the HDMI connection for simultaneous playback. Display HDMI i.LINK Select Stereo/Surround Speaker B Select Input Assign Support Audio y Input Assign and Support Audio are...
... has been assigned to a specific input 1 Rotate the INPUT selector to select the input assigned to playback from that component together with the audio signals received via the HDMI connection for simultaneous playback. Display HDMI i.LINK Select Stereo/Surround Speaker B Select Input Assign Support Audio y Input Assign and Support Audio are...


