
MCXSP10 Manual
Page 5
... 12 PREPARATION SPEAKER SETUP 13 Speaker placement 13 Speaker connections 15 CONNECTIONS 18 Before connecting components 18 Connecting video components 19 Connecting audio components 22 Connecting the antennas 24 Connecting the power cable 25 Speaker impedance setting 26 Turning ... What is i.LINK 91 Connecting i.LINK components 91 Basic i.LINK operations 92 Changing i.LINK Select parameters 92 i.LINK display messages 94 USING HDMI 95 What is HDMI 95 Connecting HDMI components 96 Basic HDMI operations 97 Changing HDMI parameters 97 ADDITIONAL INFORMATION EDITING SOUND FIELD...
... 12 PREPARATION SPEAKER SETUP 13 Speaker placement 13 Speaker connections 15 CONNECTIONS 18 Before connecting components 18 Connecting video components 19 Connecting audio components 22 Connecting the antennas 24 Connecting the power cable 25 Speaker impedance setting 26 Turning ... What is i.LINK 91 Connecting i.LINK components 91 Basic i.LINK operations 92 Changing i.LINK Select parameters 92 i.LINK display messages 94 USING HDMI 95 What is HDMI 95 Connecting HDMI components 96 Basic HDMI operations 97 Changing HDMI parameters 97 ADDITIONAL INFORMATION EDITING SOUND FIELD...
MCXSP10 Manual
Page 6
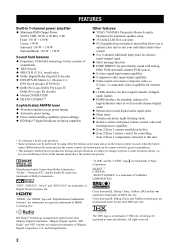
...unit • y indicates a tip for your individual audio/video Surround Back: 130 W + 130 W system Sound field features ◆ Proprietary YAMAHA technology for the creation of sound fields ◆ THX Select2 ◆ SRS CS (U.S.A. Circle Surround , Dialog Clarity and TruBass technologies are subject ... Inc. "DTS", "DTS-ES", "Neo:6" and "DTS 96/24" are trademarks of digital audio signals ◆ HDMI interface for controlling Zone 2/Zone 3 components connected to production. "iBiquity Digital" and the "HD Radio" and "HD" symbols are trademarks or registered trademarks of ...
...unit • y indicates a tip for your individual audio/video Surround Back: 130 W + 130 W system Sound field features ◆ Proprietary YAMAHA technology for the creation of sound fields ◆ THX Select2 ◆ SRS CS (U.S.A. Circle Surround , Dialog Clarity and TruBass technologies are subject ... Inc. "DTS", "DTS-ES", "Neo:6" and "DTS 96/24" are trademarks of digital audio signals ◆ HDMI interface for controlling Zone 2/Zone 3 components connected to production. "iBiquity Digital" and the "HD Radio" and "HD" symbols are trademarks or registered trademarks of ...

MCXSP10 Manual
Page 9
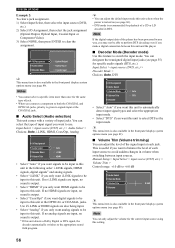
...this unit. 8 PRESET/TUNING (EDIT) Switches the function of the 5 preset station groups (A to receive infrared-signals from the remote control. • You can reproduce sound. See pages 41 to 44 ... watch. 3 AUDIO SELECT Toggles the priority for the type of audio input jack (AUTO, i.LINK, HDMI, COAX/OPT, ANALOG) when one of PRESET/TUNING l / h between automatic ("AUTO" indicator on ... to 7 second delay before the main unit can turn on the remote control). 5 A/B/C/D/E Selects one component is connected to two or more than 3 seconds to start automatic preset tuning (see page 40). 4...
...this unit. 8 PRESET/TUNING (EDIT) Switches the function of the 5 preset station groups (A to receive infrared-signals from the remote control. • You can reproduce sound. See pages 41 to 44 ... watch. 3 AUDIO SELECT Toggles the priority for the type of audio input jack (AUTO, i.LINK, HDMI, COAX/OPT, ANALOG) when one of PRESET/TUNING l / h between automatic ("AUTO" indicator on ... to 7 second delay before the main unit can turn on the remote control). 5 A/B/C/D/E Selects one component is connected to two or more than 3 seconds to start automatic preset tuning (see page 40). 4...
MCXSP10 Manual
Page 12
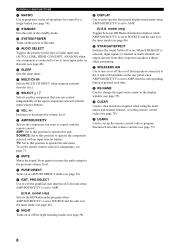
... front panel display menu mode when AMP/SOURCE/TV is set to set to two or more input jacks on the power of the input component selected with the input selector buttons. T LEARN Used to AMP. (U.S.A. P STRAIGHT/EFFECT Switches the sound fields off the set to program a... between HD Radio information displays when AMP/SOURCE/TV is set of operations for the type of audio input jack (AUTO, i.LINK, HDMI, COAX/OPT, ANALOG) when one component is connected to AMP. (U.S.A. D SYSTEM POWER Turns on this position to clear functions acquired when using an external decoder (etc.). ...
... front panel display menu mode when AMP/SOURCE/TV is set to set to two or more input jacks on the power of the input component selected with the input selector buttons. T LEARN Used to AMP. (U.S.A. P STRAIGHT/EFFECT Switches the sound fields off the set to program a... between HD Radio information displays when AMP/SOURCE/TV is set of operations for the type of audio input jack (AUTO, i.LINK, HDMI, COAX/OPT, ANALOG) when one component is connected to AMP. (U.S.A. D SYSTEM POWER Turns on this position to clear functions acquired when using an external decoder (etc.). ...
MCXSP10 Manual
Page 14
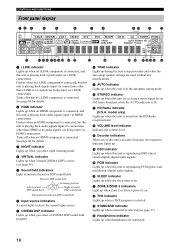
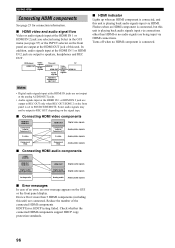
...other than i.LINK or no audio signals are being input via i.LINK connections. Flashes when an HDMI component is connected, but this unit is connected. Turns off when no HDMI component is connected. B VOLUME level indicator Indicates the volume level. E PCM indicator Lights up when this... an i.LINK component is connected, but this unit is receiving a stereo signal for an FM stereo broadcast while the AUTO indicator is playing back audio signals input via i.LINK connections. H THX indicator Lights up when a THX program is playing back signals input via HDMI connections. J ...
...other than i.LINK or no audio signals are being input via i.LINK connections. Flashes when an HDMI component is connected, but this unit is connected. Turns off when no HDMI component is connected. B VOLUME level indicator Indicates the volume level. E PCM indicator Lights up when this... an i.LINK component is connected, but this unit is receiving a stereo signal for an FM stereo broadcast while the AUTO indicator is playing back audio signals input via i.LINK connections. H THX indicator Lights up when a THX program is playing back signals input via HDMI connections. J ...
MCXSP10 Manual
Page 16
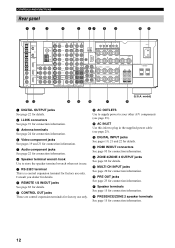
...terminals See page 15 for connection information. 12 H PRESENCE/ZONE 2 speaker terminals See page 15 for connection information. DVD DTV HDMI IN 1 GND AM ANT CBL/SAT DVD COMPONENT VIDEO Y PB PR IN 2 DTV CD DVD CBL/ SAT OUT MONITOR OUT DVR/VCR 2 COAXIAL DIGITAL INPUT VIDEO S VIDEO...-232C terminal This is a control expansion terminal for factory use only. 0 AC OUTLETS Use to supply power to your other A/V components (see page 25). C HDMI IN/OUT connectors See page 95 for connection information. E MULTI CH INPUT jacks See page 20 for connection information. D ZONE 2/ZONE...
...terminals See page 15 for connection information. 12 H PRESENCE/ZONE 2 speaker terminals See page 15 for connection information. DVD DTV HDMI IN 1 GND AM ANT CBL/SAT DVD COMPONENT VIDEO Y PB PR IN 2 DTV CD DVD CBL/ SAT OUT MONITOR OUT DVR/VCR 2 COAXIAL DIGITAL INPUT VIDEO S VIDEO...-232C terminal This is a control expansion terminal for factory use only. 0 AC OUTLETS Use to supply power to your other A/V components (see page 25). C HDMI IN/OUT connectors See page 95 for connection information. E MULTI CH INPUT jacks See page 20 for connection information. D ZONE 2/ZONE...
MCXSP10 Manual
Page 27
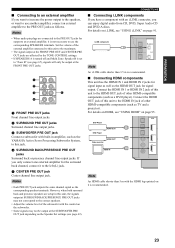
... presence speakers are connected to the PRE OUT jacks for output to an external amplifier, it is recommended. ■ Connecting HDMI components This unit has the HDMI IN 1 and HDMI IN 2 jacks for signal input as well as TV and a projector). For details on i.LINK, see "USING i.LINK...; Each PRE OUT jack outputs the same channel signal as the YAMAHA Active Servo Processing Subwoofer System, to this unit to the HDMI OUT jack of other HDMI-compatible components (such as follows. DVD Player DVD Player HDMI OUT Video monitor HDMI OUT HDMI IN HDMI CBL/SAT IN 1 IN 2 D C S OUT DVR/VCR...
... presence speakers are connected to the PRE OUT jacks for output to an external amplifier, it is recommended. ■ Connecting HDMI components This unit has the HDMI IN 1 and HDMI IN 2 jacks for signal input as well as TV and a projector). For details on i.LINK, see "USING i.LINK...; Each PRE OUT jack outputs the same channel signal as the YAMAHA Active Servo Processing Subwoofer System, to this unit to the HDMI OUT jack of other HDMI-compatible components (such as follows. DVD Player DVD Player HDMI OUT Video monitor HDMI OUT HDMI IN HDMI CBL/SAT IN 1 IN 2 D C S OUT DVR/VCR...
MCXSP10 Manual
Page 51
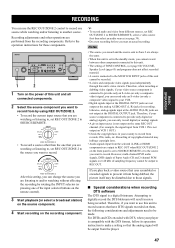
...and CDs encoded with the DTS format, follow its operation instruction to make a setting so that the analog signal will result in your source component is connected to provide only digital (or analog) signals, you can only record digital (or analog) signals. • A given input ... • When this unit and all connected components. 2 Select the source component you can record only an S-video (or only a composite video) signal to your video source component is set REC OUT/ZONE 2 to record from the selected i.LINK or HDMI components are not output at the analog AUDIO OUT (L/R)...
...and CDs encoded with the DTS format, follow its operation instruction to make a setting so that the analog signal will result in your source component is connected to provide only digital (or analog) signals, you can only record digital (or analog) signals. • A given input ... • When this unit and all connected components. 2 Select the source component you can record only an S-video (or only a composite video) signal to your video source component is set REC OUT/ZONE 2 to record from the selected i.LINK or HDMI components are not output at the analog AUDIO OUT (L/R)...
MCXSP10 Manual
Page 56
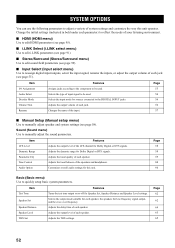
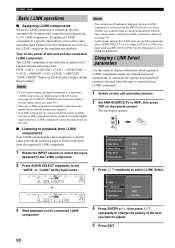
...this unit. Change the initial settings (indicated in bold under each parameter) to reflect the needs of your listening environment. ■ HDMI (HDMI menu) Use to edit HDMI parameters (see page 95). ■ i.LINK Select (i.LINK select menu) Use to edit i.LINK parameters (see page 91). ■... Use to quickly setup basic system parameters. Item I/O Assignment Audio Select Decoder Mode Volume Trim Rename Features Assigns jacks according to the component to reassign digital input/outputs, select the input signal, rename the inputs, or adjust the output volume of each speaker, the speakers...
...this unit. Change the initial settings (indicated in bold under each parameter) to reflect the needs of your listening environment. ■ HDMI (HDMI menu) Use to edit HDMI parameters (see page 95). ■ i.LINK Select (i.LINK select menu) Use to edit i.LINK parameters (see page 91). ■... Use to quickly setup basic system parameters. Item I/O Assignment Audio Select Decoder Mode Volume Trim Rename Features Assigns jacks according to the component to reassign digital input/outputs, select the input signal, rename the inputs, or adjust the output volume of each speaker, the speakers...
MCXSP10 Manual
Page 60
...DTS. Note You can select the type of jack. • When you connect a component to both the COAXIAL and OPTICAL jacks, priority is given to switch the input mode. Use if i.LINK or HDMI signals are input, no i.LINK signals are also being input. • Select "Analog"...Select, then select the input source (DVD, etc.). 2) Select I/O Assignment, then select the jack assignment (Optical Output, Optical Input, Coaxial Input or Component Video). 3) Select NONE, then press ENTER to perform DTS decoding even if you make a digital connection between input sources. Note If the digital output ...
...DTS. Note You can select the type of jack. • When you connect a component to both the COAXIAL and OPTICAL jacks, priority is given to switch the input mode. Use if i.LINK or HDMI signals are input, no i.LINK signals are also being input. • Select "Analog"...Select, then select the input source (DVD, etc.). 2) Select I/O Assignment, then select the jack assignment (Optical Output, Optical Input, Coaxial Input or Component Video). 3) Select NONE, then press ENTER to perform DTS decoding even if you make a digital connection between input sources. Note If the digital output ...
MCXSP10 Manual
Page 94
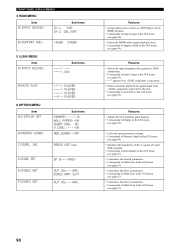
FRONT PANEL DISPLAY MENUS 4 HDMI MENU Item A)INPUT ASSIGN Sub-items IN 1 DVD IN 2 CBL/SAT B)SUPPORT AUD. >4600 OTHER 5 i.LINK MENU Item A)INPUT ASSIGN Sub-items DVD B)AUTO PLAY 6 OPTION MENU Item A)DISPLAY SET B)MEMORY GUARD C)SURR. INI PLAYER ----> PLAYER
FRONT PANEL DISPLAY MENUS 4 HDMI MENU Item A)INPUT ASSIGN Sub-items IN 1 DVD IN 2 CBL/SAT B)SUPPORT AUD. >4600 OTHER 5 i.LINK MENU Item A)INPUT ASSIGN Sub-items DVD B)AUTO PLAY 6 OPTION MENU Item A)DISPLAY SET B)MEMORY GUARD C)SURR. INI PLAYER ----> PLAYER
MCXSP10 Manual
Page 96
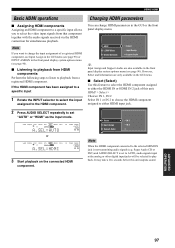
...i.LINK operations ■ Assigning i.LINK components When an i.LINK component is automatically recognized and registered in the front panel display system options menu (see page 90). • Only one i.LINK component is assigned to each input and inputs that component received via the i.LINK connection for simultaneous ...then press TOP on this unit and video monitor. 2 Set AMP/SOURCE/TV to either AUTO or i.LINK as the input mode. HDMI i.LINK Select Stereo/Surround Input Select Information Information Select Auto Play 4 Press ENTER or h, then press k / n repeatedly to change...
...i.LINK operations ■ Assigning i.LINK components When an i.LINK component is automatically recognized and registered in the front panel display system options menu (see page 90). • Only one i.LINK component is assigned to each input and inputs that component received via the i.LINK connection for simultaneous ...then press TOP on this unit and video monitor. 2 Set AMP/SOURCE/TV to either AUTO or i.LINK as the input mode. HDMI i.LINK Select Stereo/Surround Input Select Information Information Select Auto Play 4 Press ENTER or h, then press k / n repeatedly to change...
MCXSP10 Manual
Page 99
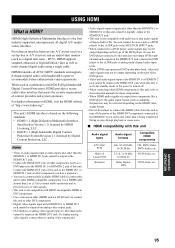
...signals are output from this unit or turn off . • When connecting other HDMI components to this unit to other HDMI-compatible components. DVD-Audio, etc. This unit's HDMI interface is based on HDMI, visit the HDMI website at the HDMI OUT jack. • This unit is not compatible with multi-stereo area audio ... CH INPUT jacks. • When connected to a DVD player, audio signals may not be output at the HDMI OUT jack when this unit is set -top box or A/V receiver) and an audio/video monitor (such as sampling frequencies) may not be output depending on the type of Super...
...signals are output from this unit or turn off . • When connecting other HDMI components to this unit to other HDMI-compatible components. DVD-Audio, etc. This unit's HDMI interface is based on HDMI, visit the HDMI website at the HDMI OUT jack. • This unit is not compatible with multi-stereo area audio ... CH INPUT jacks. • When connected to a DVD player, audio signals may not be output at the HDMI OUT jack when this unit is set -top box or A/V receiver) and an audio/video monitor (such as sampling frequencies) may not be output depending on the type of Super...
MCXSP10 Manual
Page 100
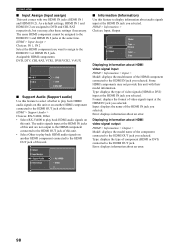
...) or the INPUT selector on the signal type. ■ Connecting HDMI video components HDMI IN 1 HDMI IN 2 Component coaxial Component D HDMI OUT Digital video signals Component coaxial Component D Analog video signals S-video S-video Analog video signals Component RCA Component RCA Analog video signals ■ Connecting HDMI audio components i.LINK (AUDIO) HDMI IN 1 HDMI IN 2 HDMI OUT Digital audio signals Digital audio (optical/coaxial) Digital audio (optical...
...) or the INPUT selector on the signal type. ■ Connecting HDMI video components HDMI IN 1 HDMI IN 2 Component coaxial Component D HDMI OUT Digital video signals Component coaxial Component D Analog video signals S-video S-video Analog video signals Component RCA Component RCA Analog video signals ■ Connecting HDMI audio components i.LINK (AUDIO) HDMI IN 1 HDMI IN 2 HDMI OUT Digital audio signals Digital audio (optical/coaxial) Digital audio (optical...
MCXSP10 Manual
Page 101
... system options menu (see page 90). Note If you to playback from that component together with the audio signals received via the HDMI connection for simultaneous playback. HDMI > Select > Choices: IN 1, IN 2 Select IN 1 or IN 2 to choose the HDMI component assigned to either HDMI input jack. 2 Press AUDIO SELECT repeatedly to set to AUTO, audio signals...
... system options menu (see page 90). Note If you to playback from that component together with the audio signals received via the HDMI connection for simultaneous playback. HDMI > Select > Choices: IN 1, IN 2 Select IN 1 or IN 2 to choose the HDMI component assigned to either HDMI input jack. 2 Press AUDIO SELECT repeatedly to set to AUTO, audio signals...
MCXSP10 Manual
Page 102
... Audio Information Input Mode Dimmer Speaker B RX-V4600 Other Zone 3 Volume ■ Information (Information) Use this feature to play back HDMI audio signals on another HDMI component connected to the HDMI OUT jack of the component connected to the HDMI IN 1 and HDMI IN 2 jacks at the HDMI IN jack you selected. Some HDMI components may alter these settings if necessary. Type...
... Audio Information Input Mode Dimmer Speaker B RX-V4600 Other Zone 3 Volume ■ Information (Information) Use this feature to play back HDMI audio signals on another HDMI component connected to the HDMI OUT jack of the component connected to the HDMI IN 1 and HDMI IN 2 jacks at the HDMI IN jack you selected. Some HDMI components may alter these settings if necessary. Type...

MCXSP10 Manual
Page 109
... does not help, set to Other and HDMI Set Support Audio to AMP, then pressing 33 SPEAKERS A or B on 33 the remote control. Make sure all speakers are not being received from a source component - it back in after the power has...components connected to "Auto". 40 No appropriate input source has been Select an appropriate input source with a DTS 40 signal. protection standards. ADDITIONAL INFORMATION 105 The impedance setting is muted. If the problem persists, the cables may be used have not Select the front speakers by setting AMP/SOURCE/TV to RX-V4600...
... does not help, set to Other and HDMI Set Support Audio to AMP, then pressing 33 SPEAKERS A or B on 33 the remote control. Make sure all speakers are not being received from a source component - it back in after the power has...components connected to "Auto". 40 No appropriate input source has been Select an appropriate input source with a DTS 40 signal. protection standards. ADDITIONAL INFORMATION 105 The impedance setting is muted. If the problem persists, the cables may be used have not Select the front speakers by setting AMP/SOURCE/TV to RX-V4600...

