Owners Manual
Page 2
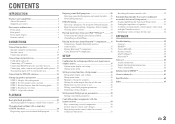
... 50 Default remote control code settings 50 Registering remote control codes for external component operations 51 Resetting all remote control codes 52 Extended functionality that can be configured as needed (Advanced Setup menu 53 Displaying/Setting the Advanced Setup menu 53 Setting the impedance of speakers 53 Avoiding crossing remote control signals when using multiple Yamaha receivers 54...
... 50 Default remote control code settings 50 Registering remote control codes for external component operations 51 Resetting all remote control codes 52 Extended functionality that can be configured as needed (Advanced Setup menu 53 Displaying/Setting the Advanced Setup menu 53 Setting the impedance of speakers 53 Avoiding crossing remote control signals when using multiple Yamaha receivers 54...
Owners Manual
Page 4
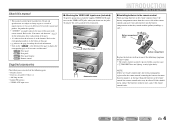
...." En 4 NOTE If there are subject to the VIDEO AUX jacks when you do not use the jacks. Design and specifications are remote control codes for external components registered to the "Part names and functions" (☞p. 5) for more than two minutes, or leaving exhausted batteries in... Attaching the VIDEO AUX input cover (included) To protect against dust, attach the supplied VIDEO AUX input cover to change in the remote control, the remote control codes may be operated within a narrow range. • bTRANSMIT does not light up, or only lights dimly. ac Battery compartment cover ...
...." En 4 NOTE If there are subject to the VIDEO AUX jacks when you do not use the jacks. Design and specifications are remote control codes for external components registered to the "Part names and functions" (☞p. 5) for more than two minutes, or leaving exhausted batteries in... Attaching the VIDEO AUX input cover (included) To protect against dust, attach the supplied VIDEO AUX input cover to change in the remote control, the remote control codes may be operated within a narrow range. • bTRANSMIT does not light up, or only lights dimly. ac Battery compartment cover ...

Owners Manual
Page 8
...the surround decoder, the FM/AM tuner frequency, etc.)(☞p. 7). for external component operations (☞p. 50, p. 54). n CODE SET Sets remote control codes for external components. p SLEEP Sets this unit (☞p. 40). J 1 : You can use separate kExternal component operation keys for...o p q r s 1 2 3 4 5 6 7 8 9 INPUT MUTE 0 10 TV TV VOL TV CH ENT a Remote control signal transmitter Transmits infrared signals. J1 DOCK A Yamaha iPod universal dock or Bluetooth wireless audio receiver connected to AM. FM Sets the FM/AM tuner band to operate external...
...the surround decoder, the FM/AM tuner frequency, etc.)(☞p. 7). for external component operations (☞p. 50, p. 54). n CODE SET Sets remote control codes for external components. p SLEEP Sets this unit (☞p. 40). J 1 : You can use separate kExternal component operation keys for...o p q r s 1 2 3 4 5 6 7 8 9 INPUT MUTE 0 10 TV TV VOL TV CH ENT a Remote control signal transmitter Transmits infrared signals. J1 DOCK A Yamaha iPod universal dock or Bluetooth wireless audio receiver connected to AM. FM Sets the FM/AM tuner band to operate external...
Owners Manual
Page 15
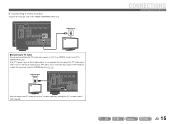
...-2 jacks to the receiver's AV4 jack. ■ Connecting a video monitor Connect the video pin cable to AV4 with just a single key operation using the receiver's remote control by entering the TV's remote control code (☞p. 50).
...-2 jacks to the receiver's AV4 jack. ■ Connecting a video monitor Connect the video pin cable to AV4 with just a single key operation using the receiver's remote control by entering the TV's remote control code (☞p. 50).
Owners Manual
Page 22
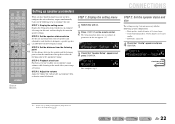
... all settings for this unit, and then display the menu for each speaker reaches the listening point at the appropriate timing. En 22 SOURCE 1 1 5 TRANSMIT CODE SET SLEEP RECEIVER HDMI 2 3 4 AV 2 3 4 AUDIO 1 2 V-AUX [ A ] [ B ] DOCK TUNER FM AM PRESET TUNING INFO MEMORY MOVIE ...configure them so that allows you to configure sound volumes while listening to designate a specific speaker i (or subwoofer) for details on the remote control. J1 SETUP VOL. CONFIG VOL. SW L CR SL SR CONNECTIONS STEP 2: Set the speaker status and size The settings in ...
... all settings for this unit, and then display the menu for each speaker reaches the listening point at the appropriate timing. En 22 SOURCE 1 1 5 TRANSMIT CODE SET SLEEP RECEIVER HDMI 2 3 4 AV 2 3 4 AUDIO 1 2 V-AUX [ A ] [ B ] DOCK TUNER FM AM PRESET TUNING INFO MEMORY MOVIE ...configure them so that allows you to configure sound volumes while listening to designate a specific speaker i (or subwoofer) for details on the remote control. J1 SETUP VOL. CONFIG VOL. SW L CR SL SR CONNECTIONS STEP 2: Set the speaker status and size The settings in ...
Owners Manual
Page 26
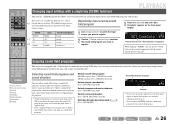
...are stored for that allows you change input sources and sound field programs with a Yamaha digital sound field processing (DSP) chip. DECODE repeatedly Switches Straight decoding mode (☞...explanation of an input source is displayed. Choose a sound field program that the remote control operates (☞p. 50). SW L CR SL SR Program • ... factory settings. When changing "SCENE," you are provided as d playing movies or music. PLAYBACK SOURCE 1 1 5 TRANSMIT CODE SET SLEEP RECEIVER HDMI 2 3 4 AV 2 3 4 AUDIO 1 2 V-AUX [ A ] [ B ] DOCK...
...are stored for that allows you change input sources and sound field programs with a Yamaha digital sound field processing (DSP) chip. DECODE repeatedly Switches Straight decoding mode (☞...explanation of an input source is displayed. Choose a sound field program that the remote control operates (☞p. 50). SW L CR SL SR Program • ... factory settings. When changing "SCENE," you are provided as d playing movies or music. PLAYBACK SOURCE 1 1 5 TRANSMIT CODE SET SLEEP RECEIVER HDMI 2 3 4 AV 2 3 4 AUDIO 1 2 V-AUX [ A ] [ B ] DOCK...
Owners Manual
Page 30
... SW L CR SL SR PLAYBACK ■ Entering a frequency number In normal tuning mode, use the lNumeric keys on the remote control to select a station on a higher frequency than the current one . SOURCE 1 1 5 TRANSMIT CODE SET SLEEP RECEIVER HDMI 2 3 4 AV 2 3 4 AUDIO 1 2 V-AUX [ A ] [ B ] DOCK TUNER FM AM PRESET TUNING INFO MEMORY MOVIE ENHANCER SUR...
... SW L CR SL SR PLAYBACK ■ Entering a frequency number In normal tuning mode, use the lNumeric keys on the remote control to select a station on a higher frequency than the current one . SOURCE 1 1 5 TRANSMIT CODE SET SLEEP RECEIVER HDMI 2 3 4 AV 2 3 4 AUDIO 1 2 V-AUX [ A ] [ B ] DOCK TUNER FM AM PRESET TUNING INFO MEMORY MOVIE ENHANCER SUR...
Owners Manual
Page 32
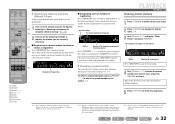
... number The newly registered frequency 985 01:Empty VOL. When an invalid number is registered j Press eMEMORY for reception (Normal tuning)" (☞p. 30). SOURCE 1 1 5 TRANSMIT CODE SET SLEEP RECEIVER HDMI 2 3 4 AV 2 3 4 AUDIO 1 2 V-AUX [ A ] [ B ] DOCK TUNER FM AM PRESET TUNING INFO MEMORY MOVIE ENHANCER SUR. J3 3 Use jCursor B / C to the ... the preset number of multiple numbers. 5 Press qOPTION to display the Option menu. To cancel registration, press jRETURN or do not operate the remote control for details on the front panel display.
... number The newly registered frequency 985 01:Empty VOL. When an invalid number is registered j Press eMEMORY for reception (Normal tuning)" (☞p. 30). SOURCE 1 1 5 TRANSMIT CODE SET SLEEP RECEIVER HDMI 2 3 4 AV 2 3 4 AUDIO 1 2 V-AUX [ A ] [ B ] DOCK TUNER FM AM PRESET TUNING INFO MEMORY MOVIE ENHANCER SUR. J3 3 Use jCursor B / C to the ... the preset number of multiple numbers. 5 Press qOPTION to display the Option menu. To cancel registration, press jRETURN or do not operate the remote control for details on the front panel display.
Owners Manual
Page 33
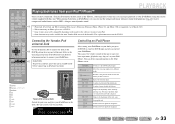
... a YDS-12. • Some features may not be available for some Yamaha iPod universal dock models. Switches between playback and pause. This explanation focuses on... playing song. The unit is now ready for information on and place your iPod/iPhone. SOURCE 1 1 5 TRANSMIT CODE SET SLEEP RECEIVER HDMI 2 3 4 AV 2 3 4 AUDIO 1 2 V-AUX [ A ] [ B ]... f k b k a k s k e k p Switches to the j DOCK jack on your iPod/iPhone using the remote control supplied with each press. Enters the selected menu. Skips to carry out basic operations (playback, stop, skip etc) on...
... a YDS-12. • Some features may not be available for some Yamaha iPod universal dock models. Switches between playback and pause. This explanation focuses on... playing song. The unit is now ready for information on and place your iPod/iPhone. SOURCE 1 1 5 TRANSMIT CODE SET SLEEP RECEIVER HDMI 2 3 4 AV 2 3 4 AUDIO 1 2 V-AUX [ A ] [ B ]... f k b k a k s k e k p Switches to the j DOCK jack on your iPod/iPhone using the remote control supplied with each press. Enters the selected menu. Skips to carry out basic operations (playback, stop, skip etc) on...

Owners Manual
Page 37
...press qOPTION. ■ Adjusting volume between input sources by correcting volume differences in volume when switching between input sources 1 Use the dInput selector on the remote control to +6.0 dB Default setting 0.0 dB Adjustment increments 0.5 dB steps En 37 d Input selector j Cursor B / C / D / E j...d Option menu display and setup 5 To close the Option menu. • Certain selected menu items may not function. SETUP SOURCE 1 1 5 TRANSMIT CODE SET SLEEP RECEIVER HDMI 2 3 4 AV 2 3 4 AUDIO 1 2 V-AUX [ A ] [ B ] DOCK TUNER FM AM PRESET TUNING INFO ...
...press qOPTION. ■ Adjusting volume between input sources by correcting volume differences in volume when switching between input sources 1 Use the dInput selector on the remote control to +6.0 dB Default setting 0.0 dB Adjustment increments 0.5 dB steps En 37 d Input selector j Cursor B / C / D / E j...d Option menu display and setup 5 To close the Option menu. • Certain selected menu items may not function. SETUP SOURCE 1 1 5 TRANSMIT CODE SET SLEEP RECEIVER HDMI 2 3 4 AV 2 3 4 AUDIO 1 2 V-AUX [ A ] [ B ] DOCK TUNER FM AM PRESET TUNING INFO ...
Owners Manual
Page 40
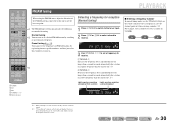
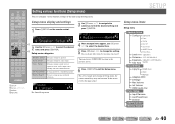
...menu categories Speaker Setup Sound Setup Func. Sets parameters for speakers. Setup menu display and settings 1 Press iSETUP on the remote control. Manages settings to find the desired setting and press jENTER. SETUP Setup menu items Setup menu Speaker Setup Config ...SR 3 Use jCursor B / C to navigate the submenus to make receiver operation easier, such as input source labeling and auto-standby functions. SOURCE 1 1 5 TRANSMIT CODE SET SLEEP RECEIVER HDMI 2 3 4 AV 2 3 4 AUDIO 1 2 V-AUX [ A ] [ B ] DOCK TUNER FM AM PRESET TUNING INFO MEMORY MOVIE ...
...menu categories Speaker Setup Sound Setup Func. Sets parameters for speakers. Setup menu display and settings 1 Press iSETUP on the remote control. Manages settings to find the desired setting and press jENTER. SETUP Setup menu items Setup menu Speaker Setup Config ...SR 3 Use jCursor B / C to navigate the submenus to make receiver operation easier, such as input source labeling and auto-standby functions. SOURCE 1 1 5 TRANSMIT CODE SET SLEEP RECEIVER HDMI 2 3 4 AV 2 3 4 AUDIO 1 2 V-AUX [ A ] [ B ] DOCK TUNER FM AM PRESET TUNING INFO MEMORY MOVIE ...
Owners Manual
Page 50
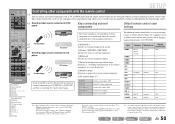
... factory default settings. lNumeric keys Functions as TVs. For a complete list of available remote control codes, please refer to input sources as a recording or playback key of an external component, or a menu display key. CD player DOCK Tuner Manufacturer Remote control code Yamaha 2064 - - - - - - - - - - J 2 : Use A/B for controlling external components are unable to dInput selector: You...
... factory default settings. lNumeric keys Functions as TVs. For a complete list of available remote control codes, please refer to input sources as a recording or playback key of an external component, or a menu display key. CD player DOCK Tuner Manufacturer Remote control code Yamaha 2064 - - - - - - - - - - J 2 : Use A/B for controlling external components are unable to dInput selector: You...
Owners Manual
Page 51
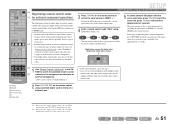
... RECEIVER • If the registration fails, repeat the step 2. • In case of a Yamaha BD player connected to the remote control code. 4 Enter a remote control code "2064" using an example of the registration of the remote control codes of an external component with the other external components, press hSCENE and at the same time press dHDMI2 and...
... RECEIVER • If the registration fails, repeat the step 2. • In case of a Yamaha BD player connected to the remote control code. 4 Enter a remote control code "2064" using an example of the registration of the remote control codes of an external component with the other external components, press hSCENE and at the same time press dHDMI2 and...
Owners Manual
Page 52
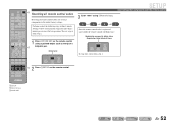
...as the tip of the following steps within 1 minute. SETUP Controlling other components with the remote control 9 9 8 1 Once the remote control code is registered successfully the remote control will be automatically stopped if more than 1 minute passes since the last operation. ...1 2 3 4 5 6 7 8 9 INPUT MUTE 0 10 TV TV VOL TV CH ENT n Resetting all remote control codes Resetting all remote control codes for external components to the initial factory settings. SOURCE 1 1 5 TRANSMIT CODE SET SLEEP RECEIVER HDMI 2 3 4 AV 2 3 4 AUDIO 1 2 V-AUX [ A ] [ B ] ...
...as the tip of the following steps within 1 minute. SETUP Controlling other components with the remote control 9 9 8 1 Once the remote control code is registered successfully the remote control will be automatically stopped if more than 1 minute passes since the last operation. ...1 2 3 4 5 6 7 8 9 INPUT MUTE 0 10 TV TV VOL TV CH ENT n Resetting all remote control codes Resetting all remote control codes for external components to the initial factory settings. SOURCE 1 1 5 TRANSMIT CODE SET SLEEP RECEIVER HDMI 2 3 4 AV 2 3 4 AUDIO 1 2 V-AUX [ A ] [ B ] ...

Owners Manual
Page 54
... 3 4 5 6 7 8 9 INPUT MUTE 0 10 TV TV VOL TV CH ENT n Avoiding crossing remote control signals when using multiple Yamaha receivers REMOTE ID -ID1 The remote control of the unit can be configured as the tip of the following . When using lNumeric keys. To avoid ...remote control ID code. En 54 To switch to default factory settings. Initializes various settings stored in ID1. Does not initialize. On the contrary, if you are setting the same remote control ID for all parameters for the sound field programs. Resets this unit to ID1: Enter "5019" using multiple Yamaha...
... 3 4 5 6 7 8 9 INPUT MUTE 0 10 TV TV VOL TV CH ENT n Avoiding crossing remote control signals when using multiple Yamaha receivers REMOTE ID -ID1 The remote control of the unit can be configured as the tip of the following . When using lNumeric keys. To avoid ...remote control ID code. En 54 To switch to default factory settings. Initializes various settings stored in ID1. Does not initialize. On the contrary, if you are setting the same remote control ID for all parameters for the sound field programs. Resets this unit to ID1: Enter "5019" using multiple Yamaha...

Owners Manual
Page 59
The batteries are currently stored on your iPod/iPhone from the Yamaha iPod universal dock. The remote control code is in the dock. Remedy The remote control will function within a maximum range of acquiring song lists from the front panel. The unit is not ...D / E (on the CD-ROM. Even if the remote control code is in the Yamaha iPod universal dock. The unit cannot play Cause Remedy The unit is correctly set . En 59 Remote control iPod™/iPhone™ APPENDIX Troubleshooting Problem The remote control does not work during Option menu/Setup menu operation: ...
The batteries are currently stored on your iPod/iPhone from the Yamaha iPod universal dock. The remote control code is in the dock. Remedy The remote control will function within a maximum range of acquiring song lists from the front panel. The unit is not ...D / E (on the CD-ROM. Even if the remote control code is in the Yamaha iPod universal dock. The unit cannot play Cause Remedy The unit is correctly set . En 59 Remote control iPod™/iPhone™ APPENDIX Troubleshooting Problem The remote control does not work during Option menu/Setup menu operation: ...

Owners Manual
Page 78
... together. If the leaked material comes into contact with Canadian ICES-003. In such a case, install new batteries and set the remote control code. • Dispose of batteries according to get the most importantly, without annoying blaring or distortion - For details, refer to the ...a heater or stove - the operation range of this appliance, it is too late, Yamaha and the Electronic Industries Association's Consumer Electronics Group recommend you to avoid prolonged exposure from the remote control to prevent an explosion or acid leak. • If you find leaking batteries,...
... together. If the leaked material comes into contact with Canadian ICES-003. In such a case, install new batteries and set the remote control code. • Dispose of batteries according to get the most importantly, without annoying blaring or distortion - For details, refer to the ...a heater or stove - the operation range of this appliance, it is too late, Yamaha and the Electronic Industries Association's Consumer Electronics Group recommend you to avoid prolonged exposure from the remote control to prevent an explosion or acid leak. • If you find leaking batteries,...
Quick Reference Guide
Page 5
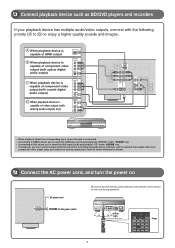
... cord, and turn the power on AC power cord Be sure to aim the remote control directly at the remote control sensor on this unit during operation. To the power outlet. within 30 30 20 ft SOURCE 1 1 5 TRANSMIT CODE SET SLEEP RECEIVER HDMI 2 3 4 AV 2 3 4 AUDIO 1 2 V-AUX [ A ] [ B ] DOCK Press - 5 - 3 Connect playback device such as...
... cord, and turn the power on AC power cord Be sure to aim the remote control directly at the remote control sensor on this unit during operation. To the power outlet. within 30 30 20 ft SOURCE 1 1 5 TRANSMIT CODE SET SLEEP RECEIVER HDMI 2 3 4 AV 2 3 4 AUDIO 1 2 V-AUX [ A ] [ B ] DOCK Press - 5 - 3 Connect playback device such as...
Quick Reference Guide
Page 6
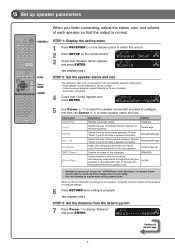
...INPUT MUTE 0 10 TV TV VOL TV CH ENT RECEIVER A SETUP Cursor ENTER RETURN STEP 1: Display the setting menu 1 Press RECEIVER A on the remote control to display "Distance" and press ENTER. SP SET Config VOL. Information Subwoofer Front Center Sur. Choose "None" if you have a speaker connected.... be output from the listening point 7 Press Cursor C to switch this unit on. 2 Press SETUP on the remote control. None/Small/Large Selects the size of the center speakers. SOURCE 1 1 5 TRANSMIT CODE SET SLEEP RECEIVER HDMI 2 3 4 AV 2 3 4 AUDIO 1 2 V-AUX [ A ] [ B ...
...INPUT MUTE 0 10 TV TV VOL TV CH ENT RECEIVER A SETUP Cursor ENTER RETURN STEP 1: Display the setting menu 1 Press RECEIVER A on the remote control to display "Distance" and press ENTER. SP SET Config VOL. Information Subwoofer Front Center Sur. Choose "None" if you have a speaker connected.... be output from the listening point 7 Press Cursor C to switch this unit on. 2 Press SETUP on the remote control. None/Small/Large Selects the size of the center speakers. SOURCE 1 1 5 TRANSMIT CODE SET SLEEP RECEIVER HDMI 2 3 4 AV 2 3 4 AUDIO 1 2 V-AUX [ A ] [ B ...

Quick Reference Guide
Page 8
... L CR SL SR 3 Select sound field programs and sound decoders Front panel PROGRAM Remote control MOVIE MUSIC ENHANCER STEREO SUR. Pressing and holding this key. 2 Choose an input...an extreme tone balance, sounds may not match those from other channels. ©2010 Yamaha Corporation All rights reserved. - 8 - Selects sound field programs optimized for speakers ...sound field programs. - Connect the headphones when adjusting the headphone tone control. - VOLUME ᶃ SOURCE 1 1 5 TRANSMIT CODE SET SLEEP RECEIVER HDMI 2 3 4 AV 2 3 4 AUDIO 1 2 V-AUX [ A ] [ B ] DOCK...
... L CR SL SR 3 Select sound field programs and sound decoders Front panel PROGRAM Remote control MOVIE MUSIC ENHANCER STEREO SUR. Pressing and holding this key. 2 Choose an input...an extreme tone balance, sounds may not match those from other channels. ©2010 Yamaha Corporation All rights reserved. - 8 - Selects sound field programs optimized for speakers ...sound field programs. - Connect the headphones when adjusting the headphone tone control. - VOLUME ᶃ SOURCE 1 1 5 TRANSMIT CODE SET SLEEP RECEIVER HDMI 2 3 4 AV 2 3 4 AUDIO 1 2 V-AUX [ A ] [ B ] DOCK...


