
Owners Manual
Page 3
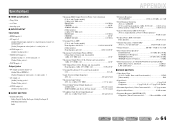
... speakers and listening environment - Subwoofer cable connection ...12 ■ Acoustic parameter adjustment to 5.1-channel configurations - INTRODUCTION Features and capabilities ■ Built-in high-quality, high-power 5-channel amplifier ■ 1-button input/sound field program switching (SCENE function 26 ■ Speaker connections for speaker acoustic parameters 22 - Speaker channels and functions ...9 - Specifying...
... speakers and listening environment - Subwoofer cable connection ...12 ■ Acoustic parameter adjustment to 5.1-channel configurations - INTRODUCTION Features and capabilities ■ Built-in high-quality, high-power 5-channel amplifier ■ 1-button input/sound field program switching (SCENE function 26 ■ Speaker connections for speaker acoustic parameters 22 - Speaker channels and functions ...9 - Specifying...
Owners Manual
Page 5
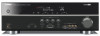
Part names and functions Front panel a A (Power) Switches this unit is in standby mode to switch on the unit. J1 e FM Sets the FM/AM tuner band to playback. j INPUT l / h Selects an ...
Part names and functions Front panel a A (Power) Switches this unit is in standby mode to switch on the unit. J1 e FM Sets the FM/AM tuner band to playback. j INPUT l / h Selects an ...
Owners Manual
Page 6
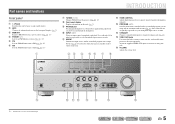
...TV capable of receiving video input, and outputting video signals to an AC wall outlet. Rear panel a DOCK jack For connecting an optional Yamaha iPod universal dock (such as the AV5 or AUDIO1-2 jacks are selected (☞p. 20). c HDMI1-4 jacks For connecting external components ...equipped with component video signals, using three cables to receive audio/video signals from (☞p. 16). m Power cord For connecting this unit to it (☞p. 15). Use these jacks to output audio/video signals to external devices equipped with audio/...
...TV capable of receiving video input, and outputting video signals to an AC wall outlet. Rear panel a DOCK jack For connecting an optional Yamaha iPod universal dock (such as the AV5 or AUDIO1-2 jacks are selected (☞p. 20). c HDMI1-4 jacks For connecting external components ...equipped with component video signals, using three cables to receive audio/video signals from (☞p. 16). m Power cord For connecting this unit to it (☞p. 15). Use these jacks to output audio/video signals to external devices equipped with audio/...

Owners Manual
Page 8
... selected input source, the sound field program, the surround decoder, the FM/AM tuner frequency, etc.)(☞p. 7). J1 DOCK A Yamaha iPod universal dock or Bluetooth wireless audio receiver connected to FM. FM/AM tuner e Tuner keys Operates the FM/AM tuner. FM...Operate a monitor such as a TV. n CODE SET Sets remote control codes for the sleep timer function. r VOLUME +/- c SOURCE A (SOURCE Power) Switches an external component on and standby modes. g Sound selection keys Switch between on and off (☞p. 25). Presets radio stations. Sleep Off Sleep...
... selected input source, the sound field program, the surround decoder, the FM/AM tuner frequency, etc.)(☞p. 7). J1 DOCK A Yamaha iPod universal dock or Bluetooth wireless audio receiver connected to FM. FM/AM tuner e Tuner keys Operates the FM/AM tuner. FM...Operate a monitor such as a TV. n CODE SET Sets remote control codes for the sleep timer function. r VOLUME +/- c SOURCE A (SOURCE Power) Switches an external component on and standby modes. g Sound selection keys Switch between on and off (☞p. 25). Presets radio stations. Sleep Off Sleep...
Owners Manual
Page 10
... "SP IMP." After approximately 3 seconds, the top menu items are displayed. Release the keys when "ADVANCED SETUP" is displayed on the front panel display. The power turns on, when the settings you made has been configured. ■ CRT monitors We recommend that you cannot connect all five speakers, give priority to...
... "SP IMP." After approximately 3 seconds, the top menu items are displayed. Release the keys when "ADVANCED SETUP" is displayed on the front panel display. The power turns on, when the settings you made has been configured. ■ CRT monitors We recommend that you cannot connect all five speakers, give priority to...
Owners Manual
Page 11
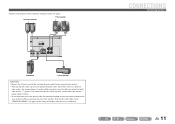
... 4 OR OUT ANTENNA FM GND AM SURROUND CENTER SPEAKERS FRONT AUDIO 2 AUDIO OUT SUBWOOFER Subwoofer Center speaker CAUTION • Remove the AC power cord of this unit from the power outlet before connecting the speakers. • Generally speaker cables consist of this unit or the speakers. Connect your speakers to indicate different...
... 4 OR OUT ANTENNA FM GND AM SURROUND CENTER SPEAKERS FRONT AUDIO 2 AUDIO OUT SUBWOOFER Subwoofer Center speaker CAUTION • Remove the AC power cord of this unit from the power outlet before connecting the speakers. • Generally speaker cables consist of this unit or the speakers. Connect your speakers to indicate different...
Owners Manual
Page 26
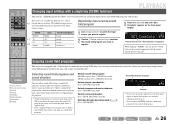
...-Fi VOL. SW L CR SL SR Program • You can also use the speaker indicators on the front panel display to turn the power on the front panel display. SET Complete SW L CR SL SR Release the key when "SET Complete" is also equipped with one key.... (sound field programs) in many different categories suitable for each of sound decoders. When changing "SCENE," you change input sources and sound field programs with a Yamaha digital sound field processing (DSP) chip. TOP MENU REC POP-UP MENU MUTE Enjoying sound field programs 1 2 3 4 5 6 7 8 9 INPUT MUTE 0 10...
...-Fi VOL. SW L CR SL SR Program • You can also use the speaker indicators on the front panel display to turn the power on the front panel display. SET Complete SW L CR SL SR Release the key when "SET Complete" is also equipped with one key.... (sound field programs) in many different categories suitable for each of sound decoders. When changing "SCENE," you change input sources and sound field programs with a Yamaha digital sound field processing (DSP) chip. TOP MENU REC POP-UP MENU MUTE Enjoying sound field programs 1 2 3 4 5 6 7 8 9 INPUT MUTE 0 10...
Owners Manual
Page 28
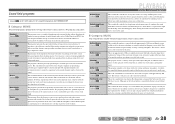
... sound field that makes the listener feel as movies, TV programs, and games. This program simulates a live space thanks to offer a powerful playing environment that emphasizes the vividness of presence in a palace. You can indulge oneself in a hot live house with a shoebox shape ...they are modest but offer an optimum 3D feeling, reproducing effects tones and background music softly but puts emphasis on reproducing a powerful space expanded widely to enjoy stereo sport broadcasts and studio variety programs with an excellent dynamic range providing everything from all around...
... sound field that makes the listener feel as movies, TV programs, and games. This program simulates a live space thanks to offer a powerful playing environment that emphasizes the vividness of presence in a palace. You can indulge oneself in a hot live house with a shoebox shape ...they are modest but offer an optimum 3D feeling, reproducing effects tones and background music softly but puts emphasis on reproducing a powerful space expanded widely to enjoy stereo sport broadcasts and studio variety programs with an excellent dynamic range providing everything from all around...
Owners Manual
Page 33
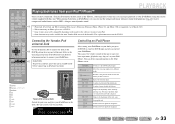
... not be available for playback. DOCK VOL. dDOCK jCursor B / C jCursor D / E jENTER k w k f k b k a k s k e k p Switches to different fields. Connecting the Yamaha iPod universal dock Use the dedicated cable to connect the dock to the j DOCK jack on the rear panel of the iPod universal dock for...MEMORY MOVIE ENHANCER SUR. COMPONENT VIDEO PR HDMI OUT PR PB PB Y MONITOR OUT Y COMPON VIDEO OPTICA AV Yamaha iPod universal dock Switch the power on the model or the software version of the currently playing song. Enters the selected menu. Switches between playback...
... not be available for playback. DOCK VOL. dDOCK jCursor B / C jCursor D / E jENTER k w k f k b k a k s k e k p Switches to different fields. Connecting the Yamaha iPod universal dock Use the dedicated cable to connect the dock to the j DOCK jack on the rear panel of the iPod universal dock for...MEMORY MOVIE ENHANCER SUR. COMPONENT VIDEO PR HDMI OUT PR PB PB Y MONITOR OUT Y COMPON VIDEO OPTICA AV Yamaha iPod universal dock Switch the power on the model or the software version of the currently playing song. Enters the selected menu. Switches between playback...
Owners Manual
Page 47
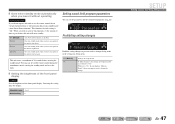
... for eight hours. This unit starts a countdown of the front panel display. Off (Default) On Settings are not protected. Off (Default) 4hours 8hours 12hours Auto Power Down function is returned to the settings on Setup menu. Lowering the setting dims the display. Adjustable range -4 to the settings on Setup menu until... without operating AutoPowerDown If you do not operate this unit for twelve hours. SETUP VOL. when an attempt is "Off." Goes into standby mode (Auto Power Down function). SW DSP Parameter L CR SL SR Prohibiting setting changes SETUP VOL.
... for eight hours. This unit starts a countdown of the front panel display. Off (Default) On Settings are not protected. Off (Default) 4hours 8hours 12hours Auto Power Down function is returned to the settings on Setup menu. Lowering the setting dims the display. Adjustable range -4 to the settings on Setup menu until... without operating AutoPowerDown If you do not operate this unit for twelve hours. SETUP VOL. when an attempt is "Off." Goes into standby mode (Auto Power Down function). SW DSP Parameter L CR SL SR Prohibiting setting changes SETUP VOL.
Owners Manual
Page 53
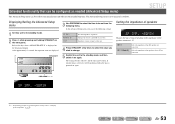
... impedance of the speakers connected. Setting the impedance of speakers SP IMP. -8 MIN Changes the unit settings depending on again. If initialization is powered on the impedance of speakers. J1 6 MIN 8 MIN (Default) Select the impedance when 6Ω speakers are connected. PROGRAM l / h... SP IMP. -8 MIN J 1 : For detailed procedures of a receiver. Release the keys when "ADVANCED SETUP" is powered on the front panel display. Select the impedance when speakers above 8Ω are connected. After approximately 3 seconds, the top menu items are displayed....
... impedance of the speakers connected. Setting the impedance of speakers SP IMP. -8 MIN Changes the unit settings depending on again. If initialization is powered on the impedance of speakers. J1 6 MIN 8 MIN (Default) Select the impedance when 6Ω speakers are connected. PROGRAM l / h... SP IMP. -8 MIN J 1 : For detailed procedures of a receiver. Release the keys when "ADVANCED SETUP" is powered on the front panel display. Select the impedance when speakers above 8Ω are connected. After approximately 3 seconds, the top menu items are displayed....
Owners Manual
Page 55
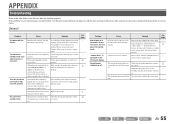
...Error" is not listed below, or if the instructions below when this unit, disconnect the power cable, and contact the nearest authorized Yamaha dealer or service center. Please contact authorized Yamaha dealer or service center to an AC inserted. etc. En 55 The unit enters standby mode... settings are connected properly. Set the speaker impedance to match your nearest Yamaha dealer or service center to an external electric shock (such as lightning or excessive static electricity) or by a drop in power supply voltage. Please contact your speakers. (When this unit and speakers ...
...Error" is not listed below, or if the instructions below when this unit, disconnect the power cable, and contact the nearest authorized Yamaha dealer or service center. Please contact authorized Yamaha dealer or service center to an AC inserted. etc. En 55 The unit enters standby mode... settings are connected properly. Set the speaker impedance to match your nearest Yamaha dealer or service center to an external electric shock (such as lightning or excessive static electricity) or by a drop in power supply voltage. Please contact your speakers. (When this unit and speakers ...
Owners Manual
Page 57
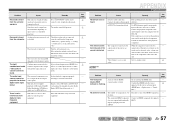
... may decreased due to the external component video output with the HDMI connection has occurred. If the subwoofer includes an Auto Power Off function, then lower the Auto Power Off sensitivity settings. The volume cannot be distorted, or the volume may be increased, or the sound is distorted. "... The right combination of HD Audio (TrueHD, Dolby Digital plus, DTS Master Audio, etc.) or DTS 96/24, etc. Turn the subwoofer power on all components connected to exit straight decoding mode. This unit does not support playback of audio / video jacks to output the desired digital ...
... may decreased due to the external component video output with the HDMI connection has occurred. If the subwoofer includes an Auto Power Off function, then lower the Auto Power Off sensitivity settings. The volume cannot be distorted, or the volume may be increased, or the sound is distorted. "... The right combination of HD Audio (TrueHD, Dolby Digital plus, DTS Master Audio, etc.) or DTS 96/24, etc. Turn the subwoofer power on all components connected to exit straight decoding mode. This unit does not support playback of audio / video jacks to output the desired digital ...
Owners Manual
Page 64
... L/R 100 W/ch [Other models] (1 kHz, 0.9% THD, 6 Ω) FRONT L/R 100 W/ch CENTER 100 W SURROUND L/R 100 W/ch • Dynamic Power (IHF) [U.S.A. Input Shorted (250 mV to Front Speakers 98 dB or more • Residual Noise (IHF-A Network) Front Speakers 150 µV or less &#... Speakers 6/4/2 105/130/150 W • Maximum Useful Output Power (JEITA) [China, Korea, General and Asia models] 1 kHz, 10% THD, 6 135 W • Maximum Output Power [U.K., Europe and Asia models] 1 kHz, 0.7% THD, 4 120 W • IEC Output Power [U.K., Europe and Asia models] Front Speakers 1 kHz, 0.9% ...
... L/R 100 W/ch [Other models] (1 kHz, 0.9% THD, 6 Ω) FRONT L/R 100 W/ch CENTER 100 W SURROUND L/R 100 W/ch • Dynamic Power (IHF) [U.S.A. Input Shorted (250 mV to Front Speakers 98 dB or more • Residual Noise (IHF-A Network) Front Speakers 150 µV or less &#... Speakers 6/4/2 105/130/150 W • Maximum Useful Output Power (JEITA) [China, Korea, General and Asia models] 1 kHz, 10% THD, 6 135 W • Maximum Output Power [U.K., Europe and Asia models] 1 kHz, 0.7% THD, 4 120 W • IEC Output Power [U.K., Europe and Asia models] Front Speakers 1 kHz, 0.9% ...
Owners Manual
Page 65
... (20.8 dBf) • Signal to 1611 kHz ■ GENERAL • Power Supply [U.S.A. and Europe models AC 230 V, 50 Hz [Asia models AC 220-240 V, 50/60 Hz • Power Consumption [U.S.A. and Canada models 530 to 1710 kHz [Asia and General models 530/531...) Mono/Stereo 0.3/0.3% • Antenna Input (unbalanced 75 Ω ■ AM SECTION • Tuning Range [U.S.A. and Canada models 250 W/320 VA [Other models 250 W • Standby Power Consumption [General models 1.0 W or less [Other models 0.5 W or less • Dimensions (W x H x D) 435 x 151 x 315 mm (17-1/8 x 6 x 12-3/8 in...
... (20.8 dBf) • Signal to 1611 kHz ■ GENERAL • Power Supply [U.S.A. and Europe models AC 230 V, 50 Hz [Asia models AC 220-240 V, 50/60 Hz • Power Consumption [U.S.A. and Canada models 530 to 1710 kHz [Asia and General models 530/531...) Mono/Stereo 0.3/0.3% • Antenna Input (unbalanced 75 Ω ■ AM SECTION • Tuning Range [U.S.A. and Canada models 250 W/320 VA [Other models 250 W • Standby Power Consumption [General models 1.0 W or less [Other models 0.5 W or less • Dimensions (W x H x D) 435 x 151 x 315 mm (17-1/8 x 6 x 12-3/8 in...

Owners Manual
Page 76
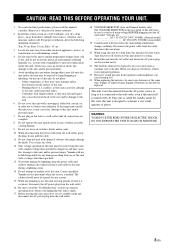
... of the obsolete outlet. 10 Protect the power cord from being affected by Yamaha Corporation of interference, which can not locate the appropriate retailer, please contact Yamaha Electronics Corp., U.S.A. 6660 Orangethorpe Ave, Buena Park, CA 90620. Utilize power outlets that may be used , use of...use attachments/accessories specified by the manufacturer. 12 Use only with the cart, stand, tripod, bracket, or table specified by Yamaha may cause interference harmful to distribute this product MUST be of sufficient magnitude to constitute a risk of Graphical Symbols The lightning...
... of the obsolete outlet. 10 Protect the power cord from being affected by Yamaha Corporation of interference, which can not locate the appropriate retailer, please contact Yamaha Electronics Corp., U.S.A. 6660 Orangethorpe Ave, Buena Park, CA 90620. Utilize power outlets that may be used , use of...use attachments/accessories specified by the manufacturer. 12 Use only with the cart, stand, tripod, bracket, or table specified by Yamaha may cause interference harmful to distribute this product MUST be of sufficient magnitude to constitute a risk of Graphical Symbols The lightning...
Owners Manual
Page 77
...cause damage and/or discoloration on switches, knobs and/or cords. 10 When disconnecting the power cable from the wall outlet, grasp the plug; Yamaha will form when the surrounding temperature changes suddenly. Disconnect the power cable from a wall outlet or this unit during a lightning storm. 14 Do not ...cold to hot, and do not locate this unit near the AC outlet and where the AC power plug can cause hearing loss. 24 When replacing the batteries, be used. Contact qualified Yamaha service personnel when any reasons. 15 When not planning to read this sound system in a well...
...cause damage and/or discoloration on switches, knobs and/or cords. 10 When disconnecting the power cable from the wall outlet, grasp the plug; Yamaha will form when the surrounding temperature changes suddenly. Disconnect the power cable from a wall outlet or this unit during a lightning storm. 14 Do not ...cold to hot, and do not locate this unit near the AC outlet and where the AC power plug can cause hearing loss. 24 When replacing the batteries, be used. Contact qualified Yamaha service personnel when any reasons. 15 When not planning to read this sound system in a well...
Quick Reference Guide
Page 2
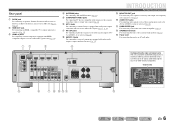
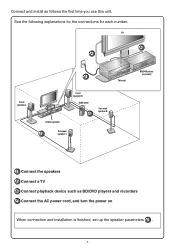
See the following explanations for the connections for each number. TV 3 2 Front speaker L 4 This unit Center speaker Front speaker R Subwoofer 1 Surround speaker R Surround 1 speaker L BD/DVD player (recorder) 1 Connect the speakers 2 Connect a TV 3 Connect playback device such as follows the first time you use this unit. Connect and install as BD/DVD players and recorders 4 Connect the AC power cord, and turn the power on When connection and installation is finished, set up the speaker parameters 5 . - 2 -
See the following explanations for the connections for each number. TV 3 2 Front speaker L 4 This unit Center speaker Front speaker R Subwoofer 1 Surround speaker R Surround 1 speaker L BD/DVD player (recorder) 1 Connect the speakers 2 Connect a TV 3 Connect playback device such as follows the first time you use this unit. Connect and install as BD/DVD players and recorders 4 Connect the AC power cord, and turn the power on When connection and installation is finished, set up the speaker parameters 5 . - 2 -
Quick Reference Guide
Page 3
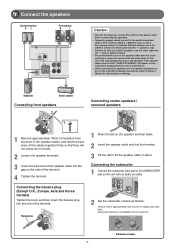
...Surround speaker R L Front speaker R L ANTENNA FM GND AM SPEAKERS SURROUND CENTER FRONT SUBWOOFER Caution: • Remove the AC power cord of this unit from the ends of the speaker cables, and twist the bare wires of the cables together firmly so that... 3 - MIN MAX MIN MAX Subwoofer examples Subwoofer Center speaker Connecting front speakers KERS 3 2 FRONT 1 4 1 Remove approximately 10mm of insulation from the power outlet before making connections. One of these cables is switched on the front panel display when this unit and the speakers, and the other cable...
...Surround speaker R L Front speaker R L ANTENNA FM GND AM SPEAKERS SURROUND CENTER FRONT SUBWOOFER Caution: • Remove the AC power cord of this unit from the ends of the speaker cables, and twist the bare wires of the cables together firmly so that... 3 - MIN MAX MIN MAX Subwoofer examples Subwoofer Center speaker Connecting front speakers KERS 3 2 FRONT 1 4 1 Remove approximately 10mm of insulation from the power outlet before making connections. One of these cables is switched on the front panel display when this unit and the speakers, and the other cable...
Quick Reference Guide
Page 5
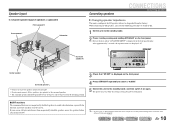
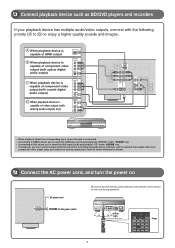
... HDMI 2 3 4 AV 2 3 4 AUDIO 1 2 V-AUX [ A ] [ B ] DOCK Press - 5 - Refer to Owner's Manual for details. 4 Connect the AC power cord, and turn the power on this unit during operation. 3 Connect playback device such as devices that cannot be connected using the above methods, such as BD/DVD...If necessary, you can connect components that output video from component video output jacks and audio from analog output jacks. To the power outlet. A When playback device is capable of HDMI output HDMI HDMI B When playback device is capable of component video output ...
... HDMI 2 3 4 AV 2 3 4 AUDIO 1 2 V-AUX [ A ] [ B ] DOCK Press - 5 - Refer to Owner's Manual for details. 4 Connect the AC power cord, and turn the power on this unit during operation. 3 Connect playback device such as devices that cannot be connected using the above methods, such as BD/DVD...If necessary, you can connect components that output video from component video output jacks and audio from analog output jacks. To the power outlet. A When playback device is capable of HDMI output HDMI HDMI B When playback device is capable of component video output ...


