
Owner's Manual
Page 1
U RX-V1600 AV Receiver OWNER'S MANUAL
U RX-V1600 AV Receiver OWNER'S MANUAL

Owner's Manual
Page 3
...Cable/s supplied with these corrective measures do not produce satisfactory results, please contact the local retailer authorized to distribute this manual, meets FCC requirements. Compliance with this product MUST be sure the antenna or cable system is provided to call the ... not installed and used . Follow all installations. In the case of interference, which can not locate the appropriate retailer, please contact Yamaha Electronics Corp., U.S.A. 6660 Orangethorpe Ave, Buena Park, CA 90620. If these requirements provides a reasonable level of the following the operating...
...Cable/s supplied with these corrective measures do not produce satisfactory results, please contact the local retailer authorized to distribute this manual, meets FCC requirements. Compliance with this product MUST be sure the antenna or cable system is provided to call the ... not installed and used . Follow all installations. In the case of interference, which can not locate the appropriate retailer, please contact Yamaha Electronics Corp., U.S.A. 6660 Orangethorpe Ave, Buena Park, CA 90620. If these requirements provides a reasonable level of the following the operating...
Owner's Manual
Page 4
...wall outlet until it at least 30 cm on the top, 20 cm on the left and right, and 20 cm on this manual carefully. Contact qualified YAMAHA service personnel when any damage resulting from loud sounds is needed. WARNING TO REDUCE THE RISK OF FIRE OR ELECTRIC SHOCK, DO ... à la norme NMB-003 du Canada. IMPORTANT Please record the serial number of at a safe level. We Want You Listening For A Lifetime YAMAHA and the Electronic Industries Association's Consumer Electronics Group want you turn off this unit, and/or personal injury. - CAUTION: READ THIS BEFORE OPERATING YOUR ...
...wall outlet until it at least 30 cm on the top, 20 cm on the left and right, and 20 cm on this manual carefully. Contact qualified YAMAHA service personnel when any damage resulting from loud sounds is needed. WARNING TO REDUCE THE RISK OF FIRE OR ELECTRIC SHOCK, DO ... à la norme NMB-003 du Canada. IMPORTANT Please record the serial number of at a safe level. We Want You Listening For A Lifetime YAMAHA and the Electronic Industries Association's Consumer Electronics Group want you turn off this unit, and/or personal injury. - CAUTION: READ THIS BEFORE OPERATING YOUR ...

Owner's Manual
Page 5
...33 BASIC OPERATION PLAYBACK 36 Basic operations 36 Additional operations 38 RECORDING 45 FM/AM TUNING 46 Automatic tuning 46 Manual tuning 47 Automatic preset tuning 47 Manual preset tuning 49 Selecting preset stations 50 Exchanging preset stations 51 XM® SATELLITE RADIO TUNING 52 What is ... movie/video sources 64 For music sources 66 SOUND FIELD PARAMETER DESCRIPTIONS 67 SOUND FIELD PROGRAM SPEAKER LAYOUTS 71 ADVANCED OPERATION MANUAL SETUP 75 Using MANUAL SETUP 77 Using BASIC MENU 78 Using SOUND MENU 81 Using INPUT MENU 83 Using OPTION MENU 85 ADVANCED OPERATIONS 89...
...33 BASIC OPERATION PLAYBACK 36 Basic operations 36 Additional operations 38 RECORDING 45 FM/AM TUNING 46 Automatic tuning 46 Manual tuning 47 Automatic preset tuning 47 Manual preset tuning 49 Selecting preset stations 50 Exchanging preset stations 51 XM® SATELLITE RADIO TUNING 52 What is ... movie/video sources 64 For music sources 66 SOUND FIELD PARAMETER DESCRIPTIONS 67 SOUND FIELD PROGRAM SPEAKER LAYOUTS 71 ADVANCED OPERATION MANUAL SETUP 75 Using MANUAL SETUP 77 Using BASIC MENU 78 Using SOUND MENU 81 Using INPUT MENU 83 Using OPTION MENU 85 ADVANCED OPERATIONS 89...

Owner's Manual
Page 6
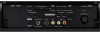
... (composite video ↔ S-video ↔ component video → HDMI digital video) capability for monitor out Other features ◆ YPAO (YAMAHA Parametric Room Acoustic Optimizer) for the creation of improvements, etc. All rights reserved. The THX logo is printed prior to 20 kHz, 8... or registered trademarks of their respective owners. 2 In cases when the button names differ between the manual and product, the product has priority. In case of YAMAHA CORPORATION. Manufactured under license from 480i to 480p ◆ Optical and coaxial digital audio signal jacks ...
... (composite video ↔ S-video ↔ component video → HDMI digital video) capability for monitor out Other features ◆ YPAO (YAMAHA Parametric Room Acoustic Optimizer) for the creation of improvements, etc. All rights reserved. The THX logo is printed prior to 20 kHz, 8... or registered trademarks of their respective owners. 2 In cases when the button names differ between the manual and product, the product has priority. In case of YAMAHA CORPORATION. Manufactured under license from 480i to 480p ◆ Optical and coaxial digital audio signal jacks ...

Owner's Manual
Page 11
...) jack Outputs audio signals for more than 3 seconds to start automatic preset tuning (see page 47). K MULTI ZONE buttons ZONE 2 ON/OFF Turns on ) and manual (the AUTO indicator is selected, 2-channel or multi-channel input signals are mixed down for private listening with TONE CONTROL. L PROGRAM selector Use to the...
...) jack Outputs audio signals for more than 3 seconds to start automatic preset tuning (see page 47). K MULTI ZONE buttons ZONE 2 ON/OFF Turns on ) and manual (the AUTO indicator is selected, 2-channel or multi-channel input signals are mixed down for private listening with TONE CONTROL. L PROGRAM selector Use to the...

Owner's Manual
Page 16
... the presence and surround back speakers automatically by running AUTO SETUP (see page 32) or manually by adjusting settings for PRESENCE SP (see page 79) and SB L/R SP (see page 79) in MANUAL SETUP when TEST TONE in MANUAL SETUP. O SLEEP indicator Lights up when Zone 2 or Zone 3 is turned on . M ... indicators Indicate the channel components of presence and surround back speakers set for PRESENCE SP (see page 79) and SB L/R SP (see page 79) in MANUAL SETUP is set to this unit. P ZONE 2/ZONE 3 indicators Light up while the sleep timer is on . 12 CONTROLS AND FUNCTIONS K 96/24 ...
... the presence and surround back speakers automatically by running AUTO SETUP (see page 32) or manually by adjusting settings for PRESENCE SP (see page 79) and SB L/R SP (see page 79) in MANUAL SETUP when TEST TONE in MANUAL SETUP. O SLEEP indicator Lights up when Zone 2 or Zone 3 is turned on . M ... indicators Indicate the channel components of presence and surround back speakers set for PRESENCE SP (see page 79) and SB L/R SP (see page 79) in MANUAL SETUP is set to this unit. P ZONE 2/ZONE 3 indicators Light up while the sleep timer is on . 12 CONTROLS AND FUNCTIONS K 96/24 ...

Owner's Manual
Page 18
... Turn it is not practical to reduce wall reflections. Place these speakers behind the listening position and at the same width as the YAMAHA Active Servo Processing Subwoofer System, is the radio communication sector of each speaker from the ideal listening position. The distance of the ITU ...however, are not highly directional. Place these speakers directly behind your video monitor. Place these speakers at least 30 cm (12 in MANUAL SETUP (see page 64). Center speaker (C) The center speaker is not so critical, because low bass sounds are obtained with the full system....
... Turn it is not practical to reduce wall reflections. Place these speakers behind the listening position and at the same width as the YAMAHA Active Servo Processing Subwoofer System, is the radio communication sector of each speaker from the ideal listening position. The distance of the ITU ...however, are not highly directional. Place these speakers directly behind your video monitor. Place these speakers at least 30 cm (12 in MANUAL SETUP (see page 64). Center speaker (C) The center speaker is not so critical, because low bass sounds are obtained with the full system....

Owner's Manual
Page 22
... by the DSP sound fields. You can connect both surround back and presence speakers to prioritize either set of speakers using the PRIORITY parameter in MANUAL SETUP (see page 79). • The surround back speakers output the surround back channel included in amplifier 1 2 3 Center speaker Front speakers (B) 4 R+ SPEAKERS...
... by the DSP sound fields. You can connect both surround back and presence speakers to prioritize either set of speakers using the PRIORITY parameter in MANUAL SETUP (see page 79). • The surround back speakers output the surround back channel included in amplifier 1 2 3 Center speaker Front speakers (B) 4 R+ SPEAKERS...

Owner's Manual
Page 26
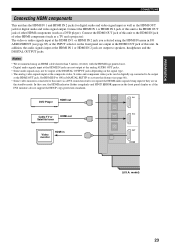
... HDMI Input COMPONENT VIDEO S VIDEO COMPONENT VIDEO jacks For component signals, separated into luminance (Y) and color difference (PB, PR) to provide the best quality in MANUAL SETUP to ON (see page 85), the analog video signals input at the VIDEO, S VIDEO and COMPONENT VIDEO jacks can be output at the COMPONENT...
... HDMI Input COMPONENT VIDEO S VIDEO COMPONENT VIDEO jacks For component signals, separated into luminance (Y) and color difference (PB, PR) to provide the best quality in MANUAL SETUP to ON (see page 85), the analog video signals input at the VIDEO, S VIDEO and COMPONENT VIDEO jacks can be output at the COMPONENT...
Owner's Manual
Page 27
... a DVD player). Connect the HDMI IN 1 or HDMI IN 2 jack of this unit to recognize the HDMI audio signals being input if they are in MANUAL SETUP to activate this feature (see page 83) or the INPUT selector on the signal type. • The analog video signals input at the composite...
... a DVD player). Connect the HDMI IN 1 or HDMI IN 2 jack of this unit to recognize the HDMI audio signals being input if they are in MANUAL SETUP to activate this feature (see page 83) or the INPUT selector on the signal type. • The analog video signals input at the composite...

Owner's Manual
Page 37
This manual uses the OSD illustrations to explain the AUTO SETUP procedure. • If an error occurs during the AUTO SETUP procedure (YPAO). model) LEVEL TITLE BAND .... TV 1 TV MUTE TV INPUT TOP PRESET MUTE EXIT PURE DIRECT (U.S.A. REC DISC SKIP OFF ON MACRO LEARN CLEAR RE-NAME 1 2-9 SET MENU . ;AUTO SETUP ;MANUAL SETUP . ;INFORMATION [ ]/[ ]:Up/Down [ENTER]:Enter p PRESET/CH A-E/CAT. PRESET/CH A-E/CAT. If there is too much ambient noise, the results may not be satisfactory...
This manual uses the OSD illustrations to explain the AUTO SETUP procedure. • If an error occurs during the AUTO SETUP procedure (YPAO). model) LEVEL TITLE BAND .... TV 1 TV MUTE TV INPUT TOP PRESET MUTE EXIT PURE DIRECT (U.S.A. REC DISC SKIP OFF ON MACRO LEARN CLEAR RE-NAME 1 2-9 SET MENU . ;AUTO SETUP ;MANUAL SETUP . ;INFORMATION [ ]/[ ]:Up/Down [ENTER]:Enter p PRESET/CH A-E/CAT. PRESET/CH A-E/CAT. If there is too much ambient noise, the results may not be satisfactory...

Owner's Manual
Page 38
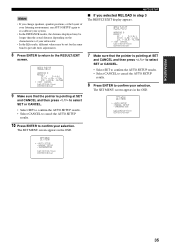
... of much higher quality than your other speakers. SP : 5/4/0.1 . FRONT To adjust the frequency response of each setup parameter, run MANUAL SETUP (see page 79). RESULT:WIRING FRONT L;;;;;;;OK []:Select [ENTER]:Return Results of the speaker connection and wiring RESULT:DISTANCE1 FRONT ...are of your front speakers are set SIZE to select WIRING, DISTANCE, SIZE, EQ or LEVEL. 1 AUTO:MENU . When EQ is selected, press l / h to manually adjust each speaker y • Press l / h repeatedly to display the AUTO SETUP results. p p p p AUTO SETUP 4 Press k / n repeatedly to ...
... of much higher quality than your other speakers. SP : 5/4/0.1 . FRONT To adjust the frequency response of each setup parameter, run MANUAL SETUP (see page 79). RESULT:WIRING FRONT L;;;;;;;OK []:Select [ENTER]:Return Results of the speaker connection and wiring RESULT:DISTANCE1 FRONT ...are of your front speakers are set SIZE to select WIRING, DISTANCE, SIZE, EQ or LEVEL. 1 AUTO:MENU . When EQ is selected, press l / h to manually adjust each speaker y • Press l / h repeatedly to display the AUTO SETUP results. p p p p AUTO SETUP 4 Press k / n repeatedly to ...
Owner's Manual
Page 39
...may be longer than the actual distance depending on the characteristics of your selection. SP : 5/4/0.1 . RESULT:EXIT WARNING 0 RESULT . SET MENU . ;AUTO SETUP ;MANUAL SETUP . ;INFORMATION [ ]/[ ]:Up/Down [ENTER]:Enter 10 Press ENTER to confirm your selection. DIST: 4.50/ 6.10m . p p p p AUTO SETUP... Select SET to confirm the AUTO SETUP results. • Select CANCEL to cancel the AUTO SETUP results. SET MENU . ;AUTO SETUP ;MANUAL SETUP . ;INFORMATION [ ]/[ ]:Up/Down [ENTER]:Enter p p 35 SP : 5/4/0.1 . DIST: 4.50/ 6.10m . The SET MENU screen appears in the ...
...may be longer than the actual distance depending on the characteristics of your selection. SP : 5/4/0.1 . RESULT:EXIT WARNING 0 RESULT . SET MENU . ;AUTO SETUP ;MANUAL SETUP . ;INFORMATION [ ]/[ ]:Up/Down [ENTER]:Enter 10 Press ENTER to confirm your selection. DIST: 4.50/ 6.10m . p p p p AUTO SETUP... Select SET to confirm the AUTO SETUP results. • Select CANCEL to cancel the AUTO SETUP results. SET MENU . ;AUTO SETUP ;MANUAL SETUP . ;INFORMATION [ ]/[ ]:Up/Down [ENTER]:Enter p p 35 SP : 5/4/0.1 . DIST: 4.50/ 6.10m . The SET MENU screen appears in the ...

Owner's Manual
Page 43
..., 7ch Stereo or PURE DIRECT is selected. • When the power of discs in 6.1-channel, select decoders (PL xMovie, PL xMusic, EX/ES or EX) manually. • 6.1/7.1-channel playback is turned off, the input mode will output from the front panel display and the video monitor. ■ Enjoying multi-channel software...
..., 7ch Stereo or PURE DIRECT is selected. • When the power of discs in 6.1-channel, select decoders (PL xMovie, PL xMusic, EX/ES or EX) manually. • 6.1/7.1-channel playback is turned off, the input mode will output from the front panel display and the video monitor. ■ Enjoying multi-channel software...

Owner's Manual
Page 48
... may not be selected when the power of source channels in the OSD. AMP SOURCE TV SET MENU MENU SRCH MODE SET MENU . ;AUTO SETUP ;MANUAL SETUP . ;INFORMATION [ ]/[ ]:Up/Down [ENTER]:Enter p p 2 Press n repeatedly to analog input. ENTER The following information appears in the input signal. When the unit is unable...
... may not be selected when the power of source channels in the OSD. AMP SOURCE TV SET MENU MENU SRCH MODE SET MENU . ;AUTO SETUP ;MANUAL SETUP . ;INFORMATION [ ]/[ ]:Up/Down [ENTER]:Enter p p 2 Press n repeatedly to analog input. ENTER The following information appears in the input signal. When the unit is unable...

Owner's Manual
Page 51
...A 1 : A M 1 0 7 0 k H z dB VOLUME SP A Straight L R 3 Press PRESET/TUNING/CH l / h to continue searching. PRESET/TUNING/CH y Press and hold the button to manually tune into FM stations with strong signals and store up in order. Note You must first set AMP/SOURCE/TV to SOURCE and then press... AUTO/MAN'L If a colon (:) appears in the front panel display, this unit to E8) of those stations in the front panel display. Manually tuning into an FM station will automatically change the reception mode to monaural reception to increase the signal quality. 1 Repeat steps 1 and 2 in...
...A 1 : A M 1 0 7 0 k H z dB VOLUME SP A Straight L R 3 Press PRESET/TUNING/CH l / h to continue searching. PRESET/TUNING/CH y Press and hold the button to manually tune into FM stations with strong signals and store up in order. Note You must first set AMP/SOURCE/TV to SOURCE and then press... AUTO/MAN'L If a colon (:) appears in the front panel display, this unit to E8) of those stations in the front panel display. Manually tuning into an FM station will automatically change the reception mode to monaural reception to increase the signal quality. 1 Repeat steps 1 and 2 in...

Owner's Manual
Page 52
... will be stored. Notes • Any station data stored under a preset station number is weak in signal strength, tune into it manually and store it by following the procedure in "Manual preset tuning". ■ Customized automatic preset tuning You can specify a preset station group and a preset station number from being lost in...
... will be stored. Notes • Any station data stored under a preset station number is weak in signal strength, tune into it manually and store it by following the procedure in "Manual preset tuning". ■ Customized automatic preset tuning You can specify a preset station group and a preset station number from being lost in...

Owner's Manual
Page 53
...indicator flashes for tuning instructions. Press PRESET/TUNING/CH l on the remote control to select a lower preset station number. FM/AM TUNING Manual preset tuning You can also store up to 40 FM or AM stations (8 stations in the front panel display. The group letter appears.... dB VOLUME SP A Sci-Fi L R 3 4 2,5 1 Repeat steps in "Automatic tuning" or "Manual tuning" to tune into a station, the front panel display shows the frequency of the 5 groups, A1 to E8) manually. Press PRESET/TUNING/CH h on the front panel to select a preset station number (1 to 8) while the...
...indicator flashes for tuning instructions. Press PRESET/TUNING/CH l on the remote control to select a lower preset station number. FM/AM TUNING Manual preset tuning You can also store up to 40 FM or AM stations (8 stations in the front panel display. The group letter appears.... dB VOLUME SP A Sci-Fi L R 3 4 2,5 1 Repeat steps in "Automatic tuning" or "Manual tuning" to tune into a station, the front panel display shows the frequency of the 5 groups, A1 to E8) manually. Press PRESET/TUNING/CH h on the front panel to select a preset station number (1 to 8) while the...

Owner's Manual
Page 54
For details, see "Automatic preset tuning" on page 47 or "Manual preset tuning" on the remote control) to select TUNER as the input source. FM/AM TUNING 5 Press MEMORY (MAN'L/AUTO FM) on the front panel ...
For details, see "Automatic preset tuning" on page 47 or "Manual preset tuning" on the remote control) to select TUNER as the input source. FM/AM TUNING 5 Press MEMORY (MAN'L/AUTO FM) on the front panel ...


