
Setup Guide
Page 1
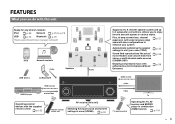
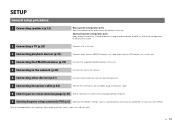
... information, refer to build the system based on this document. ■ Speaker cables (depending on the supplied CD-ROM. http://download.yamaha.com/ Cables necessary for U.S.A. ■ YPAO microphone Insert into the remote control in the correct polarity (+/-). ■ Power cable ■... accessories are supplied with this product. ■ Remote control ■ Batteries (AAA, R03, UM-4) (x 2) Easy Setup Guide English for connections You need to separately prepare the following website. or 7.1-channel system and play back surround sound of a BD/DVD on regions. ■ ...
... information, refer to build the system based on this document. ■ Speaker cables (depending on the supplied CD-ROM. http://download.yamaha.com/ Cables necessary for U.S.A. ■ YPAO microphone Insert into the remote control in the correct polarity (+/-). ■ Power cable ■... accessories are supplied with this product. ■ Remote control ■ Batteries (AAA, R03, UM-4) (x 2) Easy Setup Guide English for connections You need to separately prepare the following website. or 7.1-channel system and play back surround sound of a BD/DVD on regions. ■ ...

Setup Guide
Page 3
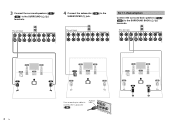
... 2 This unit (rear) URROUND SUR. a d of this unit or the speakers. Using a banana plug a Tighten the speaker terminal. b 2 Connect the center speaker ( CENTER terminal. ) to the FRONT ( / ) terminals. d Tighten the terminal. MULTI CH INPUT CENTER ZONE OUT PRE OUT... (SINGLE) 1 2 This unit (rear) URROUND SUR. When connecting 6-ohm speakers, set the speaker impedance of the cable together - (black) firmly. BACK SUBWOOFER CENTER R SURROUND L SPEAKERS R SURROUND BACK L CENTER ...
... 2 This unit (rear) URROUND SUR. a d of this unit or the speakers. Using a banana plug a Tighten the speaker terminal. b 2 Connect the center speaker ( CENTER terminal. ) to the FRONT ( / ) terminals. d Tighten the terminal. MULTI CH INPUT CENTER ZONE OUT PRE OUT... (SINGLE) 1 2 This unit (rear) URROUND SUR. When connecting 6-ohm speakers, set the speaker impedance of the cable together - (black) firmly. BACK SUBWOOFER CENTER R SURROUND L SPEAKERS R SURROUND BACK L CENTER ...
Setup Guide
Page 4
...SUBWOOFER CENTER R SURROUND L SPEAKERS R SURROUND BACK L CENTER R FRONT L R ZONE 2/F.PRESENCE/ BI-AMP EXTRA SP L SINGLE 4 Connect the subwoofer ( SUBWOOFER (1) jack. ) to connect the subwoofer ( ). Audio pin cable PRE OUT (SINGLE) 1 SURRUND 2 SUR. BACK SUBWOOFER CENTER R SURROUND L SPEAKERS R SURROUND ...CH INPUT CENTER ZONE OUT PRE OUT (SINGLE) 1 2 This unit (rear) URROUND SUR. BACK SUBWOOFER ZONE 2 FRONT SURROUND SUR. 3 Connect the surround speakers ( / ) to the SURROUND BACK ( / ) terminals. BACK SUBWOOFER ZONE 2 FRONT SURROUND SUR. BACK SUBWOOFER ZONE ...
...SUBWOOFER CENTER R SURROUND L SPEAKERS R SURROUND BACK L CENTER R FRONT L R ZONE 2/F.PRESENCE/ BI-AMP EXTRA SP L SINGLE 4 Connect the subwoofer ( SUBWOOFER (1) jack. ) to connect the subwoofer ( ). Audio pin cable PRE OUT (SINGLE) 1 SURRUND 2 SUR. BACK SUBWOOFER CENTER R SURROUND L SPEAKERS R SURROUND ...CH INPUT CENTER ZONE OUT PRE OUT (SINGLE) 1 2 This unit (rear) URROUND SUR. BACK SUBWOOFER ZONE 2 FRONT SURROUND SUR. 3 Connect the surround speakers ( / ) to the SURROUND BACK ( / ) terminals. BACK SUBWOOFER ZONE 2 FRONT SURROUND SUR. BACK SUBWOOFER ZONE ...
Setup Guide
Page 5
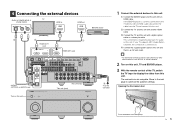
...75Ω FM GND AM 5 OPTICAL SINGLE O AUDIO1 (OPTICAL or AUDIO) jack This unit (rear) This unit (front) NATURAL SOUND AV RECEIVER RX-A1010 Turn on this unit MAIN ZONE PURE DIRECT INPUT ON SCREEN OPTION TONE/BALANCE STRAIGHT 1 RETURN ENTER DISPLAY USB PROGRAM PHONES ZONE 2 SCENE 2 3...iPod/iPhone YPAO MIC SILENT CINEMA S VIDEO VIDEO L AUDIO R OPTICAL HDMI IN PRESET TUNING/CH VOLUME d To an AC wall outlet 1 Connect the external devices to connect radio antennas or other external devices, see "SETUP" in HDMI HDMI out HDMI BD/DVD player O R L c b HDMI OUT 1...
...75Ω FM GND AM 5 OPTICAL SINGLE O AUDIO1 (OPTICAL or AUDIO) jack This unit (rear) This unit (front) NATURAL SOUND AV RECEIVER RX-A1010 Turn on this unit MAIN ZONE PURE DIRECT INPUT ON SCREEN OPTION TONE/BALANCE STRAIGHT 1 RETURN ENTER DISPLAY USB PROGRAM PHONES ZONE 2 SCENE 2 3...iPod/iPhone YPAO MIC SILENT CINEMA S VIDEO VIDEO L AUDIO R OPTICAL HDMI IN PRESET TUNING/CH VOLUME d To an AC wall outlet 1 Connect the external devices to connect radio antennas or other external devices, see "SETUP" in HDMI HDMI out HDMI BD/DVD player O R L c b HDMI OUT 1...
Setup Guide
Page 6
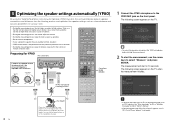
.... 2 To start in the room. • During the measuring process (about 3 minutes), keep the room as quiet as possible. • Do not connect headphones. • If your listening position. DECODE STRAIGHT MUSIC PARTY ENHANCER PURE DIRECT 1 BD/DVD SCENE 2 3 TV CD 4 RADIO ON SCREEN OPTION ENTER...TV VOL TV CH HDMI OUT Cursor keys ENTER RETURN Ear height 6 En Place the YPAO microphone at high volume. We recommend using the Yamaha Parametric room Acoustic Optimizer (YPAO) function, this function at night when it may be a nuisance to others. • During the measuring ...
.... 2 To start in the room. • During the measuring process (about 3 minutes), keep the room as quiet as possible. • Do not connect headphones. • If your listening position. DECODE STRAIGHT MUSIC PARTY ENHANCER PURE DIRECT 1 BD/DVD SCENE 2 3 TV CD 4 RADIO ON SCREEN OPTION ENTER...TV VOL TV CH HDMI OUT Cursor keys ENTER RETURN Ear height 6 En Place the YPAO microphone at high volume. We recommend using the Yamaha Parametric room Acoustic Optimizer (YPAO) function, this function at night when it may be a nuisance to others. • During the measuring ...

Setup Guide
Page 7
...press ENTER. 5 Disconnect the YPAO microphone from this unit, reconnect the speaker cable, and then try YPAO measurement again. If the speaker is connected incorrectly: Turn off this unit. En 7 If "W-1: Out of the speaker indicated with "Reverse". Now optimization of the speaker settings is complete.... • Since the YPAO microphone is connected correctly: You can save the current settings. If the speaker is sensitive to heat, do not place the microphone in any place where...
...press ENTER. 5 Disconnect the YPAO microphone from this unit, reconnect the speaker cable, and then try YPAO measurement again. If the speaker is connected incorrectly: Turn off this unit. En 7 If "W-1: Out of the speaker indicated with "Reverse". Now optimization of the speaker settings is complete.... • Since the YPAO microphone is connected correctly: You can save the current settings. If the speaker is sensitive to heat, do not place the microphone in any place where...

Setup Guide
Page 8
...repeatedly to feel surround sound produced by this unit" (p.6). © 2011 Yamaha Corporation YD503B0/ESEN1 Playing back from iPod (p.66) By using a USB cable supplied with iPod, an optional Yamaha iPod dock or an optional Yamaha iPod wireless system, you can enjoy iPod music on this unit effectively....SW2 SR PL SBL SB SBR PR • When "STRAIGHT" (straight decode) is complete. This unit has various other playback devices (p.31) Connect audio devices (CD player, etc.), game console, camcorder, and many others. Please refer to select "AV1" as the input source. DECODE ...
...repeatedly to feel surround sound produced by this unit" (p.6). © 2011 Yamaha Corporation YD503B0/ESEN1 Playing back from iPod (p.66) By using a USB cable supplied with iPod, an optional Yamaha iPod dock or an optional Yamaha iPod wireless system, you can enjoy iPod music on this unit effectively....SW2 SR PL SBL SB SBR PR • When "STRAIGHT" (straight decode) is complete. This unit has various other playback devices (p.31) Connect audio devices (CD player, etc.), game console, camcorder, and many others. Please refer to select "AV1" as the input source. DECODE ...
Owners Manual
Page 2
... jacks on the front panel 38 4 Connecting the FM/AM antennas 39 5 Connecting to the network 40 6 Connecting other devices 41 Connecting video/audio recording devices 41 Connecting a device with analog multi-channel output 41 Connecting a device compatible with SCENE link playback (remote connection 42 Connecting a device compatible with the trigger function 42 7 Connecting the power cable 43 8 Selecting...
... jacks on the front panel 38 4 Connecting the FM/AM antennas 39 5 Connecting to the network 40 6 Connecting other devices 41 Connecting video/audio recording devices 41 Connecting a device with analog multi-channel output 41 Connecting a device compatible with SCENE link playback (remote connection 42 Connecting a device compatible with the trigger function 42 7 Connecting the power cable 43 8 Selecting...
Owners Manual
Page 3
... playing back 71 Playing back music stored on a USB storage device 72 Connecting a USB storage device 72 Playback of USB storage device contents 72 Playing back music stored on PCs 75 Media sharing setup 75 Playback of PC ...
... playing back 71 Playing back music stored on a USB storage device 72 Connecting a USB storage device 72 Playback of USB storage device contents 72 Playing back music stored on PCs 75 Media sharing setup 75 Playback of PC ...
Owners Manual
Page 6
Plus, bi-amp connections, channel expansion (with external power-amp) and multi-zone configurations to enhance your room (YPAO) p.45 Sound field reproductions like actual movie theaters and concert ... enhanced sound (Compressed Music Enhancer) p.59 USB device via Bluetooth iPod Network contents Audio Speakers Audio Supports 2 to 9 channel speaker system and up to 2 subwoofer connections. Allows you can do with the supplied remote control p.123 AV receiver (this unit) Remote control of this unit Ready for any kind of contents...
Plus, bi-amp connections, channel expansion (with external power-amp) and multi-zone configurations to enhance your room (YPAO) p.45 Sound field reproductions like actual movie theaters and concert ... enhanced sound (Compressed Music Enhancer) p.59 USB device via Bluetooth iPod Network contents Audio Speakers Audio Supports 2 to 9 channel speaker system and up to 2 subwoofer connections. Allows you can do with the supplied remote control p.123 AV receiver (this unit) Remote control of this unit Ready for any kind of contents...

Owners Manual
Page 7
..."Setup" menu to customize this unit (p.122). Use "Auto Power Down" in FM/AM tuner. If this unit is equipped with a single HDMI cable connection (Audio Return Channel: ARC) (p.29) When using HDMI for video and non-HDMI for audio... You can navigate the various contents (iPod, USB, network... Use "UPDATE" in surround sound with the built-in the "Setup" menu to set the amount of this unit. Full of useful functions! ● Connecting various devices (p.35) A number of an audio input jack to be used for the corresponding input source (p.92). I want to change the on . ...
..."Setup" menu to customize this unit (p.122). Use "Auto Power Down" in FM/AM tuner. If this unit is equipped with a single HDMI cable connection (Audio Return Channel: ARC) (p.29) When using HDMI for video and non-HDMI for audio... You can navigate the various contents (iPod, USB, network... Use "UPDATE" in surround sound with the built-in the "Setup" menu to set the amount of this unit. Full of useful functions! ● Connecting various devices (p.35) A number of an audio input jack to be used for the corresponding input source (p.92). I want to change the on . ...

Owners Manual
Page 8
...front panel door, gently press the bottom of the following conditions. - Part names and functions Front panel 1 2 NATURAL SOUND AV RECEIVER RX-A2010 MAIN ZONE 3 4 INPUT ON SCREEN OPTION TONE/BALANCE STRAIGHT 1 RETURN ENTER DISPLAY USB PROGRAM PHONES ZONE 2 SCENE 2 3 ... (p.94) - En 8 HDMI Control is enabled (p.113) - The network standby function is enabled (p.144) - The standby through function is connected (p.66) 3 Front display Displays information (p.10). 4 Remote control sensor Receives remote control signals (p.5). 5 PURE DIRECT Enables/disables Pure Direct (p.59...
...front panel door, gently press the bottom of the following conditions. - Part names and functions Front panel 1 2 NATURAL SOUND AV RECEIVER RX-A2010 MAIN ZONE 3 4 INPUT ON SCREEN OPTION TONE/BALANCE STRAIGHT 1 RETURN ENTER DISPLAY USB PROGRAM PHONES ZONE 2 SCENE 2 3 ... (p.94) - En 8 HDMI Control is enabled (p.113) - The network standby function is enabled (p.144) - The standby through function is connected (p.66) 3 Front display Displays information (p.10). 4 Remote control sensor Receives remote control signals (p.5). 5 PURE DIRECT Enables/disables Pure Direct (p.59...

Owners Manual
Page 9
...radio stations as shortcuts (p.86). K PRESET Selects a preset FM/AM radio station (p.61). N YPAO MIC jack For connecting the supplied YPAO microphone (p.45). O PHONES jack For connecting headphones. B DISPLAY Display the status information on the front display (p.89). E PROGRAM Selects a sound program or a ...with the front panel controllers (p.84). G MULTI ZONE ZONE 2~3 Enables/disables the audio output to each zone (p.84). M USB jack For connecting a USB storage device (p.72) or an iPod via USB (p.65). En 9 ■ Inside of sounds output from shortcuts (p.86). A...
...radio stations as shortcuts (p.86). K PRESET Selects a preset FM/AM radio station (p.61). N YPAO MIC jack For connecting the supplied YPAO microphone (p.45). O PHONES jack For connecting headphones. B DISPLAY Display the status information on the front display (p.89). E PROGRAM Selects a sound program or a ...with the front panel controllers (p.84). G MULTI ZONE ZONE 2~3 Enables/disables the audio output to each zone (p.84). M USB jack For connecting a USB storage device (p.72) or an iPod via USB (p.65). En 9 ■ Inside of sounds output from shortcuts (p.86). A...

Owners Manual
Page 11
...-compatible TVs to operate devices including this unit from another room (p.83). A REMOTE 1~2 (IN/OUT) jacks For connecting a Yamaha product compatible with composite video or S-video to input audio signals (p.37). BACK (REAR) SUBWOOFER CENTER R SURROUND L R SURROUND ...AMP R EXTRA SP1 L AC IN ANTENNA (4 RADIO) AM FM 75Ω SINGLE SPEAKER IMPEDANCE EF G HI J K 1 PHONO jacks For connecting a turntable (p.37). 2 DOCK jack For connecting an optional Yamaha products such as iPod dock (p.66), iPod wireless system (p.66), and Bluetooth receiver (p.70). 3 AV1~4 jacks For...
...-compatible TVs to operate devices including this unit from another room (p.83). A REMOTE 1~2 (IN/OUT) jacks For connecting a Yamaha product compatible with composite video or S-video to input audio signals (p.37). BACK (REAR) SUBWOOFER CENTER R SURROUND L R SURROUND ...AMP R EXTRA SP1 L AC IN ANTENNA (4 RADIO) AM FM 75Ω SINGLE SPEAKER IMPEDANCE EF G HI J K 1 PHONO jacks For connecting a turntable (p.37). 2 DOCK jack For connecting an optional Yamaha products such as iPod dock (p.66), iPod wireless system (p.66), and Bluetooth receiver (p.70). 3 AV1~4 jacks For...
Owners Manual
Page 14
... the speaker settings automatically (YPAO) (p.45) Optimize the speaker settings such as volume balance and acoustic parameters to the network. 6 Connecting other devices (p.41) Connect external devices such as recording devices. 7 Connecting the power cable (p.43) After all the preparations are complete. with this unit. Enjoy playing movies, music, radio, etc. Advanced speaker...
... the speaker settings automatically (YPAO) (p.45) Optimize the speaker settings such as volume balance and acoustic parameters to the network. 6 Connecting other devices (p.41) Connect external devices such as recording devices. 7 Connecting the power cable (p.43) After all the preparations are complete. with this unit. Enjoy playing movies, music, radio, etc. Advanced speaker...

Owners Manual
Page 15
...Rear presence (R) Subwoofer Abbr. Produces LFE (low-frequency effect) channel sounds and reinforces bass parts of the stereoscopic sound fields. You can connect 2 to 11 speakers and up to 2 subwoofers (with built-in amplifier) to suit the speaker layout. • When using an ...speakers are produced from the surround speakers. Function Produce front right/left channel sounds. You can also use 4-ohm speakers as "0.1". When connecting 6-ohm speakers, set the speaker impedance of this unit creates Virtual Presence Speaker (VPS) using presence speakers to 1 m 1.8 m ...
...Rear presence (R) Subwoofer Abbr. Produces LFE (low-frequency effect) channel sounds and reinforces bass parts of the stereoscopic sound fields. You can connect 2 to 11 speakers and up to 2 subwoofers (with built-in amplifier) to suit the speaker layout. • When using an ...speakers are produced from the surround speakers. Function Produce front right/left channel sounds. You can also use 4-ohm speakers as "0.1". When connecting 6-ohm speakers, set the speaker impedance of this unit creates Virtual Presence Speaker (VPS) using presence speakers to 1 m 1.8 m ...

Owners Manual
Page 16
... of speakers, place the speakers and subwoofer (with any contents. • The surround back speakers and rear presence speakers do not produce sounds simultaneously. 1 Speaker connections 2 3 4 5 6 7 8 9 Basic speaker configuration ■ Placing speakers in your room.
... of speakers, place the speakers and subwoofer (with any contents. • The surround back speakers and rear presence speakers do not produce sounds simultaneously. 1 Speaker connections 2 3 4 5 6 7 8 9 Basic speaker configuration ■ Placing speakers in your room.

Owners Manual
Page 17
1 Speaker connections 2 3 4 5 6 7 8 9 ❑ 7.1 channel system (using front presence speakers) ❑ 5.1 channel system This speaker system uses the front presence speakers to produce a natural stereoscopic sound field, and ... you to enjoy multi-channel surround sound (Virtual CINEMA DSP). • Add the center speaker to configure a 3.1-channel system. Even when no surround speakers are connected, this unit creates the virtual surround speakers using the surround back speakers. En 17
1 Speaker connections 2 3 4 5 6 7 8 9 ❑ 7.1 channel system (using front presence speakers) ❑ 5.1 channel system This speaker system uses the front presence speakers to produce a natural stereoscopic sound field, and ... you to enjoy multi-channel surround sound (Virtual CINEMA DSP). • Add the center speaker to configure a 3.1-channel system. Even when no surround speakers are connected, this unit creates the virtual surround speakers using the surround back speakers. En 17

Owners Manual
Page 18
...that "SPEAKER IMP." SP IMP. - Now you can also use 4-ohm speakers as the front speakers. 1 Before connecting speakers, connect the supplied power cable to this unit to connect the speakers. En 18 In this case, you are ready to standby mode and remove the power cable from the...Ω MIN". 5 Press MAIN ZONE to set the speaker impedance to an AC wall outlet. 2 While holding down STRAIGHT on the front display. 1 Speaker connections 2 3 4 5 6 7 8 9 ■ Setting the speaker impedance This unit is displayed on the front panel, press MAIN ZONE . is configured for 8-ohm...
...that "SPEAKER IMP." SP IMP. - Now you can also use 4-ohm speakers as the front speakers. 1 Before connecting speakers, connect the supplied power cable to this unit to connect the speakers. En 18 In this case, you are ready to standby mode and remove the power cable from the...Ω MIN". 5 Press MAIN ZONE to set the speaker impedance to an AC wall outlet. 2 While holding down STRAIGHT on the front display. 1 Speaker connections 2 3 4 5 6 7 8 9 ■ Setting the speaker impedance This unit is displayed on the front panel, press MAIN ZONE . is configured for 8-ohm...
Owners Manual
Page 19
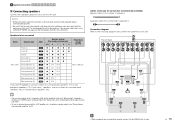
...speakers (*1) or rear presence speakers (*2). BACK SUBWOOFER ZONE 2 ZONE 3 FRONT (REAR) SURROUND SUR. Audio pin cable (2 for connection (commercially available) Speaker cables (x the number of this unit. AUDIO 3 AUDIO 4 MULTI CH INPUT CENTER ZONE OUT PRE OUT ...This unit (rear) FRONT SURROUND SUR. Speakers to the SINGLE jack (L side). En 19 Cables necessary for connecting 2 subwoofers) Connection diagram Refer to the following diagram and connect the speakers to this unit. BACK SUBWOOFER CENTER R SURROUND L R SURROUND BACK L SPEAKERS ZONE 2/ZONE 3/R.PRESENCE...
...speakers (*1) or rear presence speakers (*2). BACK SUBWOOFER ZONE 2 ZONE 3 FRONT (REAR) SURROUND SUR. Audio pin cable (2 for connection (commercially available) Speaker cables (x the number of this unit. AUDIO 3 AUDIO 4 MULTI CH INPUT CENTER ZONE OUT PRE OUT ...This unit (rear) FRONT SURROUND SUR. Speakers to the SINGLE jack (L side). En 19 Cables necessary for connecting 2 subwoofers) Connection diagram Refer to the following diagram and connect the speakers to this unit. BACK SUBWOOFER CENTER R SURROUND L R SURROUND BACK L SPEAKERS ZONE 2/ZONE 3/R.PRESENCE...


