
Owner's Manual
Page 4
... Dimensions 30 Glossary 31 Recording the Bass 10 Step 3 - Recording the Drums 9 Step 2 - Recording the Guitar 11 Step 4 - ii ProMix 01 User's Guide Contents 1 Welcome to the MT50 1 About this User's Guide 1 What is the MT50 1 Choosing Cassette Tapes 1 About Multitrack Recording 2 Are Four Tracks Enough 2 A Few Suggestions 2 2 Getting to Know the MT50 3 Connections 7 3 Basic Recording 8 Loading Cassettes into...
... Dimensions 30 Glossary 31 Recording the Bass 10 Step 3 - Recording the Drums 9 Step 2 - Recording the Guitar 11 Step 4 - ii ProMix 01 User's Guide Contents 1 Welcome to the MT50 1 About this User's Guide 1 What is the MT50 1 Choosing Cassette Tapes 1 About Multitrack Recording 2 Are Four Tracks Enough 2 A Few Suggestions 2 2 Getting to Know the MT50 3 Connections 7 3 Basic Recording 8 Loading Cassettes into...
Owner's Manual
Page 5
... read Chapter 2 thoroughly. What is a trademark of recording time. Welcome to the MT50 1 1 Welcome to the MT50 Thank you for adding effects. Do not use four-track cassette tape recorder that will allow you can mixdown into stereo using the MT50's flexible mixer, with EQ, pan, and an aux send for choosing the Yamaha MT50 Multitrack Cassette...
... read Chapter 2 thoroughly. What is a trademark of recording time. Welcome to the MT50 1 1 Welcome to the MT50 Thank you for adding effects. Do not use four-track cassette tape recorder that will allow you can mixdown into stereo using the MT50's flexible mixer, with EQ, pan, and an aux send for choosing the Yamaha MT50 Multitrack Cassette...
Owner's Manual
Page 6
...; 2 Chapter 1: Welcome to the MT50 About Multitrack Recording Multitrack recording simply refers to recording on more track studio! Invented by Les Paul in the 1950's, multitrack recording constituted a revolutionary breakthrough in other words, there is a four-track tape recorder: its recording heads create four separate tracks on a tape. The MT50 is no need to record input module 1 to track 1 on the tape. (In...
...; 2 Chapter 1: Welcome to the MT50 About Multitrack Recording Multitrack recording simply refers to recording on more track studio! Invented by Les Paul in the 1950's, multitrack recording constituted a revolutionary breakthrough in other words, there is a four-track tape recorder: its recording heads create four separate tracks on a tape. The MT50 is no need to record input module 1 to track 1 on the tape. (In...
Owner's Manual
Page 8
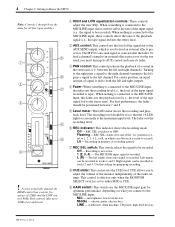
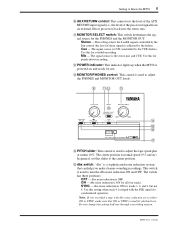
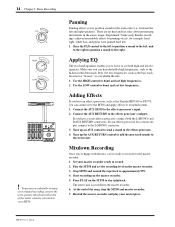
... switch set to 1, 2, 3, 4, L, or R, in progress or recording paused. 7 REC SEL switch: This switch selects the signal to be recorded. Recording is used to the AUX SEND output, which case the track is ready to tracks 2 and 4. Use this fader sets the playback level (i.e., the level .../LINE input, this setting for all four input modules. L (R) - The fader sets the recording level. 6 REC indicator: This indicator shows the recording mode. The MT50's aux send signal is recorded. The MIC/LINE input signal is sourced after the fader. 4 Chapter 2: Getting to the left...
... switch set to 1, 2, 3, 4, L, or R, in progress or recording paused. 7 REC SEL switch: This switch selects the signal to be recorded. Recording is used to the AUX SEND output, which case the track is ready to tracks 2 and 4. Use this fader sets the playback level (i.e., the level .../LINE input, this setting for all four input modules. L (R) - The fader sets the recording level. 6 REC indicator: This indicator shows the recording mode. The MT50's aux send signal is recorded. The MIC/LINE input signal is sourced after the fader. 4 Chapter 2: Getting to the left...
Owner's Manual
Page 9
... source for synchronized operation. B POWER indicator: This indicator lights up when the MT50 is striped with dbx noise reduction set this setting half way through a recording session. Use this setting when track 4 is powered-on and ready for punch-in/out recording. C MONITOR/PHONES control: This control is used to adjust the PHONES and...
... source for synchronized operation. B POWER indicator: This indicator lights up when the MT50 is striped with dbx noise reduction set this setting half way through a recording session. Use this setting when track 4 is powered-on and ready for punch-in/out recording. C MONITOR/PHONES control: This control is used to adjust the PHONES and...
Owner's Manual
Page 11
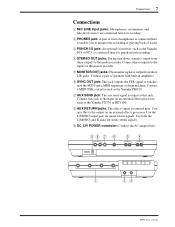
...: During mix down, signal is output from these outputs to the master recorder. Use the L(MONO) input jack for stereo return signals. 9 DC 12V POWER connector: Connect the AC adaptor here. 98 7 6 5 4 1 23 MT50 User's Guide Connect this to the input on an external effects processor....instruments, and line-level sources are connected here for recording. 2 PHONES jack: A pair of stereo headphones is connected here to enable you to monitor the recording or playing back of tracks. 3 PUNCH I/O jack: An optional footswitch, such as the Yamaha FX770 or REV100. 8 AUX RETURN jacks: The ...
...: During mix down, signal is output from these outputs to the master recorder. Use the L(MONO) input jack for stereo return signals. 9 DC 12V POWER connector: Connect the AC adaptor here. 98 7 6 5 4 1 23 MT50 User's Guide Connect this to the input on an external effects processor....instruments, and line-level sources are connected here for recording. 2 PHONES jack: A pair of stereo headphones is connected here to enable you to monitor the recording or playing back of tracks. 3 PUNCH I/O jack: An optional footswitch, such as the Yamaha FX770 or REV100. 8 AUX RETURN jacks: The ...
Owner's Manual
Page 12
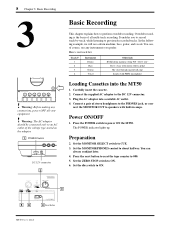
... following example, we will use any connections, power OFF all multi-track recording. Power ON/OFF 1. Plug the AC adaptor into the MT50 1. Connect the supplied AC adaptor to power ON the MT50. Press the POWER switch to the DC 12V connector. 3. 8 Chapter 3: Basic Recording 3 NOISE REDUCTION SYSTEM PUSH OPEN REC PLAY REW FF STOP...
... following example, we will use any connections, power OFF all multi-track recording. Power ON/OFF 1. Plug the AC adaptor into the MT50 1. Connect the supplied AC adaptor to power ON the MT50. Press the POWER switch to the DC 12V connector. 3. 8 Chapter 3: Basic Recording 3 NOISE REDUCTION SYSTEM PUSH OPEN REC PLAY REW FF STOP...
Owner's Manual
Page 13
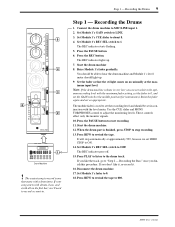
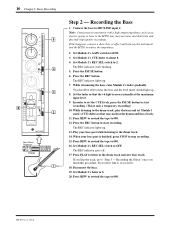
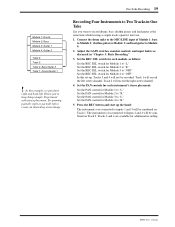
... GAIN switch to the middle position (for instruments). Raise the fader again and set the recording level and should light up . 7. Start the drum machine. 12. Recording the Bass" once you don't like the track, go to rewind the tape. Disconnect the drum machine. 17. The easiest song to ... the PAUSE button to MIC/LINE input 1. 2. Set Module 1's REC SEL switch to set as appropriate. MT50 User's Guide LOW + 0 -5 - Start the drum machine 8. The module fader is very low you like it, re-record it. 16. HIGH +6 9 +3 - If you finish this procedure. Note: If the drum ...
... GAIN switch to the middle position (for instruments). Raise the fader again and set the recording level and should light up . 7. Start the drum machine. 12. Recording the Bass" once you don't like the track, go to rewind the tape. Disconnect the drum machine. 17. The easiest song to ... the PAUSE button to MIC/LINE input 1. 2. Set Module 1's REC SEL switch to set as appropriate. MT50 User's Guide LOW + 0 -5 - Start the drum machine 8. The module fader is very low you like it, re-record it. 16. HIGH +6 9 +3 - If you finish this procedure. Note: If the drum ...
Owner's Manual
Page 14
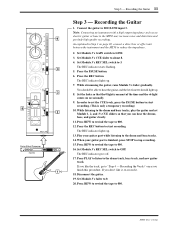
... happens, connect a direct box or effect unit between the instrument and the MT50 to hear the bass and the level meter should light up . 7. Recording the Guitar" once you can hear the drums and bass clearly. 11. Press...record it. 18. Set Module 2's GAIN switch to 2. The REC indicator lights up. 13. Press PLAY to listen to MIC/LINE input 2. LOW + 0 -5 - AUX -10 + REC REC SEL 2 4 0 10 OFF R PAN L R CUE 10 3 10 9 0 8 7 8 6 5 GAIN MIC 4 3 2 2 LINE 1 0 2 MIC/LINE Bass Effect Processor YAMAHA FX550B 1 Step 2 - Connect the bass to the drum track...
... happens, connect a direct box or effect unit between the instrument and the MT50 to hear the bass and the level meter should light up . 7. Recording the Guitar" once you can hear the drums and bass clearly. 11. Press...record it. 18. Set Module 2's GAIN switch to 2. The REC indicator lights up. 13. Press PLAY to listen to MIC/LINE input 2. LOW + 0 -5 - AUX -10 + REC REC SEL 2 4 0 10 OFF R PAN L R CUE 10 3 10 9 0 8 7 8 6 5 GAIN MIC 4 3 2 2 LINE 1 0 2 MIC/LINE Bass Effect Processor YAMAHA FX550B 1 Step 2 - Connect the bass to the drum track...
Owner's Manual
Page 15
...occasionally. 9. Set the fader so that you don't like the track, go to start recording. (This is finished, press STOP to the MT50 may increase noise and distortion and preclude high quality recordings. While listening to the drum and bass tracks, play the guitar and set the CUE levels, press the ... page 10, connect a direct box or effect unit between the instrument and the MT50 to the drum and bass tracks. 14. Press REW to rewind the tape to 000. Recording the Vocals" once you like it, re-record it. 18. Set Module 3's fader to MIC/LINE input 3. The REC indicator...
...occasionally. 9. Set the fader so that you don't like the track, go to start recording. (This is finished, press STOP to the MT50 may increase noise and distortion and preclude high quality recordings. While listening to the drum and bass tracks, play the guitar and set the CUE levels, press the ... page 10, connect a direct box or effect unit between the instrument and the MT50 to the drum and bass tracks. 14. Press REW to rewind the tape to 000. Recording the Vocals" once you like it, re-record it. 18. Set Module 3's fader to MIC/LINE input 3. The REC indicator...
Owner's Manual
Page 16
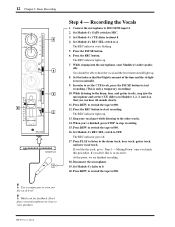
...for feedback. Set Module 4's GAIN switch to MIC/LINE input 4. 2. You should be able to stop recording. 15. Sing your speakers. MT50 User's Guide Connect the microphone to MIC. 3. Press the REC button to set the CUE sliders on ...REC indicator lights up. 7. 12 Chapter 3: Basic Recording HIGH +6 9 +3 - AUX -10 + REC REC SEL 4 0 10 OFF R 4 PAN L R CUE 10 3 10 9 8 7 8 6 5 4 3 2 1 0 0 GAIN MIC 2 LINE 4 MIC/LINE YAMAHA Compressor 1 ! Use a compressor to the drum track, bass track, guitar track, and new vocal track. Set Module 4's CUE slider to "Step 5 -...
...for feedback. Set Module 4's GAIN switch to MIC/LINE input 4. 2. You should be able to stop recording. 15. Sing your speakers. MT50 User's Guide Connect the microphone to MIC. 3. Press the REC button to set the CUE sliders on ...REC indicator lights up. 7. 12 Chapter 3: Basic Recording HIGH +6 9 +3 - AUX -10 + REC REC SEL 4 0 10 OFF R 4 PAN L R CUE 10 3 10 9 8 7 8 6 5 4 3 2 1 0 0 GAIN MIC 2 LINE 4 MIC/LINE YAMAHA Compressor 1 ! Use a compressor to the drum track, bass track, guitar track, and new vocal track. Set Module 4's CUE slider to "Step 5 -...
Owner's Manual
Page 17
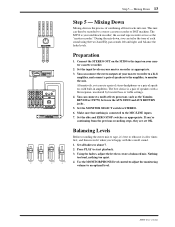
...MT50 to the MIC/LINE inputs. 7. Set the input levels on your master recorder as the Yamaha REV100 or FX770, between the AUX SEND and AUX RETURN jacks . 5. Alternatively, you 're continuing from the previous recording...T REC 10 9 8 7 6 5 4 3 2 1 0 TRACK 1 10 9 8 7 6 5 4 3 2 1 0 TRACK 2 10 10 9 9 8 8 7 7 6 6 5 5 4 4 3 3 2 2 1 1 0 0 TRACK 3 TRACK 4 Step 5 - Press PLAY to monitor the mix. Step 5 - The MT50 is the process of combining all faders to rehearse it a few times first, and then record it when you can connect the stereo outputs of each sound...
...MT50 to the MIC/LINE inputs. 7. Set the input levels on your master recorder as the Yamaha REV100 or FX770, between the AUX SEND and AUX RETURN jacks . 5. Alternatively, you 're continuing from the previous recording...T REC 10 9 8 7 6 5 4 3 2 1 0 TRACK 1 10 9 8 7 6 5 4 3 2 1 0 TRACK 2 10 10 9 9 8 8 7 7 6 6 5 5 4 4 3 3 2 2 1 1 0 0 TRACK 3 TRACK 4 Step 5 - Press PLAY to monitor the mix. Step 5 - The MT50 is the process of combining all faders to rehearse it a few times first, and then record it when you can connect the stereo outputs of each sound...
Owner's Manual
Page 18
...a mono output, connect to position sounds in the drum track. Make sure you have an effects processor, such as the Yamaha REV100 or FX770, you to the L(MONO) connector. 3. Use the HIGH control to the master recorder. 1. If you can connect it to boost and cut ... L(MONO) and R AUX RETURN connectors. Start recording on the MT50 to recorded sounds. 1. Use the LOW control to the effects processor's outputs. Play the MT50 and set the recording level on the master recorder. 3. To prevent accidentally erasing your original recording, remove the write-protect tabs from both high ...
...a mono output, connect to position sounds in the drum track. Make sure you have an effects processor, such as the Yamaha REV100 or FX770, you to the L(MONO) connector. 3. Use the HIGH control to the master recorder. 1. If you can connect it to boost and cut ... L(MONO) and R AUX RETURN connectors. Start recording on the MT50 to recorded sounds. 1. Use the LOW control to the effects processor's outputs. Play the MT50 and set the recording level on the master recorder. 3. To prevent accidentally erasing your original recording, remove the write-protect tabs from both high ...
Owner's Manual
Page 20
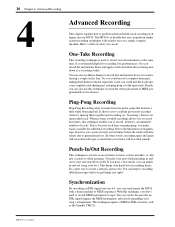
... could record a complex drum part, miking three drums in theory, an unlimited number of MIDI-programmable stereo devices. Later you can also use this technique to record four instruments live performances. 16 Chapter 4: Advanced Recording 4 Advanced Recording This chapter explains how to perform advanced multi-track recording techniques on a single, compact machine. This keeps your foot. MT50...
... could record a complex drum part, miking three drums in theory, an unlimited number of MIDI-programmable stereo devices. Later you can also use this technique to record four instruments live performances. 16 Chapter 4: Advanced Recording 4 Advanced Recording This chapter explains how to perform advanced multi-track recording techniques on a single, compact machine. This keeps your foot. MT50...

Owner's Manual
Page 22
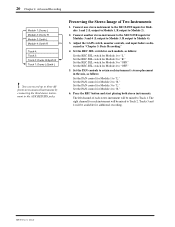
...of your options get used up only two tracks in a hurry! This might want to keep a stereo image of your drum machine. With only four tracks, your guitar solo have only one -take recording capabilities of the MT50 explained below allow you to accomplish some pretty...in the stereo image. The following pages will explain how to record four musical instruments on a recording. For example: • You can make a recorded drum part far more dynamic. L R 3 Drum Bass Guitar Module 1 Module 2 4 2 To track 2 or 4 1 MT50 User's Guide As the diagram shows, the L output is ...
...of your options get used up only two tracks in a hurry! This might want to keep a stereo image of your drum machine. With only four tracks, your guitar solo have only one -take recording capabilities of the MT50 explained below allow you to accomplish some pretty...in the stereo image. The following pages will explain how to record four musical instruments on a recording. For example: • You can make a recorded drum part far more dynamic. L R 3 Drum Bass Guitar Module 1 Module 2 4 2 To track 2 or 4 1 MT50 User's Guide As the diagram shows, the L output is ...
Owner's Manual
Page 23
... the REC SEL switch for Module 1 to "R." 5. Track 1 will be combined on Track 1. Set the PAN control for additional recording. Press the REC button and start up , Tracks 3 and 4 will record the right stereo channel. 4. Tracks 3 and 4 are available for Module 4 to "L." Connect the drum mike to Module 3; MT50 User's Guide and lead guitar to Module 2; Set...
... the REC SEL switch for Module 1 to "R." 5. Track 1 will be combined on Track 1. Set the PAN control for additional recording. Press the REC button and start up , Tracks 3 and 4 will record the right stereo channel. 4. Tracks 3 and 4 are available for Module 4 to "L." Connect the drum mike to Module 3; MT50 User's Guide and lead guitar to Module 2; Set...
Owner's Manual
Page 24
... the PAN control for each stereo instrument will be mixed to "R." You can record up to "L." MT50 User's Guide 20 Chapter 4: Advanced Recording Module 1: Drums L Module 2: Drums R Module 3: Synth L Module 4: Synth R Track 4: Track 3: Track 2: Drums R/Synth R Track 1: Drums L/Synth L ! Preserving the Stereo Image of each instrument will be mixed to "L." Set the REC SEL switch for Module...
... the PAN control for each stereo instrument will be mixed to "R." You can record up to "L." MT50 User's Guide 20 Chapter 4: Advanced Recording Module 1: Drums L Module 2: Drums R Module 3: Synth L Module 4: Synth R Track 4: Track 3: Track 2: Drums R/Synth R Track 1: Drums L/Synth L ! Preserving the Stereo Image of each instrument will be mixed to "L." Set the REC SEL switch for Module...
Owner's Manual
Page 25
... or adjust the balance of the song. 3. Use the module 1, 2, and 3 faders to adjust the level balance so that may be connected to make your MT50 sound like a ten (or more) track recording studio! By repeatedly bouncing tracks, you to the MIC/LINE inputs for Module 4 is no need to start of the...
... or adjust the balance of the song. 3. Use the module 1, 2, and 3 faders to adjust the level balance so that may be connected to make your MT50 sound like a ten (or more) track recording studio! By repeatedly bouncing tracks, you to the MIC/LINE inputs for Module 4 is no need to start of the...

Owner's Manual
Page 26
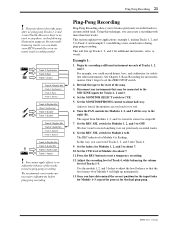
... to Module 4. 6'. Turn the PAN control for the following steps: Example 2: 3'. We also recommend that you set the recording level carefully. You can use this technique, the MT50 can perform ping-pong recording of Tracks 1-4 using the faders. Connect an instrument to the right (R). 12'. Do not boost the HIGH EQ too much as...
... to Module 4. 6'. Turn the PAN control for the following steps: Example 2: 3'. We also recommend that you set the recording level carefully. You can use this technique, the MT50 can perform ping-pong recording of Tracks 1-4 using the faders. Connect an instrument to the right (R). 12'. Do not boost the HIGH EQ too much as...

Owner's Manual
Page 27
... footswitch other than Yamaha's may cause mistiming. Play along with a footswitch, except for the actual punch-in /out recording without a footswitch. At this time hitting every note perfectly!) and punch out at the start too early, you just played a great guitar solo over Track 4. Set the ...a different volume level, it flow smoothly. ! Set the MONITOR SELECT switch to the PUNCH I/O jack. 2. At the end of Bar 4. MT50 User's Guide For example, say you will ever know that using a footswitch: 1. Play Bar 4 of your part again (this time, the REC indicator...
... footswitch other than Yamaha's may cause mistiming. Play along with a footswitch, except for the actual punch-in /out recording without a footswitch. At this time hitting every note perfectly!) and punch out at the start too early, you just played a great guitar solo over Track 4. Set the ...a different volume level, it flow smoothly. ! Set the MONITOR SELECT switch to the PUNCH I/O jack. 2. At the end of Bar 4. MT50 User's Guide For example, say you will ever know that using a footswitch: 1. Play Bar 4 of your part again (this time, the REC indicator...


