
Owner's Manual
Page 5
...12 Information on jacks and cable plugs 13 Information on HDMI 14 Connecting video components 15 Connecting audio components 17 Connecting a Yamaha iPod™ universal dock and Bluetooth™ adapter 18 Connecting to the VIDEO AUX jacks on the front panel 18 Connecting ...4 Preparation: Check the items 4 Step 1: Set up your speakers 5 Step 2: Connect your DVD player and other components.... 51 Setting remote control codes 53 Advanced setup 54 ADDITIONAL INFORMATION Troubleshooting 55 Glossary 60 Specifications 62 Index 63 APPENDIX (at the end of this manual for the information...
...12 Information on jacks and cable plugs 13 Information on HDMI 14 Connecting video components 15 Connecting audio components 17 Connecting a Yamaha iPod™ universal dock and Bluetooth™ adapter 18 Connecting to the VIDEO AUX jacks on the front panel 18 Connecting ...4 Preparation: Check the items 4 Step 1: Set up your speakers 5 Step 2: Connect your DVD player and other components.... 51 Setting remote control codes 53 Advanced setup 54 ADDITIONAL INFORMATION Troubleshooting 55 Glossary 60 Specifications 62 Index 63 APPENDIX (at the end of this manual for the information...

Owner's Manual
Page 6
... (3 COMPONENT VIDEO INs and 1 MONITOR OUT) ◆ iPod controlling capability ◆ Sleep timer ◆ Cinema and music night listening modes ◆ Remote control with a license agreement. "HDMI", the "HDMI" logo and... "High-Definition Multimedia Interface" are trademarks or registered trademarks of Apple Inc., registered in the U.S. iPod™ "iPod" is a registered trademark of your sensitive hearing. Bluetooth™ Bluetooth is a trademark of HDMI Licensing LLC. We Want You Listening For A Lifetime Yamaha...
... (3 COMPONENT VIDEO INs and 1 MONITOR OUT) ◆ iPod controlling capability ◆ Sleep timer ◆ Cinema and music night listening modes ◆ Remote control with a license agreement. "HDMI", the "HDMI" logo and... "High-Definition Multimedia Interface" are trademarks or registered trademarks of Apple Inc., registered in the U.S. iPod™ "iPod" is a registered trademark of your sensitive hearing. Bluetooth™ Bluetooth is a trademark of HDMI Licensing LLC. We Want You Listening For A Lifetime Yamaha...

Owner's Manual
Page 7
... Checking the supplied accessories Check that you notice the following parts. ❏ Remote control ❏ Batteries (2) (AAA, R03, UM-4) ❏ AM loop antenna ❏ Indoor FM antenna ■ Installing batteries in the remote control, the contents of the memory may have the same shape and color. &#... panel of the battery compartment. 3 Snap the battery compartment cover back into contact with general house waste; the operation range of the remote control decreases. • Do not use an old battery and a new one together. • Do not use different types of batteries ...
... Checking the supplied accessories Check that you notice the following parts. ❏ Remote control ❏ Batteries (2) (AAA, R03, UM-4) ❏ AM loop antenna ❏ Indoor FM antenna ■ Installing batteries in the remote control, the contents of the memory may have the same shape and color. &#... panel of the battery compartment. 3 Snap the battery compartment cover back into contact with general house waste; the operation range of the remote control decreases. • Do not use an old battery and a new one together. • Do not use different types of batteries ...

Owner's Manual
Page 12
...infrared signals from the standby mode, press ASTANDBY/ON (or DPOWER) on this unit from the remote control. ■ Adjusting the parameters of this unit ☞ P. 43 • Setting the remote control ☞ P. 51 • Adjusting the advanced parameters ☞ P. 54 ■ Additional ...this unit? ■ Customizing the SCENE templates • Using various SCENE templates ☞ P. 24 ■ Using various input sources • Basic controls of this unit ☞ P. 29 • Enjoying FM/AM radio programs ☞ P. 37 • Using your listening room (BASIC SETUP) ...
...infrared signals from the standby mode, press ASTANDBY/ON (or DPOWER) on this unit from the remote control. ■ Adjusting the parameters of this unit ☞ P. 43 • Setting the remote control ☞ P. 51 • Adjusting the advanced parameters ☞ P. 54 ■ Additional ...this unit? ■ Customizing the SCENE templates • Using various SCENE templates ☞ P. 24 ■ Using various input sources • Basic controls of this unit ☞ P. 29 • Enjoying FM/AM radio programs ☞ P. 37 • Using your listening room (BASIC SETUP) ...
Owner's Manual
Page 23
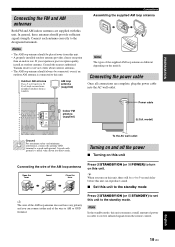
If you can reproduce sound. ■ Set this unit to receive infrared signals from the remote control. Outdoor AM antenna Use a 5 to 10 m (16 to 32 ft) of power in order to the standby mode y The wire of the supplied AM loop ... designated terminals. Note In the standby mode, this unit consumes a small amount of vinyl-covered wire extended outdoors from this unit. Consult the nearest authorized Yamaha dealer or service center about outdoor antennas. • The AM loop antenna should always be placed away from a window. ANTENNA DEO N DVR OUT MONITOR OUT...
If you can reproduce sound. ■ Set this unit to receive infrared signals from the remote control. Outdoor AM antenna Use a 5 to 10 m (16 to 32 ft) of power in order to the standby mode y The wire of the supplied AM loop ... designated terminals. Note In the standby mode, this unit consumes a small amount of vinyl-covered wire extended outdoors from this unit. Consult the nearest authorized Yamaha dealer or service center about outdoor antennas. • The AM loop antenna should always be placed away from a window. ANTENNA DEO N DVR OUT MONITOR OUT...
Owner's Manual
Page 25
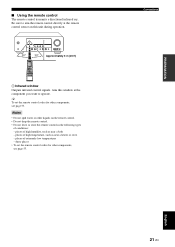
...remote control The remote control transmits a directional infrared ray. y To set the remote control codes for other liquids on this window at the component you want to aim the remote control directly at the remote control sensor on the remote control. • Do not drop the remote control. • Do not leave or store the remote control... En places of high temperature, such as near a heater or stove - dusty places • To set the remote control codes for other components, see page 53. Aim this unit during operation. 30º 30º Approximately 6 m (20...
...remote control The remote control transmits a directional infrared ray. y To set the remote control codes for other liquids on this window at the component you want to aim the remote control directly at the remote control sensor on the remote control. • Do not drop the remote control. • Do not leave or store the remote control... En places of high temperature, such as near a heater or stove - dusty places • To set the remote control codes for other components, see page 53. Aim this unit during operation. 30º 30º Approximately 6 m (20...
Owner's Manual
Page 26
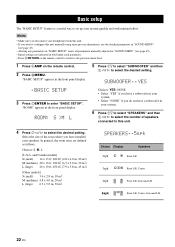
... / h to select the desired setting. In general, the room sizes are indicated in bold under each parameter. • Press 8RETURN on the remote control to return to select the number of the room where you do not have a subwoofer in "SOUND MENU" (see page 45). • Initial..." resets all parameters manually adjusted in your system. 6 Press 7n to select "SPEAKERS" and then 7l / h to the previous menu level. 1 Press 4AMP on the remote control. 2 Press HMENU. SUBWOOFER .. and Canada models] S (small) 16 x 13 ft, 200 ft2 (4.8 x 4.0 m, 20 m2) M (medium) 20 x 16 ft, 300 ft2 (6.3 x 5.0 m, 30 m2...
... / h to select the desired setting. In general, the room sizes are indicated in bold under each parameter. • Press 8RETURN on the remote control to return to select the number of the room where you do not have a subwoofer in "SOUND MENU" (see page 45). • Initial..." resets all parameters manually adjusted in your system. 6 Press 7n to select "SPEAKERS" and then 7l / h to the previous menu level. 1 Press 4AMP on the remote control. 2 Press HMENU. SUBWOOFER .. and Canada models] S (small) 16 x 13 ft, 200 ft2 (4.8 x 4.0 m, 20 m2) M (medium) 20 x 16 ft, 300 ft2 (6.3 x 5.0 m, 30 m2...
Owner's Manual
Page 28
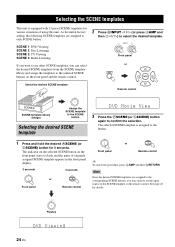
...the desired SCENE templates from the SCENE template library and assign the templates to the selected SCENE buttons on the front panel and the remote control. 2 Press NINPUT l / h (or press 4AMP and then 7l / h) to select the desired template. l INPUT h Front panel...various situations of currently assigned SCENE template appears in the front panel display. 3 seconds 3 seconds 1 Front panel or 1 Remote control 1 Front panel or 1 Remote control y To cancel the procedure, press 4AMP and then 8RETURN. SELECTING THE SCENE TEMPLATES Selecting the SCENE templates This unit is ...
...the desired SCENE templates from the SCENE template library and assign the templates to the selected SCENE buttons on the front panel and the remote control. 2 Press NINPUT l / h (or press 4AMP and then 7l / h) to select the desired template. l INPUT h Front panel...various situations of currently assigned SCENE template appears in the front panel display. 3 seconds 3 seconds 1 Front panel or 1 Remote control 1 Front panel or 1 Remote control y To cancel the procedure, press 4AMP and then 8RETURN. SELECTING THE SCENE TEMPLATES Selecting the SCENE templates This unit is ...
Owner's Manual
Page 31
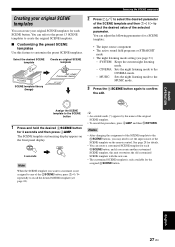
The SCENE template customizing display appears on the remote control. BASIC OPERATION Selecting the SCENE templates Creating your original SCENE templates You can create your original SCENE templates for the assigned 5SCENE button. Select the ...
The SCENE template customizing display appears on the remote control. BASIC OPERATION Selecting the SCENE templates Creating your original SCENE templates You can create your original SCENE templates for the assigned 5SCENE button. Select the ...
Owner's Manual
Page 32
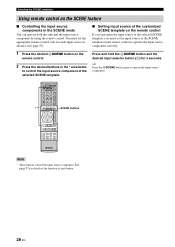
... the input source component correctly. 1 Press the desired 5SCENE button on the remote control. 2 Press the desired buttons in the SCENE mode You can operate both this unit and the input source component by using the remote control. See page 51 for details of the function of each input source in ...advance (see page 53). ■ Setting input source of the customized SCENE template on the remote control If you customize the input source of the selected SCENE template, you must set the input source of the selected SCENE template. Press and ...
... the input source component correctly. 1 Press the desired 5SCENE button on the remote control. 2 Press the desired buttons in the SCENE mode You can operate both this unit and the input source component by using the remote control. See page 51 for details of the function of each input source in ...advance (see page 53). ■ Setting input source of the customized SCENE template on the remote control If you customize the input source of the selected SCENE template, you must set the input source of the selected SCENE template. Press and ...
Owner's Manual
Page 36
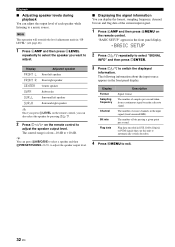
...rate and flag data of the current input signal. 1 Press 4AMP and then press HMENU on the remote control. Display Format Sampling frequency Channel Bit rate Flag data Description Signal format. The number of samples per ...this unit to automatically switch decoders. 4 Press HMENU to select "SIGNAL INFO" and then press 7ENTER. The control range is from a continuous signal to switch the displayed information. Display Adjusted speaker FRONT L Front left speaker... the speaker by pressing 7k / n. 2 Press 7l / h on the remote control, you press 6LEVEL on the remote control to +10 dB.
...rate and flag data of the current input signal. 1 Press 4AMP and then press HMENU on the remote control. Display Format Sampling frequency Channel Bit rate Flag data Description Signal format. The number of samples per ...this unit to automatically switch decoders. 4 Press HMENU to select "SIGNAL INFO" and then press 7ENTER. The control range is from a continuous signal to switch the displayed information. Display Adjusted speaker FRONT L Front left speaker... the speaker by pressing 7k / n. 2 Press 7l / h on the remote control, you press 6LEVEL on the remote control to +10 dB.
Owner's Manual
Page 37
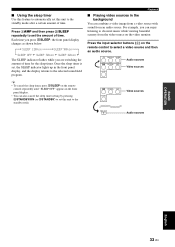
...as shown below. Press 4AMP and then press OSLEEP repeatedly to set this unit to the standby mode. Press the input selector buttons (3) on the remote control repeatedly until "SLEEP OFF" appears in the front panel display. • You can combine a video image from a video source with sound from...by pressing ASTANDBY/ON (or ESTANDBY) to set the amount of time. y • To cancel the sleep timer, press OSLEEP on the remote control to select a video source and then an audio source. SLEEP 120min SLEEP 90min SLEEP OFF SLEEP 30min SLEEP 60min The SLEEP indicator flashes while you...
...as shown below. Press 4AMP and then press OSLEEP repeatedly to set this unit to the standby mode. Press the input selector buttons (3) on the remote control repeatedly until "SLEEP OFF" appears in the front panel display. • You can combine a video image from a video source with sound from...by pressing ASTANDBY/ON (or ESTANDBY) to set the amount of time. y • To cancel the sleep timer, press OSLEEP on the remote control to select a video source and then an audio source. SLEEP 120min SLEEP 90min SLEEP OFF SLEEP 30min SLEEP 60min The SLEEP indicator flashes while you...
Owner's Manual
Page 43
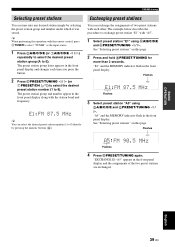
... hold BPRESET/TUNING for more than 3 seconds. Exchanging preset stations You can select the desired preset station number (1 to exchange preset station "E1" with the remote control, press 3TUNER to select "TUNER" as the input source. 1 Press DA/B/C/D/E (or 7A/B/C/D/E l / h) repeatedly to select the desired preset station group (A to 8). E1:FM 87...
... hold BPRESET/TUNING for more than 3 seconds. Exchanging preset stations You can select the desired preset station number (1 to exchange preset station "E1" with the remote control, press 3TUNER to select "TUNER" as the input source. 1 Press DA/B/C/D/E (or 7A/B/C/D/E l / h) repeatedly to select the desired preset station group (A to 8). E1:FM 87...

Owner's Manual
Page 44
... s: Stop w/f: Search backward/forward b/a: Skip backward/forward Notes • Operations can enjoy playback of your iPod using the supplied remote control. Stationing your iPod to the Yamaha iPod universal dock Once you can be compatible depending on the model or the software version of your iPod. • For a... complete list of status messages that appear in the front panel display, see page 18), you station your iPod to the Yamaha iPod universal dock, "iPod connected" and the DOCK indicator appears in the front panel display when "V-AUX" is turned on your iPod. DECODE ...
... s: Stop w/f: Search backward/forward b/a: Skip backward/forward Notes • Operations can enjoy playback of your iPod using the supplied remote control. Stationing your iPod to the Yamaha iPod universal dock Once you can be compatible depending on the model or the software version of your iPod. • For a... complete list of status messages that appear in the front panel display, see page 18), you station your iPod to the Yamaha iPod universal dock, "iPod connected" and the DOCK indicator appears in the front panel display when "V-AUX" is turned on your iPod. DECODE ...
Owner's Manual
Page 45
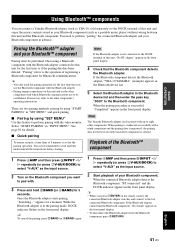
... a portable music player) without wiring between this feature to perform pairing with the video monitor. English 41 En Note The Yamaha Bluetooth adapter can connect a Yamaha Bluetooth adapter (such as YBA-10, sold separately) to the DOCK terminal of 8 minutes is cleared. You need the... then press NINPUT l / h repeatedly (or press 3V-AUX/DOCK) to select "V-AUX" as the input source. 2 Turn on the remote control, the connected Bluetooth adapter searches and connect to the last connected Bluetooth component. While the Bluetooth adapter is registered, the pairing data for Bluetooth ...
... a portable music player) without wiring between this feature to perform pairing with the video monitor. English 41 En Note The Yamaha Bluetooth adapter can connect a Yamaha Bluetooth adapter (such as YBA-10, sold separately) to the DOCK terminal of 8 minutes is cleared. You need the... then press NINPUT l / h repeatedly (or press 3V-AUX/DOCK) to select "V-AUX" as the input source. 2 Turn on the remote control, the connected Bluetooth adapter searches and connect to the last connected Bluetooth component. While the Bluetooth adapter is registered, the pairing data for Bluetooth ...

Owner's Manual
Page 48
... 32). Designates the default audio input jack select setting mode for the input sources connected to the DIGITAL INPUT jacks when you turn on the remote control. "1 SOUND MENU" appears in the front panel display. .BASIC SETUP 4 Press 7k / n repeatedly and then press 7ENTER to select and ...MEMORY GUARD C)AUDIO SELECT D)PARAM. INI E)BLUETOOTH Features Adjusts the brightness of the sound field programs to access and adjust each parameter. Pairs the connected Yamaha Bluetooth adapter (such as you want to adjust. • To return to the previous menu level, press 8 RETURN. 6 Press 7k / n ...
... 32). Designates the default audio input jack select setting mode for the input sources connected to the DIGITAL INPUT jacks when you turn on the remote control. "1 SOUND MENU" appears in the front panel display. .BASIC SETUP 4 Press 7k / n repeatedly and then press 7ENTER to select and ...MEMORY GUARD C)AUDIO SELECT D)PARAM. INI E)BLUETOOTH Features Adjusts the brightness of the sound field programs to access and adjust each parameter. Pairs the connected Yamaha Bluetooth adapter (such as you want to adjust. • To return to the previous menu level, press 8 RETURN. 6 Press 7k / n ...

Owner's Manual
Page 52
...specific item more components. setting. 48 En Mute type MUTE TYP. This may be used if the initial settings of this feature to -80 dB. Control range: 0 to reduce the current volume by 20 dB. However, when "MAX VOL." Once the input jacks are reassigned, you can select the ...priority over the "INI.VOL." Initial volume INI.VOL. setting takes priority over the "Initial Volume" setting. For example, you turn on the remote control). For example, the original volume range is useful to delay the sound output and synchronize it with the video image. Use this feature to avoid...
...specific item more components. setting. 48 En Mute type MUTE TYP. This may be used if the initial settings of this feature to -80 dB. Control range: 0 to reduce the current volume by 20 dB. However, when "MAX VOL." Once the input jacks are reassigned, you can select the ...priority over the "INI.VOL." Initial volume INI.VOL. setting takes priority over the "Initial Volume" setting. For example, you turn on the remote control). For example, the original volume range is useful to delay the sound output and synchronize it with the video image. Use this feature to avoid...

Owner's Manual
Page 53
...last selected video source as the background video source. Choices: CD, TUNER, MD/CD-R, DVD, DTV/CBL, V-AUX (DOCK), DVR, MULTI CH IN Control range: -6.0 to +6.0 dB Control step: 1.0 dB Initial setting: 0.0 dB ■ Decoder mode D)DECODER MODE Decoder select mode Use this feature to the DIGITAL INPUT jacks when you ... CH INPUT jacks. CD MD/CD-R TUNER DVD DTV/CBL DVR or V-AUX/DOCK MULTI CH IN 2 Press 4AMP and then press 7l / h on the remote control to place the "_" (underscore) under the space or the character you want to edit. 3 Press 7k / n to select the character you turn on the ...
...last selected video source as the background video source. Choices: CD, TUNER, MD/CD-R, DVD, DTV/CBL, V-AUX (DOCK), DVR, MULTI CH IN Control range: -6.0 to +6.0 dB Control step: 1.0 dB Initial setting: 0.0 dB ■ Decoder mode D)DECODER MODE Decoder select mode Use this feature to the DIGITAL INPUT jacks when you ... CH INPUT jacks. CD MD/CD-R TUNER DVD DTV/CBL DVR or V-AUX/DOCK MULTI CH IN 2 Press 4AMP and then press 7l / h on the remote control to place the "_" (underscore) under the space or the character you want to edit. 3 Press 7k / n to select the character you turn on the ...

Owner's Manual
Page 55
..., a TV, or other than one TV by Yamaha and other components, you must set the appropriate remote control code for 3DTV/CBL (see the "Digital TV/Cable TV" column on or off the power. English 51 En Remote control features Remote control features In addition to controlling this unit, the remote control can also operate other audiovisual components made by...
..., a TV, or other than one TV by Yamaha and other components, you must set the appropriate remote control code for 3DTV/CBL (see the "Digital TV/Cable TV" column on or off the power. English 51 En Remote control features Remote control features In addition to controlling this unit, the remote control can also operate other audiovisual components made by...

Owner's Manual
Page 56
... VOL SCENE 1 2 3 4 [2] BAND LEVEL TITLE MENU VOLUME [3] [4] [5] ENTER RETURN REC DISPLAY [7] [8] [6] l PROG h 1 2 ENHANCER SUR. DECODE 3 4 STRAIGHT NIGHT 5 6 7 8 MULTI CH IN AUDIO SEL 9 0 SLEEP 10 ENT [9] Remote control [1] AV POWER [2] TITLE [3] PRESET/CH k PRESET/CH n A/B/C/D/E l A/B/C/D/E h ENTER [4] RETURN [5] REC p w f e b a s [6] 1-9, 0, +10 [7] MENU [8] DISPLAY [9] ENT DVD player/recor VCR der Digital TV/ Cable TV LD player...
... VOL SCENE 1 2 3 4 [2] BAND LEVEL TITLE MENU VOLUME [3] [4] [5] ENTER RETURN REC DISPLAY [7] [8] [6] l PROG h 1 2 ENHANCER SUR. DECODE 3 4 STRAIGHT NIGHT 5 6 7 8 MULTI CH IN AUDIO SEL 9 0 SLEEP 10 ENT [9] Remote control [1] AV POWER [2] TITLE [3] PRESET/CH k PRESET/CH n A/B/C/D/E l A/B/C/D/E h ENTER [4] RETURN [5] REC p w f e b a s [6] 1-9, 0, +10 [7] MENU [8] DISPLAY [9] ENT DVD player/recor VCR der Digital TV/ Cable TV LD player...


