
Owner's Manual
Page 6
... preset tuning ◆ Automatic preset tuning HDMI (High-Definition Multimedia Interface) ◆ HDMI interface for discrete multi-channel input ◆ Component video input/output capability (3 COMPONENT VIDEO INs and 1 MONITOR OUT) ◆ iPod controlling capability ◆ Sleep timer ◆...◆ DOCK terminal to get the most importantly, without annoying blaring or distortion - "DTS" and "DTS Digital Surround" are registered trademarks of Yamaha Corporation. "Dolby", "Pro Logic", and the double-D symbol are trademarks or registered trademarks of Dolby Laboratories. ...
... preset tuning ◆ Automatic preset tuning HDMI (High-Definition Multimedia Interface) ◆ HDMI interface for discrete multi-channel input ◆ Component video input/output capability (3 COMPONENT VIDEO INs and 1 MONITOR OUT) ◆ iPod controlling capability ◆ Sleep timer ◆...◆ DOCK terminal to get the most importantly, without annoying blaring or distortion - "DTS" and "DTS Digital Surround" are registered trademarks of Yamaha Corporation. "Dolby", "Pro Logic", and the double-D symbol are trademarks or registered trademarks of Dolby Laboratories. ...
Owner's Manual
Page 8
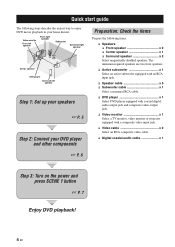
... subwoofer x 1 Select an active subwoofer equipped with an RCA input jack. ❏ Speaker cable x 5 ❏ Subwoofer cable x 1 Select a monaural RCA cable. ❏ DVD player x 1 Select DVD player equipped with coaxial digital audio output jack and composite video output jack. ❏ Video... monitor x 1 Select a TV monitor, video monitor or projector equipped with a composite video input jack. ❏ Video cable x 2 Select an RCA composite video cable. ❏ Digital coaxial audio cable x 1 ☞ P. 6 Step 3: Turn on the power and press SCENE 1 button ...
... subwoofer x 1 Select an active subwoofer equipped with an RCA input jack. ❏ Speaker cable x 5 ❏ Subwoofer cable x 1 Select a monaural RCA cable. ❏ DVD player x 1 Select DVD player equipped with coaxial digital audio output jack and composite video output jack. ❏ Video... monitor x 1 Select a TV monitor, video monitor or projector equipped with a composite video input jack. ❏ Video cable x 2 Select an RCA composite video cable. ❏ Digital coaxial audio cable x 1 ☞ P. 6 Step 3: Turn on the power and press SCENE 1 button ...

Owner's Manual
Page 9
DOCK COMPONENT VIDEO DVD DTV/CBL DVR MONITOR OUT PR OUT DVD DTV/CBL HDMI DIGITAL INPUT PB OPTICAL Y CD 3 DTV/ CBL 2 COAXIAL DVD 1 DVD VIDEO DTV/CBL DVR IN OUT MONITOR OUT MULTI CH INPUT FRONT SURROUND CENTER L DVD DTV/CBL AUDIO DVR CD IN OUT L R R SUBWOOFER ANTENNA SPEAKERS ...metal part of your speakers and subwoofer in the room. 2 Connect speaker cables to the input jack on the subwoofer and the SUBWOOFER OUTPUT jack on this unit. Subwoofer AV receiver Input jack Subwoofer cable SUBWOOFER OUTPUT jack English 5 En IN MD/ OUT (PLAY) CD-R...
DOCK COMPONENT VIDEO DVD DTV/CBL DVR MONITOR OUT PR OUT DVD DTV/CBL HDMI DIGITAL INPUT PB OPTICAL Y CD 3 DTV/ CBL 2 COAXIAL DVD 1 DVD VIDEO DTV/CBL DVR IN OUT MONITOR OUT MULTI CH INPUT FRONT SURROUND CENTER L DVD DTV/CBL AUDIO DVR CD IN OUT L R R SUBWOOFER ANTENNA SPEAKERS ...metal part of your speakers and subwoofer in the room. 2 Connect speaker cables to the input jack on the subwoofer and the SUBWOOFER OUTPUT jack on this unit. Subwoofer AV receiver Input jack Subwoofer cable SUBWOOFER OUTPUT jack English 5 En IN MD/ OUT (PLAY) CD-R...

Owner's Manual
Page 10
... • Using the other kind of speaker combinations ☞ P. 10 • Connecting a video monitor and DVD player ☞ P. 15 Digital coaxial audio output jack Digital coaxial audio cable DVD DIGITAL INPUT COAXIAL jack • Connecting a cable TV/satellite tuner and DVD recorder ☞ P. 15 • Connecting to the HDMI jacks ☞ ...on your DVD player and other components DOCK COMPONENT VIDEO DVD DTV/CBL DVR MONITOR OUT PR OUT DVD DTV/CBL HDMI DIGITAL INPUT PB OPTICAL Y CD 3 DTV/ CBL 2 COAXIAL DVD 1 DVD VIDEO DTV/CBL DVR IN OUT MONITOR OUT MULTI CH...
... • Using the other kind of speaker combinations ☞ P. 10 • Connecting a video monitor and DVD player ☞ P. 15 Digital coaxial audio output jack Digital coaxial audio cable DVD DIGITAL INPUT COAXIAL jack • Connecting a cable TV/satellite tuner and DVD recorder ☞ P. 15 • Connecting to the HDMI jacks ☞ ...on your DVD player and other components DOCK COMPONENT VIDEO DVD DTV/CBL DVR MONITOR OUT PR OUT DVD DTV/CBL HDMI DIGITAL INPUT PB OPTICAL Y CD 3 DTV/ CBL 2 COAXIAL DVD 1 DVD VIDEO DTV/CBL DVR IN OUT MONITOR OUT MULTI CH...

Owner's Manual
Page 13
...1 2 Connections 3 45 6 DOCK COMPONENT VIDEO DVD DTV/CBL DVR MONITOR OUT PR OUT DVD DTV/CBL HDMI DIGITAL INPUT PB OPTICAL Y CD 3 DTV/ CBL 2 MULTI CH INPUT FRONT SURROUND CENTER L DVD VIDEO DTV/CBL DVR IN OUT MONITOR OUT DVD DTV/CBL AUDIO DVR CD IN OUT ...OUTPUT SUB WOOFER R FRONT A L Connections 7 8 9 0 Name 1 DOCK terminal 2 COMPONENT VIDEO jacks 3 HDMI jacks 4 VIDEO jacks 5 ANTENNA terminals 6 SPEAKERS terminals 7 DIGITAL INPUT jacks 8 MULTI CH INPUT jacks 9 AUDIO jacks 0 SUBWOOFER OUTPUT jack See page 18 16 16 15 19 11 15, 17 17 15, 17 11 English 9 En
...1 2 Connections 3 45 6 DOCK COMPONENT VIDEO DVD DTV/CBL DVR MONITOR OUT PR OUT DVD DTV/CBL HDMI DIGITAL INPUT PB OPTICAL Y CD 3 DTV/ CBL 2 MULTI CH INPUT FRONT SURROUND CENTER L DVD VIDEO DTV/CBL DVR IN OUT MONITOR OUT DVD DTV/CBL AUDIO DVR CD IN OUT ...OUTPUT SUB WOOFER R FRONT A L Connections 7 8 9 0 Name 1 DOCK terminal 2 COMPONENT VIDEO jacks 3 HDMI jacks 4 VIDEO jacks 5 ANTENNA terminals 6 SPEAKERS terminals 7 DIGITAL INPUT jacks 8 MULTI CH INPUT jacks 9 AUDIO jacks 0 SUBWOOFER OUTPUT jack See page 18 16 16 15 19 11 15, 17 17 15, 17 11 English 9 En

Owner's Manual
Page 15
... Left Center speaker Front speakers (B) Right Left DOCK COMPONENT VIDEO DVD DTV/CBL DVR MONITOR OUT PR OUT DVD DTV/CBL HDMI DIGITAL INPUT PB OPTICAL Y CD 3 DTV/ CBL 2 COAXIAL DVD 1 DVD VIDEO DTV/CBL DVR IN OUT MONITOR OUT MULTI CH... (REC) OUTPUT SUB WOOFER R FRONT A L Subwoofer Right Left Front speakers (A) ■ Before connecting to set "SP IMP." If this unit cannot reproduce the input sources accurately. If the connections are colored or shaped differently, perhaps with the specified impedance shown on the rear panel of insulated cables running side...
... Left Center speaker Front speakers (B) Right Left DOCK COMPONENT VIDEO DVD DTV/CBL DVR MONITOR OUT PR OUT DVD DTV/CBL HDMI DIGITAL INPUT PB OPTICAL Y CD 3 DTV/ CBL 2 COAXIAL DVD 1 DVD VIDEO DTV/CBL DVR IN OUT MONITOR OUT MULTI CH... (REC) OUTPUT SUB WOOFER R FRONT A L Subwoofer Right Left Front speakers (A) ■ Before connecting to set "SP IMP." If this unit cannot reproduce the input sources accurately. If the connections are colored or shaped differently, perhaps with the specified impedance shown on the rear panel of insulated cables running side...

Owner's Manual
Page 17
...Connection depends on the availability of input jacks on separate wires of sampling frequency. • This unit handles digital and analog signals independently. DIGITAL AUDIO COAXIAL jacks For digital audio signals transmitted via left jacks. Thus audio signals input at the analog AUDIO OUT (...jacks. DIGITAL AUDIO OPTICAL jacks For digital audio signals transmitted via composite video cables. Notes • You can use the digital jacks to input PCM, Dolby Digital and DTS bitstreams. All digital input jacks are not output at the digital jacks are compatible with digital signals ...
...Connection depends on the availability of input jacks on separate wires of sampling frequency. • This unit handles digital and analog signals independently. DIGITAL AUDIO COAXIAL jacks For digital audio signals transmitted via left jacks. Thus audio signals input at the analog AUDIO OUT (...jacks. DIGITAL AUDIO OPTICAL jacks For digital audio signals transmitted via composite video cables. Notes • You can use the digital jacks to input PCM, Dolby Digital and DTS bitstreams. All digital input jacks are not output at the digital jacks are compatible with digital signals ...

Owner's Manual
Page 18
... the HDMI jack are output to the connected video monitor only when this unit is turned on and set to the input source (DVD or DTV/CBL). Refer to the instruction manual of each connected component. ■ HDMI jack and cable plug HDMI HDMI cable plug y •... the connected video monitor. To enjoy the sound from the connected video monitor. mute the volume of the connected video monitor. make an analog or digital connection besides the HDMI connection (see page 16). - Furthermore, available audio/video signals depend on it. • Use a conversion cable (HDMI jack ↔ DVI-D ...
... the HDMI jack are output to the connected video monitor only when this unit is turned on and set to the input source (DVD or DTV/CBL). Refer to the instruction manual of each connected component. ■ HDMI jack and cable plug HDMI HDMI cable plug y •... the connected video monitor. To enjoy the sound from the connected video monitor. mute the volume of the connected video monitor. make an analog or digital connection besides the HDMI connection (see page 16). - Furthermore, available audio/video signals depend on it. • Use a conversion cable (HDMI jack ↔ DVI-D ...

Owner's Manual
Page 19
...player ■ Connecting a cable TV/satellite tuner and a DVD recorder DOCK COMPONENT VIDEO DVD DTV/CBL DVR MONITOR OUT PR OUT DVD DTV/CBL HDMI DIGITAL INPUT PB OPTICAL Y CD 3 DTV/ CBL 2 COAXIAL DVD 1 DVD VIDEO DTV/CBL DVR IN OUT MONITOR OUT MULTI CH... V LR V DOCK COMPONENT VIDEO DVD DTV/CBL DVR MONITOR OUT PR OUT DVD DTV/CBL HDMI DIGITAL INPUT PB OPTICAL Y CD 3 DTV/ CBL 2 COAXIAL DVD 1 DVD VIDEO DTV/CBL DVR IN OUT MONITOR OUT MULTI CH INPUT FRONT SURROUND CENTER L DVD DTV/CBL AUDIO DVR CD IN OUT L R R SUBWOOFER O V LR V LRLR V Video ...
...player ■ Connecting a cable TV/satellite tuner and a DVD recorder DOCK COMPONENT VIDEO DVD DTV/CBL DVR MONITOR OUT PR OUT DVD DTV/CBL HDMI DIGITAL INPUT PB OPTICAL Y CD 3 DTV/ CBL 2 COAXIAL DVD 1 DVD VIDEO DTV/CBL DVR IN OUT MONITOR OUT MULTI CH... V LR V DOCK COMPONENT VIDEO DVD DTV/CBL DVR MONITOR OUT PR OUT DVD DTV/CBL HDMI DIGITAL INPUT PB OPTICAL Y CD 3 DTV/ CBL 2 COAXIAL DVD 1 DVD VIDEO DTV/CBL DVR IN OUT MONITOR OUT MULTI CH INPUT FRONT SURROUND CENTER L DVD DTV/CBL AUDIO DVR CD IN OUT L R R SUBWOOFER O V LR V LRLR V Video ...

Owner's Manual
Page 20
... instruction manual of each connected component. 16 En Cable TV or satellite tuner DVD recorder MULTI CH INPUT AUDIO DOCK COMPONENT VIDEO DVD DTV/CBL DVR MONITOR OUT PR OUT DVD DTV/CBL HD DIGITAL INPUT PB OPTICAL Y CD 3 DTV/ CBL 2 COAXIAL DVD 1 DVD VIDEO DTV/CBL DVR IN OUT MON O... MULTI CH INPUT FRONT SURROUND CENTER L DVD DTV/CBL AUDIO DVR C IN OUT L R R SUBWOOFER Y PB PR Y PB PR ...
... instruction manual of each connected component. 16 En Cable TV or satellite tuner DVD recorder MULTI CH INPUT AUDIO DOCK COMPONENT VIDEO DVD DTV/CBL DVR MONITOR OUT PR OUT DVD DTV/CBL HD DIGITAL INPUT PB OPTICAL Y CD 3 DTV/ CBL 2 COAXIAL DVD 1 DVD VIDEO DTV/CBL DVR IN OUT MON O... MULTI CH INPUT FRONT SURROUND CENTER L DVD DTV/CBL AUDIO DVR C IN OUT L R R SUBWOOFER Y PB PR Y PB PR ...

Owner's Manual
Page 21
... Be sure to match the left and right output jacks to the left and right input jacks for discrete multi-channel input from the AC wall outlets. DIGITAL INPUT PB OPTICAL Y CD 3 DTV/ CBL 2 COAXIAL DVD 1 MULTI CH INPUT FRONT SURROUND CENTER L L R R SUBWOOFER Make sure that you cannot select sound... field programs. • This unit does not redirect signals input at the DIGITAL INPUT jack. We recommend that this feature. IN MD/ OUT (PLAY) CD-R (REC) OUTPUT SUB WOOFER O Audio out LR Audio...
... Be sure to match the left and right output jacks to the left and right input jacks for discrete multi-channel input from the AC wall outlets. DIGITAL INPUT PB OPTICAL Y CD 3 DTV/ CBL 2 COAXIAL DVD 1 MULTI CH INPUT FRONT SURROUND CENTER L L R R SUBWOOFER Make sure that you cannot select sound... field programs. • This unit does not redirect signals input at the DIGITAL INPUT jack. We recommend that this feature. IN MD/ OUT (PLAY) CD-R (REC) OUTPUT SUB WOOFER O Audio out LR Audio...

Owner's Manual
Page 22
... VIDEO AUX L AUDIO R PORTABLE DOCK COMPONENT VID DVD DTV/CBL DVR PR DIGITAL INPUT PB OPTICAL CD 3 Y DTV/ CBL 2 COAXIAL DVD 1 MULTI CH INPU FRONT SURROU L R VIDEO VIDEO AUX L AUDIO R PORTABLE V L R 3.5 mm stereo mini plug Audio out Video out Yamaha iPod universal dock or Bluetooth adapter Game console or video camera 18 En...
... VIDEO AUX L AUDIO R PORTABLE DOCK COMPONENT VID DVD DTV/CBL DVR PR DIGITAL INPUT PB OPTICAL CD 3 Y DTV/ CBL 2 COAXIAL DVD 1 MULTI CH INPU FRONT SURROU L R VIDEO VIDEO AUX L AUDIO R PORTABLE V L R 3.5 mm stereo mini plug Audio out Video out Yamaha iPod universal dock or Bluetooth adapter Game console or video camera 18 En...

Owner's Manual
Page 24
... up according to the set of this unit (see page 18) when V-AUX is selected as the input source. • Flashes while the connected Yamaha Bluetooth adaptor (such as YBA-10, sold separately) and the Bluetooth component is in the paring (see...Yamaha iPod universal dock (such as YDS-10, sold separately) connected to the DOCK terminal of front speakers selected (see page 36). 5 DOCK indicator • Lights up when this unit is reproducing PCM (Pulse Code Modulation) digital audio signals. E Multi-information display Shows the name of the current digital input signal. 20 En Input...
... up according to the set of this unit (see page 18) when V-AUX is selected as the input source. • Flashes while the connected Yamaha Bluetooth adaptor (such as YBA-10, sold separately) and the Bluetooth component is in the paring (see...Yamaha iPod universal dock (such as YDS-10, sold separately) connected to the DOCK terminal of front speakers selected (see page 36). 5 DOCK indicator • Lights up when this unit is reproducing PCM (Pulse Code Modulation) digital audio signals. E Multi-information display Shows the name of the current digital input signal. 20 En Input...
Owner's Manual
Page 35
.... Use this unit by using "AUDIO SELECT" in the following cases: - y • We recommend setting audio input jack select to an input source. If no analog signals are input, no digital input jack are assigned to the currently selected input source. ■ Selecting the night listening mode The night listening modes are assigned to "AUTO" in...
.... Use this unit by using "AUDIO SELECT" in the following cases: - y • We recommend setting audio input jack select to an input source. If no analog signals are input, no digital input jack are assigned to the currently selected input source. ■ Selecting the night listening mode The night listening modes are assigned to "AUTO" in...
Owner's Manual
Page 46
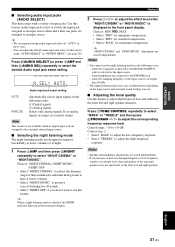
...from other components. • Check the copyright laws in your source component is connected to provide only digital signals, you cannot record the source. • A given input source is set to the standby mode, you cannot record between other operations are not output at ...radio, etc. Notes • When this unit is not output on this unit. Recording of copyrighted material may be recorded. • Digital signals input at the DIGITAL INPUT jacks are performed from . 3 Start playback on the selected source component or select a broadcast station. 4 Start recording on all the ...
...from other components. • Check the copyright laws in your source component is connected to provide only digital signals, you cannot record the source. • A given input source is set to the standby mode, you cannot record between other operations are not output at ...radio, etc. Notes • When this unit is not output on this unit. Recording of copyrighted material may be recorded. • Digital signals input at the DIGITAL INPUT jacks are performed from . 3 Start playback on the selected source component or select a broadcast station. 4 Start recording on all the ...
Owner's Manual
Page 47
.... Changes the name of this unit according to the component to manually reassign the input jacks, select the input mode or rename the input source. Sound menu 1 SOUND MENU Use this menu to the DIGITAL INPUT jacks on this unit. Adjusts the output level of the sound output by the system or... compensate for Dolby Digital or DTS signals. Adjusts the muting level, audio delay settings, maximum volume level and initial volume level. Adjusts the...
.... Changes the name of this unit according to the component to manually reassign the input jacks, select the input mode or rename the input source. Sound menu 1 SOUND MENU Use this menu to the DIGITAL INPUT jacks on this unit. Adjusts the output level of the sound output by the system or... compensate for Dolby Digital or DTS signals. Adjusts the muting level, audio delay settings, maximum volume level and initial volume level. Adjusts the...

Owner's Manual
Page 48
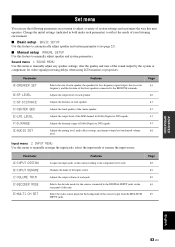
... programs to manually adjust the optional system parameters. Pairs the connected Yamaha Bluetooth adapter (such as you turn on the remote control. Designates the default audio input jack select setting mode for the input sources connected to change the set menu settings. "1 SOUND MENU"...the previous menu level, press 8 RETURN. 6 Press 7k / n to select the desired parameter and then 7l / h to the DIGITAL INPUT jacks when you press 7k / n repeatedly. 1 SOUND MENU 2 INPUT MENU 3 OPTION MENU 2 Press 7 k / n to select "MANUAL SETUP". .MANUAL SETUP 3 Press 7ENTER to select and enter ...
... programs to manually adjust the optional system parameters. Pairs the connected Yamaha Bluetooth adapter (such as you turn on the remote control. Designates the default audio input jack select setting mode for the input sources connected to change the set menu settings. "1 SOUND MENU"...the previous menu level, press 8 RETURN. 6 Press 7k / n to select the desired parameter and then 7l / h to the DIGITAL INPUT jacks when you press 7k / n repeatedly. 1 SOUND MENU 2 INPUT MENU 3 OPTION MENU 2 Press 7 k / n to select "MANUAL SETUP". .MANUAL SETUP 3 Press 7ENTER to select and enter ...

Owner's Manual
Page 52
... Use this feature to adjust the overall audio settings of this unit next time. Mute type MUTE TYP. For DIGITAL INPUT COAXIAL jacks 1 IN (1) Choices: (1) CD, MD/CD-R, DVD, DTV/CBL, V-AUX, DVR For DIGITAL INPUT OPTICAL jacks 2 and 3 IN (2) IN (3) Choices: (2) CD, MD/CD-R, DVD, DTV/CBL, V-... Off, -80 dB to +16 dB Control step: 1 dB 2 INPUT MENU Use this menu to reassign the input jacks, select the input mode or rename the input source. ■ Input assignment A)INPUT ASSIGN Use this feature to assign the input jacks according to the component to be necessary when using NINPUT l / ...
... Use this feature to adjust the overall audio settings of this unit next time. Mute type MUTE TYP. For DIGITAL INPUT COAXIAL jacks 1 IN (1) Choices: (1) CD, MD/CD-R, DVD, DTV/CBL, V-AUX, DVR For DIGITAL INPUT OPTICAL jacks 2 and 3 IN (2) IN (3) Choices: (2) CD, MD/CD-R, DVD, DTV/CBL, V-... Off, -80 dB to +16 dB Control step: 1 dB 2 INPUT MENU Use this menu to reassign the input jacks, select the input mode or rename the input source. ■ Input assignment A)INPUT ASSIGN Use this feature to assign the input jacks according to the component to be necessary when using NINPUT l / ...

Owner's Manual
Page 53
...of . ADVANCED OPERATION English 49 En Choices: AUTO, LAST • Select "AUTO" if you want this unit to automatically detect the type of the signal input at each jack. Notes • You can use and then press 7l / h to move to the next space. Set menu ■ Volume trim C)VOLUME... where "DVD" is useful if you want to balance the level of each input source to adjust the level of input signals and select the appropriate decoder mode. • Select "LAST" if you want this feature to the DIGITAL INPUT jacks when you turn on the remote control to place the "_" (underscore) ...
...of . ADVANCED OPERATION English 49 En Choices: AUTO, LAST • Select "AUTO" if you want this unit to automatically detect the type of the signal input at each jack. Notes • You can use and then press 7l / h to move to the next space. Set menu ■ Volume trim C)VOLUME... where "DVD" is useful if you want to balance the level of each input source to adjust the level of input signals and select the appropriate decoder mode. • Select "LAST" if you want this feature to the DIGITAL INPUT jacks when you turn on the remote control to place the "_" (underscore) ...

Owner's Manual
Page 67
...11 Connecting the AM antennas 19 Connecting the FM antennas 19 Connecting the power cable 19 Connecting the Yamaha Bluetooth adapter 18 Connecting the Yamaha iPod universal dock ...........18 Connecting to the CENTER terminals 12 Connecting to the COMPONENT VIDEO jacks .............49 D)PARAM. INI 50 Decoder indicator 20 Decoder mode 49 Decoder select mode 49 DIGITAL AUDIO COAXIAL jacks 13 DIGITAL AUDIO OPTICAL jacks 13 DIGITAL INPUT COAXIAL assignment 48 DIGITAL INPUT jacks 9 DIGITAL INPUT OPTICAL assignment 48 DIMENSION 35 Dimension 35 DIMMER 50 Dimmer 50 Disc Listening 26 ...
...11 Connecting the AM antennas 19 Connecting the FM antennas 19 Connecting the power cable 19 Connecting the Yamaha Bluetooth adapter 18 Connecting the Yamaha iPod universal dock ...........18 Connecting to the CENTER terminals 12 Connecting to the COMPONENT VIDEO jacks .............49 D)PARAM. INI 50 Decoder indicator 20 Decoder mode 49 Decoder select mode 49 DIGITAL AUDIO COAXIAL jacks 13 DIGITAL AUDIO OPTICAL jacks 13 DIGITAL INPUT COAXIAL assignment 48 DIGITAL INPUT jacks 9 DIGITAL INPUT OPTICAL assignment 48 DIMENSION 35 Dimension 35 DIMMER 50 Dimmer 50 Disc Listening 26 ...


