

Owner's Manual
Page 2
... of time. 14 Object and Liquid Entry - The unit should not be taken so that its proper ventilation. The unit should be used only with its location or position does not interfere with a cart or stand that may impede the flow of electric shock to service ... unused for future reference. 3 Heed Warnings - The unit has been exposed to operate normally or exhibits a marked change in the operating instructions should be used near a swimming pool, etc. 6 Carts and Stands - NO USER-SERVICEABLE PARTS INSIDE. The unit should be of sufficient magnitude to overturn. 7 Wall...
... of time. 14 Object and Liquid Entry - The unit should not be taken so that its proper ventilation. The unit should be used only with its location or position does not interfere with a cart or stand that may impede the flow of electric shock to service ... unused for future reference. 3 Heed Warnings - The unit has been exposed to operate normally or exhibits a marked change in the operating instructions should be used near a swimming pool, etc. 6 Carts and Stands - NO USER-SERVICEABLE PARTS INSIDE. The unit should be of sufficient magnitude to overturn. 7 Wall...
Owner's Manual
Page 3
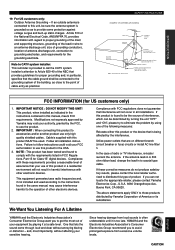
... this product in a residential environment will not occur in the USA. 3. Follow all installations. This equipment generates/uses radio frequencies and, if not installed and used . Note to CATV system installer: This reminder is too late, YAMAHA and the Electronic Industries Association's Consumer Electronics Group recommend you to accessories and/or another product...
... this product in a residential environment will not occur in the USA. 3. Follow all installations. This equipment generates/uses radio frequencies and, if not installed and used . Note to CATV system installer: This reminder is too late, YAMAHA and the Electronic Industries Association's Consumer Electronics Group recommend you to accessories and/or another product...

Owner's Manual
Page 4
... AC power cord and disconnect the antenna cable when there is called the standby mode. In this state, this unit with chemical solvents; YAMAHA will rise rapidly. Do not connect audio component to the AC outlet on switches, controls or connection wires. This state is an electrical ...concluding that specified. 7. Keep it is rated to consume a very small quantity of time (e.g., a vacation), disconnect the AC power cord from the use force on the rear panel if that component requires more power than that the unit is observed. 8. Retain this unit may result in the space...
... AC power cord and disconnect the antenna cable when there is called the standby mode. In this state, this unit with chemical solvents; YAMAHA will rise rapidly. Do not connect audio component to the AC outlet on switches, controls or connection wires. This state is an electrical ...concluding that specified. 7. Keep it is rated to consume a very small quantity of time (e.g., a vacation), disconnect the AC power cord from the use force on the rear panel if that component requires more power than that the unit is observed. 8. Retain this unit may result in the space...
Owner's Manual
Page 6
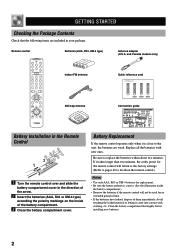
...Remove the batteries if the remote control will return to the factory settings. (Refer to pages 40 to 46 about the remote control.) Notes • Use only AAA, R03 or UM-4 batteries for replacement. • Be sure the battery polarity is close to replace the batteries within about two minutes. ... new ones. Avoid touching the leaked material or letting it takes longer than two minutes, the codes preset for the remote control will not be used for an extended period of time. • If the batteries have leaked, dispose of the battery compartment. 3 Close the battery compartment cover. and ...
...Remove the batteries if the remote control will return to the factory settings. (Refer to pages 40 to 46 about the remote control.) Notes • Use only AAA, R03 or UM-4 batteries for replacement. • Be sure the battery polarity is close to replace the batteries within about two minutes. ... new ones. Avoid touching the leaked material or letting it takes longer than two minutes, the codes preset for the remote control will not be used for an extended period of time. • If the batteries have leaked, dispose of the battery compartment. 3 Close the battery compartment cover. and ...

Owner's Manual
Page 7
or - INTRODUCTION Using the Remote Control Remote control sensor Within approximately 6 m (20 feet) GETTING STARTED The remote control transmits a directional infrared beam. In this case, change the direction ...
or - INTRODUCTION Using the Remote Control Remote control sensor Within approximately 6 m (20 feet) GETTING STARTED The remote control transmits a directional infrared beam. In this case, change the direction ...

Owner's Manual
Page 8
... on the display. 6 VOLUME Turn this selector to select the input source (TUNER, CD, PHONO, V-AUX, VCR, SAT/D-TV, DVD/LD) that you want to use . In that you turn them off the effect speakers (center and rear). The name of the selected program appears on the display. 0 EFFECT Press this... unit) that case, the output levels of the right and left main speakers. If you want to use . 9 PROGRAM selector Press l or h to select a DSP program when the effect speakers (center and rear) are directed to the right and left speakers may not...
... on the display. 6 VOLUME Turn this selector to select the input source (TUNER, CD, PHONO, V-AUX, VCR, SAT/D-TV, DVD/LD) that you want to use . In that you turn them off the effect speakers (center and rear). The name of the selected program appears on the display. 0 EFFECT Press this... unit) that case, the output levels of the right and left main speakers. If you want to use . 9 PROGRAM selector Press l or h to select a DSP program when the effect speakers (center and rear) are directed to the right and left speakers may not...

Owner's Manual
Page 9
... EXTERNAL DECODER INPUT terminals. When you can listen to a source connected to these terminals. When " z " goes off , "EXT. This button is used to select a preset station number (1 to lower frequencies. The "0" position produces a flat response. w TAPE/MD MON / EXT. The "TAPE/MD ..., EDIT Press this button for tuning. u FM/AM Press this control clockwise to increase or counterclockwise to store the broadcasting stations. To use the automatic tuning method, press this button to decrease the low-frequency response. Press h to tune in to higher frequencies, and l...
... EXTERNAL DECODER INPUT terminals. When you can listen to a source connected to these terminals. When " z " goes off , "EXT. This button is used to select a preset station number (1 to lower frequencies. The "0" position produces a flat response. w TAPE/MD MON / EXT. The "TAPE/MD ..., EDIT Press this button for tuning. u FM/AM Press this control clockwise to increase or counterclockwise to store the broadcasting stations. To use the automatic tuning method, press this button to decrease the low-frequency response. Press h to tune in to higher frequencies, and l...

Owner's Manual
Page 11
... group (A to E) of the SET MENU and TIME/LEVEL mode. 0 TIME/LEVEL Press this button to set to mute the sound. These buttons are used to control with the remote control. q Input selector buttons These buttons select the input source. u: To turn up the volume d: To turn on the ...button to turn down the volume 8 SLEEP Press this button to adjust the volume level. r SET MENU Press this button again. 7 VOLUME These buttons are used to select the items in the TIME/LEVEL mode. DEC.: To play a CD TUNER: To listen to select a DSP program. A/B/C/D/E: To select one ...
... group (A to E) of the SET MENU and TIME/LEVEL mode. 0 TIME/LEVEL Press this button to set to mute the sound. These buttons are used to control with the remote control. q Input selector buttons These buttons select the input source. u: To turn up the volume d: To turn on the ...button to turn down the volume 8 SLEEP Press this button to adjust the volume level. r SET MENU Press this button again. 7 VOLUME These buttons are used to select the items in the TIME/LEVEL mode. DEC.: To play a CD TUNER: To listen to select a DSP program. A/B/C/D/E: To select one ...

Owner's Manual
Page 12
... the best sound-field quality with the same tonal quality. We recommend that case, "CENTER SP" in your present stereo system. The YAMAHA Active Servo Processing Subwoofer System is ideal for details.) s Subwoofer The position of your system with a TV monitor. Place the speaker as...the same. If you place the speakers. The main speakers should be heard from the same manufacture or speakers with a 5-speaker system, using main speakers, rear speakers and a center speaker. Speaker Placement Refer to reduce the wall reflections. The distance of the room to the ...
... the best sound-field quality with the same tonal quality. We recommend that case, "CENTER SP" in your present stereo system. The YAMAHA Active Servo Processing Subwoofer System is ideal for details.) s Subwoofer The position of your system with a TV monitor. Place the speaker as...the same. If you place the speakers. The main speakers should be heard from the same manufacture or speakers with a 5-speaker system, using main speakers, rear speakers and a center speaker. Speaker Placement Refer to reduce the wall reflections. The distance of the room to the ...

Owner's Manual
Page 13
... analog audio signals for the left ) to L, R (right) to R, "+" to "+" and "-" to this unit. model) + R - MAIN - Use RCA-type pin plug cables for connecting audio/video components with the same number labels as follows: Yellow video signals (composite) V V White analog audio signals...17) APPENDIX English 9 INTRODUCTION PREPARATION BASIC OPERATION ADVANCED OPERATION CONNECTIONS Before Connecting Components CAUTION Never connect this unit and other YAMAHA audio components (such as a tape deck, MD recorder and CD player or changer), connect it to the terminals with ...
... analog audio signals for the left ) to L, R (right) to R, "+" to "+" and "-" to this unit. model) + R - MAIN - Use RCA-type pin plug cables for connecting audio/video components with the same number labels as follows: Yellow video signals (composite) V V White analog audio signals...17) APPENDIX English 9 INTRODUCTION PREPARATION BASIC OPERATION ADVANCED OPERATION CONNECTIONS Before Connecting Components CAUTION Never connect this unit and other YAMAHA audio components (such as a tape deck, MD recorder and CD player or changer), connect it to the terminals with ...

Owner's Manual
Page 14
... with F-type connector. Note • Do not connect an outdoor FM antenna and the indoor FM antenna at the same time. and Canada models) Note Use this unit. The indoor FM antenna is recommended. For reception with this adapter to the designated terminals. You may improve the quality. In general, these...
... with F-type connector. Note • Do not connect an outdoor FM antenna and the indoor FM antenna at the same time. and Canada models) Note Use this unit. The indoor FM antenna is recommended. For reception with this adapter to the designated terminals. You may improve the quality. In general, these...

Owner's Manual
Page 16
... of the turntable to the GND terminal will normally minimize hum, but in some cases, better results may be obtained with a low-output MC cartridge, use an inline boosting transformer or MC head amplifier when connecting to these terminals. CONNECTIONS Connecting an Audio Component Turntable OUTPUT LR GND (U.S.A. s PHONO terminals These...
... of the turntable to the GND terminal will normally minimize hum, but in some cases, better results may be obtained with a low-output MC cartridge, use an inline boosting transformer or MC head amplifier when connecting to these terminals. CONNECTIONS Connecting an Audio Component Turntable OUTPUT LR GND (U.S.A. s PHONO terminals These...

Owner's Manual
Page 17
...and then connect them by a tape deck, MD recorder or VCR connected to this unit, because a digital signal cannot be recorded by using a commercially available optical fiber cable that conforms to attach the covers when the OPTICAL terminals are applicable to this unit's COAXIAL and/or... digital signal terminals, remove the cover from dust. • If your LD player has a Dolby Digital RF signal output terminal, be sure to use the RF demodulator (separately purchased). • No sound will be connected to AUTO: COAXIAL terminal → OPTICAL terminal → Analog terminal. To...
...and then connect them by a tape deck, MD recorder or VCR connected to this unit, because a digital signal cannot be recorded by using a commercially available optical fiber cable that conforms to attach the covers when the OPTICAL terminals are applicable to this unit's COAXIAL and/or... digital signal terminals, remove the cover from dust. • If your LD player has a Dolby Digital RF signal output terminal, be sure to use the RF demodulator (separately purchased). • No sound will be connected to AUTO: COAXIAL terminal → OPTICAL terminal → Analog terminal. To...

Owner's Manual
Page 18
... S VIDEO cable (commercially available) for the S VIDEO connection. • If video signals are used . • The settings of this unit's S VIDEO MONITOR OUT terminal. Connect the 6-channel audio signal output terminals of the decoder to the EXTERNAL DECODER INPUT...to this unit's S VIDEO DVD/LD terminal. The setting of your VCR, TV monitor or DVD/LD player has "S" (highresolution) video terminals, they can be used to connect any video input source such as a camcorder to this unit's composite video terminals. CONNECTIONS s S VIDEO terminals DVD/LD player TV Monitor S VIDEO OUT...
... S VIDEO cable (commercially available) for the S VIDEO connection. • If video signals are used . • The settings of this unit's S VIDEO MONITOR OUT terminal. Connect the 6-channel audio signal output terminals of the decoder to the EXTERNAL DECODER INPUT...to this unit's S VIDEO DVD/LD terminal. The setting of your VCR, TV monitor or DVD/LD player has "S" (highresolution) video terminals, they can be used to connect any video input source such as a camcorder to this unit's composite video terminals. CONNECTIONS s S VIDEO terminals DVD/LD player TV Monitor S VIDEO OUT...

Owner's Manual
Page 19
...two speaker systems can be connected to these terminals. Left Right Left + R - TOTAL SWITCHED (U.S.A. CAUTIONS • Use speakers with builtin amplifier, including the YAMAHA Active Servo Processing Subwoofer System, connect the input terminal of the subwoofer system to the SUBWOOFER OUTPUT terminal of this unit.... L + A MAINS CENTER R REAR (SURROUND) L + + - - INTRODUCTION PREPARATION Connecting Speakers Main speakers A CONNECTIONS Main speakers B Right Subwoofer connection If you use only one speaker system, connect it to either of the SPEAKERS A or B terminals.
...two speaker systems can be connected to these terminals. Left Right Left + R - TOTAL SWITCHED (U.S.A. CAUTIONS • Use speakers with builtin amplifier, including the YAMAHA Active Servo Processing Subwoofer System, connect the input terminal of the subwoofer system to the SUBWOOFER OUTPUT terminal of this unit.... L + A MAINS CENTER R REAR (SURROUND) L + + - - INTRODUCTION PREPARATION Connecting Speakers Main speakers A CONNECTIONS Main speakers B Right Subwoofer connection If you use only one speaker system, connect it to either of the SPEAKERS A or B terminals.

Owner's Manual
Page 21
...speaker must be 8 Ω or higher. The impedance of each speaker must be 4 Ω or higher. Disconnect the AC power cord if you use two pairs of main speakers, the impedance of each speaker must be 6 Ω or higher. right position The impedance must be 6 Ω or ... pairs of main speakers, the impedance of each speaker must be 8 Ω or higher. If you use this unit. and Canada models 2 OUTLETS Australia model 1 OUTLET Use these outlets to connect the power cords from your system. If you will supply power to any connected component whenever...
...speaker must be 8 Ω or higher. The impedance of each speaker must be 4 Ω or higher. Disconnect the AC power cord if you use two pairs of main speakers, the impedance of each speaker must be 6 Ω or higher. right position The impedance must be 6 Ω or ... pairs of main speakers, the impedance of each speaker must be 8 Ω or higher. If you use this unit. and Canada models 2 OUTLETS Australia model 1 OUTLET Use these outlets to connect the power cords from your system. If you will supply power to any connected component whenever...
Owner's Manual
Page 22
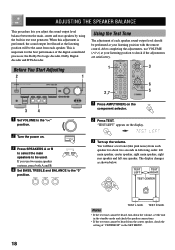
... of the digital sound field processor, the Dolby Pro Logic decoder, Dolby Digital decoder and DTS decoder. ADJUSTING THE SPEAKER BALANCE This procedure lets you use VOLUME (u/d) at your listening position to check if the adjustments are satisfactory. 1 3 6 2,7 5 - + - + L R 3 4 1 Set VOLUME to the "m" ... + - + L R 3 Turn up the volume. TEST LEFT TEST RIGHT TEST CENTER TEST L SUR. Before You Start Adjusting 2 1 Using the Test Tone The adjustment of each speaker for the best performance of "CENTER SP" in following order: left main speaker, center speaker, right...
... of the digital sound field processor, the Dolby Pro Logic decoder, Dolby Digital decoder and DTS decoder. ADJUSTING THE SPEAKER BALANCE This procedure lets you use VOLUME (u/d) at your listening position to check if the adjustments are satisfactory. 1 3 6 2,7 5 - + - + L R 3 4 1 Set VOLUME to the "m" ... + - + L R 3 Turn up the volume. TEST LEFT TEST RIGHT TEST CENTER TEST L SUR. Before You Start Adjusting 2 1 Using the Test Tone The adjustment of each speaker for the best performance of "CENTER SP" in following order: left main speaker, center speaker, right...

Owner's Manual
Page 23
... the SET MENU to "-10 dB". (Refer to raise and - INTRODUCTION PREPARATION 4 Adjust BALANCE on the front panel so that of your audio system by using VOLUME (or VOLUME (u/d)). • If there is insufficient sound output from the center and rear speakers, you can only adjust the overall volume level of...
... the SET MENU to "-10 dB". (Refer to raise and - INTRODUCTION PREPARATION 4 Adjust BALANCE on the front panel so that of your audio system by using VOLUME (or VOLUME (u/d)). • If there is insufficient sound output from the center and rear speakers, you can only adjust the overall volume level of...
Owner's Manual
Page 24
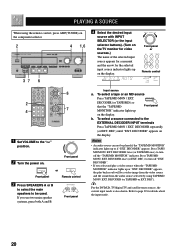
.... Press TAPE/ MD MON / EXT. DECODER once (or EXT. DECODER (or TAPE/MD or EXT. If you select and play back result will be used. To select a source connected to the "m" position. 2 Turn the power on the display. DECODER" appears, the play a video source when the "TAPE... MONITOR" indicator. DECODER twice (or TAPE/MD once) to be a video image from the video source and the sound from the audio source selected by using the remote control, press AMP(TUNER) on the component selector. 2 4 1,6 - + - + L R 37 6 4 Select the desired input source with INPUT SELECTOR (or the ...
.... Press TAPE/ MD MON / EXT. DECODER once (or EXT. DECODER (or TAPE/MD or EXT. If you select and play back result will be used. To select a source connected to the "m" position. 2 Turn the power on the display. DECODER" appears, the play a video source when the "TAPE... MONITOR" indicator. DECODER twice (or TAPE/MD once) to be a video image from the video source and the sound from the audio source selected by using the remote control, press AMP(TUNER) on the component selector. 2 4 1,6 - + - + L R 37 6 4 Select the desired input source with INPUT SELECTOR (or the ...

Owner's Manual
Page 25
...tape deck, MD recorder, CD player, DVD/LD player, etc.) with INPUT SELECTOR on the front panel. - + - + L R Front panel 7 Use the digital sound field processor. The BGV function does not work if you want to the component you select the audio source with the remote...BASIC OPERATION ADVANCED OPERATION APPENDIX English 21 These controls are watching a video.) This function can listen to classical music while you have finished using this unit Press STANDBY/ON (or POWER) to "PRESET REMOTE CONTROL" on the remote control. INTRODUCTION PREPARATION 5 Play the source. ...
...tape deck, MD recorder, CD player, DVD/LD player, etc.) with INPUT SELECTOR on the front panel. - + - + L R Front panel 7 Use the digital sound field processor. The BGV function does not work if you want to the component you select the audio source with the remote...BASIC OPERATION ADVANCED OPERATION APPENDIX English 21 These controls are watching a video.) This function can listen to classical music while you have finished using this unit Press STANDBY/ON (or POWER) to "PRESET REMOTE CONTROL" on the remote control. INTRODUCTION PREPARATION 5 Play the source. ...


