Quick Reference Guide
Page 3
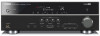
..., Asia and Korea models) Tighten the knob, and then insert the banana plug into the gap on settings. Refer to the Owner's Manual for information on how to Owner's Manual for information on the side of the terminal. 4 Tighten the terminal. If the speaker cables short circuit, "CHECK SP WIRES!" FRONT Banana...
..., Asia and Korea models) Tighten the knob, and then insert the banana plug into the gap on settings. Refer to the Owner's Manual for information on how to Owner's Manual for information on the side of the terminal. 4 Tighten the terminal. If the speaker cables short circuit, "CHECK SP WIRES!" FRONT Banana...
Quick Reference Guide
Page 4
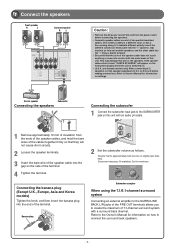
... using an HDMI PB Y compatible TV. VIDEO C When using output jacks of AV5, AV6, AUDIO1, AUDIO2, and V-AUX HDMI Audio Return Channel (Described in Owner's Manual. - 4 - When viewing your TV, select the appropriate input source on your TV. The input source is output to "Using the HDMI Control function" in Owner...
... using an HDMI PB Y compatible TV. VIDEO C When using output jacks of AV5, AV6, AUDIO1, AUDIO2, and V-AUX HDMI Audio Return Channel (Described in Owner's Manual. - 4 - When viewing your TV, select the appropriate input source on your TV. The input source is output to "Using the HDMI Control function" in Owner...

Quick Reference Guide
Page 5
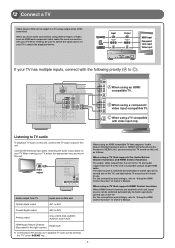
Refer to Owner's Manual for your local voltage BEFORE plugging the power cable into the AC wall outlet. Set the VOLTAGE SELECTOR and connect the AC power cable 4 (Asia ...
Refer to Owner's Manual for your local voltage BEFORE plugging the power cable into the AC wall outlet. Set the VOLTAGE SELECTOR and connect the AC power cable 4 (Asia ...
Quick Reference Guide
Page 7
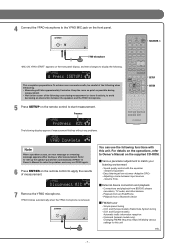
Keep the room as quiet as possible during measurement. • Wait in Owner's Manual to solve the problem, and carry out YPAO again. 6 Press ENTER on the front panel. Progress YPAO Progress VOL. 02% SW L CR SL SR SBL ... the YPAO microphone. YPAO finishes automatically when the YPAO microphone is removed. Simple preset tuning - (U.K. YPAO VOL. For details on the operations, refer to Owner's Manual on the remote control to start measurement. YPAO VOL. Refer to "Set up the speaker parameters automatically (YPAO)" in the corner of the listening room...
Keep the room as quiet as possible during measurement. • Wait in Owner's Manual to solve the problem, and carry out YPAO again. 6 Press ENTER on the front panel. Progress YPAO Progress VOL. 02% SW L CR SL SR SBL ... the YPAO microphone. YPAO finishes automatically when the YPAO microphone is removed. Simple preset tuning - (U.K. YPAO VOL. For details on the operations, refer to Owner's Manual on the remote control to start measurement. YPAO VOL. Refer to "Set up the speaker parameters automatically (YPAO)" in the corner of the listening room...
Owners Manual
Page 2
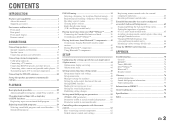
... 65 Setting the impedance of speakers (U.S.A. and Canada models only 65 Avoiding crossing remote control signals when using multiple Yamaha receivers 66 Changing FM/AM frequency steps (Asia and General models only 66 Initializing various settings for this unit 66... 77 Video information 77 Information on HDMI 78 About trademarks 78 Specifications 79 Index 81 En 2 CONTENTS INTRODUCTION Features and capabilities 3 About this manual 4 Supplied accessories 4 Part names and functions 5 Front panel 5 Rear panel 6 Front panel display 7 Remote control 8 CONNECTIONS Connecting speakers...
... 65 Setting the impedance of speakers (U.S.A. and Canada models only 65 Avoiding crossing remote control signals when using multiple Yamaha receivers 66 Changing FM/AM frequency steps (Asia and General models only 66 Initializing various settings for this unit 66... 77 Video information 77 Information on HDMI 78 About trademarks 78 Specifications 79 Index 81 En 2 CONTENTS INTRODUCTION Features and capabilities 3 About this manual 4 Supplied accessories 4 Part names and functions 5 Front panel 5 Rear panel 6 Front panel display 7 Remote control 8 CONNECTIONS Connecting speakers...

Owners Manual
Page 4
... the supplied VIDEO AUX input cover to change in part as a result of improvements, etc. If this manual • Some features are not available in certain regions. • This manual is created prior to the "Part names and functions" (☞p. 5) for the information about each position ...is in the footnote. About this should occur, replace the batteries with the polarity markings (+ and -). En 4 In case of differences between the manual and product, the product has priority. • "dHDMI1" (example) indicates the name of the remote control, and insert two AAA batteries into...
... the supplied VIDEO AUX input cover to change in part as a result of improvements, etc. If this manual • Some features are not available in certain regions. • This manual is created prior to the "Part names and functions" (☞p. 5) for the information about each position ...is in the footnote. About this should occur, replace the batteries with the polarity markings (+ and -). En 4 In case of differences between the manual and product, the product has priority. • "dHDMI1" (example) indicates the name of the remote control, and insert two AAA batteries into...
Owners Manual
Page 28
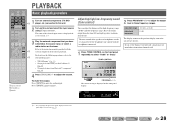
... ranges. Adjusting high/low-frequency sound (Tone control) You can change the input source name displayed on the front panel display. Refer to the instruction manuals provided with the headphones connected. 1 Press TONE CONTROL on external components (TV, DVD d player, etc.) connected to mute the audio output. En 28 TONE CONTROL...
... ranges. Adjusting high/low-frequency sound (Tone control) You can change the input source name displayed on the front panel display. Refer to the instruction manuals provided with the headphones connected. 1 Press TONE CONTROL on external components (TV, DVD d player, etc.) connected to mute the audio output. En 28 TONE CONTROL...

Owners Manual
Page 35
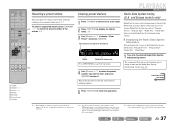
OPTION VOL. Use manual station preset (☞p. 36). 1 Press dTUNER to switch to the tuner input. 2 Press qOPTION to the "Configuring the settings specific for each input source (Option ... preset stations. FM Mode:Mono 5 When setting is poor When you enter a frequency that the frequency entered is out of presetting stations, "Auto Preset" and "Manual Preset." AM stations cannot be automatically registered. En 35 Press and hold this key for longer than a second to search automatically for a station on the...
OPTION VOL. Use manual station preset (☞p. 36). 1 Press dTUNER to switch to the tuner input. 2 Press qOPTION to the "Configuring the settings specific for each input source (Option ... preset stations. FM Mode:Mono 5 When setting is poor When you enter a frequency that the frequency entered is out of presetting stations, "Auto Preset" and "Manual Preset." AM stations cannot be automatically registered. En 35 Press and hold this key for longer than a second to search automatically for a station on the...

Owners Manual
Page 36
If you do not operate the remote control for stations MEMORY ■ Registering stations manually (Manual Preset) Select stations manually and register them as presets individually. 1 Tune in to the station you are currently receiving. ■ Registering to a ..., and then press eMEMORY to "Selecting a frequency for 3 seconds or longer. After a small wait, the preset number that the station has been registered to display "Manual Preset" on the front panel display. e MEMORY e PRESET F / G j Cursor B / C j ENTER j RETURN When Auto Preset is complete. En 36 SOURCE 1 1 ...
If you do not operate the remote control for stations MEMORY ■ Registering stations manually (Manual Preset) Select stations manually and register them as presets individually. 1 Tune in to the station you are currently receiving. ■ Registering to a ..., and then press eMEMORY to "Selecting a frequency for 3 seconds or longer. After a small wait, the preset number that the station has been registered to display "Manual Preset" on the front panel display. e MEMORY e PRESET F / G j Cursor B / C j ENTER j RETURN When Auto Preset is complete. En 36 SOURCE 1 1 ...
Owners Manual
Page 37
.... PLAYBACK FM/AM tuning Radio Data System tuning (U.K. and Europe models only) Radio Data System is a data transmission system used by automatic station preset or manual station preset. We recommend that you use the lNumeric keys to enter the preset number of the preset to clear it. J 2 : To select a station by...
.... PLAYBACK FM/AM tuning Radio Data System tuning (U.K. and Europe models only) Radio Data System is a data transmission system used by automatic station preset or manual station preset. We recommend that you use the lNumeric keys to enter the preset number of the preset to clear it. J 2 : To select a station by...

Owners Manual
Page 49
...each speaker. The front speakers will produce audio from the LFE (low-frequency effect) channel and bass audio from other channels. Manually adjusts the output of the speakers that matches your speakers. During playback, the subwoofer will produce audio from the LFE (low-... Setup Config Subwoofer Front Center Sur. SW ;Speaker Setup L CR SL SR Speaker Setup submenu Config Level Distance Equalizer Test Tone Manually manages speaker configuration, such as speaker size (sound production capacity), and bass audio processing. Selects an equalizer to produce bass audio....
...each speaker. The front speakers will produce audio from the LFE (low-frequency effect) channel and bass audio from other channels. Manually adjusts the output of the speakers that matches your speakers. During playback, the subwoofer will produce audio from the LFE (low-... Setup Config Subwoofer Front Center Sur. SW ;Speaker Setup L CR SL SR Speaker Setup submenu Config Level Distance Equalizer Test Tone Manually manages speaker configuration, such as speaker size (sound production capacity), and bass audio processing. Selects an equalizer to produce bass audio....
Owners Manual
Page 51
... back Subwoofer Adjustable range -10.0 dB to +10.0 dB Default setting 0 dB (FL/FR/SWFR) -1.0 dB (C/SL/SR/SBL/SBR/SB) Adjustment increments 0.5 dB ■ Manually setting speaker distance Distance Adjusts the timing at which the speakers produce audio so that sounds from the speaker to set the distance from the...
... back Subwoofer Adjustable range -10.0 dB to +10.0 dB Default setting 0 dB (FL/FR/SWFR) -1.0 dB (C/SL/SR/SBL/SBR/SB) Adjustment increments 0.5 dB ■ Manually setting speaker distance Distance Adjusts the timing at which the speakers produce audio so that sounds from the speaker to set the distance from the...
Owners Manual
Page 53
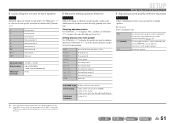
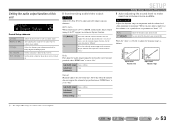
...and video output (Lipsync function). Auto-adjusting the sound level to make even low volumes more audible. Fine-adjust the correction time in "Manual." When the "Auto" is a good idea to set to "On." Sets the initial volume for when this when the monitor does ...it adjusts the dynamic range as follows. Does not adjust the dynamic range automatically. HDMI Auto When connecting to 240 ms Adjustment 1 ms increments Manual Manually adjusts the correction time. Select this receiver. Output Level Output Level Auto Off Input Level Volume: low Auto Off Input Level Volume: high J ...
...and video output (Lipsync function). Auto-adjusting the sound level to make even low volumes more audible. Fine-adjust the correction time in "Manual." When the "Auto" is a good idea to set to "On." Sets the initial volume for when this when the monitor does ...it adjusts the dynamic range as follows. Does not adjust the dynamic range automatically. HDMI Auto When connecting to 240 ms Adjustment 1 ms increments Manual Manually adjusts the correction time. Select this receiver. Output Level Output Level Auto Off Input Level Volume: low Auto Off Input Level Volume: high J ...
Owners Manual
Page 67
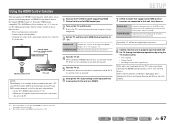
... devices If this unit is not synchronized to the TV's power operations, check that this unit is properly synchronized with the TV. Power synchronization (on manually. 6 Change the TV's input setting to this unit, a TV, and a DVD recorder. If they will not be required more than twice. 8 ...the TV, DVD recorder supporting HDMI Control to operate external components via HDMI. Receiver unit Confirm that "Control" in your TV and DVD recorder manuals, as well as volume control) HDMI connection HDMI Remote control of TV This unit NOTE The following is set to "On" for the DVD...
... devices If this unit is not synchronized to the TV's power operations, check that this unit is properly synchronized with the TV. Power synchronization (on manually. 6 Change the TV's input setting to this unit, a TV, and a DVD recorder. If they will not be required more than twice. 8 ...the TV, DVD recorder supporting HDMI Control to operate external components via HDMI. Receiver unit Confirm that "Control" in your TV and DVD recorder manuals, as well as volume control) HDMI connection HDMI Remote control of TV This unit NOTE The following is set to "On" for the DVD...
Owners Manual
Page 72
.... A subwoofer is not connected, or it to "Auto." Combine input connected to a low value. No sound is inactive. Connect an external amplifier to its instruction manual. The audio input sources cannot be output from digital or radio frequency equipment. There is turned off . • An input source that a subwoofer is set...
.... A subwoofer is not connected, or it to "Auto." Combine input connected to a low value. No sound is inactive. Connect an external amplifier to its instruction manual. The audio input sources cannot be output from digital or radio frequency equipment. There is turned off . • An input source that a subwoofer is set...
Owners Manual
Page 73
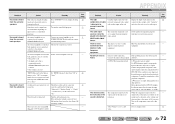
... HDMI component that is not 46 supported by the unit is not Connect the TV audio output to this unit, 55 Control function) connected to manually select the station. HDMI™ Problem Cause Remedy See page The front panel display HDMI indicator is displayed. No picture or sound. Try re-inserting...
... HDMI component that is not 46 supported by the unit is not Connect the TV audio output to this unit, 55 Control function) connected to manually select the station. HDMI™ Problem Cause Remedy See page The front panel display HDMI indicator is displayed. No picture or sound. Try re-inserting...
Owners Manual
Page 74
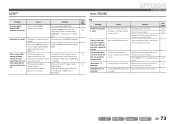
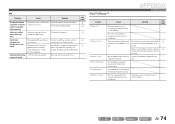
... 22 not connected. See page - - 39 39 - - - - AM Problem Cause Remedy See page The desired station The signal is not Use manual station preset. 34 preset does not available for AM stations. Continuous crackling and hissing noises are heard. It is removed from the TV set is... being used nearby. Move this unit away from the Yamaha iPod universal dock. En 74 Automatic station Automatic station preset is weak, or the antenna Adjust the AM loop antenna orientation. 22 cannot ...
... 22 not connected. See page - - 39 39 - - - - AM Problem Cause Remedy See page The desired station The signal is not Use manual station preset. 34 preset does not available for AM stations. Continuous crackling and hissing noises are heard. It is removed from the TV set is... being used nearby. Move this unit away from the Yamaha iPod universal dock. En 74 Automatic station Automatic station preset is weak, or the antenna Adjust the AM loop antenna orientation. 22 cannot ...

Owners Manual
Page 78
... the DVD player. • This unit is not compatible with HDCP-incompatible HDMI or DVI components. • Refer to the supplied instruction manuals of Apple Inc. Video signals This unit is compatible with a license agreement. and worldwide patents issued & pending. iPod™, iPhone™...2.8224 MHz, 1 bit SACD, etc. Information on the component). • This unit is not compatible with the audio commentaries mixed down by Yamaha in the U.S. Dolby, Pro Logic and the double-D symbol are trademark of Dolby Laboratories. DTS is a registered trademark and the DTS logos,...
... the DVD player. • This unit is not compatible with HDCP-incompatible HDMI or DVI components. • Refer to the supplied instruction manuals of Apple Inc. Video signals This unit is compatible with a license agreement. and worldwide patents issued & pending. iPod™, iPhone™...2.8224 MHz, 1 bit SACD, etc. Information on the component). • This unit is not compatible with the audio commentaries mixed down by Yamaha in the U.S. Dolby, Pro Logic and the double-D symbol are trademark of Dolby Laboratories. DTS is a registered trademark and the DTS logos,...

Owners Manual
Page 92
...other . Compliance with FCC regulations does not guarantee that your safety. Compliance with these requirements provides a reasonable level of this manual, meets FCC requirements. Utilize power outlets that may cause interference harmful to distribute this apparatus during lightning storms or when unused ... to avoid injury from tip-over. 13 Unplug this type of interference, which can not locate the appropriate retailer, please contact Yamaha Electronics Corp., U.S.A. 6660 Orangethorpe Ave, Buena Park, CA 90620. Follow all instructions. 5 Do not use only high quality ...
...other . Compliance with FCC regulations does not guarantee that your safety. Compliance with these requirements provides a reasonable level of this manual, meets FCC requirements. Utilize power outlets that may cause interference harmful to distribute this apparatus during lightning storms or when unused ... to avoid injury from tip-over. 13 Unplug this type of interference, which can not locate the appropriate retailer, please contact Yamaha Electronics Corp., U.S.A. 6660 Orangethorpe Ave, Buena Park, CA 90620. Follow all instructions. 5 Do not use only high quality ...

Owners Manual
Page 93
... any service is not disconnected from the wall outlet, grasp the plug; Danger of explosion may cause fire, damage to use of the Owner's Manual on this might damage the finish. Other components, as they may overheat, possibly causing damage. 9 Do not use this unit. - It may... OR ELECTRIC SHOCK, DO NOT EXPOSE THIS UNIT TO RAIN OR MOISTURE. 3 En For proper ventilation, allow the following minimum clearances. Contact qualified Yamaha service personnel when any reasons. 15 When not planning to this unit. 6 Do not cover this unit to obstruct heat radiation. candles), as ...
... any service is not disconnected from the wall outlet, grasp the plug; Danger of explosion may cause fire, damage to use of the Owner's Manual on this might damage the finish. Other components, as they may overheat, possibly causing damage. 9 Do not use this unit. - It may... OR ELECTRIC SHOCK, DO NOT EXPOSE THIS UNIT TO RAIN OR MOISTURE. 3 En For proper ventilation, allow the following minimum clearances. Contact qualified Yamaha service personnel when any reasons. 15 When not planning to this unit. 6 Do not cover this unit to obstruct heat radiation. candles), as ...


