
Owners Manual
Page 1
AV Receiver Owner's Manual English for North America
AV Receiver Owner's Manual English for North America
Owners Manual
Page 3
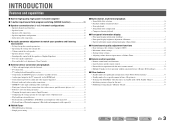
Speaker layout...10 - Speaker cable connection...10 - Speaker impedance configuration...10 - Specifying the settings for each speaker 41 - Subwoofer cable connection ...12 ■ Acoustic parameter adjustment to 5.1-channel configurations - Setting for 2- Volume control for each speaker...42 - Sound quality control with the equalizer Speaker channels and functions ...9 - INTRODUCTION Features and capabilities ■ Built-in high-quality, high-power 5-channel amplifier ■ 1-button input/sound field program switching (SCENE function 26 ■ Speaker ...
Speaker layout...10 - Speaker cable connection...10 - Speaker impedance configuration...10 - Specifying the settings for each speaker 41 - Subwoofer cable connection ...12 ■ Acoustic parameter adjustment to 5.1-channel configurations - Setting for 2- Volume control for each speaker...42 - Sound quality control with the equalizer Speaker channels and functions ...9 - INTRODUCTION Features and capabilities ■ Built-in high-quality, high-power 5-channel amplifier ■ 1-button input/sound field program switching (SCENE function 26 ■ Speaker ...
Owners Manual
Page 6
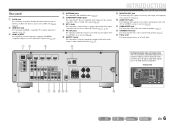
...ab c d ANTENNA jacks For connecting AM and FM antennas (☞p. 21). g AV OUT jacks For outputting audio/video signals received when analog inputs (AV35 or AUDIO1-2) are selected (☞p. 20). Use these jacks...AV 2 COAXIAL (CD) AV 3 OPTICAL ( TV ) AV 4 AV 5 AV OUT AUDIO 1 AUDIO 2 ANTENNA FM GND SURROU SUBWOOFER e f g h jik l m En 6 k SUBWOOFER jack For connecting a subwoofer with HDMIcompatible outputs to (☞p. 14). e COMPONENT VIDEO jacks For connecting TV that this unit to it (☞p. 15). Rear panel a DOCK jack For connecting an optional Yamaha...
...ab c d ANTENNA jacks For connecting AM and FM antennas (☞p. 21). g AV OUT jacks For outputting audio/video signals received when analog inputs (AV35 or AUDIO1-2) are selected (☞p. 20). Use these jacks...AV 2 COAXIAL (CD) AV 3 OPTICAL ( TV ) AV 4 AV 5 AV OUT AUDIO 1 AUDIO 2 ANTENNA FM GND SURROU SUBWOOFER e f g h jik l m En 6 k SUBWOOFER jack For connecting a subwoofer with HDMIcompatible outputs to (☞p. 14). e COMPONENT VIDEO jacks For connecting TV that this unit to it (☞p. 15). Rear panel a DOCK jack For connecting an optional Yamaha...
Owners Manual
Page 8
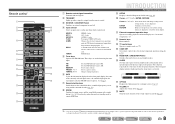
Remote control a b c d e f g h i j k l m SOURCE 1 1 5 TRANSMIT CODE SET SLEEP RECEIVER HDMI 2 3 4 AV 2 3 4 AUDIO 1 2 V-AUX [ A ] [ B ] DOCK TUNER FM AM PRESET TUNING INFO MEMORY MOVIE ENHANCER SUR. c SOURCE A (SOURCE Power) Switches an external component ...output from which to switch on the front panel display (the name of time has elapsed (sleep timer). J1 DOCK A Yamaha iPod universal dock or Bluetooth wireless audio receiver connected to FM. J1 l Numeric keys Enter numbers. Press this unit (☞p. 40). d Input selector Select an ...
Remote control a b c d e f g h i j k l m SOURCE 1 1 5 TRANSMIT CODE SET SLEEP RECEIVER HDMI 2 3 4 AV 2 3 4 AUDIO 1 2 V-AUX [ A ] [ B ] DOCK TUNER FM AM PRESET TUNING INFO MEMORY MOVIE ENHANCER SUR. c SOURCE A (SOURCE Power) Switches an external component ...output from which to switch on the front panel display (the name of time has elapsed (sleep timer). J1 DOCK A Yamaha iPod universal dock or Bluetooth wireless audio receiver connected to FM. J1 l Numeric keys Enter numbers. Press this unit (☞p. 40). d Input selector Select an ...
Owners Manual
Page 14
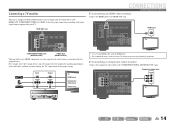
...PR (BD/DVD) HDMI 1 HDMI 2 PB PB Y MONITOR OUT Y COMPONENT VIDEO VIDEO HDMI 3 HDMI 4 MONITOR OUT OPTICAL AV 1 COAXIAL AV 2 COAXIAL (CD) AV 3 OPTICAL ( TV ) AV 4 AV 5 AV OUT AUDIO 1 AUDIO 2 AUDIO OUT HDMI input HDMI HDMI TV COMPONENT VIDEO jacks (MONITOR OUT) VIDEO jack (MONITOR OUT) ...This unit will receive HDMI, component, or video signals in the same format as transmitted by your TV. Select ...
...PR (BD/DVD) HDMI 1 HDMI 2 PB PB Y MONITOR OUT Y COMPONENT VIDEO VIDEO HDMI 3 HDMI 4 MONITOR OUT OPTICAL AV 1 COAXIAL AV 2 COAXIAL (CD) AV 3 OPTICAL ( TV ) AV 4 AV 5 AV OUT AUDIO 1 AUDIO 2 AUDIO OUT HDMI input HDMI HDMI TV COMPONENT VIDEO jacks (MONITOR OUT) VIDEO jack (MONITOR OUT) ...This unit will receive HDMI, component, or video signals in the same format as transmitted by your TV. Select ...
Owners Manual
Page 15
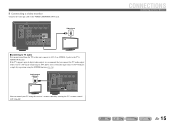
... just a single key operation using the receiver's remote control by entering the TV's remote control code (☞p. 50). DOCK COMPONENT VIDEO PR HDMI OUT PR (BD/DVD) HDMI 1 HDMI 2 PB PB Y MONITOR OUT Y COMPONENT VIDEO VIDEO HDMI 3 HDMI 4 MONITOR OUT V OPTICAL AV 1 COAXIAL AV 2 COAXIAL (CD) AV 3 OPTICAL ( TV ) AV 4 AV 5 AV OUT AUDIO 1 AUDIO 2 AUDIO OUT...
... just a single key operation using the receiver's remote control by entering the TV's remote control code (☞p. 50). DOCK COMPONENT VIDEO PR HDMI OUT PR (BD/DVD) HDMI 1 HDMI 2 PB PB Y MONITOR OUT Y COMPONENT VIDEO VIDEO HDMI 3 HDMI 4 MONITOR OUT V OPTICAL AV 1 COAXIAL AV 2 COAXIAL (CD) AV 3 OPTICAL ( TV ) AV 4 AV 5 AV OUT AUDIO 1 AUDIO 2 AUDIO OUT...
Owners Manual
Page 16
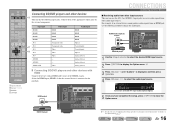
...an HDMI jack, use the AV1-5 or AUDIO1-2 input jacks to change the audio input. BD/DVD player OPTICAL AV 1 COAXIAL AV 2 COAXIAL (CD) AV 3 OPTICAL ( TV ) AV 4 AV 5 AV OUT AUDIO 1 AUDIO 2 AUDIO OUT J 1 : See the section on "Configuring the settings specific for each ... Use the dInput selector to select the desired HDMI input source. 2 Press qOPTION to close the Option menu. SOURCE 1 1 5 TRANSMIT CODE SET SLEEP RECEIVER HDMI 2 3 4 AV 2 3 4 AUDIO 1 2 V-AUX [ A ] [ B ] DOCK TUNER FM AM PRESET TUNING INFO MEMORY MOVIE ENHANCER SUR. Select the HDMI input...
...an HDMI jack, use the AV1-5 or AUDIO1-2 input jacks to change the audio input. BD/DVD player OPTICAL AV 1 COAXIAL AV 2 COAXIAL (CD) AV 3 OPTICAL ( TV ) AV 4 AV 5 AV OUT AUDIO 1 AUDIO 2 AUDIO OUT J 1 : See the section on "Configuring the settings specific for each ... Use the dInput selector to select the desired HDMI input source. 2 Press qOPTION to close the Option menu. SOURCE 1 1 5 TRANSMIT CODE SET SLEEP RECEIVER HDMI 2 3 4 AV 2 3 4 AUDIO 1 2 V-AUX [ A ] [ B ] DOCK TUNER FM AM PRESET TUNING INFO MEMORY MOVIE ENHANCER SUR. Select the HDMI input...
Owners Manual
Page 17
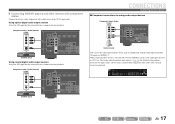
... connecting these devices, select the AV3-5 or the AUDIO1-2 jacks as the audio input for detailed setup guidance. See "Receiving audio from other input sources" (☞p. 16) for AV1 or AV2. Component video / Audio (Optical) output COMPONENT... (BD/DVD) HDMI 1 HDMI 2 PR PR PB PB Y Y COMPONENT VIDEO VIDEO HDMI 3 HDMI 4 MONITOR OUT C OPTICAL AV 1 COAXIAL AV 2 COAXIAL (CD) AV 3 OPTICAL ( TV ) AV 4 AV 5 AV OUT AUDIO 1 AUDIO 2 AUDIO OUT CONNECTIONS Connecting external devices ■ Component connections to analog audio output devices Component video / Audio ...
... connecting these devices, select the AV3-5 or the AUDIO1-2 jacks as the audio input for detailed setup guidance. See "Receiving audio from other input sources" (☞p. 16) for AV1 or AV2. Component video / Audio (Optical) output COMPONENT... (BD/DVD) HDMI 1 HDMI 2 PR PR PB PB Y Y COMPONENT VIDEO VIDEO HDMI 3 HDMI 4 MONITOR OUT C OPTICAL AV 1 COAXIAL AV 2 COAXIAL (CD) AV 3 OPTICAL ( TV ) AV 4 AV 5 AV OUT AUDIO 1 AUDIO 2 AUDIO OUT CONNECTIONS Connecting external devices ■ Component connections to analog audio output devices Component video / Audio ...

Owners Manual
Page 20
... Y MONITOR OUT PB V Y COMPONENT VIDEO VIDEO MONITOR OUT L L R R OPTICAL AV 1 COAXIAL AV 2 COAXIAL (CD) AV 3 OPTICAL ( TV ) AV 4 AV 5 AV OUT AUDIO 1 AUDIO 2 AUDIO OUT VCR Audio input AUDIO L R Audio recorder Using the AV OUT jacks Connect this jack to use these jacks. Select the V-AUX input to the... cannot be transmitted from the PORTABLE jack is transmitted. Using the AUDIO OUT jacks Connect this jacks to the receiver. Connecting video cameras and portable audio players CONNECTIONS Connecting external devices Transmitting input A/V to external devices Use the ...
... Y MONITOR OUT PB V Y COMPONENT VIDEO VIDEO MONITOR OUT L L R R OPTICAL AV 1 COAXIAL AV 2 COAXIAL (CD) AV 3 OPTICAL ( TV ) AV 4 AV 5 AV OUT AUDIO 1 AUDIO 2 AUDIO OUT VCR Audio input AUDIO L R Audio recorder Using the AV OUT jacks Connect this jack to use these jacks. Select the V-AUX input to the... cannot be transmitted from the PORTABLE jack is transmitted. Using the AUDIO OUT jacks Connect this jacks to the receiver. Connecting video cameras and portable audio players CONNECTIONS Connecting external devices Transmitting input A/V to external devices Use the ...
Owners Manual
Page 22
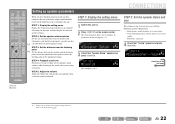
... the listening point j Set the distance between the speakers and the listening point so that "Config" appears and press jENTER. SOURCE 1 1 5 TRANSMIT CODE SET SLEEP RECEIVER HDMI 2 3 4 AV 2 3 4 AUDIO 1 2 V-AUX [ A ] [ B ] DOCK TUNER FM AM PRESET TUNING INFO MEMORY MOVIE ENHANCER SUR. STEP 2: Set the speaker status and size Set the size and...
... the listening point j Set the distance between the speakers and the listening point so that "Config" appears and press jENTER. SOURCE 1 1 5 TRANSMIT CODE SET SLEEP RECEIVER HDMI 2 3 4 AV 2 3 4 AUDIO 1 2 V-AUX [ A ] [ B ] DOCK TUNER FM AM PRESET TUNING INFO MEMORY MOVIE ENHANCER SUR. STEP 2: Set the speaker status and size Set the size and...
Owners Manual
Page 23
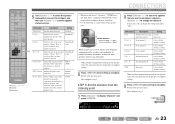
... jCursor D / E to change the setting units under "Unit." Unit;;;;;;feet SW L CR SL SR 9 Press jRETURN when setting is optional. SOURCE 1 1 5 TRANSMIT CODE SET SLEEP RECEIVER HDMI 2 3 4 AV 2 3 4 AUDIO 1 2 V-AUX [ A ] [ B ] DOCK TUNER FM AM PRESET TUNING INFO MEMORY MOVIE ENHANCER SUR. Information Description Setting Subwoofer Sets the subwoofer status.
... jCursor D / E to change the setting units under "Unit." Unit;;;;;;feet SW L CR SL SR 9 Press jRETURN when setting is optional. SOURCE 1 1 5 TRANSMIT CODE SET SLEEP RECEIVER HDMI 2 3 4 AV 2 3 4 AUDIO 1 2 V-AUX [ A ] [ B ] DOCK TUNER FM AM PRESET TUNING INFO MEMORY MOVIE ENHANCER SUR. Information Description Setting Subwoofer Sets the subwoofer status.
Owners Manual
Page 24
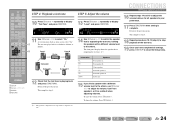
... jCursor D / E to display "Test Tone" and press jENTER. J 1 : Only speakers configured for speakers with a different volume level to the others . SOURCE 1 1 5 TRANSMIT CODE SET SLEEP RECEIVER HDMI 2 3 4 AV 2 3 4 AUDIO 1 2 V-AUX [ A ] [ B ] DOCK TUNER FM AM PRESET TUNING INFO MEMORY MOVIE ENHANCER SUR. SW L CR SL SR 14 Use jCursor B / C to switch the speaker...
... jCursor D / E to display "Test Tone" and press jENTER. J 1 : Only speakers configured for speakers with a different volume level to the others . SOURCE 1 1 5 TRANSMIT CODE SET SLEEP RECEIVER HDMI 2 3 4 AV 2 3 4 AUDIO 1 2 V-AUX [ A ] [ B ] DOCK TUNER FM AM PRESET TUNING INFO MEMORY MOVIE ENHANCER SUR. SW L CR SL SR 14 Use jCursor B / C to switch the speaker...
Owners Manual
Page 25
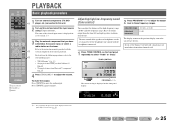
... MUTE 0 10 TV TV VOL TV CH ENT d Input selector r VOLUME +/s MUTE Basic playback procedure 1 Turn on the tuner. PLAYBACK SOURCE 1 1 5 TRANSMIT CODE SET SLEEP RECEIVER HDMI 2 3 4 AV 2 3 4 AUDIO 1 2 V-AUX [ A ] [ B ] DOCK TUNER FM AM PRESET TUNING INFO MEMORY MOVIE ENHANCER SUR.
... MUTE 0 10 TV TV VOL TV CH ENT d Input selector r VOLUME +/s MUTE Basic playback procedure 1 Turn on the tuner. PLAYBACK SOURCE 1 1 5 TRANSMIT CODE SET SLEEP RECEIVER HDMI 2 3 4 AV 2 3 4 AUDIO 1 2 V-AUX [ A ] [ B ] DOCK TUNER FM AM PRESET TUNING INFO MEMORY MOVIE ENHANCER SUR.
Owners Manual
Page 26
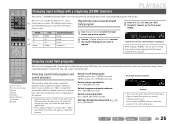
...decoders This unit offers sound field settings (sound field programs) in many different categories suitable for that sounds best with a Yamaha digital sound field processing (DSP) chip. SET Complete SW L CR SL SR Release the key when "SET Complete"...repeatedly Switches Straight decoding mode (☞p. 27): Press gSTRAIGHT Sound field program categories MOVIE Sci-Fi VOL. PLAYBACK SOURCE 1 1 5 TRANSMIT CODE SET SLEEP RECEIVER HDMI 2 3 4 AV 2 3 4 AUDIO 1 2 V-AUX [ A ] [ B ] DOCK TUNER FM AM PRESET TUNING INFO MEMORY MOVIE ENHANCER SUR. When changing "...
...decoders This unit offers sound field settings (sound field programs) in many different categories suitable for that sounds best with a Yamaha digital sound field processing (DSP) chip. SET Complete SW L CR SL SR Release the key when "SET Complete"...repeatedly Switches Straight decoding mode (☞p. 27): Press gSTRAIGHT Sound field program categories MOVIE Sci-Fi VOL. PLAYBACK SOURCE 1 1 5 TRANSMIT CODE SET SLEEP RECEIVER HDMI 2 3 4 AV 2 3 4 AUDIO 1 2 V-AUX [ A ] [ B ] DOCK TUNER FM AM PRESET TUNING INFO MEMORY MOVIE ENHANCER SUR. When changing "...
Owners Manual
Page 27
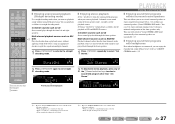
..." from the surround field programs when you want to playback 2-channel stereo sound (from a playback source without sound field processing. SOURCE 1 1 5 TRANSMIT CODE SET SLEEP RECEIVER HDMI 2 3 4 AV 2 3 4 AUDIO 1 2 V-AUX [ A ] [ B ] DOCK TUNER FM AM PRESET TUNING INFO MEMORY MOVIE ENHANCER SUR. You can playback as follows in the following conditions: • When...
..." from the surround field programs when you want to playback 2-channel stereo sound (from a playback source without sound field processing. SOURCE 1 1 5 TRANSMIT CODE SET SLEEP RECEIVER HDMI 2 3 4 AV 2 3 4 AUDIO 1 2 V-AUX [ A ] [ B ] DOCK TUNER FM AM PRESET TUNING INFO MEMORY MOVIE ENHANCER SUR. You can playback as follows in the following conditions: • When...

Owners Manual
Page 30
... tuner, adjust the direction of this unit to enter a frequency. Leave the decimal point out when entering a number. J 2 : "Wrong Station!" SOURCE 1 1 5 TRANSMIT CODE SET SLEEP RECEIVER HDMI 2 3 4 AV 2 3 4 AUDIO 1 2 V-AUX [ A ] [ B ] DOCK TUNER FM AM PRESET TUNING INFO MEMORY MOVIE ENHANCER SUR. d The FM/AM tuner of the FM/AM antenna connected to...
... tuner, adjust the direction of this unit to enter a frequency. Leave the decimal point out when entering a number. J 2 : "Wrong Station!" SOURCE 1 1 5 TRANSMIT CODE SET SLEEP RECEIVER HDMI 2 3 4 AV 2 3 4 AUDIO 1 2 V-AUX [ A ] [ B ] DOCK TUNER FM AM PRESET TUNING INFO MEMORY MOVIE ENHANCER SUR. d The FM/AM tuner of the FM/AM antenna connected to...
Owners Manual
Page 31
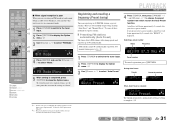
...presetting is complete. J2 En 31 If you select a preset number. OPTION Auto Preset VOL. SOURCE 1 1 5 TRANSMIT CODE SET SLEEP RECEIVER HDMI 2 3 4 AV 2 3 4 AUDIO 1 2 ■ When signal reception is poor When you are two methods of these methods to register stations. ■... do not select a preset number, Auto Preset will be automatically registered. V-AUX [ A ] [ B ] DOCK TUNER 1 d Press dTUNER to switch to receive in a monaural mode. J1 STRAIGHT BD DVD SETUP SCENE TV CD RADIO OPTION 3 Use jCursor B / C to select "Auto Preset." J 1 : See...
...presetting is complete. J2 En 31 If you select a preset number. OPTION Auto Preset VOL. SOURCE 1 1 5 TRANSMIT CODE SET SLEEP RECEIVER HDMI 2 3 4 AV 2 3 4 AUDIO 1 2 ■ When signal reception is poor When you are two methods of these methods to register stations. ■... do not select a preset number, Auto Preset will be automatically registered. V-AUX [ A ] [ B ] DOCK TUNER 1 d Press dTUNER to switch to receive in a monaural mode. J1 STRAIGHT BD DVD SETUP SCENE TV CD RADIO OPTION 3 Use jCursor B / C to select "Auto Preset." J 1 : See...
Owners Manual
Page 54
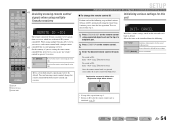
... 8 9 INPUT MUTE 0 10 TV TV VOL TV CH ENT n Avoiding crossing remote control signals when using multiple Yamaha AV receivers, you can only receive signals from the following steps within 1 minute. Does not initialize. En 54 Once the remote control code is registered ...CODE SET SETUP Extended functionality that can be initialized from a receiver which has an identical ID (remote control ID). To reset, repeat from step 1. • Returns to operate 2 receivers. When using multiple Yamaha receivers REMOTE ID -ID1 The remote control of a ballpoint pen...
... 8 9 INPUT MUTE 0 10 TV TV VOL TV CH ENT n Avoiding crossing remote control signals when using multiple Yamaha AV receivers, you can only receive signals from the following steps within 1 minute. Does not initialize. En 54 Once the remote control code is registered ...CODE SET SETUP Extended functionality that can be initialized from a receiver which has an identical ID (remote control ID). To reset, repeat from step 1. • Returns to operate 2 receivers. When using multiple Yamaha receivers REMOTE ID -ID1 The remote control of a ballpoint pen...
Owners Manual
Page 57
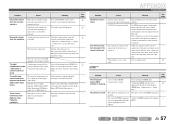
... cables properly. Sound may decreased due to a low value. Turn the subwoofer power on . Set the playback component properly referring to the output jacks of AV receivers. If the condition is not turned on . The source does not contain LFE (☞p. 61) or low frequency signals. En 57 Select a desired input source...
... cables properly. Sound may decreased due to a low value. Turn the subwoofer power on . Set the playback component properly referring to the output jacks of AV receivers. If the condition is not turned on . The source does not contain LFE (☞p. 61) or low frequency signals. En 57 Select a desired input source...
Owners Manual
Page 62
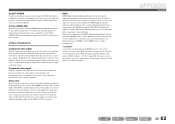
... using a minimal two-speaker system that allows you to output component signals. Parameters for headphones have been set -top boxes or AV receivers) and audio/video monitors (such as digital TV), HDMI supports standard, enhanced or high-definition video as well as set for ...screen color banding for chrominance. While remaining compatible with bandwidth to spare to enjoy Virtual CINEMA DSP using a single cable. SILENT CINEMA Yamaha has developed a natural, realistic sound effect DSP algorithm for still pictures and computer graphics. The component signal is also called the "...
... using a minimal two-speaker system that allows you to output component signals. Parameters for headphones have been set -top boxes or AV receivers) and audio/video monitors (such as digital TV), HDMI supports standard, enhanced or high-definition video as well as set for ...screen color banding for chrominance. While remaining compatible with bandwidth to spare to enjoy Virtual CINEMA DSP using a single cable. SILENT CINEMA Yamaha has developed a natural, realistic sound effect DSP algorithm for still pictures and computer graphics. The component signal is also called the "...


