

Owner's Manual
Page 3
...is not to be sure to keep this can cause permanent hearing loss. Handling caution • When turning on the buttons, switches or connectors. (5)-4 EMX5014C Owner's Manual 3 Do not open • Do not open and make sure that it . If some trouble or malfunction occurs, immediately turn off ... • Do not use of the rack open the device or attempt to disassemble the internal parts or modify them in fire. Then have the device inspected by qualified Yamaha service personnel. • If this device is to be mounted with devices that the AC outlet you ...
...is not to be sure to keep this can cause permanent hearing loss. Handling caution • When turning on the buttons, switches or connectors. (5)-4 EMX5014C Owner's Manual 3 Do not open • Do not open and make sure that it . If some trouble or malfunction occurs, immediately turn off ... • Do not use of the rack open the device or attempt to disassemble the internal parts or modify them in fire. Then have the device inspected by qualified Yamaha service personnel. • If this device is to be mounted with devices that the AC outlet you ...
Owner's Manual
Page 5
After reading the manual, please store it in its Place 12 A Plethora of this Yamaha EMX5014C powered mixer. Contents Features ...6 Before Turning On the Mixer...6 ■ Mixer Basics Quick Guide ...7 Getting Sound to the Speakers ...7 Adding... Section ...22 Master Section ...24 Rear Panel ...27 Speaker Connections 28 2-channel connection ...28 2-channel parallel connection ...28 Rack Mounting 29 Setup ...30 Troubleshooting 31 Specifications 32 EMX5014C Owner's Manual 5 Please read through this manual carefully before beginning use, so that you for your mixer's superlative features ...
After reading the manual, please store it in its Place 12 A Plethora of this Yamaha EMX5014C powered mixer. Contents Features ...6 Before Turning On the Mixer...6 ■ Mixer Basics Quick Guide ...7 Getting Sound to the Speakers ...7 Adding... Section ...22 Master Section ...24 Rear Panel ...27 Speaker Connections 28 2-channel connection ...28 2-channel parallel connection ...28 Rack Mounting 29 Setup ...30 Troubleshooting 31 Specifications 32 EMX5014C Owner's Manual 5 Please read through this manual carefully before beginning use, so that you for your mixer's superlative features ...
Owner's Manual
Page 6
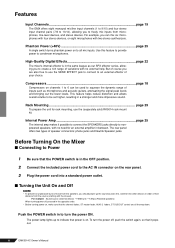
... power outlet. ■ Turning the Unit On and Off NOTE • To prevent an unpleasant burst of variations with no need for rack mounting, use the SEND EFFECT jack to connect to an external effector of speaker connectors: phone jacks and Neutrik Speakon jacks. To turn the ... But of their distance from microphones, line-level devices, and stereo devices. Internal Power Amp page 25 The internal amp makes it pops out. 6 EMX5014C Owner's Manual For example: Sound source (external device) → EMX unit → Amps (Powered speakers) When turning power off , push the ...
... power outlet. ■ Turning the Unit On and Off NOTE • To prevent an unpleasant burst of variations with no need for rack mounting, use the SEND EFFECT jack to connect to an external effector of speaker connectors: phone jacks and Neutrik Speakon jacks. To turn the ... But of their distance from microphones, line-level devices, and stereo devices. Internal Power Amp page 25 The internal amp makes it pops out. 6 EMX5014C Owner's Manual For example: Sound source (external device) → EMX unit → Amps (Powered speakers) When turning power off , push the ...
Owner's Manual
Page 29
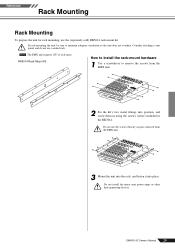
... from the EMX unit. 2 Set the kit's two metal fittings into place. EMX5014C Owner's Manual 29 Reference Rack Mounting Rack Mounting To prepare the unit for rack mounting, use a sealed rack. Do not install the mixer near power amps or other heat-generating devices. If rack-mounting the unit, be sure to remove the screws from the EMX unit...
... from the EMX unit. 2 Set the kit's two metal fittings into place. EMX5014C Owner's Manual 29 Reference Rack Mounting Rack Mounting To prepare the unit for rack mounting, use a sealed rack. Do not install the mixer near power amps or other heat-generating devices. If rack-mounting the unit, be sure to remove the screws from the EMX unit...
