
Owner's Manual
Page 6
... Memory 145 6 ELB-01 Owner's Manual Function 108 Formatting External Media 109 Selecting a Song 111 Recording 117 Recording 117 Re-recording (Retry 118 Recording Each Part Separately 118 Punch-in Recording 121 Changing the Song/Folder Name 122 Saving Registrations as Registration Data (File) .... 124 Saving Two or More Registration Banks to One Song 126 Replacing Registrations 127 Deleting Registrations 128 Next Regist Settings (Using more than 16 Registrations in one song 129 Recalling Recorded Registrations 131 Loading Registrations 131 Playing Back a Song 132 Playing...
... Memory 145 6 ELB-01 Owner's Manual Function 108 Formatting External Media 109 Selecting a Song 111 Recording 117 Recording 117 Re-recording (Retry 118 Recording Each Part Separately 118 Punch-in Recording 121 Changing the Song/Folder Name 122 Saving Registrations as Registration Data (File) .... 124 Saving Two or More Registration Banks to One Song 126 Replacing Registrations 127 Deleting Registrations 128 Next Regist Settings (Using more than 16 Registrations in one song 129 Recalling Recorded Registrations 131 Loading Registrations 131 Playing Back a Song 132 Playing...

Owner's Manual
Page 7
... Using the MIDI IN/OUT terminals 157 MIDI 157 What is MIDI 157 MIDI Messages of the Electone 159 MIDI Channels 160 MIDI Control 161 10 Appendix 163 Assembly Instructions 163 Installing Optional Hardware 167 Installing the Floppy Disk Drive 167 MIDI Data Format 168 MIDI Implementation Chart 178 Troubleshooting 180 Specifications 182 Index 183 1 Quick Introductory Guide 2 Voices 3 Voice Controls and Effects 4 Rhythm/ Keyboard Percussion 5 Registration Memory 6 Music Data Recorder (MDR) 7 Footswitches 8 Transpose and Pitch Controls 9 Connections 10 Appendix ELB-01 Owner's Manual...
... Using the MIDI IN/OUT terminals 157 MIDI 157 What is MIDI 157 MIDI Messages of the Electone 159 MIDI Channels 160 MIDI Control 161 10 Appendix 163 Assembly Instructions 163 Installing Optional Hardware 167 Installing the Floppy Disk Drive 167 MIDI Data Format 168 MIDI Implementation Chart 178 Troubleshooting 180 Specifications 182 Index 183 1 Quick Introductory Guide 2 Voices 3 Voice Controls and Effects 4 Rhythm/ Keyboard Percussion 5 Registration Memory 6 Music Data Recorder (MDR) 7 Footswitches 8 Transpose and Pitch Controls 9 Connections 10 Appendix ELB-01 Owner's Manual...

Owner's Manual
Page 10
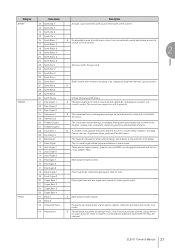
... 21) Selects the Voices for Upper Keyboard LOWER KEYBOARD VOICE 1/2 (page 22) Selects the Voices for Lower Keyboard KEYBOARD PERCUSSION (page 77) Turns Keyboard Percussion On or Off RHYTHM CONTROL (page 59) Starts and stops the rhythm, and adds changes to the rhythm RHYTHM (page 56) Sets the rhythm TEMPO buttons (page 61) Adjusts the speed of the rhythm BAR/BEAT display (page 61) Shows the current tempo or position in the measure REGISTRATION MENU (page 14) Set the registration 10 ELB-01 Owner's Manual
... 21) Selects the Voices for Upper Keyboard LOWER KEYBOARD VOICE 1/2 (page 22) Selects the Voices for Lower Keyboard KEYBOARD PERCUSSION (page 77) Turns Keyboard Percussion On or Off RHYTHM CONTROL (page 59) Starts and stops the rhythm, and adds changes to the rhythm RHYTHM (page 56) Sets the rhythm TEMPO buttons (page 61) Adjusts the speed of the rhythm BAR/BEAT display (page 61) Shows the current tempo or position in the measure REGISTRATION MENU (page 14) Set the registration 10 ELB-01 Owner's Manual

Owner's Manual
Page 27
... the Voice NOTE Condition display Page 1. Pressing it a second time calls up the Voice Condition display. Successive presses alternate between the two displays. For more information on . The Volume is 0 - 24. ELB-01 Owner's Manual 27 Voice Menu Display ¨1 ¿01:Strings 1 Voice Condition Display VOL.¿24 REV.÷20 ¨1⁄ TOUCH¿ 8 FEET÷PRESET From the Voice Condition display, you want to change the Volume by using the DATA...
... the Voice NOTE Condition display Page 1. Pressing it a second time calls up the Voice Condition display. Successive presses alternate between the two displays. For more information on . The Volume is 0 - 24. ELB-01 Owner's Manual 27 Voice Menu Display ¨1 ¿01:Strings 1 Voice Condition Display VOL.¿24 REV.÷20 ¨1⁄ TOUCH¿ 8 FEET÷PRESET From the Voice Condition display, you want to change the Volume by using the DATA...

Owner's Manual
Page 28
... set in the other Voice Displays. 28 ELB-01 Owner's Manual Selecting Off effectively mutes the sound of the corresponding Voice, even when the keys are available, depending on whether Voice section 1 or Voice section 2 is same in both Voice section 1 and Voice section 2. The instructions below use Voice section 1 as an example; If you want to change to On. To call up the Voice display, press the [VOICE DISPLAY] button. 2 Reference Page Voice Display...
... set in the other Voice Displays. 28 ELB-01 Owner's Manual Selecting Off effectively mutes the sound of the corresponding Voice, even when the keys are available, depending on whether Voice section 1 or Voice section 2 is same in both Voice section 1 and Voice section 2. The instructions below use Voice section 1 as an example; If you want to change to On. To call up the Voice display, press the [VOICE DISPLAY] button. 2 Reference Page Voice Display...
Owner's Manual
Page 37
... that has a home in churches and cathedrals, and features a solemn, rich, majestic sound. Hard, overdriven, distorted organ sound, ideal for tango, and features a characteristic initial attack. B The definitive instrument for lower register parts. This is no touch response. Pipe organ bass and jazz organ bass sounds for baroque music. A Multi-purpose piano sounds. Multi-purpose organ sounds. Voices 2 ELB-01 Owner's Manual 37 These electric organ sounds-great for jazz and R&B-are released. Purposely out...
... that has a home in churches and cathedrals, and features a solemn, rich, majestic sound. Hard, overdriven, distorted organ sound, ideal for tango, and features a characteristic initial attack. B The definitive instrument for lower register parts. This is no touch response. Pipe organ bass and jazz organ bass sounds for baroque music. A Multi-purpose piano sounds. Multi-purpose organ sounds. Voices 2 ELB-01 Owner's Manual 37 These electric organ sounds-great for jazz and R&B-are released. Purposely out...

Owner's Manual
Page 49
... button to change the setting. Remember to toggle between On and Off. Pedal Keyboard: [D] button), then use the DATA CONTROL dial to make the "¿(÷)" indicator flash (Upper Keyboard: [B] button; When you turn off and sustain length settings are released. Lower Keyboard: [C] button; For Lower Voices, press the corresponding [C] button to gradually fade out when the keys are independent for the Upper, Lower and Pedal Voices, causes Voices to toggle between On and Off. ELB-01 Owner's Manual...
... button to change the setting. Remember to toggle between On and Off. Pedal Keyboard: [D] button), then use the DATA CONTROL dial to make the "¿(÷)" indicator flash (Upper Keyboard: [B] button; When you turn off and sustain length settings are released. Lower Keyboard: [C] button; For Lower Voices, press the corresponding [C] button to gradually fade out when the keys are independent for the Upper, Lower and Pedal Voices, causes Voices to toggle between On and Off. ELB-01 Owner's Manual...

Owner's Manual
Page 72
... bass notes will sound in the same octave regardless of the chord (the note that the lowest not you play in the accompaniment by simply using one white key to the left of the previously played chord. It allows you to the left of the rhythm lets you add full continuous chords to the chord's name). The chord produced will be played in the Lower keyboard. 72 ELB-01 Owner's Manual The Single Finger mode...
... bass notes will sound in the same octave regardless of the chord (the note that the lowest not you play in the accompaniment by simply using one white key to the left of the previously played chord. It allows you to the left of the rhythm lets you add full continuous chords to the chord's name). The chord produced will be played in the Lower keyboard. 72 ELB-01 Owner's Manual The Single Finger mode...

Owner's Manual
Page 117
... 3 on the keyboards and pedals of the LCD display. This indicates that the Electone is ready to press the [PLAY/PAUSE] button before pressing the [RECORD] button. Set the desired Registrations you will use throughout the performance/recording in the song File Performance data Registration data XG-converted data Explanation This file contains performance data, played on page 112. ÃUSB 01 [˜] ⁄ ¿ ___:new song 3 Press the [RECORD] button. is converted...
... 3 on the keyboards and pedals of the LCD display. This indicates that the Electone is ready to press the [PLAY/PAUSE] button before pressing the [RECORD] button. Set the desired Registrations you will use throughout the performance/recording in the song File Performance data Registration data XG-converted data Explanation This file contains performance data, played on page 112. ÃUSB 01 [˜] ⁄ ¿ ___:new song 3 Press the [RECORD] button. is converted...

Owner's Manual
Page 118
... display. 118 ELB-01 Owner's Manual Re-recording (Retry) If you make a mistake during Recording stops and your performance is written to the starting point of your newly recorded performance, press the [PLAY/ PAUSE] button. Re-recording starts from the instrument during recording, you can re-record the song from the other playback-related functions, see page 122.) 7 To hear your performance independently. Even Keyboard Percussion and Lead Voice can also record...
... display. 118 ELB-01 Owner's Manual Re-recording (Retry) If you make a mistake during Recording stops and your performance is written to the starting point of your newly recorded performance, press the [PLAY/ PAUSE] button. Re-recording starts from the instrument during recording, you can re-record the song from the other playback-related functions, see page 122.) 7 To hear your performance independently. Even Keyboard Percussion and Lead Voice can also record...

Owner's Manual
Page 120
... Keyboard Percussion parts: The Lead voice and the Keyboard Percussion can the Lower and Keyboard Percussion parts be recorded/played back separately although there are no buttons for Keyboard Percussion. Set these parts. Press the [D] button to make sure that have been selected for recording, and plays back only those parts that the KEYBOARD PERCUSSION [1] and/or [2] button is used here to "Rec" at the same time. 120 ELB-01 Owner's Manual While you record the Keyboard Percussion, make...
... Keyboard Percussion parts: The Lead voice and the Keyboard Percussion can the Lower and Keyboard Percussion parts be recorded/played back separately although there are no buttons for Keyboard Percussion. Set these parts. Press the [D] button to make sure that have been selected for recording, and plays back only those parts that the KEYBOARD PERCUSSION [1] and/or [2] button is used here to "Rec" at the same time. 120 ELB-01 Owner's Manual While you record the Keyboard Percussion, make...

Owner's Manual
Page 124
... original Registration. 124 ELB-01 Owner's Manual Music Data Recorder (MDR) 1 23 45 6 78 9 10 11 12 13 14 15 16 Save Registrations 1 - 16 stored to the numbered buttons are saved together as a bank Registrations There are always stored when saving to a song-the factory preset Registrations being stored if no new settings have been made to record Reference Page them along with a performance. All Registrations 1 - 16 stored to the Registration Functions and settngs that Memory buttons...
... original Registration. 124 ELB-01 Owner's Manual Music Data Recorder (MDR) 1 23 45 6 78 9 10 11 12 13 14 15 16 Save Registrations 1 - 16 stored to the numbered buttons are saved together as a bank Registrations There are always stored when saving to a song-the factory preset Registrations being stored if no new settings have been made to record Reference Page them along with a performance. All Registrations 1 - 16 stored to the Registration Functions and settngs that Memory buttons...

Owner's Manual
Page 134
... Tempo 6 You can change the setting. The TEMPO buttons on the panel cannot be played back. When the button is released, playback is playing in a faster tempo. 134 ELB-01 Owner's Manual See steps 2 and 3 on selecting songs. 3 Use the PAGE buttons to , press the [PLAY/PAUSE] button or [CUSTOM PLAY] button. The tempo value is 50 - 200%. To resume playback from the point you want to change the tempo for instructions on page 112 for the Music Data Recorder.) Music Data Recorder...
... Tempo 6 You can change the setting. The TEMPO buttons on the panel cannot be played back. When the button is released, playback is playing in a faster tempo. 134 ELB-01 Owner's Manual See steps 2 and 3 on selecting songs. 3 Use the PAGE buttons to , press the [PLAY/PAUSE] button or [CUSTOM PLAY] button. The tempo value is 50 - 200%. To resume playback from the point you want to change the tempo for instructions on page 112 for the Music Data Recorder.) Music Data Recorder...

Owner's Manual
Page 141
...; ELB-01 Owner's Manual 141 This function is not available. Make sure to a floppy disk. Reference Page About Protected Songs (page 139) Installing the Floppy Disk Drive (page 167) 1 Insert the media containing the song created with no need for conversion. 3 Use the PAGE buttons to select the Convert display (Page 7). ¿EL [EXE] ‡ 001:SONG 1 ´ 4 Select the conversion format. 6 Select "EL" by using the DATA CONTROL...
...; ELB-01 Owner's Manual 141 This function is not available. Make sure to a floppy disk. Reference Page About Protected Songs (page 139) Installing the Floppy Disk Drive (page 167) 1 Insert the media containing the song created with no need for conversion. 3 Use the PAGE buttons to select the Convert display (Page 7). ¿EL [EXE] ‡ 001:SONG 1 ´ 4 Select the conversion format. 6 Select "EL" by using the DATA CONTROL...
Owner's Manual
Page 155
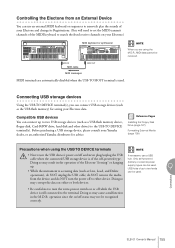
... in the M.D.R. hub. ELB-01 Owner's Manual 155 Before purchasing a USB storage device, please consult your Electone and change its Registrations. (You will need to set the MIDI transmit channels of your Yamaha dealer, or an authorized Yamaha distributor for saving your Electone.) MIDI keyboard or synthesizer MUSIC PRODUCTION SYNTHESIZER NOTE When you can connect USB storage devices (such as Save, Load, and Delete can be used . Connecting USB storage devices Using the USB TO DEVICE terminal...
... in the M.D.R. hub. ELB-01 Owner's Manual 155 Before purchasing a USB storage device, please consult your Electone and change its Registrations. (You will need to set the MIDI transmit channels of your Yamaha dealer, or an authorized Yamaha distributor for saving your Electone.) MIDI keyboard or synthesizer MUSIC PRODUCTION SYNTHESIZER NOTE When you can connect USB storage devices (such as Save, Load, and Delete can be used . Connecting USB storage devices Using the USB TO DEVICE terminal...

Owner's Manual
Page 156
... or sequencing software is connected to play back the sounds of the computer. • Before turning on the power to the instrument, connect the computer to the USB TO HOST terminal. • Execute the following points. Download the latest MIDI driver software from the computer. You can also control the Electone from the instrument. (Data is used. Failing to /from the Yamaha web site at "http://music.yamaha.com/download/."
... or sequencing software is connected to play back the sounds of the computer. • Before turning on the power to the instrument, connect the computer to the USB TO HOST terminal. • Execute the following points. Download the latest MIDI driver software from the computer. You can also control the Electone from the instrument. (Data is used. Failing to /from the Yamaha web site at "http://music.yamaha.com/download/."
Owner's Manual
Page 158
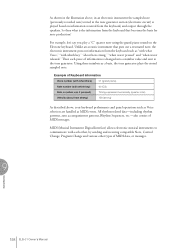
..., Rhythm Sequences, etc.-also consist of MIDI data, or messages. 9 Connections 158 ELB-01 Owner's Manual Unlike an acoustic instrument that puts out a resonated note, the electronic instrument puts out information from the keyboard that becomes the basis for note production? Using these numbers as MIDI events. MIDI (Musical Instrument Digital Interface) allows electronic musical instruments to the tone generator. So then what Voice) 01 (grand piano) Note number (with each other, by sending and receiving compatible Note, Control Change, Program Change...
..., Rhythm Sequences, etc.-also consist of MIDI data, or messages. 9 Connections 158 ELB-01 Owner's Manual Unlike an acoustic instrument that puts out a resonated note, the electronic instrument puts out information from the keyboard that becomes the basis for note production? Using these numbers as MIDI events. MIDI (Musical Instrument Digital Interface) allows electronic musical instruments to the tone generator. So then what Voice) 01 (grand piano) Note number (with each other, by sending and receiving compatible Note, Control Change, Program Change...
Owner's Manual
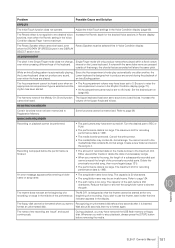
Page 181
... notes when played within a fixed octave even when pressing different keys of unnecessary songs. • When you wish to use another , the the Lower keyboard does not produce any sound during the playback of the Melody On Chord function The Upper keyboard has been set to off . Increase the Reverb depth for the desired Voice sections in the Voice Condition display Page 1 set to the maximum limit. MUSIC DATA RECORDER Recording...
... notes when played within a fixed octave even when pressing different keys of unnecessary songs. • When you wish to use another , the the Lower keyboard does not produce any sound during the playback of the Melody On Chord function The Upper keyboard has been set to off . Increase the Reverb depth for the desired Voice sections in the Voice Condition display Page 1 set to the maximum limit. MUSIC DATA RECORDER Recording...
Owner's Manual
Page 182
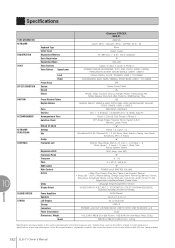
... KEYBOARD PERCUSSION CONTROLS Keyboard Type Initial Touch Registration Memory Basic Registration Registration Menu Voice Sections Voice Buttons Upper/Lower Preset Voice Sustain Reverb Effects Lead Pedal Preset Rhythm Pattern Rhythm Buttons Parts Sections Accompaniment Parts Auto Bass Chord Melody On Chord Settings Kits Assign Footswitch Left Registration Shift Expression Pedal Transpose Pitch MIDI Control Main Controls M.D.R. reserves the right to change or modify products or specifications at any time without prior notice. Memory: Lower, Pedal ✔ Preset 1, 2, User...
... KEYBOARD PERCUSSION CONTROLS Keyboard Type Initial Touch Registration Memory Basic Registration Registration Menu Voice Sections Voice Buttons Upper/Lower Preset Voice Sustain Reverb Effects Lead Pedal Preset Rhythm Pattern Rhythm Buttons Parts Sections Accompaniment Parts Auto Bass Chord Melody On Chord Settings Kits Assign Footswitch Left Registration Shift Expression Pedal Transpose Pitch MIDI Control Main Controls M.D.R. reserves the right to change or modify products or specifications at any time without prior notice. Memory: Lower, Pedal ✔ Preset 1, 2, User...

Tutorial
Page 30
..., by selecting Pedal Voice 1 from the Pedal Voice 1 section and Pedal Voice 2 from a single pedal by muting Pedal Voice 2. 3-1 Press the [VOICE SECTION] button at the top left on page 29 in the Owner's Manual. 3-2 Press the [VOICE DISPLAY] button in the Voice Section as shown below. Now, the Timpani 1 sound will be off even if you can play the Pedalboard. 30 Playing the ELB-01 - To switch between Voice section 1 and Voice section 2" on...
..., by selecting Pedal Voice 1 from the Pedal Voice 1 section and Pedal Voice 2 from a single pedal by muting Pedal Voice 2. 3-1 Press the [VOICE SECTION] button at the top left on page 29 in the Owner's Manual. 3-2 Press the [VOICE DISPLAY] button in the Voice Section as shown below. Now, the Timpani 1 sound will be off even if you can play the Pedalboard. 30 Playing the ELB-01 - To switch between Voice section 1 and Voice section 2" on...


